Note
Access to this page requires authorization. You can try signing in or changing directories.
Access to this page requires authorization. You can try changing directories.
The Defender for Servers plan in Microsoft Defender for Cloud protects Windows and Linux virtual machines (VMs) that run in Azure, Amazon Web Service (AWS), Google Cloud Platform (GCP), and in on-premises environments. Defender for Servers provides recommendations to improve the security posture of machines and protects machines against security threats.
This article helps you deploy a Defender for Servers plan.
Note
After you enable a plan, a 30-day trial period begins. You can't stop, pause, or extend this trial period. To get the most out of the full 30-day trial, plan your evaluation goals.
Prerequisites
| Requirement | Details |
|---|---|
| Plan your deployment | Review the Defender for Servers planning guide. Check permissions needed to deploy and work with the plan, choose a plan and deployment scope, or check out the differences between the Defender for Servers plans, and understand how data is collected and stored. |
| Compare plan features | Understand and compare Defender for Servers plan features. |
| Review pricing | Review Defender for Servers pricing on the Defender for Cloud pricing page. You can also estimate costs with the Defender for Cloud cost calculator. |
| Get an Azure subscription | You need a Microsoft Azure subscription. Sign up for a free one if you need to. |
| Turn on Defender for Cloud | Make sure Defender for Cloud is available in the subscription. |
| Onboard AWS/GCP machines | To protect AWS and GCP machines, connect AWS accounts and GCP projects to Defender for Cloud. By default the connection process onboards machines as Azure Arc-enabled VMs. |
| Onboard on-premises machines | Onboard on-premises machines as Azure Arc VMs for full functionality in Defender for Servers. If you onboard on-premises machines by directly installing the Defender for Endpoint agent instead of onboarding Azure Arc, only Plan 1 functionality is available. In Defender for Servers Plan 2, you get only the premium Defender Vulnerability Management features in addition to Plan 1 functionality. |
| Review support requirements | Check Defender for Servers requirements and support information. |
| Take advantage of 500 MB free data ingestion | When Defender for Servers Plan 2 is enabled, a benefit of free 500-MB data ingestion is available for specific data types. Learn about requirements and set up free data ingestion |
| Defender integration | Defender for Endpoint and Defender for Vulnerability Management are integrated by default in Defender for Cloud. When you enable Defender for Servers, you give consent for the Defender for Servers plan to access Defender for Endpoint data related to vulnerabilities, installed software, and endpoint alerts. |
| Enable at resource level | Although we recommend enabling Defender for Servers for a subscription, you can enable Defender for Servers at resource level if needed, for Azure VMs, Azure Arc-enabled servers, and Azure Virtual Machine Scale Sets. You can enable Plan 1 at the resource level. You can disable Plan 1 and Plan 2 at the resource level. |
Enable on Azure, AWS, or GCP
You can enable a Defender for Servers plan for an Azure subscription, AWS account, or GCP project.
Sign in to the Azure portal.
Search for and select Microsoft Defender for Cloud.
In the Defender for Cloud menu, select Environment settings.
Select the relevant Azure subscription, AWS account, or GCP project.
On the Defender plans page, toggle the Servers switch to On.
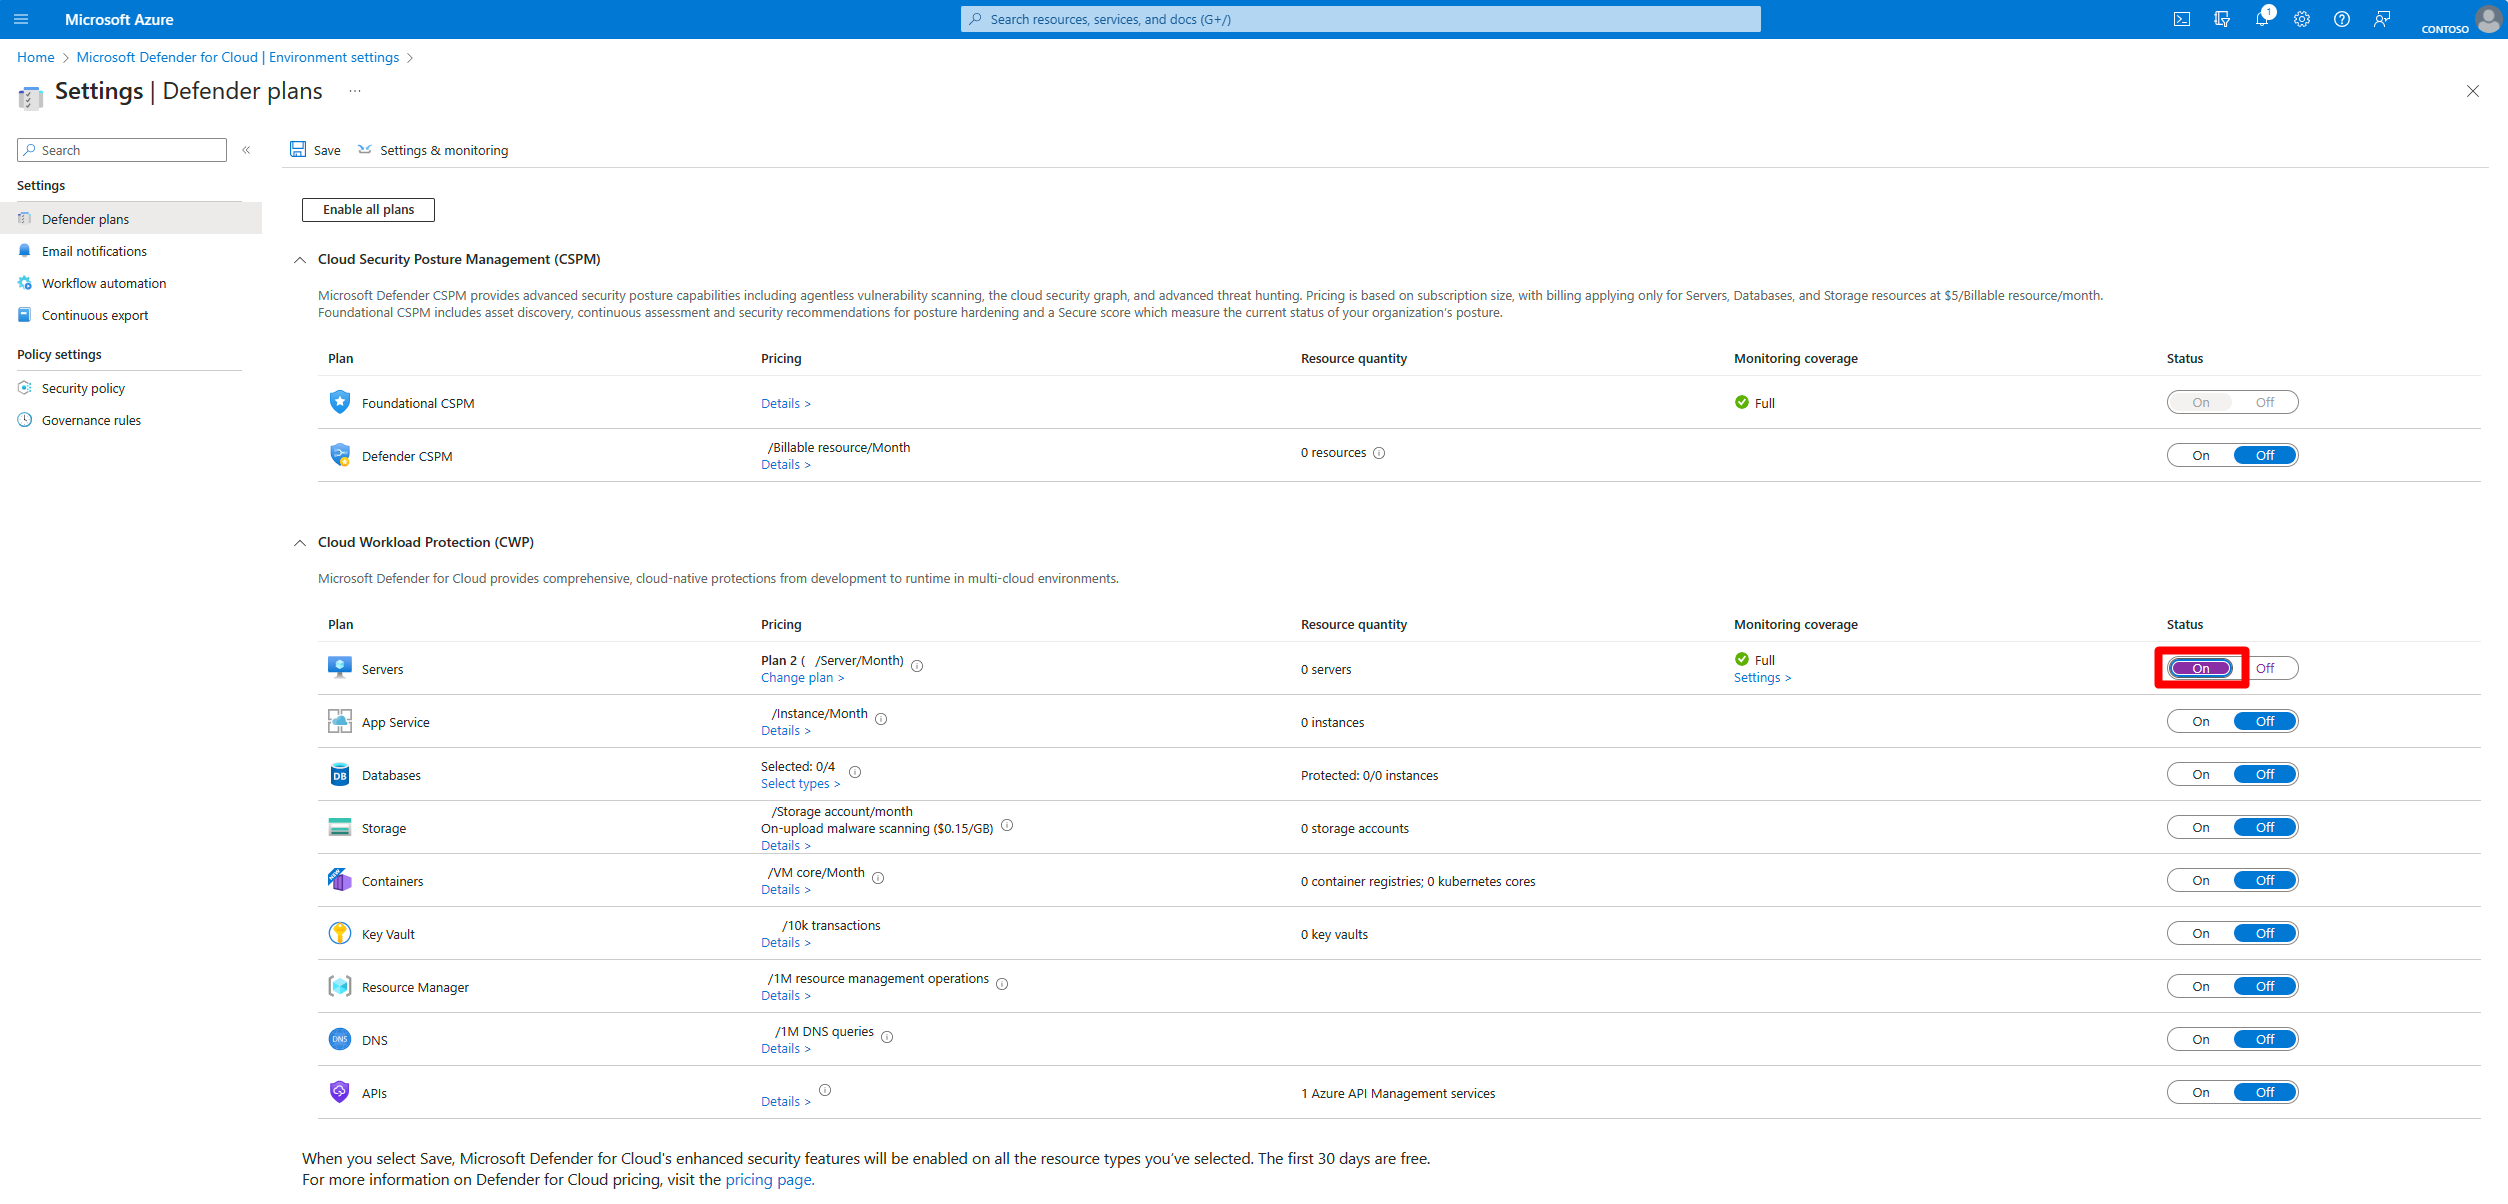
By default, this turns on Defender for Servers Plan 2. If you want to switch the plan, select Change plans.
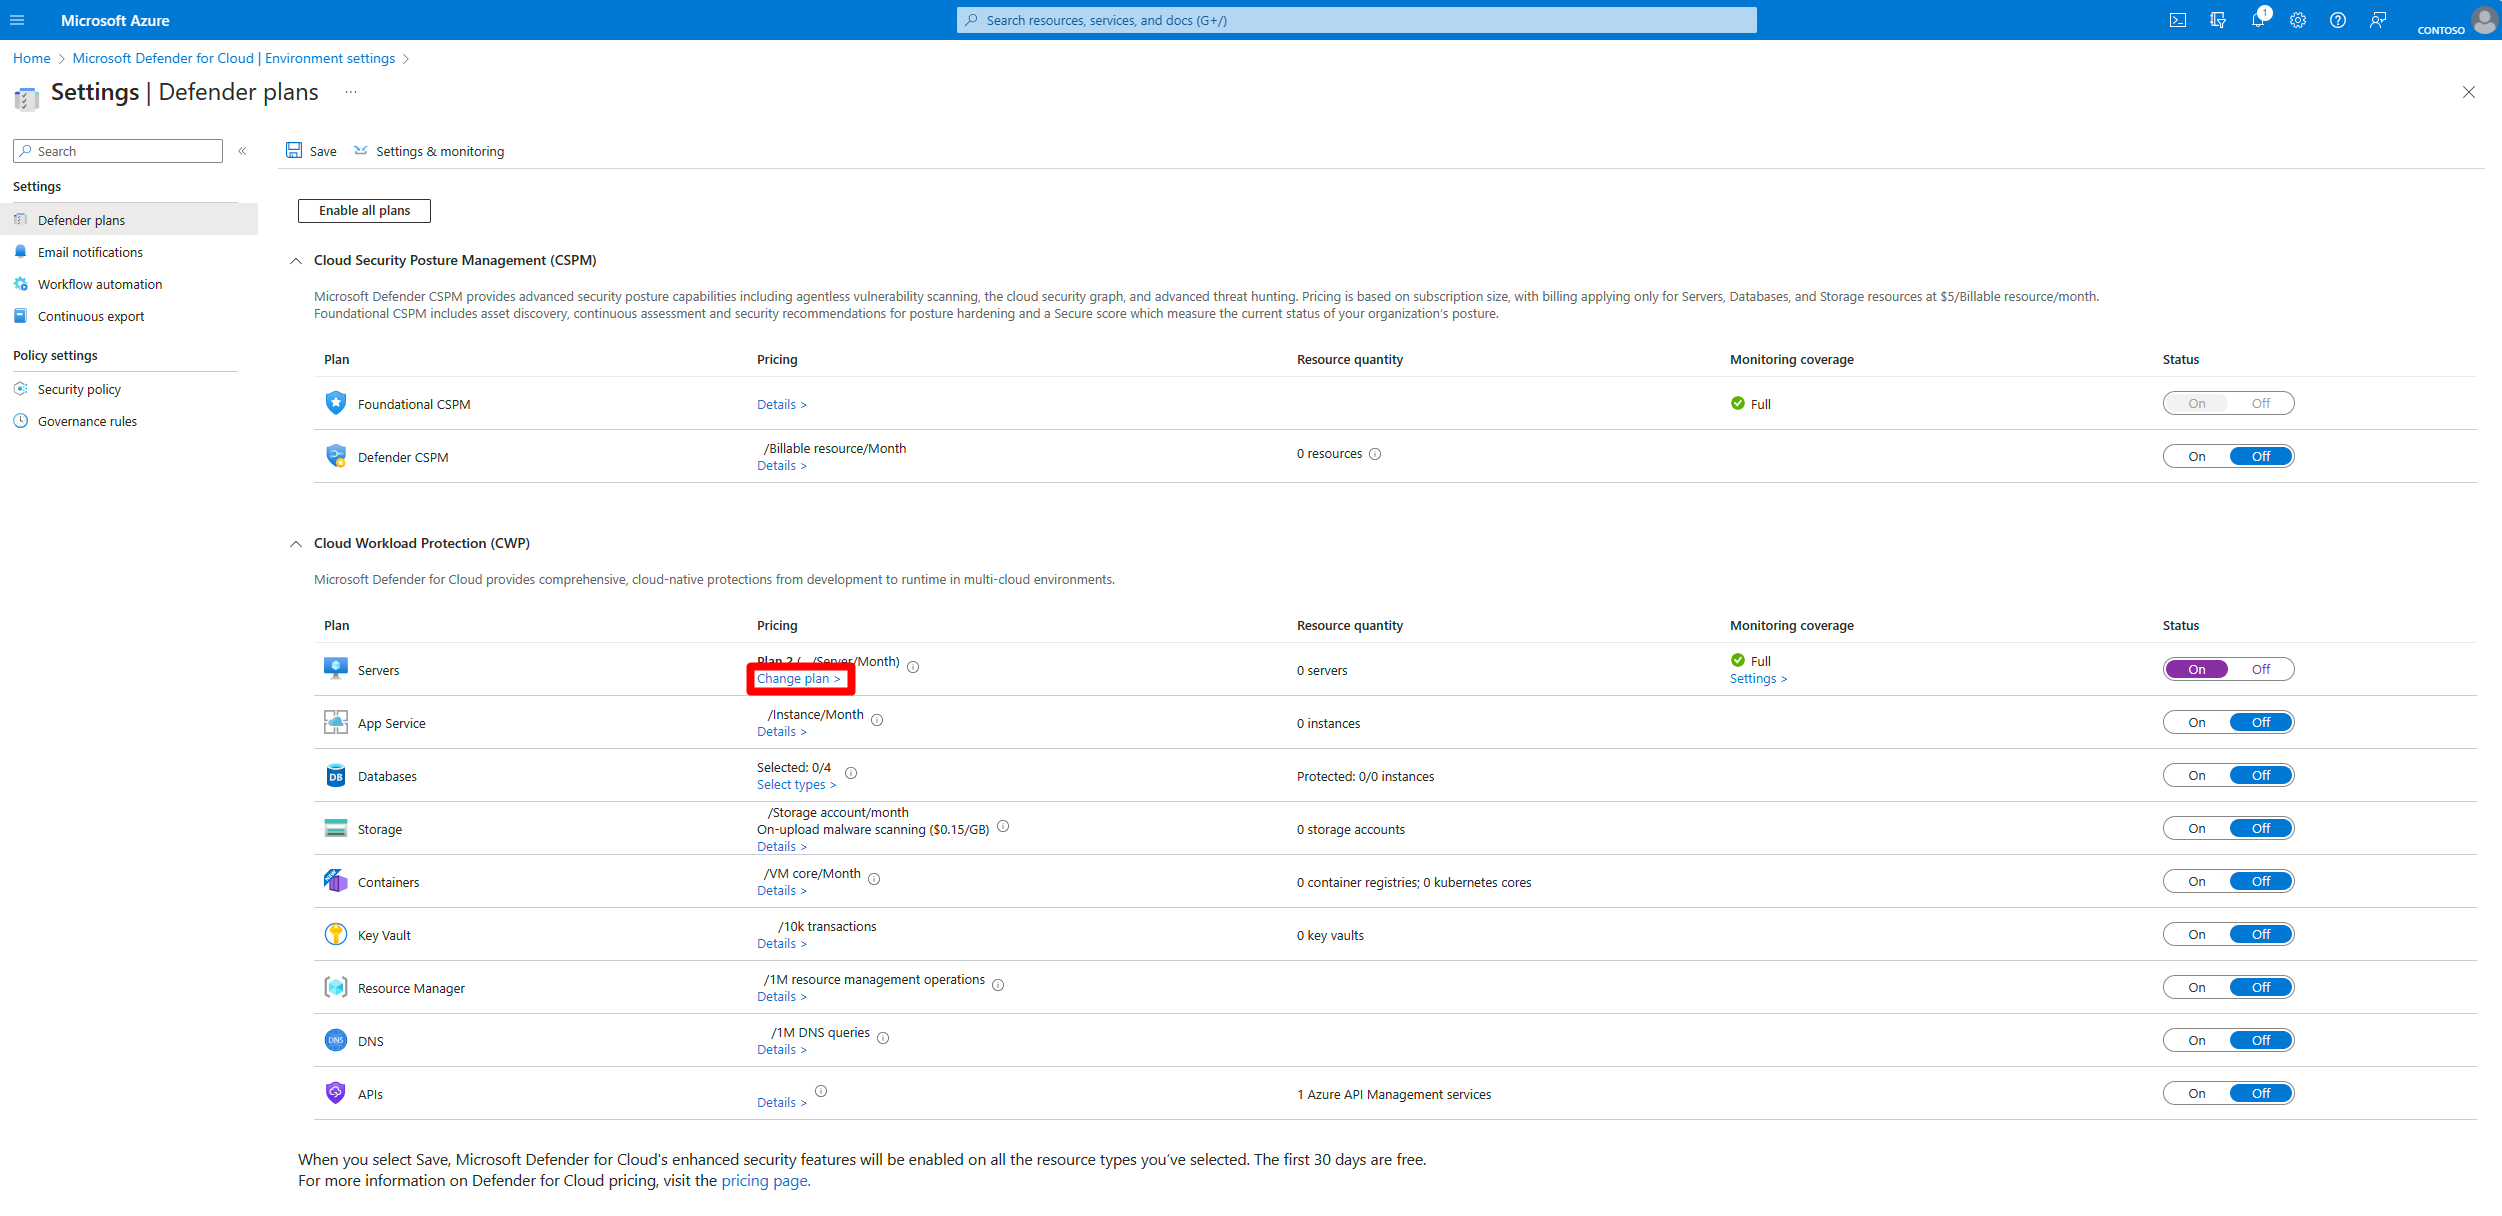
In the popup window, select Plan 2 or Plan 1.
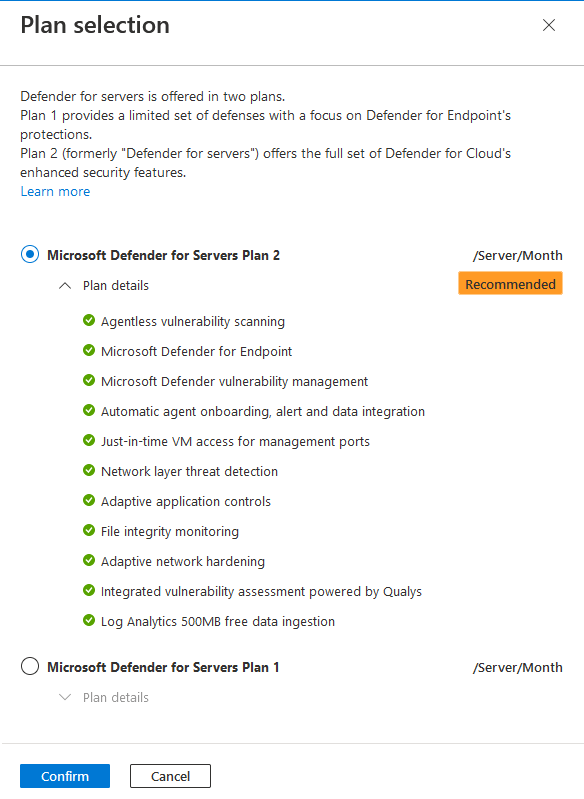
Select Confirm.
Select Save.


After enabling the plan, you can configure the features of the plan to suit your needs.
Disable Defender for Servers on a subscription
- In Microsoft Defender for Cloud, select Environment settings.
- Toggle the plan switch to Off.
Note
If you enabled Defender for Servers Plan 2 on a Log Analytics workspace, you need to disable it explicitly. To do that, navigate to the plans page for the workspace and toggle the switch to Off.
Enable Defender for Servers at the resource level
Although we recommend enabling the plan for an entire Azure subscription, you might need to mix plans, exclude specific resources, or enable Defender for Servers on specific machines only. To do this, you can enable or disable Defender for Servers at the resource level. Review deployment scope options before you start.
Configure on individual machines
Enable or disable the plan on specific machines.
Enable Plan 1 on a machine using the REST API
To enable Plan 1 for the machine, in Update Pricing, create a PUT request with the endpoint.
In the PUT request, replace the subscriptionId, resourceGroupName, and machineName in the endpoint URL with your own settings.
    PUT
    https://management.azure.com/subscriptions/{subscriptionId}/resourceGroups/{resourceGroupName}/providers/Microsoft.Compute/virtualMachines/{machineName}/providers/Microsoft.Security/pricings/virtualMachines?api-version=2024-01-01
Add this request body.
{
 "properties": {
"pricingTier": "Standard",
"subPlan": "P1"
  }
}
Disable the plan on a machine using the REST API
To disable Defender for Servers at the machine level, create a PUT request with the endpoint URL.
In the PUT request, replace the subscriptionId, resourceGroupName, and machineName in the endpoint URL with your own settings.
    PUT
    https://management.azure.com/subscriptions/{subscriptionId}/resourceGroups/{resourceGroupName}/providers/Microsoft.Compute/virtualMachines/{machineName}/providers/Microsoft.Security/pricings/virtualMachines?api-version=2024-01-01
Add this request body.
{
 "properties": {
"pricingTier": "Free",
  }
}
Remove the resource-level configuration using the REST API
To remove the machine-level configuration using the REST API, create a DELETE request with the endpoint URL.
In the DELETE request, replace the subscriptionId, resourceGroupName, and machineName in the endpoint URL with your own settings.
    DELETE
    https://management.azure.com/subscriptions/{subscriptionId}/resourceGroups/{resourceGroupName}/providers/Microsoft.Compute/virtualMachines/{machineName}/providers/Microsoft.Security/pricings/virtualMachines?api-version=2024-01-01
Enable Plan 1 using a script
Enable Plan 1 with a script
- Download and save this file as a PowerShell file.
- Run the downloaded script.
- Customize as needed. Select resources by tag.
- Follow the rest of the on-screen instructions.
Enable Plan 1 using Azure Policy (on resource tag)
- Sign in to the Azure portal and navigate to the Policy dashboard.
- In the Policy dashboard, select Definitions from the left-side menu.
- In the Security Center – Granular Pricing category, search for and then select Configure Azure Defender for Servers to be enabled (with 'P1' subplan) for all resources with the selected tag. This policy enables Defender for Servers Plan 1 on all resources (Azure VMs, Virtual Machine Scale Sets, and Azure Arc-enabled servers) under the assignment scope.
- Select the policy and review it.
- Select Assign and edit the assignment details according to your needs.
- In the Parameters tab, clear Only show parameters that need input or review.
- In Inclusion Tag Name, enter the custom tag name. Enter the tag's value in the Inclusion Tag Values array.
- In the Remediation tab, select Create a remediation task.
- Edit all details, select Review + create, and then select Create.
Note
Defender for Servers doesn't require a specific tag name or value for onboarding or exclusion. Use any tag your organization chooses and configure your Azure Policy or script to match it.
Disable the plan using a script
- Download and save this script as a PowerShell file.
- Run the downloaded script.
- Customize as needed. Select resources by tag.
- Follow the rest of the on-screen instructions.
Disable the plan using Azure Policy (for resource tag)
- Sign in to the Azure portal and navigate to the Policy dashboard.
- In the Policy dashboard, select Definitions from the left-side menu.
- In the Security Center – Granular Pricing category, search for and then select Configure Azure Defender for Servers to be disabled for resources (resource level) with the selected tag. This policy disables Defender for Servers on all resources (Azure VMs, Virtual Machine Scale Sets, and Azure Arc-enabled servers) under the assignment scope based on the tag you defined.
- Select the policy and review it.
- Select Assign and edit the assignment details according to your needs.
- In the Parameters tab, clear Only show parameters that need input or review.
- In Inclusion Tag Name, enter the custom tag name. Enter the tag's value in the Inclusion Tag Values array.
- In the Remediation tab, select Create a remediation task.
- Edit all details, select Review + create, and then select Create.
Remove the per-resource configuration using a script (tag)
- Download and save this script as a PowerShell file.
- Run the downloaded script.
- Customize as needed. Select resources by tag.
- Follow the rest of the on-screen instructions.
View your current coverage
Defender for Cloud provides access to workbooks through Azure workbooks. Workbooks are customizable reports that provide insights into your security posture.
The coverage workbook helps you understand your current coverage by showing which plans are enabled on your subscriptions and resources.
Next steps
If you enabled Defender for Servers Plan 2, take advantage of the free data ingestion benefit.
After enabling Defender for Servers Plan 2, enable file integrity monitoring
Modify plan settings as needed.