Note
Access to this page requires authorization. You can try signing in or changing directories.
Access to this page requires authorization. You can try changing directories.
This article is one in a series of articles describing the deployment path for OT monitoring with Microsoft Defender for IoT, and describes how to onboard OT network sensors to Microsoft Defender for IoT in the Azure portal.

Prerequisites
Before you onboard an OT network sensor to Defender for IoT, make sure that you have the following:
An OT plan onboarded to Defender for IoT
Access to the Azure portal as a Security Admin, Contributor, or Owner user.
An understanding of which site and zone you'll want to assign to your sensor.
Assigning sensors to specific sites and zones is an integral part of implementing a Zero Trust security strategy, and will help you monitor for unauthorized traffic crossing segments. For more information, see List your planned OT sensors.
This step is performed by your deployment teams.
Onboard an OT sensor
This procedure describes how to onboard an OT network sensor with Defender for IoT and download a sensor activation file.
To onboard your OT sensor to Defender for IoT:
In the Azure portal, go to Defender for IoT > Getting started and select Set up OT/ICS Security.
Alternately, from the Defender for IoT Sites and sensors page, select Onboard OT sensor > OT.
By default, on the Set up OT/ICS Security page, Step 1: Did you set up a sensor? and Step 2: Configure SPAN port or TAP of the wizard are collapsed.
You'll install software and configure traffic mirroring later on in the deployment process, but should have your appliances ready and traffic mirroring method planned. For more information, see:
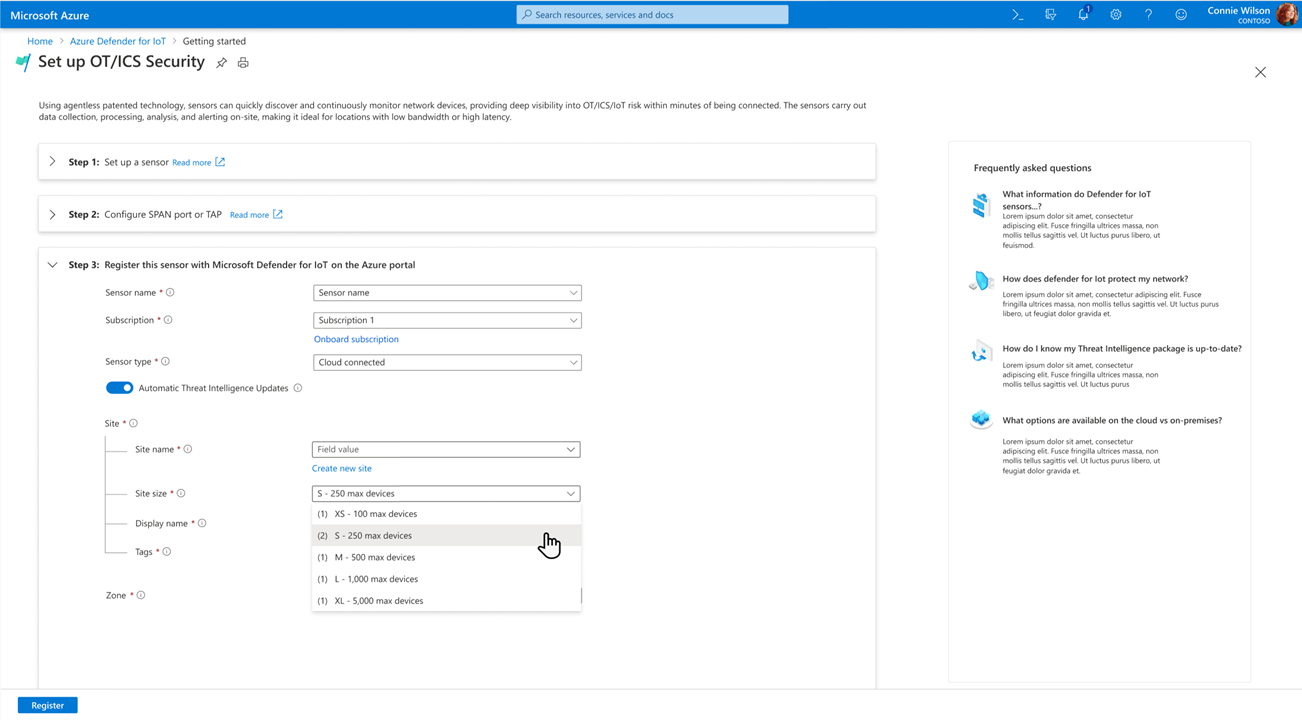
In Step 3: Register this sensor with Microsoft Defender for IoT enter or select the following values for your sensor:
In the Sensor name field, enter a meaningful name for your OT sensor.
We recommend including your OT sensor's IP address as part of the name, or using another easily identifiable name. You'll want to keep track of the registration name in the Azure portal and the IP address of the sensor shown in the OT sensor console.
In the Subscription field, select your Azure subscription.
If you don't yet have a subscription to select, select Onboard subscription to add an OT plan to your Azure subscription.
(Optional) Toggle on the Cloud connected option to view detected data and manage your sensor from the Azure portal, and to connect your data to other Microsoft services, such as Microsoft Sentinel.
For more information, see Cloud-connected vs. local OT sensors.
(Optional) Toggle on the Automatic Threat Intelligence updates to have Defender for IoT automatically push threat intelligence packages to your OT sensor.
In the Site section, enter the following details:
Field name Description Resource name Select the site you want to attach your sensors to, or select Create site to create a new site.
If you're creating a new site:
1. In the New site field, enter your site's name and select the checkmark button.
2. From the Site size menu, select your site's size. The sizes listed in this menu are the sizes that you're licensed for, based on the licenses you'd purchased in the Microsoft 365 admin center.
If you're working with a legacy OT plan, the Site size field isn't included.Display name Enter a meaningful name for your site to be shown across Defender for IoT. Tags Enter tag key and values to help you identify and locate your site and sensor in the Azure portal. Zone Select the zone you want to use for your OT sensor, or select Create zone to create a new one.
For example:
When you're done with all other fields, select Register. A success message appears and your activation file is automatically downloaded.
Select Finish. Your sensor is now shown under the selected site on the Defender for IoT Sites and sensors page.

Until you activate your sensor, the sensor's status shows as Pending Activation. Make the downloaded activation file accessible to the sensor console admin so that they can activate the sensor.
All files downloaded from the Azure portal are signed by root of trust so that your machines use signed assets only.
Note
If you're working with a large deployment, we recommend that you use the Azure portal to manage cloud-connected sensors, and an OT sensor to manage locally-managed sensors.