Note
Access to this page requires authorization. You can try signing in or changing directories.
Access to this page requires authorization. You can try changing directories.
This article is one in a series of articles describing the deployment path for OT monitoring with Microsoft Defender for IoT.

This article describes how to use Promiscuous mode in a Hyper-V Vswitch environment as a workaround for configuring traffic mirroring, similar to a SPAN port. A SPAN port on your switch mirrors local traffic from interfaces on the switch to a different interface on the same switch.
For more information, see Traffic mirroring with virtual switches.
Prerequisites
Before you start:
Make sure that you understand your plan for network monitoring with Defender for IoT, and the SPAN ports you want to configure.
For more information, see Traffic mirroring methods for OT monitoring.
Ensure that there's no instance of a virtual appliance running.
Make sure that you've enabled Ensure SPAN on your virtual switch's data port, and not the management port.
Ensure that the data port SPAN configuration isn't configured with an IP address.
Create new Hyper-V virtual switch to relay the mirrored traffic into the VM
Create a new virtual switch with PowerShell
New-VMSwitch -Name vSwitch_Span -NetAdapterName Ethernet -AllowManagementOS:$true
Where:
| Parameter | Description |
|---|---|
| vSwitch_Span | Newly added SPAN virtual switch name |
| Ethernet | Physical adapter name |
Learn how to Create and configure a virtual switch with Hyper-V
Create a new virtual switch with Hyper-V Manager
Open the Virtual Switch Manager.
In the Virtual switches list, select New virtual network switch > External as the dedicated spanned network adapter type.
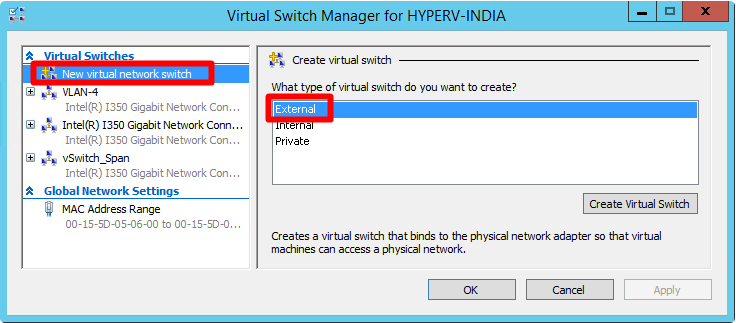
Select Create Virtual Switch.
In the Connection type area, select External network and ensure that the Allow management operating system to share this network adapter option is selected. For example:
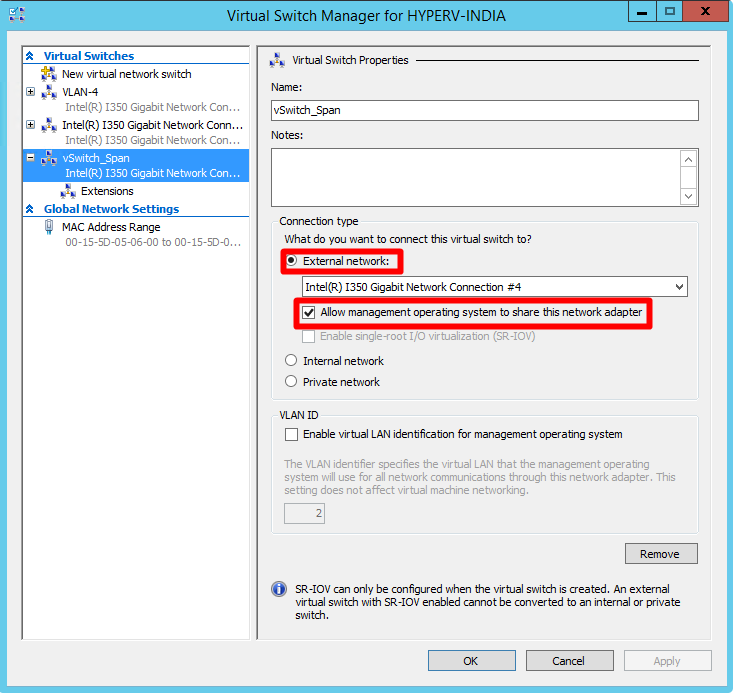
Select OK.
Attach a SPAN Virtual Interface to the virtual switch
Use Windows PowerShell or Hyper-V Manager to attach a SPAN virtual interface to the virtual switch you created earlier.
If you use PowerShell, define the name of the newly added adapter hardware as Monitor. If you use Hyper-V Manager, the name of the newly added adapter hardware is set to Network Adapter.
Attach a SPAN virtual interface to the virtual switch with PowerShell
Select the newly added SPAN virtual switch you created earlier, and run the following command to add a new network adapter:
ADD-VMNetworkAdapter -VMName VK-C1000V-LongRunning-650 -Name Monitor -SwitchName vSwitch_SpanEnable port mirroring for the selected interface as the span destination with the following command:
Get-VMNetworkAdapter -VMName VK-C1000V-LongRunning-650 | ? Name -eq Monitor | Set-VMNetworkAdapter -PortMirroring DestinationWhere:
Parameter Description VK-C1000V-LongRunning-650 CPPM VA name vSwitch_Span Newly added SPAN virtual switch name Monitor Newly added adapter name When you're done, select OK.
Attach a SPAN virtual interface to the virtual switch with Hyper-V Manager
Under the Hyper-V Manager's Hardware list, select Network Adapter.
In the Virtual switch field, select vSwitch_Span.

In the Hardware list, under the Network Adapter drop-down list, select Advanced Features. Under the Port Mirroring section, select Destination as the mirroring mode for the new virtual interface.
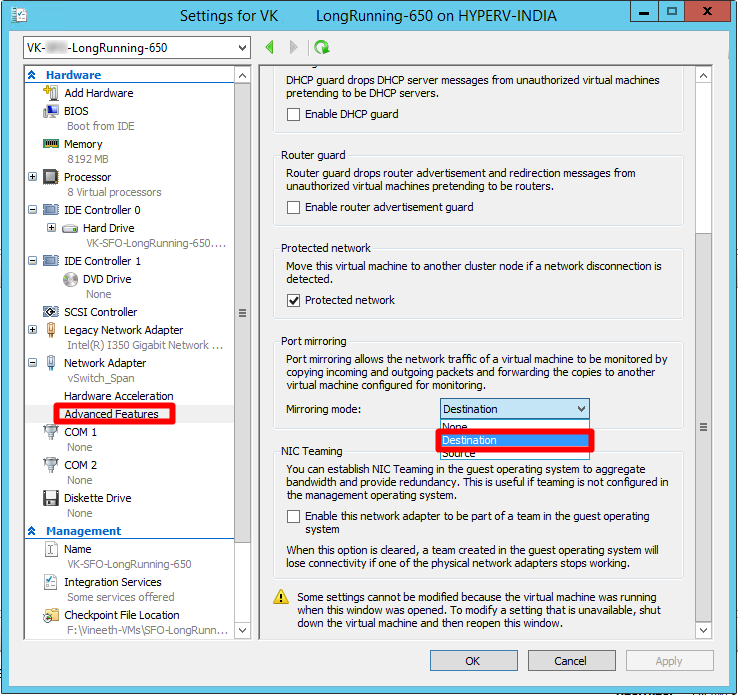
Select OK.
Turn on Microsoft NDIS capture extensions with PowerShell
Turn on support for Microsoft NDIS Capture Extensions for the virtual switch you created earlier.
To enable Microsoft NDIS capture extensions for your new virtual switch:
Enable-VMSwitchExtension -VMSwitchName vSwitch_Span -Name "Microsoft NDIS Capture"
Turn on Microsoft NDIS capture extensions with Hyper-V Manager
Turn on support for Microsoft NDIS Capture Extensions for the virtual switch you created earlier.
To enable Microsoft NDIS capture extensions for your new virtual switch:
Open the Virtual Switch Manager on the Hyper-V host.
In the Virtual Switches list, expand the virtual switch name
vSwitch_Spanand select Extensions.In the Switch Extensions field, select Microsoft NDIS Capture.
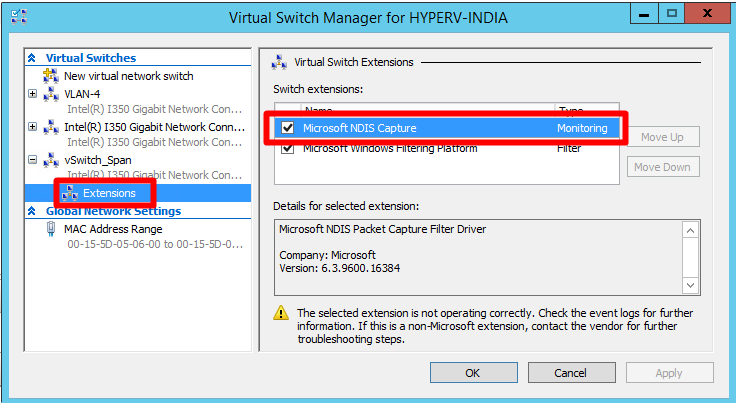
Select OK.
Configure the switch's mirroring mode
Configure the mirroring mode on the virtual switch you created earlier so that the external port is defined as the mirroring source. This includes configuring the Hyper-V virtual switch (vSwitch_Span) to forward any traffic that comes to the external source port to a virtual network adapter configured as the destination.
To set the virtual switch's external port as the source mirror mode, run:
$ExtPortFeature=Get-VMSystemSwitchExtensionPortFeature -FeatureName "Ethernet Switch Port Security Settings"
$ExtPortFeature.SettingData.MonitorMode=2
Add-VMSwitchExtensionPortFeature -ExternalPort -SwitchName vSwitch_Span -VMSwitchExtensionFeature $ExtPortFeature
Where:
| Parameter | Description |
|---|---|
| vSwitch_Span | Name of the virtual switch you created earlier |
| MonitorMode=2 | Source |
| MonitorMode=1 | Destination |
| MonitorMode=0 | None |
To verify the monitoring mode status, run:
Get-VMSwitchExtensionPortFeature -FeatureName "Ethernet Switch Port Security Settings" -SwitchName vSwitch_Span -ExternalPort | select -ExpandProperty SettingData
| Parameter | Description |
|---|---|
| vSwitch_Span | Newly added SPAN virtual switch name |
Configure VLAN settings for the Monitor adapter (if needed)
If the mirrored traffic is VLAN tagged, configure the Monitor adapter of the VM to accept traffic from the mirrored VLAN(s).
Use this PowerShell command to enable the Monitor adapter of the VM to accept the monitored traffic from different VLANs:
Set-VMNetworkAdapterVlan -VMName VK-C1000V-LongRunning-650 -VMNetworkAdapterName Monitor -Trunk -AllowedVlanIdList 1010-1020 -NativeVlanId 10
Where:
| Parameter | Description |
|---|---|
| VK-C1000V-LongRunning-650 | CPPM VA name |
| 1010-1020 | VLAN range from which IoT traffic is mirrored |
| 10 | Native VLAN ID of the environment |
Learn more about the Set-VMNetworkAdapterVlan PowerShell cmdlet.
Validate traffic mirroring
After configuring traffic mirroring, make an attempt to receive a sample of recorded traffic (PCAP file) from the switch SPAN or mirror port.
A sample PCAP file will help you:
- Validate the switch configuration
- Confirm that the traffic going through your switch is relevant for monitoring
- Identify the bandwidth and an estimated number of devices detected by the switch
Use a network protocol analyzer application, such as Wireshark, to record a sample PCAP file for a few minutes. For example, connect a laptop to a port where you've configured traffic monitoring.
Check that Unicast packets are present in the recording traffic. Unicast traffic is traffic sent from address to another.
If most of the traffic is ARP messages, your traffic mirroring configuration isn't correct.
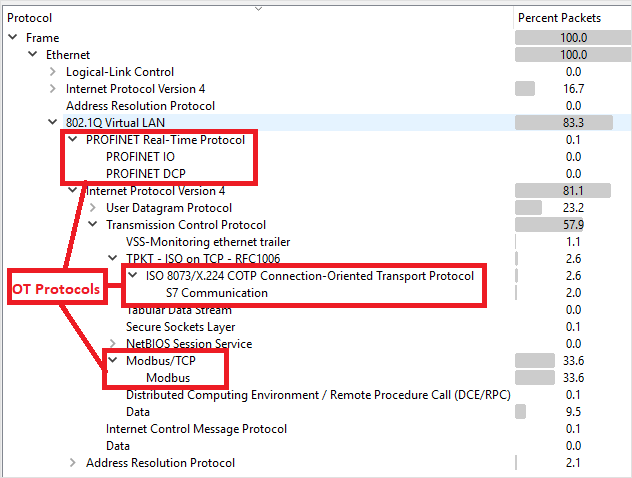
Verify that your OT protocols are present in the analyzed traffic.
For example: