Note
Access to this page requires authorization. You can try signing in or changing directories.
Access to this page requires authorization. You can try changing directories.
This article shows you how to run Open Liberty on Azure Container Apps. You do the following activities in this article:
- Run your Java, Java Enterprise Edition (EE), Jakarta EE, or MicroProfile application on the Open Liberty runtime.
- Build the application Docker image using Liberty container images.
- Deploy the containerized application to Azure Container Apps.
For more information about Open Liberty, see the Open Liberty project page. This article is intended to help you quickly get to deployment. Before going to production, you should explore Tuning Liberty.
If you're interested in providing feedback or working closely on your migration scenarios with the engineering team developing Java on Azure solutions, fill out this short survey on Azure migration and include your contact information. The team of program managers, architects, and engineers will promptly get in touch with you to initiate close collaboration.
Prerequisites
- An Azure subscription. If you don't have an Azure subscription, create a free account before you begin.
- Prepare a local machine with either Windows or Unix-like operating system installed - for example, Ubuntu, macOS, or Windows Subsystem for Linux.
- Install the Azure CLI 2.62.0 or above to run Azure CLI commands.
- If you're prompted, install the Azure CLI extension on first use. For more information about extensions, see Use and manage extensions with the Azure CLI.
- Run
az versionto find the version and dependent libraries that are installed. To upgrade to the latest version, runaz upgrade.
- Install a Java Standard Edition (SE) implementation version 17 - for example, Microsoft build of OpenJDK.
- Install Maven 3.9.8 or higher.
- Ensure that Git is installed.
Sign in to Azure
Sign in to your Azure subscription by using the az login command and follow the on-screen directions.
az login
Note
You can run most Azure CLI commands in PowerShell the same as in Bash. The difference exists only when using variables. In the following sections, the difference is addressed in different tabs when needed.
If you have multiple Azure tenants associated with your Azure credentials, you must specify which tenant you want to sign in to. You can specify the tenant by using the --tenant option - for example, az login --tenant contoso.onmicrosoft.com.
If you have multiple subscriptions within a single tenant, make sure you're signed in with the one you intend to use by using az account set --subscription <subscription-id>.
Create a resource group
An Azure resource group is a logical group in which Azure resources are deployed and managed.
Create a resource group called java-liberty-project using the az group create command in the eastus2 location. This resource group is used later for creating the Azure Container Registry (ACR) instance and the Azure Container Apps instance.
export RESOURCE_GROUP_NAME=java-liberty-project
export LOCATION=eastus2
az group create --name $RESOURCE_GROUP_NAME --location $LOCATION
Create an ACR instance
Use the az acr create command to create the ACR instance. The following example creates an ACR instance named youruniqueacrname. Make sure youruniqueacrname is unique within Azure.
Note
This article uses the recommended passwordless authentication mechanism for Container Registry. It's still possible to use a username and password with docker login after using az acr credential show to obtain the username and password. Using a username and password is less secure than passwordless authentication.
export REGISTRY_NAME=youruniqueacrname
az acr create \
    --resource-group $RESOURCE_GROUP_NAME \
    --name $REGISTRY_NAME \
    --sku Basic
After a short time, you should see a JSON output that contains the following lines:
"provisioningState": "Succeeded",
"publicNetworkAccess": "Enabled",
"resourceGroup": "java-liberty-project",
Next, use the following command to retrieve the login server for the Container Registry instance. You need this value when you deploy the application image to the Azure Container Apps later.
export ACR_LOGIN_SERVER=$(az acr show \
    --resource-group $RESOURCE_GROUP_NAME \
    --name $REGISTRY_NAME \
    --query 'loginServer' \
    --output tsv)
Create an environment
An environment in Azure Container Apps creates a secure boundary around a group of container apps. Container Apps deployed to the same environment are deployed in the same virtual network and write logs to the same Log Analytics workspace. Use the az containerapp env create command to create an environment. The following example creates an environment named youracaenvname:
export ACA_ENV=youracaenvname
az containerapp env create \
    --resource-group $RESOURCE_GROUP_NAME \
    --location $LOCATION \
    --name $ACA_ENV
If you're asked to install an extension, answer Y.
After a short time, you should see a JSON output that contains the following lines:
"provisioningState": "Succeeded",
"type": "Microsoft.App/managedEnvironments"
"resourceGroup": "java-liberty-project",
Create a single database in Azure SQL Database
In this section, you create a single database in Azure SQL Database, for use with your app.
First, use the following commands to set database-related environment variables. Replace <your-unique-sql-server-name> with a unique name for your Azure SQL Database server.
export SQL_SERVER_NAME=<your-unique-sql-server-name>
export DB_NAME=demodb
Next, use the following commands to create a single database in Azure SQL Database and set the current signed-in user as a Microsoft Entra admin. For more information, see Quickstart: Create a single database - Azure SQL Database.
export ENTRA_ADMIN_NAME=$(az account show --query user.name --output tsv)

az sql server create \
    --name $SQL_SERVER_NAME \
    --resource-group $RESOURCE_GROUP_NAME \
    --enable-ad-only-auth \
    --external-admin-principal-type User \
    --external-admin-name $ENTRA_ADMIN_NAME \
    --external-admin-sid $(az ad signed-in-user show --query id --output tsv)
az sql db create \
    --resource-group $RESOURCE_GROUP_NAME \
    --server $SQL_SERVER_NAME \
    --name $DB_NAME \
    --edition GeneralPurpose \
    --compute-model Serverless \
    --family Gen5 \
    --capacity 2
Then, use the following commands to add the local IP address to the Azure SQL Database server firewall rules to allow your local machine to connect to the database for local testing later.
export AZ_LOCAL_IP_ADDRESS=$(curl -s https://whatismyip.akamai.com)
az sql server firewall-rule create \
    --resource-group $RESOURCE_GROUP_NAME \
    --server $SQL_SERVER_NAME \
    --name AllowLocalIP \
    --start-ip-address $AZ_LOCAL_IP_ADDRESS \
    --end-ip-address $AZ_LOCAL_IP_ADDRESS
Note
You create an Azure SQL server with SQL authentication disabled for security considerations. Only Microsoft Entra ID is used to authenticate to the server. If you need to enable SQL authentication, see az sql server create.
Configure and build the application image
To deploy and run your Liberty application on Azure Container Apps, containerize your application as a Docker image using Open Liberty container images.
Follow the steps in this section to deploy the sample application on the Liberty runtime. These steps use Maven.
Check out the application
Use the following commands to prepare the sample code for this guide. The sample is on GitHub.
git clone https://github.com/Azure-Samples/open-liberty-on-aca.git
cd open-liberty-on-aca
export BASE_DIR=$PWD
git checkout 20250327
If you see a message about being in detached HEAD state, this message is safe to ignore. It just means you checked out a tag.
This article uses java-app. Here's the file structure of the application's important files:
java-app
├─ src/main/
│  ├─ liberty/config/
│  │  ├─ server.xml
│  ├─ java/
│  ├─ resources/
│  ├─ webapp/
├─ Dockerfile
├─ pom.xml
├─ pom-azure-identity.xml
The directories java, resources, and webapp contain the source code of the sample application. The code declares and uses a data source named jdbc/JavaEECafeDB.
In the java-app root directory, there's a Dockerfile to create the application image with Open Liberty.
In the liberty/config directory, the server.xml file is used to configure the database connection for the Open Liberty. It defines a variable azure.sql.connectionstring that is used to connect to the Azure SQL Database.
The pom.xml file is the Maven project object model (POM) file that contains the configuration information for the project. The pom-azure-identity.xml file declares the azure-identity dependency, which is used to authenticate to Azure services using Microsoft Entra ID.
Note
This sample uses azure-identity library to authenticate to Azure SQL Database using Microsoft Entra authentication, which is recommended for security considerations. If you need to use SQL authentication in your Liberty application, see Relational database connections with JDBC.
Build the project
Use the following commands to build the application:
cd $BASE_DIR/java-app
mvn clean install
mvn dependency:copy-dependencies -f pom-azure-identity.xml -DoutputDirectory=target/liberty/wlp/usr/shared/resources
If the build is successful, you should see output similar to the following at the end of your build.
[INFO] ------------------------------------------------------------------------
[INFO] BUILD SUCCESS
[INFO] ------------------------------------------------------------------------
[INFO] Total time:  22.651 s
[INFO] Finished at: 2023-10-26T18:58:40-04:00
[INFO] ------------------------------------------------------------------------
If you don't see this output, troubleshoot and resolve the problem before continuing.
Test your project locally
You can now use the following steps to run and test the project locally before deploying to Azure. For convenience, use the liberty-maven-plugin. To learn more about the liberty-maven-plugin, see Building a web application with Maven. For your application, you can do something similar using any other mechanism, such as your local IDE.
Note
If you selected a "serverless" database deployment, verify that your SQL database didn't enter pause mode. One way to perform the verification is to sign in to the database query editor as described in Quickstart: Use the Azure portal query editor (preview) to query Azure SQL Database.
Start the application using
liberty:run.cd $BASE_DIR/java-app # The value of environment variable AZURE_SQL_CONNECTIONSTRING is read by the configuration variable azure.sql.connectionstring in server.xml. export AZURE_SQL_CONNECTIONSTRING="jdbc:sqlserver://$SQL_SERVER_NAME.database.windows.net:1433;databaseName=$DB_NAME;authentication=ActiveDirectoryDefault" mvn liberty:runVerify that the application works as expected. If successful, you should see a message similar to
[INFO] [AUDIT ] CWWKZ0001I: Application javaee-cafe started in 11.086 seconds.in the command output. Go tohttp://localhost:9080/in your browser to verify that the application is accessible and all functions are working.Press Ctrl+C to stop. Select Y if you're asked to terminate the batch job.
When you're finished, delete the firewall rule that allows your local IP address to access the Azure SQL Database by using the following command:
az sql server firewall-rule delete \
    --resource-group $RESOURCE_GROUP_NAME \
    --server $SQL_SERVER_NAME \
    --name AllowLocalIP
Build the image for Azure Container Apps deployment
You can now run the az acr build command to build the image, as shown in the following example:
cd $BASE_DIR/java-app

az acr build \
    --registry ${REGISTRY_NAME} \
    --image javaee-cafe:v1 \
    .
The az acr build command uploads the artifacts specified in the Dockerfile to the Container Registry instance, builds the image, and stores it in the Container Registry instance.
Deploy the application to Azure Container Apps
Use the following commands to create an Azure Container Apps instance to run the app after pulling the image from the ACR. This example creates an Azure Container Apps instance named youracainstancename:
export ACA_NAME=youracainstancename
az containerapp create \
    --resource-group $RESOURCE_GROUP_NAME \
    --name $ACA_NAME \
    --image ${ACR_LOGIN_SERVER}/javaee-cafe:v1 \
    --environment $ACA_ENV \
    --registry-server $ACR_LOGIN_SERVER \
    --registry-identity system \
    --target-port 9080 \
    --ingress 'external' \
    --min-replicas 1
Successful output is a JSON object including the property "type": "Microsoft.App/containerApps".
Then, connect the Azure SQL Database server to the container app using Service Connector by using the following steps:
- Open the Azure portal in your browser and navigate to the Azure Container Apps instance you created in the previous step.
- In the navigation pane, select Settings > Service Connector (preview).
- Select Create. You should see the popup window Create connection.
- In the Basic pane, for Service type, select SQL Database. For Client type, select Java. Leave other fields at their default values, then select Next: Authentication.
- In the Authentication pane, for Authentication type, select System assigned managed identity, then select Next: Networking.
- In the Networking pane, select Next: Review + create.
- In the Review + create pane, wait for the validation to pass, and then select Create on Cloud Shell. The Cloud Shell opens and then executes the commands to create the connection. Wait for the commands to finish and then close the Cloud Shell.
Note
The Service Connector creates a secret in the container app that contains the value for AZURE_SQL_CONNECTIONSTRING, which is a password-free connection string to the Azure SQL Database. For more information, see the sample value from the User-assigned managed identity section of Integrate Azure SQL Database with Service Connector.
Test the application
Use the following command to get a fully qualified URL to access the application:
echo https://$(az containerapp show \
    --resource-group $RESOURCE_GROUP_NAME \
    --name $ACA_NAME \
    --query properties.configuration.ingress.fqdn \
    --output tsv)
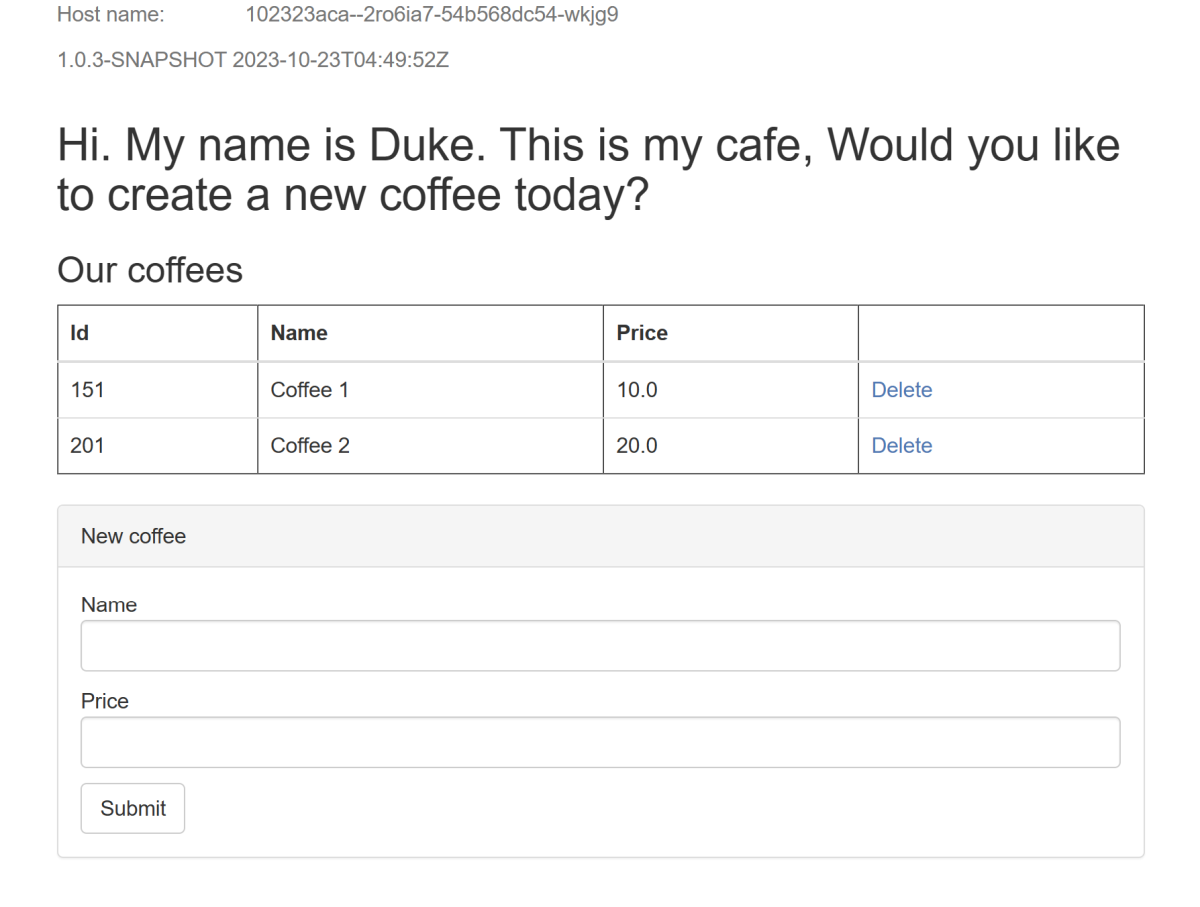
To access and test the application, open a web browser to the URL. The following screenshot shows the running application:
Clean up resources
To avoid Azure charges, you should clean up unnecessary resources. When the cluster is no longer needed, use the az group delete command to remove the resource group, container registry, container apps, database server, and all related resources.
az group delete --name $RESOURCE_GROUP_NAME --yes --no-wait
Next steps
You can learn more from the references used in this guide:
- Azure Container Apps
- Integrate Azure SQL Database with Service Connector
- Connect using Microsoft Entra authentication
- Open Liberty
- Open Liberty Server Configuration
- Liberty Maven Plugin
- Open Liberty Container Images
To explore options to run WebSphere products on Azure, see What are solutions to run the WebSphere family of products on Azure?