Note
Access to this page requires authorization. You can try signing in or changing directories.
Access to this page requires authorization. You can try changing directories.
Note
The Storage Accounts feature in Azure Explorer is deprecated. You can utilize the Azure portal to create and manage storage accounts and containers. See the Azure Storage documentation for quickstarts on how to manage storage accounts.
Azure Explorer, which is part of the Azure Toolkit for Eclipse, provides Java developers with an easy-to-use solution for managing storage accounts in their Azure account from inside the Eclipse integrated development environment (IDE).
Prerequisites
To complete the steps in this article, you will need to install the Azure Toolkit for Eclipse, which requires the following software components:
- An Azure supported Java Development Kit (JDK)
- An Eclipse IDE
- The Azure Toolkit for Eclipse, see installation guide for more information
- Be signed in to your Azure account for the Azure Toolkit for Eclipse
Note
The Azure Toolkit for Eclipse page at the Eclipse Marketplace lists the builds that are compatible with the toolkit.
Displaying the Azure Explorer view
If the Azure Explorer view is not visible in Eclipse, display it by doing the following:
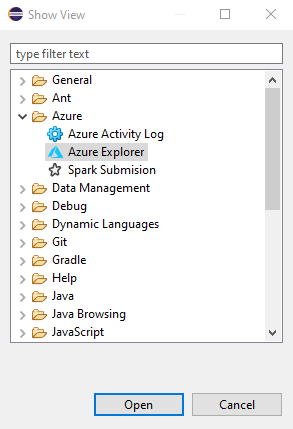
Click Window, hover over Show View, and then click Other.
In the Show View dialog box, expand Azure, select Azure Explorer, and then click Open.
Create a storage account
Sign in to your Azure account by using the Sign-in instructions for the Azure Toolkit for Eclipse.
In the Azure Explorer view, expand the Azure node, right-click Storage Accounts, and then click Create Storage Account.
In the Create Storage Account dialog box, specify the following options:
Name: Specifies the name for the new storage account.
Subscription: Specifies the Azure subscription that you want to use for the new storage account.
Resource Group: Specifies the resource group for your storage account. Select one of the following options:
- Create New: Specifies that you want to create a new resource group.
- Use Existing: Specifies that you will select from a list of resource groups that are associated with your Azure account.
Region: Specifies the location where your storage account is created - for example, "West US".
Account kind: Specifies the type of storage account to create - for example, "General purpose v1". For more information, see About Azure storage accounts.
Performance: Specifies which storage account offering to use from the selected publisher - for example, "Standard". For more information, see Azure storage scalability and performance targets.
Replication: Specifies the replication for the storage account - for example, "Locally Redundant". For more information, see Azure storage replication.
When you have specified all of the preceding options, click Create.
Create and manage storage containers
To create and manage storage containers, visit the Azure portal or programatically provision your resources.
See Upload, download, and list blobs with the Azure portal for a step-by-step tutorial on how to use the Azure portal to create a container in Azure Storage, and to upload and download block blobs in that container.
Delete a storage account
In the Azure Explorer view, right-click the storage account, and then click Delete.
In the confirmation window, click OK.
Next steps
For more information about Azure storage accounts, sizes, and pricing, see the following resources:
- Introduction to Microsoft Azure Storage
- About Azure storage accounts
- Azure storage-account sizes
- Azure storage-account pricing
To report bugs or request new features, create issues on our GitHub repository. Or, ask questions on Stack Overflow with tag azure-java-tools.
For more information about using Java with Azure, see the following links: