Authenticate JavaScript apps to Azure services during local development using developer accounts
When you create cloud applications, developers need to debug and test applications on their local workstation. When an application is run on a developer's workstation during local development, it still must authenticate to any Azure services used by the app. This article covers how to use a developer's Azure credentials to authenticate the app to Azure during local development.
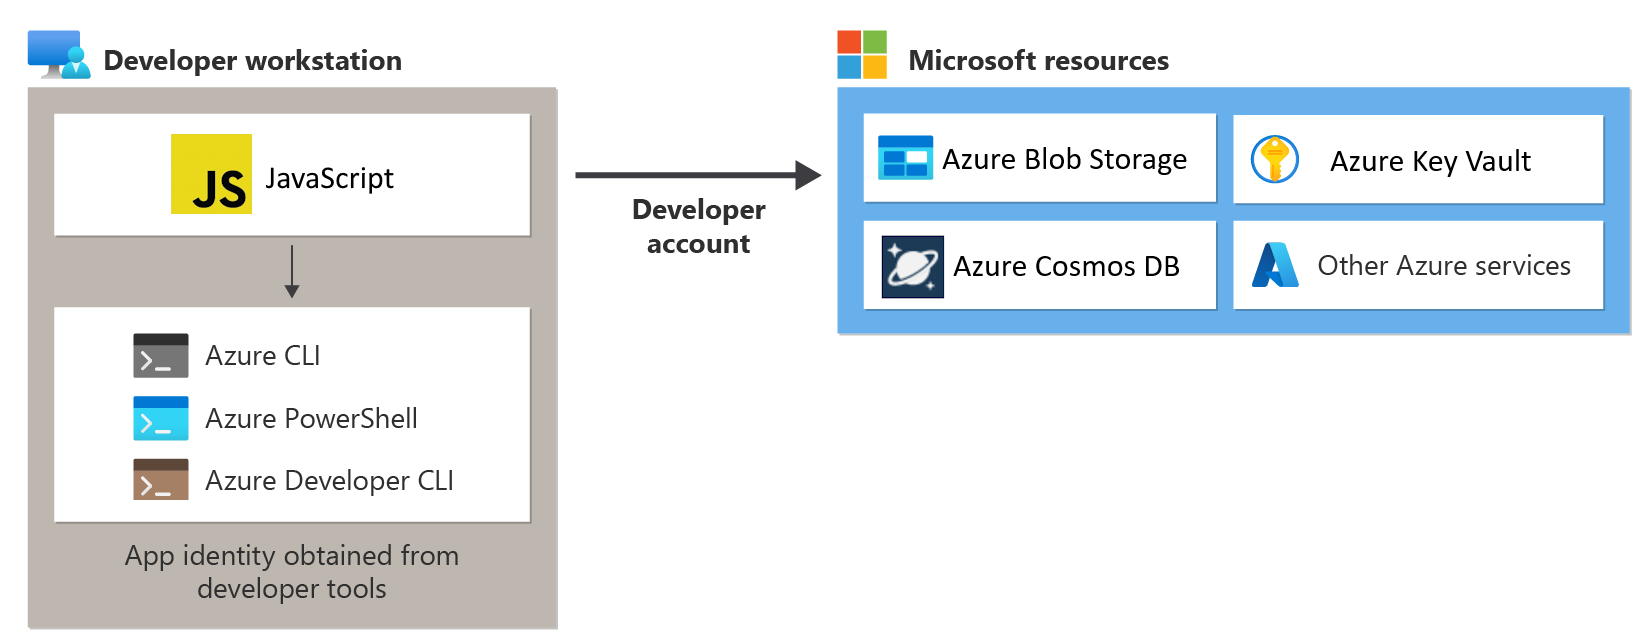
For an app to authenticate to Azure during local development using the developer's Azure credentials, the developer must be signed-in to Azure from the Visual Studio Code Azure Tools extension, the Azure CLI, or Azure PowerShell. The Azure SDK for JavaScript is able to detect that the developer is signed-in from one of these tools and then obtain the necessary credentials from the credentials cache to authenticate the app to Azure as the signed-in user.
This approach is easiest to set up for a development team since it takes advantage of the developers' existing Azure accounts. However, a developer's account will likely have more permissions than required by the application, therefore exceeding the permissions the app runs with in production. As an alternative, you can create application service principals to use during local development, which can be scoped to have only the access needed by the app.
1 - Create Microsoft Entra group for local development
Since there are almost always multiple developers who work on an application, it's recommended to first create a Microsoft Entra group to encapsulate the roles (permissions) the app needs in local development. This offers the following advantages.
- Every developer is assured to have the same roles assigned since roles are assigned at the group level.
- If a new role is needed for the app, it only needs to be added to the Microsoft Entra group for the app.
- If a new developer joins the team, they simply must be added to the correct Microsoft Entra group to get the correct permissions to work on the app.
If you have an existing Microsoft Entra group for your development team, you can use that group. Otherwise, complete the following steps to create a Microsoft Entra group.
| Instructions | Screenshot |
|---|---|
| Navigate to the Microsoft Entra ID page in the Azure portal by typing Microsoft Entra ID into the search box at the top of the page and then selecting Microsoft Entra ID from under services. |

|
| On the Microsoft Entra ID page, select Groups from the left-hand menu. |

|
| On the All groups page, select New group. |

|
On the New Group page:
|

|
On the Add members dialog box:
|

|
| Back on the New group page, select Create to create the group. The group will be created and you will be taken back to the All groups page. It may take up to 30 seconds for the group to appear and you may need to refresh the page due to caching in the Azure portal. |

|
2 - Assign roles to the Microsoft Entra group
Next, you need to determine what roles (permissions) your app needs on what resources and assign those roles to your app. In this example, the roles are assigned to the Microsoft Entra group created in step 1. Roles can be assigned a role at a resource, resource group, or subscription scope. This example shows how to assign roles at the resource group scope since most applications group all their Azure resources into a single resource group.
| Instructions | Screenshot |
|---|---|
| Locate the resource group for your application by searching for the resource group name using the search box at the top of the Azure portal. Navigate to your resource group by selecting the resource group name under the Resource Groups heading in the dialog box. |

|
| On the page for the resource group, select Access control (IAM) from the left-hand menu. |

|
On the Access control (IAM) page:
|

|
The Add role assignment page lists all of the roles that can be assigned for the resource group.
|

|
The next Add role assignment page allows you to specify what user to assign the role to.
|

|
In the Select members dialog:
|

|
| The Microsoft Entra group shows as selected on the Add role assignment screen. Select Review + assign to go to the final page and then Review + assign again to complete the process. |

|
3 - Sign-in to Azure using VS Code, the Azure CLI, or Azure PowerShell
Open a terminal on your developer workstation and sign-in to Azure from Azure PowerShell.
Connect-AzAccount
4 - Implement DefaultAzureCredential in your application
To authenticate Azure SDK client objects to Azure, your application should use the DefaultAzureCredential class from the @azure/identity package. In this scenario, DefaultAzureCredential will sequentially check to see if the developer has signed-in to Azure using the VS Code Azure tools extension, the Azure CLI, or Azure PowerShell. If the developer is signed-in to Azure using any of these tools, then the credentials used to sign into the tool will be used by the app to authenticate to Azure with.
Start by adding the @azure/identity package to your application.
npm install @azure/identity
Next, for any JavaScript code that creates an Azure SDK client object in your app, you'll want to:
- Import the
DefaultAzureCredentialclass from the@azure/identitymodule. - Create a
DefaultAzureCredentialobject. - Pass the
DefaultAzureCredentialobject to the Azure SDK client object constructor.
An example of this is shown in the following code segment.
import { BlobServiceClient } from '@azure/storage-blob';
import { DefaultAzureCredential } from '@azure/identity';

// Acquire a credential object
const tokenCredential = DefaultAzureCredential();

const blobServiceClient = BlobServiceClient(
        `https://${accountName}.blob.core.windows.net`,
        tokenCredential
);
DefaultAzureCredential will automatically detect the authentication mechanism configured for the app and obtain the necessary tokens to authenticate the app to Azure. If an application makes use of more than one SDK client, the same credential object can be used with each SDK client object.
Feedback
Coming soon: Throughout 2024 we will be phasing out GitHub Issues as the feedback mechanism for content and replacing it with a new feedback system. For more information see: https://aka.ms/ContentUserFeedback.
Submit and view feedback for