Note
Access to this page requires authorization. You can try signing in or changing directories.
Access to this page requires authorization. You can try changing directories.
Note
Azure Spring Apps is the new name for the Azure Spring Cloud service. Although the service has a new name, you'll see the old name in some places for a while as we work to update assets such as screenshots, videos, and diagrams.
Azure Spring Apps is a fully managed microservice development with built-in service discovery and configuration management. The service makes it easy to deploy Spring Boot-based microservice applications to Azure. This tutorial demonstrates how you can use Azure CLI in Jenkins to automate continuous integration and delivery (CI/CD) for Azure Spring Apps.
In this tutorial, you'll complete these tasks:
- Provision a service instance and launch a Java Spring application
- Prepare your Jenkins server
- Use the Azure CLI in a Jenkins pipeline to build and deploy the microservice applications
Prerequisites
- Azure subscription: If you don't have an Azure subscription, create a free account before you begin.
- Jenkins: Install Jenkins on a Linux VM
- GitHub account: If you don't have a GitHub account, create a free account before you begin.
Provision a service instance and launch a Java Spring application
We use Piggy Metrics as the sample Microsoft service application and follow the same steps in Quickstart: Launch a Java Spring application using the Azure CLI to provision the service instance and set up the applications. If you've already gone through the same process, you can skip to the next section. Otherwise, included in the following are the Azure CLI commands. Refer to Quickstart: Launch a Java Spring application using the Azure CLI to get more information.
Your local machine needs to meet the same prerequisite as the Jenkins build server. Make sure the following are installed to build and deploy the microservice applications:
- Git
- JDK 8
- Maven 3.0 or above
- Azure CLI installed, version 2.0.67 or higher
Install the Azure Spring Apps extension:
az extension add --name springCreate a resource group to contain your Azure Spring Apps service:
az group create --location eastus --name <resource group name>Provision an instance of Azure Spring Apps:
az spring create -n <service name> -g <resource group name>Fork the Piggy Metrics repo to your own GitHub account. In your local machine, clone your repo in a directory called
source-code:mkdir source-code git clone https://github.com/<your GitHub id>/piggymetricsSet up your configuration server. Make sure you replace <your GitHub id> with the correct value.
az spring config-server git set -n <your-service-name> --uri https://github.com/<your GitHub id>/piggymetrics --label configBuild the project:
cd piggymetrics
mvn clean package -D skipTests
Create the three microservices: gateway, auth-service, and account-service:
az spring app create --n gateway -s <service name> -g <resource group name>
az spring app create --n auth-service -s <service name> -g <resource group name>
az spring app create --n account-service -s <service name> -g <resource group name>
Deploy the applications:
az spring app deploy -n gateway -s <service name> -g <resource group name> --jar-path ./gateway/target/gateway.jar
az spring app deploy -n account-service -s <service name> -g <resource group name> --jar-path ./account-service/target/account-service.jar
az spring app deploy -n auth-service -s <service name> -g <resource group name> --jar-path ./auth-service/target/auth-service.jar
Assign public endpoint to gateway:
az spring app update -n gateway -s <service name> -g <resource group name> --is-public trueQuery the gateway application to get the url so that you can verify that the application is running.
az spring app show --name gateway | grep urlNavigate to the URL provided by the previous command to run the PiggyMetrics application.
Prepare Jenkins server
In this section, you prepare the Jenkins server to run a build, which is fine for testing. However, because of security implication, you should use an Azure VM agent or Azure Container agent to spin up an agent in Azure to run your builds.
Install plug-ins
Log in to your Jenkins server.
Select Manage Jenkins.
Select Manage Plugins.
On the Available tab, select the following plug-ins:
If these plug-ins don't appear in the list, check the Installed tab to see if they're already installed.
To install the plug-ins, select Download now and install after restart.
Restart your Jenkins server to complete the installation.
Add your Azure Service Principal credential in Jenkins credential store
You need an Azure Service Principal to deploy to Azure. For more information, see the Create service principal section in the Deploy to Azure App Service tutorial. The output from
az ad sp create-for-rbaclooks something like this:{ "appId": "xxxxxx-xxx-xxxx-xxx-xxxxxxxxxxxx", "displayName": "xxxxxxxjenkinssp", "name": "http://xxxxxxxjenkinssp", "password": "xxxxxx-xxx-xxxx-xxx-xxxxxxxxxxxx", "tenant": "xxxxxx--xxx-xxxx-xxx-xxxxxxxxxxxx" }On the Jenkins dashboard, select Credentials > System. Then, select Global credentials(unrestricted).
Select Add Credentials.
Select Microsoft Azure Service Principal as kind.
Supply values for the following fields:
- Subscription ID: Azure subscription ID
- Client ID: Service principal appid
- Client Secret: Service principal password
- Tenant ID: Microsoft account tenant ID
- Azure Environment: Select the appropriate value for your environment. For example, use Azure for Azure Global
- ID: Set as
azure_service_principal. We use this ID in a later step in this article - Description: This value is optional, but recommended from a documentation/maintenance standpoint.
Install Maven and Azure CLI spring extension
The sample pipeline uses Maven to build and Azure CLI to deploy to the service instance. When Jenkins is installed, it creates an admin account named jenkins. Ensure that the user jenkins has permission to run the spring extension.
Connect to the Jenkins controller via SSH.
Install Maven.
sudo apt-get install mavenVerify that the Azure CLI is installed by entering
az version. If the Azure CLI isn't installed, see Installing the Azure CLI.Switch to the
jenkinsuser:sudo su jenkinsInstall the spring extension:
az extension add --name spring
Create a Jenkinsfile
In your own repo -
https://github.com/your_github_id/piggymetrics- create a Jenkinsfile in the root.Update the file as follows. Make sure you replace the values of <resource group name> and <service name>. Replace azure_service_principal with the right ID if you use a different value when you added the credential in Jenkins.
    node {
      stage('init') {
        checkout scm
      }
      stage('build') {
        sh 'mvn clean package'
      }
      stage('deploy') {
        withCredentials([azureServicePrincipal('azure_service_principal')]) {
          // Log in to Azure
          sh '''
            az login --service-principal -u $AZURE_CLIENT_ID -p $AZURE_CLIENT_SECRET -t $AZURE_TENANT_ID
            az account set -s $AZURE_SUBSCRIPTION_ID
          '''
          // Set default resource group name and service name. Replace <resource group name> and <service name> with the right values
          sh 'az config set defaults.group=<resource group name>'
          sh 'az config set defaults.spring=<service name>'

          // Deploy applications
          sh 'az spring app deploy -n gateway --jar-path ./gateway/target/gateway.jar'
          sh 'az spring app deploy -n account-service --jar-path ./account-service/target/account-service.jar'
          sh 'az spring app deploy -n auth-service --jar-path ./auth-service/target/auth-service.jar'
          sh 'az logout'
        }
      }
    }
Save and commit the change.
Create the job
On the Jenkins dashboard, select New Item.
Provide a name, Deploy-PiggyMetrics for the job and select Pipeline. Click OK.
Select the Pipeline tab.
For Definition, select Pipeline script from SCM.
For SCM, select Git.
Enter the GitHub URL for your forked repo:
https://github.com/<your GitHub id>/piggymetrics.git.For Branch Specifier (black for 'any'), select /Azure.
For Script path, select Jenkinsfile.
Select Save
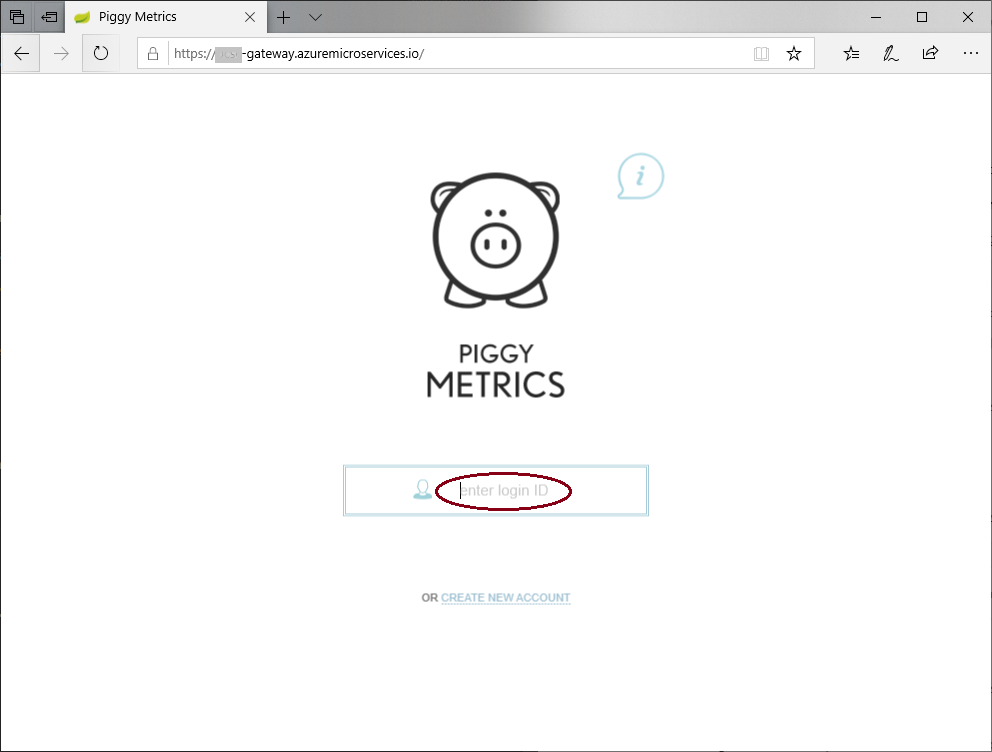
Validate and run the job
Before running the job, edit the text in the login input box to enter login ID.
In your repo, open
index.htmlin/gateway/src/main/resources/static/.Search for
enter your loginand update that text toenter login ID.<input class="frontforms" id="frontloginform" name="username" placeholder="enter login ID" type="text" autocomplete="off"/>Save and commit the change.
Run the job in Jenkins manually. On the Jenkins dashboard, select the job
Deploy-PiggyMetricsand then select Build Now.
After the job is complete, navigate to the public IP of the gateway application and verify that your application has been updated.
Clean up resources
When no longer needed, delete the resources created in this article:
az group delete -y --no-wait -n <resource group name>