Tutorial: Send push notifications to React Native apps using Azure Notification Hubs via a backend service
 Download the sample
In this tutorial, you use Azure Notification Hubs to push notifications to a React Native application targeting Android and iOS.
An ASP.NET Core Web API backend is used to handle device registration for the client using the latest and best Installation approach. The service will also send push notifications in a cross-platform manner.
These operations are handled using the Notification Hubs SDK for backend operations. Further detail on the overall approach is provided in the Registering from your app backend documentation.
This tutorial takes you through the following steps:
- Set up Push Notification Services and Azure Notification Hubs.
- Create an ASP.NET Core Web API backend application.
- Create a cross-platform React Native application.
- Configure the native Android project for push notifications.
- Configure the native iOS project for push notifications.
- Test the solution.
Prerequisites
To follow along, you require:
- An Azure subscription where you can create and manage resources.
- A Mac with Visual Studio for Mac installed (or a PC running Visual Studio 2019 with the Mobile Development with .NET workload).
- The ability to run the app on either Android (physical or emulator devices) or iOS (physical devices only).
For Android, you must have:
- A developer unlocked physical device or an emulator (running API 26 and above with Google Play Services installed).
For iOS, you must have:
- An active Apple Developer Account.
- A physical iOS device that is registered to your developer account (running iOS 13.0 and above).
- A .p12 development certificate installed in your keychain allowing you to run an app on a physical device.
Note
The iOS Simulator does not support remote notifications and so a physical device is required when exploring this sample on iOS. However, you do not need to run the app on both Android and iOS in order to complete this tutorial.
You can follow the steps in this first-principles example with no prior experience. However, you'll benefit from having familiarity with the following aspects.
- Apple Developer Portal
- ASP.NET Core
- Google Firebase Console
- Microsoft Azure and Send push notifications to iOS apps using Azure Notification Hubs.
- React Native.
The steps provided are for Visual Studio for Mac and Visual Studio Code but it's possible to follow along using Visual Studio 2019.
Set up Push Notification Services and Azure Notification Hub
In this section, you set up Firebase Cloud Messaging (FCM) and Apple Push Notification Services (APNS). You then create and configure a notification hub to work with those services.
Create a Firebase project and enable Firebase Cloud Messaging for Android
Sign in to the Firebase console. Create a new Firebase project entering PushDemo as the Project name.
Note
A unique name will be generated for you. By default this is comprised of a lowercase variant of the name you provided plus a generated number separated by a dash. You can change this if you want provided it is still globally unique.
After you create your project, select Add Firebase to your Android app.
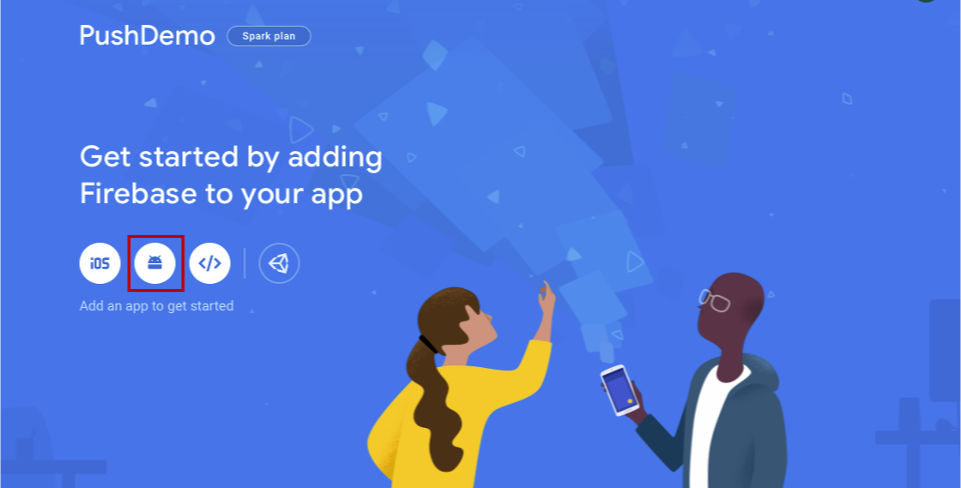
On the Add Firebase to your Android app page, take the following steps.
For the Android package name, enter a name for your package. For example:
com.<organization_identifier>.<package_name>.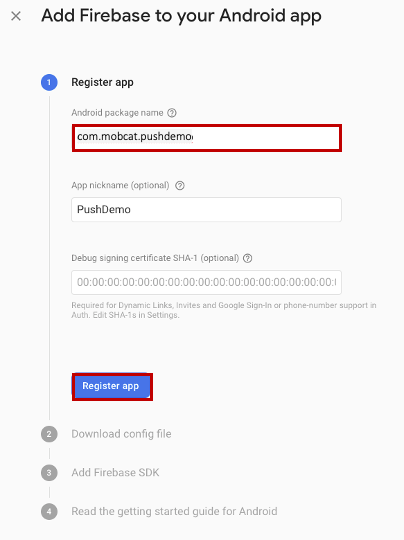
Select Register app.
Select Download google-services.json. Then save the file into a local folder for use later on and select Next.

Select Next.
Select Continue to console
Note
If the Continue to console button is not enabled, due to the verify installation check, then choose Skip this step.
In the Firebase console, select the cog for your project. Then select Project Settings.

Note
If you haven't downloaded the google-services.json file, you can do download it on this page.
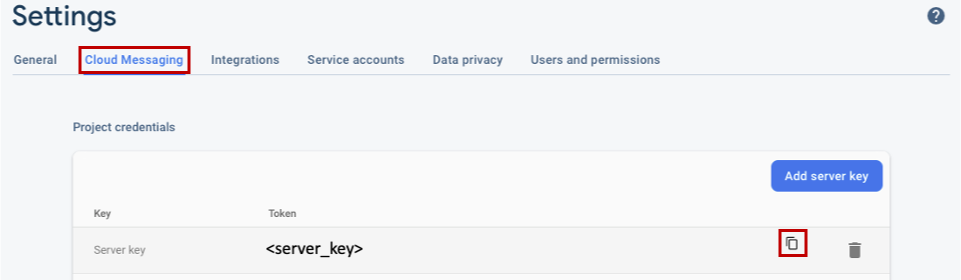
Switch to the Cloud Messaging tab at the top. Copy and save the Server key for later use. You use this value to configure your notification hub.
Register your iOS app for push notifications
To send push notifications to an iOS app, register your application with Apple, and also register for push notifications.
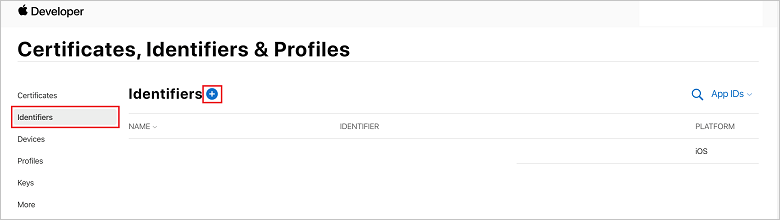
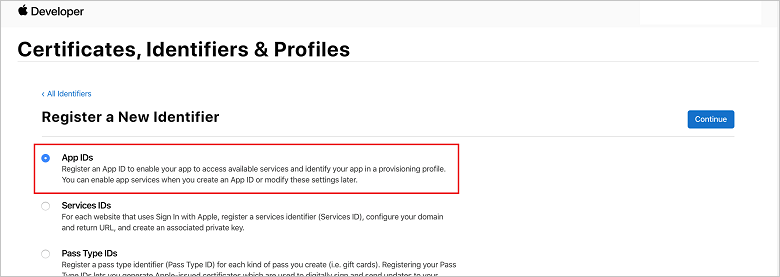
If you haven't already registered your app, browse to the iOS Provisioning Portal at the Apple Developer Center. Sign in to the portal with your Apple ID, navigate to Certificates, Identifiers & Profiles, then select Identifiers. Click + to register a new app.
On the Register a New Identifier screen, select the App IDs radio button. Then select Continue.
Update the following three values for your new app, and then select Continue:
Description: Type a descriptive name for your app.
Bundle ID: Enter a Bundle ID of the form com.<organization_identifier>.<product_name> as mentioned in the App Distribution Guide. In the following screenshot, the
mobcatvalue is used as an organization identifier and the PushDemo value is used as the product name.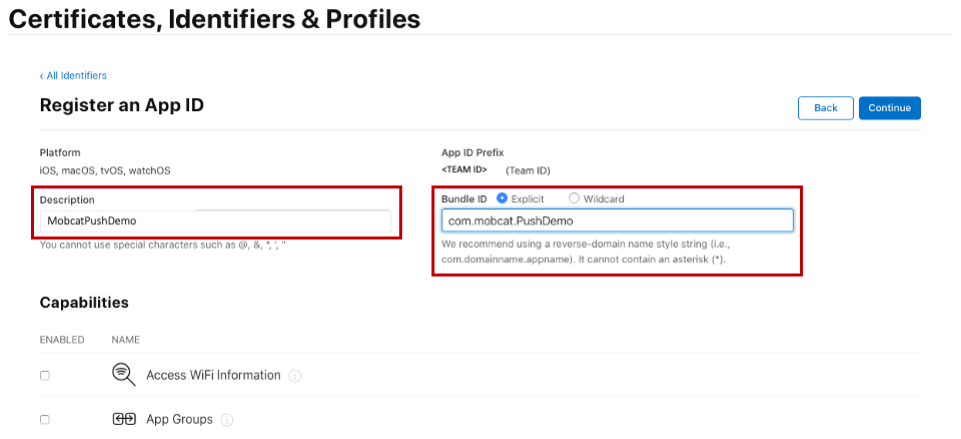
Push Notifications: Check the Push Notifications option in the Capabilities section.
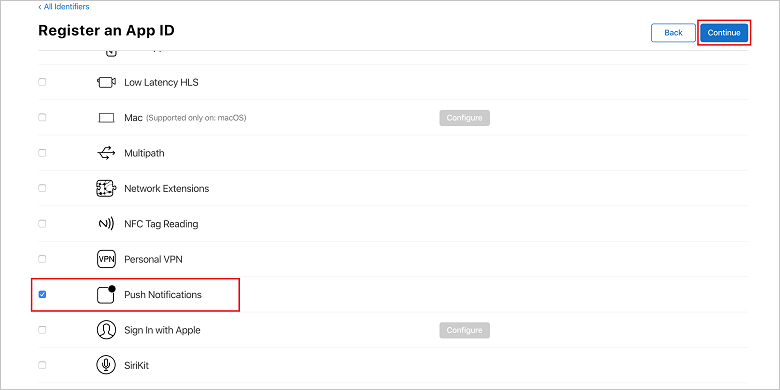
This action generates your App ID and requests that you confirm the information. Select Continue, then select Register to confirm the new App ID.
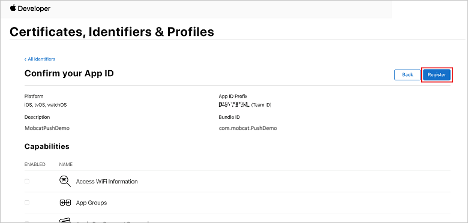
After you select Register, you see the new App ID as a line item in the Certificates, Identifiers & Profiles page.
In the Certificates, Identifiers & Profiles page, under Identifiers, locate the App ID line item that you created. Then, select its row to display the Edit your App ID Configuration screen.
Creating a certificate for Notification Hubs
A certificate is required to enable the notification hub to work with Apple Push Notification Services (APNS) and can be provided in one of two ways:
Creating a p12 push certificate that can be uploaded directly to Notification Hub (the original approach)
Creating a p8 certificate that can be used for token-based authentication (the newer and recommended approach)
The newer approach has a number of benefits as documented in Token-based (HTTP/2) authentication for APNS. Fewer steps are required but is also mandated for specific scenarios. However, steps have been provided for both approaches since either will work for the purposes of this tutorial.
OPTION 1: Creating a p12 push certificate that can be uploaded directly to Notification Hub
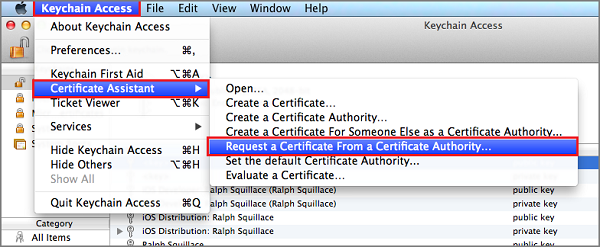
On your Mac, run the Keychain Access tool. It can be opened from the Utilities folder or the Other folder on the Launchpad.
Select Keychain Access, expand Certificate Assistant, and then select Request a Certificate from a Certificate Authority.
Note
By default, Keychain Access selects the first item in the list. This can be a problem if you're in the Certificates category and Apple Worldwide Developer Relations Certification Authority is not the first item in the list. Make sure you have a non-key item, or the Apple Worldwide Developer Relations Certification Authority key is selected, before generating the CSR (Certificate Signing Request).
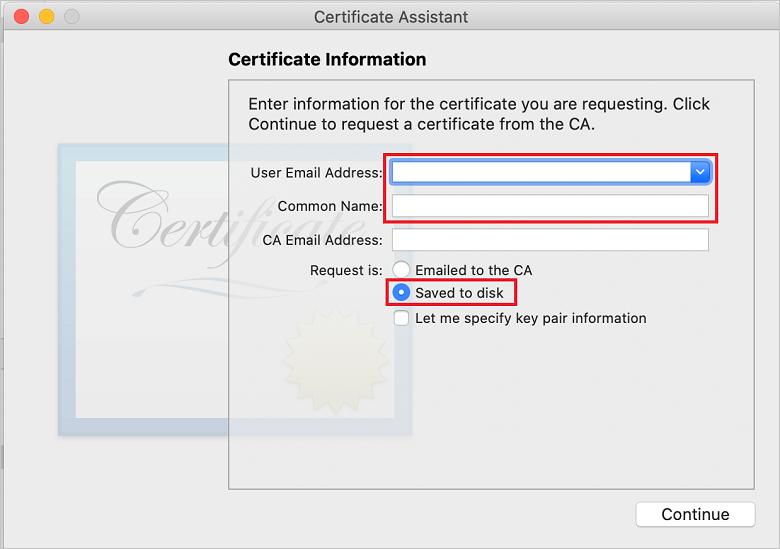
Select your User Email Address, enter your Common Name value, make sure that you specify Saved to disk, and then select Continue. Leave CA Email Address blank as it isn't required.
Enter a name for the Certificate Signing Request (CSR) file in Save As, select the location in Where, and then select Save.
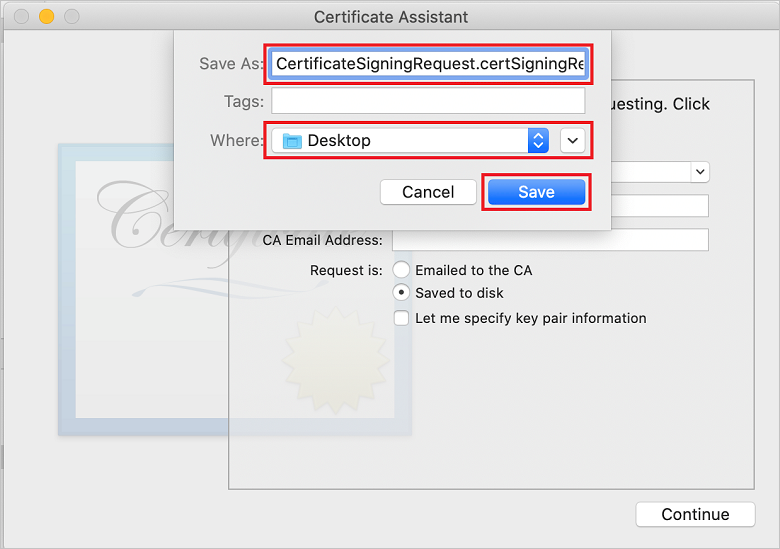
This action saves the CSR file in the selected location. The default location is Desktop. Remember the location chosen for the file.
Back on the Certificates, Identifiers & Profiles page in the iOS Provisioning Portal, scroll down to the checked Push Notifications option, and then select Configure to create the certificate.
The Apple Push Notification service TLS/SSL Certificates window appears. Select the Create Certificate button under the Development TLS/SSL Certificate section.

The Create a new Certificate screen is displayed.
Note
This tutorial uses a development certificate. The same process is used when registering a production certificate. Just make sure that you use the same certificate type when sending notifications.
Select Choose File, browse to the location where you saved the CSR file, and then double-click the certificate name to load it. Then select Continue.
After the portal creates the certificate, select the Download button. Save the certificate, and remember the location to which it's saved.
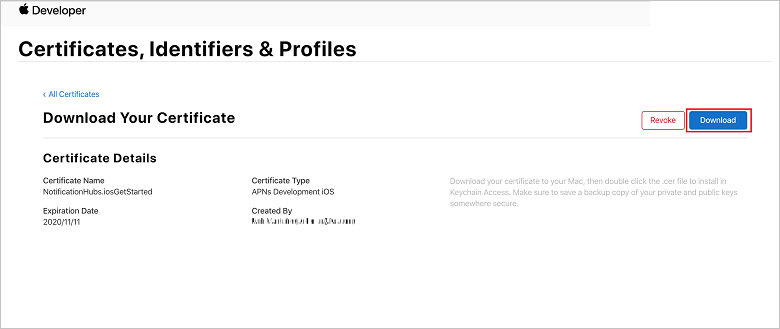
The certificate is downloaded and saved to your computer in your Downloads folder.
Note
By default, the downloaded development certificate is named aps_development.cer.
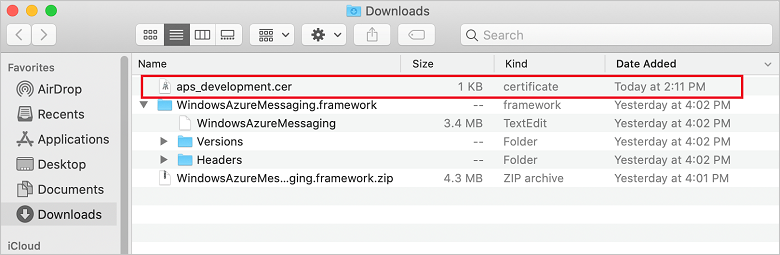
Double-click the downloaded push certificate aps_development.cer. This action installs the new certificate in the Keychain, as shown in the following image:
Note
Although the name in your certificate might be different, the name will be prefixed with Apple Development iOS Push Services and have the appropriate bundle identifier associated with it.
In Keychain Access, Control + Click on the new push certificate that you created in the Certificates category. Select Export, name the file, select the p12 format, and then select Save.
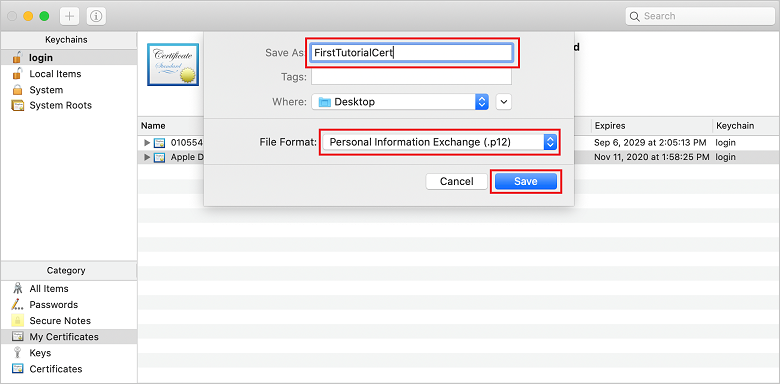
You can choose to protect the certificate with a password, but a password is optional. Click OK if you want to bypass password creation. Make a note of the file name and location of the exported p12 certificate. They're used to enable authentication with APNs.
Note
Your p12 file name and location might be different than what is pictured in this tutorial.
OPTION 2: Creating a p8 certificate that can be used for token-based authentication
Make note of the following details:
- App ID Prefix (Team ID)
- Bundle ID
Back in Certificates, Identifiers & Profiles, click Keys.
Note
If you already have a key configured for APNS, you can re-use the p8 certificate that you downloaded right after it was created. If so, you can ignore steps 3 through 5.
Click the + button (or the Create a key button) to create a new key.
Provide a suitable Key Name value, then check the Apple Push Notifications service (APNS) option, and then click Continue, followed by Register on the next screen.
Click Download and then move the p8 file (prefixed with AuthKey_) to a secure local directory, then click Done.
Note
Be sure to keep your p8 file in a secure place (and save a backup). After downloading your key, it cannot be re-downloaded as the server copy is removed.
On Keys, click on the key that you created (or an existing key if you have chosen to use that instead).
Make note of the Key ID value.
Open your p8 certificate in a suitable application of your choice such as Visual Studio Code. Make note of the key value (between -----BEGIN PRIVATE KEY----- and -----END PRIVATE KEY-----).
-----BEGIN PRIVATE KEY-----
<key_value>
-----END PRIVATE KEY-----Note
This is the token value that will be used later to configure Notification Hub.
At the end of these steps, you should have the following information for use later in Configure your notification hub with APNS information:
- Team ID (see step 1)
- Bundle ID (see step 1)
- Key ID (see step 7)
- Token value (p8 key value obtained in step 8)
Create a provisioning profile for the app
Return to the iOS Provisioning Portal, select Certificates, Identifiers & Profiles, select Profiles from the left menu, and then select + to create a new profile. The Register a New Provisioning Profile screen appears.
Select iOS App Development under Development as the provisioning profile type, and then select Continue.
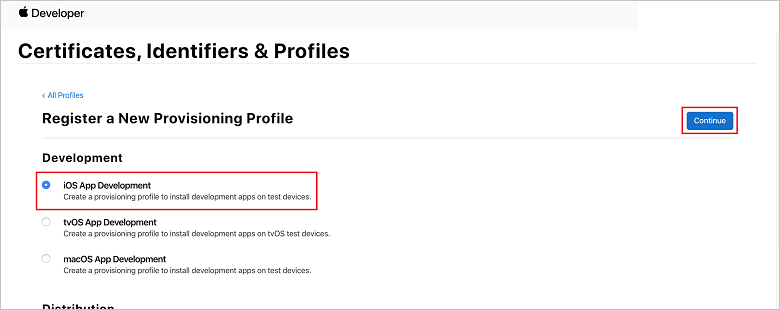
Next, select the app ID you created from the App ID drop-down list, and select Continue.
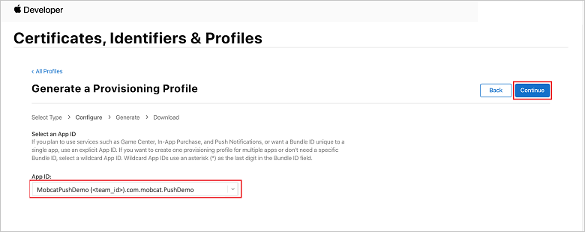
In the Select certificates window, select the development certificate that you use for code signing, and select Continue.
Note
This certificate is not the push certificate you created in the previous step. This is your development certificate. If one does not exist, you must create it since this is a prerequisite for this tutorial. Developer certificates can be created in the Apple Developer Portal, via Xcode or in Visual Studio.
Return to the Certificates, Identifiers & Profiles page, select Profiles from the left menu, and then select + to create a new profile. The Register a New Provisioning Profile screen appears.
In the Select certificates window, select the development certificate that you created. Then select Continue.
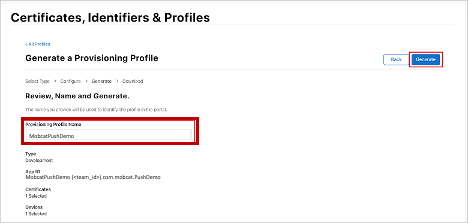
Next, select the devices to use for testing, and select Continue.
Finally, choose a name for the profile in Provisioning Profile Name, and select Generate.
When the new provisioning profile is created, select Download. Remember the location to which it's saved.
Browse to the location of the provisioning profile, and then double-click it to install it on your development machine.
Create a Notification Hub
In this section, you create a notification hub and configure authentication with APNS. You can use a p12 push certificate or token-based authentication. If you want to use a notification hub that you've already created, you can skip to step 5.
Sign in to Azure.
Click Create a resource, then search for and choose Notification Hub, then click Create.
Update the following fields, then click Create:
BASIC DETAILS
Subscription: Choose the target Subscription from the drop-down list
Resource Group: Create a new Resource Group (or pick an existing one)NAMESPACE DETAILS
Notification Hub Namespace: Enter a globally unique name for the Notification Hub namespace
Note
Ensure the Create new option is selected for this field.
NOTIFICATION HUB DETAILS
Notification Hub: Enter a name for the Notification Hub
Location: Choose a suitable location from the drop-down list
Pricing Tier: Keep the default Free optionNote
Unless you have reached the maximum number of hubs on the free tier.
Once the Notification Hub has been provisioned, navigate to that resource.
Navigate to your new Notification Hub.
Select Access Policies from the list (under MANAGE).
Make note of the Policy Name values along with their corresponding Connection String values.
Configure your Notification Hub with APNS information
Under Notification Services, select Apple then follow the appropriate steps based on the approach you chose previously in the Creating a Certificate for Notification Hubs section.
Note
Use the Production for Application Mode only if you want to send push notifications to users who purchased your app from the store.
OPTION 1: Using a .p12 push certificate
Select Certificate.
Select the file icon.
Select the .p12 file that you exported earlier, and then select Open.
If necessary, specify the correct password.
Select Sandbox mode.
Select Save.
OPTION 2: Using token-based authentication
Select Token.
Enter the following values that you acquired earlier:
- Key ID
- Bundle ID
- Team ID
- Token
Choose Sandbox.
Select Save.
Configure your notification hub with FCM information
- Select Google (GCM/FCM) in the Settings section on the left menu.
- Enter the server key you noted down from the Google Firebase Console.
- Select Save on the toolbar.
Create an ASP.NET Core Web API backend application
In this section, you create the ASP.NET Core Web API backend to handle device registration and the sending of notifications to the React Native mobile app.
Create a web project
In Visual Studio, select File > New Solution.
Select .NET Core > App > ASP.NET Core > API > Next.
In the Configure your new ASP.NET Core Web API dialog, select Target Framework of .NET Core 3.1.
Enter PushDemoApi for the Project Name and then select Create.
Start debugging (Command + Enter) to test the templated app.
Note
The templated app is configured to use the WeatherForecastController as the launchUrl. This is set in Properties > launchSettings.json.
If you are prompted with an Invalid development certificate found message:
Click Yes to agree to running the 'dotnet dev-certs https' tool to fix this. The 'dotnet dev-certs https' tool then prompt you to enter a password for the certificate and the password for your Keychain.
Click Yes when prompted to Install and trust the new certificate, then enter the password for your Keychain.
Expand the Controllers folder, then delete WeatherForecastController.cs.
Delete WeatherForecast.cs.
Set up local configuration values using the Secret Manager tool. Decoupling the secrets from the solution ensures that they don't end up in source control. Open Terminal then go to the directory of the project file and run the following commands:
dotnet user-secrets init
dotnet user-secrets set "NotificationHub:Name" <value>
dotnet user-secrets set "NotificationHub:ConnectionString" <value>
Replace the placeholder values with your own notification hub name and connection string values. You made a note of them in the create a notification hub section. Otherwise, you can look them up in Azure.
NotificationHub:Name:
See Name in the Essentials summary at the top of Overview.NotificationHub:ConnectionString:
See DefaultFullSharedAccessSignature in Access PoliciesNote
For production scenarios, you can look at options such as Azure KeyVault to securely store the connection string. For simplicity, the secrets will be added to the Azure App Service application settings.
Authenticate clients using an API Key (Optional)
API keys aren't as secure as tokens, but will suffice for the purposes of this tutorial. An API key can be configured easily via the ASP.NET Middleware.
Add the API key to the local configuration values.
dotnet user-secrets set "Authentication:ApiKey" <value>Note
You should replace the placeholder value with your own and make a note of it.
Control + Click on the PushDemoApi project, choose New Folder from the Add menu, then click Add using Authentication as the Folder Name.
Control + Click on the Authentication folder, then choose New File... from the Add menu.
Select General > Empty Class, enter ApiKeyAuthOptions.cs for the Name, then click New adding the following implementation.
using Microsoft.AspNetCore.Authentication;

namespace PushDemoApi.Authentication
{
    public class ApiKeyAuthOptions : AuthenticationSchemeOptions
    {
        public const string DefaultScheme = "ApiKey";
        public string Scheme => DefaultScheme;
        public string ApiKey { get; set; }
    }
}
Add another Empty Class to the Authentication folder called ApiKeyAuthHandler.cs, then add the following implementation.
using System;
using System.Collections.Generic;
using System.Linq;
using System.Security.Claims;
using System.Text.Encodings.Web;
using System.Threading.Tasks;
using Microsoft.AspNetCore.Authentication;
using Microsoft.Extensions.Logging;
using Microsoft.Extensions.Options;

namespace PushDemoApi.Authentication
{
    public class ApiKeyAuthHandler : AuthenticationHandler<ApiKeyAuthOptions>
    {
        const string ApiKeyIdentifier = "apikey";

        public ApiKeyAuthHandler(
            IOptionsMonitor<ApiKeyAuthOptions> options,
            ILoggerFactory logger,
            UrlEncoder encoder,
            ISystemClock clock)
            : base(options, logger, encoder, clock) {}

        protected override Task<AuthenticateResult> HandleAuthenticateAsync()
        {
            string key = string.Empty;

            if (Request.Headers[ApiKeyIdentifier].Any())
            {
                key = Request.Headers[ApiKeyIdentifier].FirstOrDefault();
            }
            else if (Request.Query.ContainsKey(ApiKeyIdentifier))
            {
                if (Request.Query.TryGetValue(ApiKeyIdentifier, out var queryKey))
                    key = queryKey;
            }

            if (string.IsNullOrWhiteSpace(key))
                return Task.FromResult(AuthenticateResult.Fail("No api key provided"));

            if (!string.Equals(key, Options.ApiKey, StringComparison.Ordinal))
                return Task.FromResult(AuthenticateResult.Fail("Invalid api key."));

            var identities = new List<ClaimsIdentity> {
                new ClaimsIdentity("ApiKeyIdentity")
            };

            var ticket = new AuthenticationTicket(
                new ClaimsPrincipal(identities), Options.Scheme);

            return Task.FromResult(AuthenticateResult.Success(ticket));
        }
    }
}
Note
An Authentication Handler is a type that implements the behavior of a scheme, in this case a custom API Key scheme.
Add another Empty Class to the Authentication folder called ApiKeyAuthenticationBuilderExtensions.cs, then add the following implementation.
using System;
using Microsoft.AspNetCore.Authentication;

namespace PushDemoApi.Authentication
{
    public static class AuthenticationBuilderExtensions
    {
        public static AuthenticationBuilder AddApiKeyAuth(
            this AuthenticationBuilder builder,
            Action<ApiKeyAuthOptions> configureOptions)
        {
            return builder
                .AddScheme<ApiKeyAuthOptions, ApiKeyAuthHandler>(
                    ApiKeyAuthOptions.DefaultScheme,
                    configureOptions);
        }
    }
}
Note
This extension method simplifies the middleware configuration code in Startup.cs making it more readable and generally easier to follow.
In Startup.cs, update the ConfigureServices method to configure the API Key authentication below the call to the services.AddControllers method.
using PushDemoApi.Authentication;
using PushDemoApi.Models;
using PushDemoApi.Services;

public void ConfigureServices(IServiceCollection services)
{
    services.AddControllers();

    services.AddAuthentication(options =>
    {
        options.DefaultAuthenticateScheme = ApiKeyAuthOptions.DefaultScheme;
        options.DefaultChallengeScheme = ApiKeyAuthOptions.DefaultScheme;
    }).AddApiKeyAuth(Configuration.GetSection("Authentication").Bind);
}
Still in Startup.cs, update the Configure method to call the UseAuthentication and UseAuthorization extension methods on the app's IApplicationBuilder. Ensure those methods are called after UseRouting and before app.UseEndpoints.
public void Configure(IApplicationBuilder app, IWebHostEnvironment env)
{
    if (env.IsDevelopment())
    {
        app.UseDeveloperExceptionPage();
    }

    app.UseHttpsRedirection();

    app.UseRouting();

    app.UseAuthentication();

    app.UseAuthorization();

    app.UseEndpoints(endpoints =>
    {
        endpoints.MapControllers();
    });
}
Note
Calling UseAuthentication registers the middleware which uses the previously registered authentication schemes (from ConfigureServices). This must be called before any middleware that depends on users being authenticated.
Add dependencies and configure services
ASP.NET Core supports the dependency injection (DI) software design pattern, which is a technique for achieving Inversion of Control (IoC) between classes and their dependencies.
Use of the notification hub and the Notification Hubs SDK for backend operations is encapsulated within a service. The service is registered and made available through a suitable abstraction.
Control + Click on the Dependencies folder, then choose Manage NuGet Packages....
Search for Microsoft.Azure.NotificationHubs and ensure it's checked.
Click Add Packages, then click Accept when prompted to accept the license terms.
Control + Click on the PushDemoApi project, choose New Folder from the Add menu, then click Add using Models as the Folder Name.
Control + Click on the Models folder, then choose New File... from the Add menu.
Select General > Empty Class, enter PushTemplates.cs for the Name, then click New adding the following implementation.
namespace PushDemoApi.Models
{
    public class PushTemplates
    {
        public class Generic
        {
            public const string Android = "{ \"notification\": { \"title\" : \"PushDemo\", \"body\" : \"$(alertMessage)\"}, \"data\" : { \"action\" : \"$(alertAction)\" } }";
            public const string iOS = "{ \"aps\" : {\"alert\" : \"$(alertMessage)\"}, \"action\" : \"$(alertAction)\" }";
        }

        public class Silent
        {
            public const string Android = "{ \"data\" : {\"message\" : \"$(alertMessage)\", \"action\" : \"$(alertAction)\"} }";
            public const string iOS = "{ \"aps\" : {\"content-available\" : 1, \"apns-priority\": 5, \"sound\" : \"\", \"badge\" : 0}, \"message\" : \"$(alertMessage)\", \"action\" : \"$(alertAction)\" }";
        }
    }
}
Note
This class contains the tokenized notification payloads for the generic and silent notifications required by this scenario. The payloads are defined outside of the Installation to allow experimentation without having to update existing installations via the service. Handling changes to installations in this way is out of scope for this tutorial. For production, consider custom templates.
Add another Empty Class to the Models folder called DeviceInstallation.cs, then add the following implementation.
using System.Collections.Generic;
using System.ComponentModel.DataAnnotations;

namespace PushDemoApi.Models
{
    public class DeviceInstallation
    {
        [Required]
        public string InstallationId { get; set; }

        [Required]
        public string Platform { get; set; }

        [Required]
        public string PushChannel { get; set; }

        public IList<string> Tags { get; set; } = Array.Empty<string>();
    }
}
Add another Empty Class to the Models folder called NotificationRequest.cs, then add the following implementation.
using System;

namespace PushDemoApi.Models
{
    public class NotificationRequest
    {
        public string Text { get; set; }
        public string Action { get; set; }
        public string[] Tags { get; set; } = Array.Empty<string>();
        public bool Silent { get; set; }
    }
}
Add another Empty Class to the Models folder called NotificationHubOptions.cs, then add the following implementation.
using System.ComponentModel.DataAnnotations;

namespace PushDemoApi.Models
{
    public class NotificationHubOptions
    {
        [Required]
        public string Name { get; set; }

        [Required]
        public string ConnectionString { get; set; }
    }
}
Add a new folder to the PushDemoApi project called Services.
Add an Empty Interface to the Services folder called INotificationService.cs, then add the following implementation.
using System.Threading;
using System.Threading.Tasks;
using PushDemoApi.Models;

namespace PushDemoApi.Services
{
    public interface INotificationService
    {
        Task<bool> CreateOrUpdateInstallationAsync(DeviceInstallation deviceInstallation, CancellationToken token);
        Task<bool> DeleteInstallationByIdAsync(string installationId, CancellationToken token);
        Task<bool> RequestNotificationAsync(NotificationRequest notificationRequest, CancellationToken token);
    }
}
Add an Empty Class to the Services folder called NotificationHubsService.cs, then add the following code to implement the INotificationService interface:
using System;
using System.Collections.Generic;
using System.Linq;
using System.Threading;
using System.Threading.Tasks;
using Microsoft.Azure.NotificationHubs;
using Microsoft.Extensions.Logging;
using Microsoft.Extensions.Options;
using PushDemoApi.Models;

namespace PushDemoApi.Services
{
    public class NotificationHubService : INotificationService
    {
        readonly NotificationHubClient _hub;
        readonly Dictionary<string, NotificationPlatform> _installationPlatform;
        readonly ILogger<NotificationHubService> _logger;

        public NotificationHubService(IOptions<NotificationHubOptions> options, ILogger<NotificationHubService> logger)
        {
            _logger = logger;
            _hub = NotificationHubClient.CreateClientFromConnectionString(
                options.Value.ConnectionString,
                options.Value.Name);

            _installationPlatform = new Dictionary<string, NotificationPlatform>
            {
                { nameof(NotificationPlatform.Apns).ToLower(), NotificationPlatform.Apns },
                { nameof(NotificationPlatform.Fcm).ToLower(), NotificationPlatform.Fcm }
            };
        }

        public async Task<bool> CreateOrUpdateInstallationAsync(DeviceInstallation deviceInstallation, CancellationToken token)
        {
            if (string.IsNullOrWhiteSpace(deviceInstallation?.InstallationId) ||
                string.IsNullOrWhiteSpace(deviceInstallation?.Platform) ||
                string.IsNullOrWhiteSpace(deviceInstallation?.PushChannel))
                return false;

            var installation = new Installation()
            {
                InstallationId = deviceInstallation.InstallationId,
                PushChannel = deviceInstallation.PushChannel,
                Tags = deviceInstallation.Tags
            };

            if (_installationPlatform.TryGetValue(deviceInstallation.Platform, out var platform))
                installation.Platform = platform;
            else
                return false;

            try
            {
                await _hub.CreateOrUpdateInstallationAsync(installation, token);
            }
            catch
            {
                return false;
            }

            return true;
        }

        public async Task<bool> DeleteInstallationByIdAsync(string installationId, CancellationToken token)
        {
            if (string.IsNullOrWhiteSpace(installationId))
                return false;

            try
            {
                await _hub.DeleteInstallationAsync(installationId, token);
            }
            catch
            {
                return false;
            }

            return true;
        }

        public async Task<bool> RequestNotificationAsync(NotificationRequest notificationRequest, CancellationToken token)
        {
            if ((notificationRequest.Silent &&
                string.IsNullOrWhiteSpace(notificationRequest?.Action)) ||
                (!notificationRequest.Silent &&
                (string.IsNullOrWhiteSpace(notificationRequest?.Text)) ||
                string.IsNullOrWhiteSpace(notificationRequest?.Action)))
                return false;

            var androidPushTemplate = notificationRequest.Silent ?
                PushTemplates.Silent.Android :
                PushTemplates.Generic.Android;

            var iOSPushTemplate = notificationRequest.Silent ?
                PushTemplates.Silent.iOS :
                PushTemplates.Generic.iOS;

            var androidPayload = PrepareNotificationPayload(
                androidPushTemplate,
                notificationRequest.Text,
                notificationRequest.Action);

            var iOSPayload = PrepareNotificationPayload(
                iOSPushTemplate,
                notificationRequest.Text,
                notificationRequest.Action);

            try
            {
                if (notificationRequest.Tags.Length == 0)
                {
                    // This will broadcast to all users registered in the notification hub
                    await SendPlatformNotificationsAsync(androidPayload, iOSPayload, token);
                }
                else if (notificationRequest.Tags.Length <= 20)
                {
                    await SendPlatformNotificationsAsync(androidPayload, iOSPayload, notificationRequest.Tags, token);
                }
                else
                {
                    var notificationTasks = notificationRequest.Tags
                        .Select((value, index) => (value, index))
                        .GroupBy(g => g.index / 20, i => i.value)
                        .Select(tags => SendPlatformNotificationsAsync(androidPayload, iOSPayload, tags, token));

                    await Task.WhenAll(notificationTasks);
                }

                return true;
            }
            catch (Exception e)
            {
                _logger.LogError(e, "Unexpected error sending notification");
                return false;
            }
        }

        string PrepareNotificationPayload(string template, string text, string action) => template
            .Replace("$(alertMessage)", text, StringComparison.InvariantCulture)
            .Replace("$(alertAction)", action, StringComparison.InvariantCulture);

        Task SendPlatformNotificationsAsync(string androidPayload, string iOSPayload, CancellationToken token)
        {
            var sendTasks = new Task[]
            {
                _hub.SendFcmNativeNotificationAsync(androidPayload, token),
                _hub.SendAppleNativeNotificationAsync(iOSPayload, token)
            };

            return Task.WhenAll(sendTasks);
        }

        Task SendPlatformNotificationsAsync(string androidPayload, string iOSPayload, IEnumerable<string> tags, CancellationToken token)
        {
            var sendTasks = new Task[]
            {
                _hub.SendFcmNativeNotificationAsync(androidPayload, tags, token),
                _hub.SendAppleNativeNotificationAsync(iOSPayload, tags, token)
            };

            return Task.WhenAll(sendTasks);
        }
    }
}
Note
The tag expression provided to SendTemplateNotificationAsync is limited to 20 tags. It is limited to 6 for most operators but the expression contains only ORs (||) in this case. If there are more than 20 tags in the request then they must be split into multiple requests. See the Routing and Tag Expressions documentation for more detail.
In Startup.cs, update the ConfigureServices method to add the NotificationHubsService as a singleton implementation of INotificationService.
using PushDemoApi.Models;
using PushDemoApi.Services;

public void ConfigureServices(IServiceCollection services)
{
    ...

    services.AddSingleton<INotificationService, NotificationHubService>();

    services.AddOptions<NotificationHubOptions>()
        .Configure(Configuration.GetSection("NotificationHub").Bind)
        .ValidateDataAnnotations();
}
Create the notifications API
Control + Click on the Controllers folder, then choose New File... from the Add menu.
Select ASP.NET Core > Web API Controller Class, enter NotificationsController for the Name, then click New.
Note
If you're following with Visual Studio 2019, choose the API Controller with read/write actions template.
Add the following namespaces to the top of the file.
using System.ComponentModel.DataAnnotations;
using System.Net;
using System.Threading;
using System.Threading.Tasks;
using Microsoft.AspNetCore.Authorization;
using Microsoft.AspNetCore.Mvc;
using PushDemoApi.Models;
using PushDemoApi.Services;
Update the templated controller so it derives from ControllerBase and is decorated with the ApiController attribute.
[ApiController]
[Route("api/[controller]")]
public class NotificationsController : ControllerBase
{
    // Templated methods here
}
Note
The Controller base class provides support for views but this is not needed in this case and so ControllerBase can be used instead. If you're following with Visual Studio 2019, you can skip this step.
If you chose to complete the Authenticate clients using an API Key section, you should decorate the NotificationsController with the Authorize attribute as well.
[Authorize]Update the constructor to accept the registered instance of INotificationService as an argument and assign it to a readonly member.
readonly INotificationService _notificationService;

public NotificationsController(INotificationService notificationService)
{
    _notificationService = notificationService;
}
In launchSettings.json (within the Properties folder), change the launchUrl from
weatherforecastto api/notifications to match the URL specified in the RegistrationsController Route attribute.Start debugging (Command + Enter) to validate the app is working with the new NotificationsController and returns a 401 Unauthorized status.
Note
Visual Studio may not automatically launch the app in the browser. You will use Postman to test the API from this point on.
On a new Postman tab, set the request to GET. Enter the address below replacing the placeholder <applicationUrl> with the https applicationUrl found in Properties > launchSettings.json.
<applicationUrl>/api/notificationsNote
The applicationUrl should be 'https://localhost:5001' for the default profile. If you're using IIS (default in Visual Studio 2019 on Windows), you should use the applicationUrl specified in the iisSettings item instead. You will receive a 404 response if the address is incorrect.
If you chose to complete the Authenticate clients using an API Key section, be sure to configure the request headers to include your apikey value.
Key Value apikey <your_api_key> Click the Send button.
Note
You should receive a 200 OK status with some JSON content.
If you receive an SSL certificate verification warning, you can switch the request SSL certificate verification Postman setting off in the Settings.
Replace the templated class methods in NotificationsController.cs with the following code.
[HttpPut]
[Route("installations")]
[ProducesResponseType((int)HttpStatusCode.OK)]
[ProducesResponseType((int)HttpStatusCode.BadRequest)]
[ProducesResponseType((int)HttpStatusCode.UnprocessableEntity)]
public async Task<IActionResult> UpdateInstallation(
    [Required]DeviceInstallation deviceInstallation)
{
    var success = await _notificationService
        .CreateOrUpdateInstallationAsync(deviceInstallation, HttpContext.RequestAborted);

    if (!success)
        return new UnprocessableEntityResult();

    return new OkResult();
}

[HttpDelete()]
[Route("installations/{installationId}")]
[ProducesResponseType((int)HttpStatusCode.OK)]
[ProducesResponseType((int)HttpStatusCode.BadRequest)]
[ProducesResponseType((int)HttpStatusCode.UnprocessableEntity)]
public async Task<ActionResult> DeleteInstallation(
    [Required][FromRoute]string installationId)
{
    var success = await _notificationService
        .DeleteInstallationByIdAsync(installationId, CancellationToken.None);

    if (!success)
        return new UnprocessableEntityResult();

    return new OkResult();
}

[HttpPost]
[Route("requests")]
[ProducesResponseType((int)HttpStatusCode.OK)]
[ProducesResponseType((int)HttpStatusCode.BadRequest)]
[ProducesResponseType((int)HttpStatusCode.UnprocessableEntity)]
public async Task<IActionResult> RequestPush(
    [Required]NotificationRequest notificationRequest)
{
    if ((notificationRequest.Silent &&
        string.IsNullOrWhiteSpace(notificationRequest?.Action)) ||
        (!notificationRequest.Silent &&
        string.IsNullOrWhiteSpace(notificationRequest?.Text)))
        return new BadRequestResult();

    var success = await _notificationService
        .RequestNotificationAsync(notificationRequest, HttpContext.RequestAborted);

    if (!success)
        return new UnprocessableEntityResult();

    return new OkResult();
}
Create the API app
You now create an API App in Azure App Service for hosting the backend service.
Sign in to the Azure portal.
Click Create a resource, then search for and choose API App, then click Create.
Update the following fields, then click Create.
App name:
Enter a globally unique name for the API AppSubscription:
Choose the same target Subscription you created the notification hub in.Resource Group:
Choose the same Resource Group you created the notification hub in.App Service Plan/Location:
Create a new App Service PlanNote
Change from the default option to a plan that includes SSL support. Otherwise, you will need to take the appropriate steps when working with the mobile app to prevent http requests from getting blocked.
Application Insights:
Keep the suggested option (a new resource will be created using that name) or pick an existing resource.Once the API App has been provisioned, navigate to that resource.
Make note of the URL property in the Essentials summary at the top of the Overview. This URL is your backend endpoint that will be used later in this tutorial.
Note
The URL uses the API app name that you specified earlier, with the format
https://<app_name>.azurewebsites.net.Select Configuration from the list (under Settings).
For each of the settings below, click New application setting to enter the Name and a Value, then click OK.
Name Value Authentication:ApiKey<api_key_value> NotificationHub:Name<hub_name_value> NotificationHub:ConnectionString<hub_connection_string_value> Note
These are the same settings you defined previously in the user settings. You should be able to copy these over. The Authentication:ApiKey setting is required only if you chose to to complete the Authenticate clients using an API Key section. For production scenarios, you can look at options such as Azure KeyVault. These have been added as application settings for simplicity in this case.
Once all application settings have been added click Save, then Continue.
Publish the backend service
Next, you deploy the app to the API App to make it accessible from all devices.
Note
The following steps are specific to Visual Studio for Mac. If you're following with Visual Studio 2019 on Windows, the publishing flow will be different. See Publish to Azure App Service on Windows.
Change your configuration from Debug to Release if you haven't already done so.
Control + Click the PushDemoApi project, and then choose Publish to Azure... from the Publish menu.
Follow the auth flow if prompted to do so. Use the account that you used in the previous create the API App section.
Select the Azure App Service API App you created previously from the list as your publish target, and then click Publish.
After you've completed the wizard, it publishes the app to Azure and then opens the app. Make a note of the URL if you haven't done so already. This URL is your backend endpoint that is used later in this tutorial.
Validating the published API
In Postman open a new tab, set the request to PUT and enter the address below. Replace the placeholder with the base address you made note of in the previous publish the backend service section.
https://<app_name>.azurewebsites.net/api/notifications/installationsNote
The base address should be in the format
https://<app_name>.azurewebsites.net/If you chose to complete the Authenticate clients using an API Key section, be sure to configure the request headers to include your apikey value.
Key Value apikey <your_api_key> Choose the raw option for the Body, then choose JSON from the list of format options, and then include some placeholder JSON content:
{}Click Send.
Note
You should receive a 422 UnprocessableEntity status from the service.
Do steps 1-4 again but this time specifying the requests endpoint to validate you receive a 400 Bad Request response.
https://<app_name>.azurewebsites.net/api/notifications/requests
Note
It is not yet possible to test the API using valid request data since this will require platform-specific information from the client mobile app.
Create a cross-platform React Native application
In this section, you build a React Native mobile application implementing push notifications in a cross-platform manner.
It enables you to register and deregister from a notification hub via the backend service that you created.
An alert is displayed when an action is specified and the app is in the foreground. Otherwise, notifications appear in notification center.
Note
You would typically perform the registration (and deregistration) actions during the appropriate point in the application lifecycle (or as part of your first-run experience perhaps) without explicit user register/deregister inputs. However, this example will require explicit user input to allow this functionality to be explored and tested more easily.
Create the React Native solution
In
Terminal, update your environment tools, required to work with React Native using the following commands:# install node brew install node # or update brew update node # install watchman brew install watchman # or update brew upgrade watchman # install cocoapods sudo gem install cocoapodsIn
Terminal, run the following command, if you haveReact NativeCLI installed to uninstall it. Usenpxto automatically access the latest React Native CLI version available:npm uninstall -g react-native-cliNote
React Native has a built-in command line interface. Rather than install and manage a specific version of the CLI globally, we recommend you access the current version at runtime using
npx, which ships with Node.js. Withnpx react-native <command>, the current stable version of the CLI will be downloaded and executed at the time the command is run.Navigate to your projects folder where you want to create the new application. Use the Typescript-based template by specifying the
--templateparameter:# init new project with npx npx react-native init PushDemo --template react-native-template-typescriptRun metro server, which builds JavaScript bundles and monitors any code updates to refresh the bundles in real time:
cd PushDemo
npx react-native start
Run the iOS app to verify the setup. Make sure you started an iOS simulator or connected an iOS device, before executing the following command:
npx react-native run-iosRun the Android app to verify the setup. It requires a few additional steps to configure an Android emulator or device to be able accessing the React Native metro server. The following commands generate initial JavaScript bundle for Android and put it into the assets folder.
# create assets folder for the bundle
mkdir android/app/scr/main/assets
# build the bundle
npx react-native bundle --platform android --dev true --entry-file index.js --bundle-output android/app/src/main/assets/index.android.bundle --assets-dest android/app/src/main/res
# enable ability for sim to access the localhost
adb reverse tcp:8081 tcp:8081
This script will be pre-deployed with the initial version of the app. Once deployed, configure your emulator or device to access the metro server by specifying the server ip address. Execute the following command to build and run the Android application:
npx react-native run-androidOnce in the app, hit
CMD+M(emulator) or shake the device to populate the developer settings, navigate toSettings>Change Bundle Location, and specify the metro server ip address with the default port:<metro-server-ip-address>:8081.In the
App.tsxfile, apply any change to the page layout, save it and make the change is automatically reflected in both iOS and Android apps.Note
Detailed development environment setup guide is available in the official documentation
Install required packages
You need the following three packages for this sample to work:
React Native Push Notifications iOS - Project GitHub
This package was created when the PushNotificationIOS was split out from the core of React Native. The package natively implements push notifications for iOS and provides React Native interface to access it. Run the following command to install the package:
yarn add @react-native-community/push-notification-iosReact Native Push Notifications Cross-platform
This package implements local and remote notifications on iOS and Android in a cross-platform way. Run the following command to install the package:
yarn add react-native-push-notificationDevice info package The package provides information about a device in runtime. Use it to define a device identifier, which is used to register for push notification. Run the following command to install the package:
yarn add react-native-device-info
Implement the cross-platform components
Create and implement
DemoNotificationHandler:import PushNotification from 'react-native-push-notification'; class DemoNotificationHandler { private _onRegister: any; private _onNotification: any; onNotification(notification: any) { console.log('NotificationHandler:', notification); if (typeof this._onNotification === 'function') { this._onNotification(notification); } } onRegister(token: any) { console.log('NotificationHandler:', token); if (typeof this._onRegister === 'function') { this._onRegister(token); } } attachTokenReceived(handler: any) { this._onRegister = handler; } attachNotificationReceived(handler: any) { this._onNotification = handler; } } const handler = new DemoNotificationHandler(); PushNotification.configure({ onRegister: handler.onRegister.bind(handler), onNotification: handler.onNotification.bind(handler), permissions: { alert: true, badge: true, sound: true, }, popInitialNotification: true, requestPermissions: true, }); export default handler;Create and implement
DemoNotificationService:import PushNotification from 'react-native-push-notification'; import DemoNotificationHandler from './DemoNotificationHandler'; export default class DemoNotificationService { constructor(onTokenReceived: any, onNotificationReceived: any) { DemoNotificationHandler.attachTokenReceived(onTokenReceived); DemoNotificationHandler.attachNotificationReceived(onNotificationReceived); PushNotification.getApplicationIconBadgeNumber(function(number: number) { if(number > 0) { PushNotification.setApplicationIconBadgeNumber(0); } }); } checkPermissions(cbk: any) { return PushNotification.checkPermissions(cbk); } requestPermissions() { return PushNotification.requestPermissions(); } cancelNotifications() { PushNotification.cancelLocalNotifications(); } cancelAll() { PushNotification.cancelAllLocalNotifications(); } abandonPermissions() { PushNotification.abandonPermissions(); } }Create and implement
DemoNotificationRegistrationService:export default class DemoNotificationService { constructor( readonly apiUrl: string, readonly apiKey: string) { } async registerAsync(request: any): Promise<Response> { const method = 'PUT'; const registerApiUrl = `${this.apiUrl}/notifications/installations`; const result = await fetch(registerApiUrl, { method: method, headers: { Accept: 'application/json', 'Content-Type': 'application/json', 'apiKey': this.apiKey }, body: JSON.stringify(request) }); this.validateResponse(registerApiUrl, method, request, result); return result; } async deregisterAsync(deviceId: string): Promise<Response> { const method = 'DELETE'; const deregisterApiUrl = `${this.apiUrl}/notifications/installations/${deviceId}`; const result = await fetch(deregisterApiUrl, { method: method, headers: { Accept: 'application/json', 'Content-Type': 'application/json', 'apiKey': this.apiKey } }); this.validateResponse(deregisterApiUrl, method, null, result); return result; } private validateResponse(requestUrl: string, method: string, requestPayload: any, response: Response) { console.log(`Request: ${method} ${requestUrl} => ${JSON.stringify(requestPayload)}\nResponse: ${response.status}`); if (!response || response.status != 200) { throw `HTTP error ${response.status}: ${response.statusText}`; } } }Configure the app. Open
package.jsonand add the following script definition:"configure": "cp .app.config.tsx src/config/AppConfig.tsx"Then execute this script, which will copy the default config to the
configfolder.yarn configureFinal step is to update the configuration file copied at the previous step with the API access information. Specify
apiKeyandapiUrlparameters:module.exports = { appName: "PushDemo", env: "production", apiUrl: "https://<azure-push-notifications-api-url>/api/", apiKey: "<api-auth-key>", };
Implement the cross-platform UI
Define page layout
<View style={styles.container}>
  {this.state.isBusy &&
    <ActivityIndicator></ActivityIndicator>
  }
  <View style={styles.button}>
    <Button title="Register" onPress={this.onRegisterButtonPress.bind(this)} disabled={this.state.isBusy} />
  </View>
  <View style={styles.button}>
    <Button title="Deregister" onPress={this.onDeregisterButtonPress.bind(this)} disabled={this.state.isBusy} />
  </View>
</View>
Apply styles
const styles = StyleSheet.create({
  container: {
    flex: 1,
    alignItems: "center",
    justifyContent: 'flex-end',
    margin: 50,
  },
  button: {
    margin: 5,
    width: "100%",
  }
});
Initialize the page component
  state: IState;
  notificationService: DemoNotificationService;
  notificationRegistrationService: DemoNotificationRegistrationService;
  deviceId: string;

  constructor(props: any) {
    super(props);
    this.deviceId = DeviceInfo.getUniqueId();
    this.state = {
      status: "Push notifications registration status is unknown",
      registeredOS: "",
      registeredToken: "",
      isRegistered: false,
      isBusy: false,
    };

    this.notificationService = new DemoNotificationService(
      this.onTokenReceived.bind(this),
      this.onNotificationReceived.bind(this),
    );

    this.notificationRegistrationService = new DemoNotificationRegistrationService(
      Config.apiUrl,
      Config.apiKey,
    );
  }
Define button click handlers
  async onRegisterButtonPress() {
    if (!this.state.registeredToken || !this.state.registeredOS) {
      Alert.alert("The push notifications token wasn't received.");
      return;
    }

    let status: string = "Registering...";
    let isRegistered = this.state.isRegistered;
    try {
      this.setState({ isBusy: true, status });
      const pnPlatform = this.state.registeredOS == "ios" ? "apns" : "fcm";
      const pnToken = this.state.registeredToken;
      const request = {
        installationId: this.deviceId,
        platform: pnPlatform,
        pushChannel: pnToken,
        tags: []
      };
      const response = await this.notificationRegistrationService.registerAsync(request);
      status = `Registered for ${this.state.registeredOS} push notifications`;
      isRegistered = true;
    } catch (e) {
      status = `Registration failed: ${e}`;
    }
    finally {
      this.setState({ isBusy: false, status, isRegistered });
    }
  }

  async onDeregisterButtonPress() {
    if (!this.notificationService)
      return;

    let status: string = "Deregistering...";
    let isRegistered = this.state.isRegistered;
    try {
      this.setState({ isBusy: true, status });
      await this.notificationRegistrationService.deregisterAsync(this.deviceId);
      status = "Deregistered from push notifications";
      isRegistered = false;
    } catch (e) {
      status = `Deregistration failed: ${e}`;
    }
    finally {
      this.setState({ isBusy: false, status, isRegistered });
    }
  }
Handle received token registrations and push notifications
  onTokenReceived(token: any) {
    console.log(`Received a notification token on ${token.os}`);
    this.setState({ registeredToken: token.token, registeredOS: token.os, status: `The push notifications token has been received.` });

    if (this.state.isRegistered && this.state.registeredToken && this.state.registeredOS) {
      this.onRegisterButtonPress();
    }
  }

  onNotificationReceived(notification: any) {
    console.log(`Received a push notification on ${this.state.registeredOS}`);
    this.setState({ status: `Received a push notification...` });

    if (notification.data.message) {
      Alert.alert(AppConfig.appName, `${notification.data.action} action received`);
    }
  }
};
Configure the native Android project for push notifications
Configure required Android packages
The package is automatically linked when building the app. You have a few additional steps below to complete the configuration process.
Configure Android manifest
In your "android/app/src/main/AndroidManifest.xml", verify the package name, permissions, and required services. Make sure that you registered RNPushNotificationPublisher and RNPushNotificationBootEventReceiver receivers, and registered the RNPushNotificationListenerService service. The notifications metadata can be used to customize your push notifications appearance.
<manifest xmlns:android="http://schemas.android.com/apk/res/android"
    package="YOUR_PACKAGE_NAME">

      <uses-permission android:name="android.permission.INTERNET" />
      <uses-permission android:name="android.permission.WAKE_LOCK" />
      <uses-permission android:name="android.permission.VIBRATE" />
      <uses-permission android:name="android.permission.RECEIVE_BOOT_COMPLETED"/>

      <application
        android:name=".MainApplication"
        android:label="@string/app_name"
        android:usesCleartextTraffic="true"
        android:icon="@mipmap/ic_launcher"
        android:roundIcon="@mipmap/ic_launcher_round"
        android:allowBackup="false"
        android:theme="@style/AppTheme">

        <meta-data  android:name="com.dieam.reactnativepushnotification.notification_channel_name"
                    android:value="PushDemo Channel"/>
        <meta-data  android:name="com.dieam.reactnativepushnotification.notification_channel_description"
                    android:value="PushDemo Channel Description"/>
        <meta-data  android:name="com.dieam.reactnativepushnotification.notification_foreground"
                    android:value="true"/>
        <meta-data  android:name="com.dieam.reactnativepushnotification.notification_color"
                    android:resource="@android:color/white"/>

        <receiver android:name="com.dieam.reactnativepushnotification.modules.RNPushNotificationPublisher" />
        <receiver android:name="com.dieam.reactnativepushnotification.modules.RNPushNotificationBootEventReceiver">
            <intent-filter>
                <action android:name="android.intent.action.BOOT_COMPLETED" />
            </intent-filter>
        </receiver>

        <service
            android:name="com.dieam.reactnativepushnotification.modules.RNPushNotificationListenerService"
            android:exported="false" >
            <intent-filter>
                <action android:name="com.google.firebase.MESSAGING_EVENT" />
            </intent-filter>
        </service>

        <activity
          android:name=".MainActivity"
          android:label="@string/app_name"
          android:configChanges="keyboard|keyboardHidden|orientation|screenSize|uiMode"
          android:launchMode="singleTask"
          android:windowSoftInputMode="adjustResize">
          <intent-filter>
              <action android:name="android.intent.action.MAIN" />
              <category android:name="android.intent.category.LAUNCHER" />
          </intent-filter>
        </activity>
        <activity android:name="com.facebook.react.devsupport.DevSettingsActivity" />
      </application>

</manifest>
Configure Google services
In "android/app/build.gradle" register Google Services:
dependencies {
  ...
  implementation 'com.google.firebase:firebase-analytics:17.3.0'
  ...
}

apply plugin: 'com.google.gms.google-services'
Copy the "google-services.json" file that you downloaded during FCM setup to the project folder "android/app/".
Handle push notifications for Android
You configured the existing RNPushNotificationListenerService service to handle incoming Android push notifications. This service was registered earlier in the application manifest. It processes incoming notifications and proxies them to the cross-platform React Native part. No additional steps are required.
Configure the native iOS project for push notifications
Configure required iOS packages
The package is automatically linked when building the app. All you need to do is to install the native pods:
npx pod-install
Configure Info.plist and Entitlements.plist
Go into your "PushDemo/ios" folder and open "PushDemo.xcworkspace" workspace, select the top project "PushDemo" and select the "Signing & Capabilities" tab.
Update Bundle Identifier to match the value used in the provisioning profile.
Add two new Capabilities using the - "+" button:
- Background Mode capability and tick Remote Notifications.
- Push Notifications capability
Handle push notifications for iOS
Open "AppDelegate.h" and add the following import:
#import <UserNotifications/UNUserNotificationCenter.h>Update list of protocols, supported by the "AppDelegate", by adding
UNUserNotificationCenterDelegate:@interface AppDelegate : UIResponder <UIApplicationDelegate, RCTBridgeDelegate, UNUserNotificationCenterDelegate>Open "AppDelegate.m" and configure all the required iOS callbacks:
#import <UserNotifications/UserNotifications.h>
#import <RNCPushNotificationIOS.h>

...

// Required to register for notifications
- (void)application:(UIApplication *)application didRegisterUserNotificationSettings:(UIUserNotificationSettings *)notificationSettings
{
 [RNCPushNotificationIOS didRegisterUserNotificationSettings:notificationSettings];
}

// Required for the register event.
- (void)application:(UIApplication *)application didRegisterForRemoteNotificationsWithDeviceToken:(NSData *)deviceToken
{
 [RNCPushNotificationIOS didRegisterForRemoteNotificationsWithDeviceToken:deviceToken];
}

// Required for the notification event. You must call the completion handler after handling the remote notification.
- (void)application:(UIApplication *)application didReceiveRemoteNotification:(NSDictionary *)userInfo
fetchCompletionHandler:(void (^)(UIBackgroundFetchResult))completionHandler
{
  [RNCPushNotificationIOS didReceiveRemoteNotification:userInfo fetchCompletionHandler:completionHandler];
}

// Required for the registrationError event.
- (void)application:(UIApplication *)application didFailToRegisterForRemoteNotificationsWithError:(NSError *)error
{
 [RNCPushNotificationIOS didFailToRegisterForRemoteNotificationsWithError:error];
}

// IOS 10+ Required for localNotification event
- (void)userNotificationCenter:(UNUserNotificationCenter *)center
didReceiveNotificationResponse:(UNNotificationResponse *)response
         withCompletionHandler:(void (^)(void))completionHandler
{
  [RNCPushNotificationIOS didReceiveNotificationResponse:response];
  completionHandler();
}

// IOS 4-10 Required for the localNotification event.
- (void)application:(UIApplication *)application didReceiveLocalNotification:(UILocalNotification *)notification
{
 [RNCPushNotificationIOS didReceiveLocalNotification:notification];
}

//Called when a notification is delivered to a foreground app.
-(void)userNotificationCenter:(UNUserNotificationCenter *)center willPresentNotification:(UNNotification *)notification withCompletionHandler:(void (^)(UNNotificationPresentationOptions options))completionHandler
{
  completionHandler(UNAuthorizationOptionSound | UNAuthorizationOptionAlert | UNAuthorizationOptionBadge);
}
Test the solution
You can now test sending notifications via the backend service.
Send a test notification
Open a new tab in Postman.
Set the request to POST, and enter the following address:
https://<app_name>.azurewebsites.net/api/notifications/requestsIf you chose to complete the Authenticate clients using an API Key section, be sure to configure the request headers to include your apikey value.
Key Value apikey <your_api_key> Choose the raw option for the Body, then choose JSON from the list of format options, and then include some placeholder JSON content:
{
    "text": "Message from Postman!",
    "action": "action_a"
}
Select the Code button, which is under the Save button on the upper right of the window. The request should look similar to the following example when displayed for HTML (depending on whether you included an apikey header):
POST /api/notifications/requests HTTP/1.1
Host: https://<app_name>.azurewebsites.net
apikey: <your_api_key>
Content-Type: application/json

{
    "text": "Message from backend service",
    "action": "action_a"
}
Run the PushDemo application on one or both of the target platforms (Android and iOS).
Note
If you are testing on Android ensure that you are not running in Debug, or if the app has been deployed by running the application then force close the app and start it again from the launcher.
In the PushDemo app, tap on the Register button.
Back in Postman, close the Generate Code Snippets window (if you haven't done so already) then click the Send button.
Validate that you get a 200 OK response in Postman and the alert appears in the app showing ActionA action received.
Close the PushDemo app, then click the Send button again in Postman.
Validate that you get a 200 OK response in Postman again. Validate that a notification appears in the notification area for the PushDemo app with the correct message.
Tap on the notification to confirm that it opens the app and displayed the ActionA action received alert.
Back in Postman, modify the previous request body to send a silent notification specifying action_b instead of action_a for the action value.
{
    "action": "action_b",
    "silent": true
}
With the app still open, click the Send button in Postman.
Validate that you get a 200 OK response in Postman and that the alert appears in the app showing ActionB action received instead of ActionA action received.
Close the PushDemo app, then click the Send button again in Postman.
Validate that you get a 200 OK response in Postman and that the silent notification doesn't appear in the notification area.
Troubleshooting
No response from the backend service
When testing locally, ensure that the backend service is running and is using the correct port.
If testing against the Azure API App, check the service is running and has been deployed and has started without error.
Be sure to check you've specified the base address correctly in Postman or in the mobile app configuration when testing via the client. The base address should indicatively be https://<api_name>.azurewebsites.net/ or https://localhost:5001/ when testing locally.
Not receiving notifications on Android after starting or stopping a debug session
Ensure you register again after starting or stopping a debug session. The debugger will cause a new Firebase token to be generated. The notification hub installation must be updated as well.
Receiving a 401 status code from the backend service
Validate that you're setting the apikey request header and this value matches the one you had configured for the backend service.
If you receive this error when testing locally, ensure the key value you defined in the client config, matches the Authentication:ApiKey user-setting value used by the API.
If you're testing with an API App, ensure the key value in the client config file matches the Authentication:ApiKey application setting you're using in the API App.
Note
If you had created or changed this setting after you had deployed the backend service then you must restart the service in order for it take effect.
If you chose not to complete the Authenticate clients using an API Key section, ensure that you didn't apply the Authorize attribute to the NotificationsController class.
Receiving a 404 status code from the backend service
Validate that the endpoint and HTTP request method is correct. For example, the endpoints should indicatively be:
- [PUT]
https://<api_name>.azurewebsites.net/api/notifications/installations - [DELETE]
https://<api_name>.azurewebsites.net/api/notifications/installations/<installation_id> - [POST]
https://<api_name>.azurewebsites.net/api/notifications/requests
Or when testing locally:
- [PUT]
https://localhost:5001/api/notifications/installations - [DELETE]
https://localhost:5001/api/notifications/installations/<installation_id> - [POST]
https://localhost:5001/api/notifications/requests
When specifying the base address in the client app, ensure it ends with a /. The base address should indicatively be https://<api_name>.azurewebsites.net/ or https://localhost:5001/ when testing locally.
Unable to register and a notification hub error message is displayed
Verify that the test device has network connectivity. Then, determine the Http response status code by setting a breakpoint to inspect the StatusCode property value in the HttpResponse.
Review the previous troubleshooting suggestions where applicable based on the status code.
Set a breakpoint on the lines that return these specific status codes for the respective API. Then try calling the backend service when debugging locally.
Validate the backend service is working as expected via Postman using the appropriate payload. Use the actual payload created by the client code for the platform in question.
Review the platform-specific configuration sections to ensure that no steps have been missed. Check that suitable values are being resolved for installation id and token variables for the appropriate platform.
Unable to resolve an ID for the device error message is displayed
Review the platform-specific configuration sections to ensure that no steps have been missed.
Related links
- Azure Notification Hubs overview
- Installing Visual Studio for Mac
- Installing Visual Studio Code
- Setting up the React Native development environment
- Notification Hubs SDK for back-end operations
- Notification Hubs SDK on GitHub
- Register with application backend
- Registration management
- Working with tags
- Working with custom templates
Next steps
You should now have a basic React Native app connected to a notification hub via a backend service and can send and receive notifications.
You'll likely need to adapt the example used in this tutorial to fit your own scenario. Implementing more robust error handling, retry logic, and logging is also recommended.
Visual Studio App Center can be quickly incorporated into mobile apps providing analytics and diagnostics to aid in troubleshooting.