Note
Access to this page requires authorization. You can try signing in or changing directories.
Access to this page requires authorization. You can try changing directories.
When you build a chat application by using the Retrieval Augmented Generation (RAG) pattern with your own data, make sure that each user receives an answer based on their permissions. Follow the process in this article to add document access control to your chat app.
Authorized user: This person should have access to answers contained within the documents of the chat app.
Unauthorized user: This person shouldn't have access to answers from secured documents they don't have authorization to see.
Note
This article uses one or more AI app templates as the basis for the examples and guidance in the article. AI app templates provide you with well-maintained reference implementations that are easy to deploy. They help to ensure a high-quality starting point for your AI apps.
Architectural overview
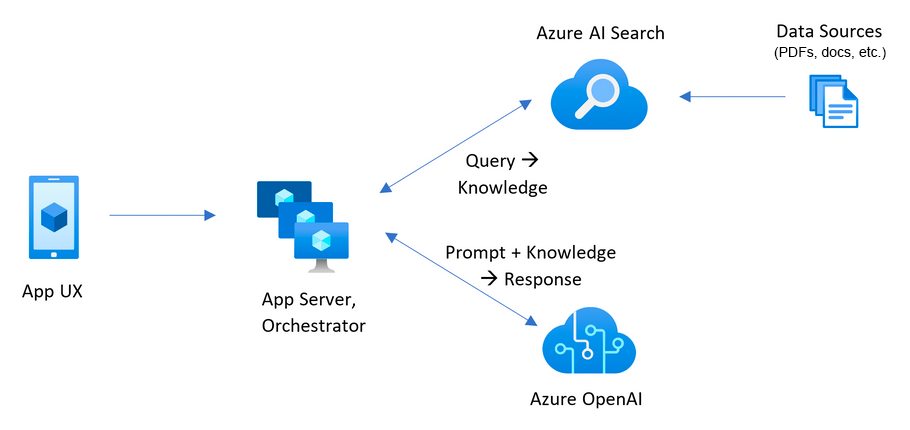
Without a document security feature, the enterprise chat app has a simple architecture by using Azure AI Search and Azure OpenAI Models in Microsoft Foundry. An answer is determined from queries to Azure AI Search where the documents are stored, in combination with a response from an Azure OpenAI GPT model. No user authentication is used in this simple flow.
To add security for the documents, you need to update the enterprise chat app:
- Add client authentication to the chat app with Microsoft Entra.
- Add server-side logic to populate a search index with user and group access.
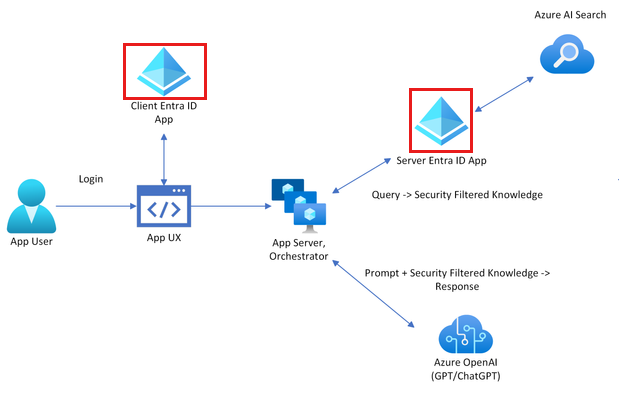
Azure AI Search doesn't provide native document-level permissions and can't vary search results from within an index by user permissions. Instead, your application can use search filters to ensure that a document is accessible to a specific user or by a specific group. Within your search index, each document should have a filterable field that stores user or group identity information.
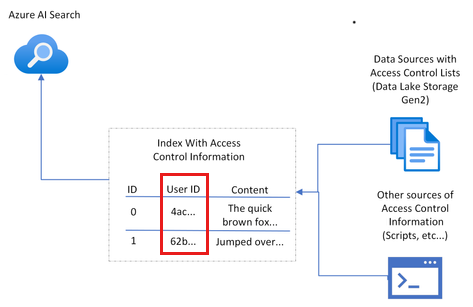
Because the authorization isn't natively contained in Azure AI Search, you need to add a field to hold user or group information, and then filter any documents that don't match. To implement this technique, you need to:
- Create a document access control field in your index dedicated to storing the details of users or groups with document access.
- Populate the document's access control field with the relevant user or group details.
- Update this access control field whenever there are changes in user or group access permissions.
If your index updates are scheduled with an indexer, changes are picked up on the next indexer run. If you don't use an indexer, you need to manually reindex.
In this article, the process of securing documents in Azure AI Search is made possible with example scripts, which you as the search administrator would run. The scripts associate a single document with a single user identity. You can take these scripts and apply your own security and production requirements to scale to your needs.
Determine security configuration
The solution provides Boolean environment variables to turn on features that are necessary for document security in this sample.
| Parameter | Purpose |
|---|---|
AZURE_USE_AUTHENTICATION |
When set to true, enables user sign-in to the chat app and Azure App Service authentication. Enables Use oid security filter in the chat app Developer settings. |
AZURE_ENFORCE_ACCESS_CONTROL |
When set to true, requires authentication for any document access. The Developer settings for object ID (OID) and group security are turned on and disabled so that they can't be disabled from the UI. |
AZURE_ENABLE_GLOBAL_DOCUMENTS_ACCESS |
When set to true, this setting allows authenticated users to search on documents that have no access controls assigned, even when access control is required. This parameter should be used only when AZURE_ENFORCE_ACCESS_CONTROL is enabled. |
AZURE_ENABLE_UNAUTHENTICATED_ACCESS |
When set to true, this setting allows unauthenticated users to use the app, even when access control is enforced. This parameter should be used only when AZURE_ENFORCE_ACCESS_CONTROL is enabled. |
Use the following sections to understand the security profiles supported in this sample. This article configures the Enterprise profile.
Enterprise: Required account + document filter
Each user of the site must sign in. The site contains content that's public to all users. The document-level security filter is applied to all requests.
Environment variables:
AZURE_USE_AUTHENTICATION=trueAZURE_ENABLE_GLOBAL_DOCUMENTS_ACCESS=trueAZURE_ENFORCE_ACCESS_CONTROL=true
Mixed use: Optional account + document filter
Each user of the site might sign in. The site contains content that's public to all users. The document-level security filter is applied to all requests.
Environment variables:
AZURE_USE_AUTHENTICATION=trueAZURE_ENABLE_GLOBAL_DOCUMENTS_ACCESS=trueAZURE_ENFORCE_ACCESS_CONTROL=trueAZURE_ENABLE_UNAUTHENTICATED_ACCESS=true
Prerequisites
A development container environment is available with all the dependencies that are required to complete this article. You can run the development container in GitHub Codespaces (in a browser) or locally by using Visual Studio Code.
To use this article, you need the following prerequisites:
- An Azure subscription. Create one for free.
- Azure account permissions: Your Azure account must have:
- Permission to manage applications in Microsoft Entra ID.
Microsoft.Authorization/roleAssignments/writepermissions, such as User Access Administrator or Owner.
You need more prerequisites depending on your preferred development environment.
Open a development environment
Use the following instructions to deploy a preconfigured development environment containing all required dependencies to complete this article.
GitHub Codespaces runs a development container managed by GitHub with Visual Studio Code for the Web as the user interface. For the most straightforward development environment, use GitHub Codespaces so that you have the correct developer tools and dependencies preinstalled to complete this article.
Important
All GitHub accounts can use GitHub Codespaces for up to 60 hours free each month with two core instances. For more information, see GitHub Codespaces monthly included storage and core hours.
Start the process to create a new GitHub codespace on the
mainbranch of the Azure-Samples/azure-search-openai-demo GitHub repository.Right-click the following button, and select Open link in new windows to have the development environment and the documentation available at the same time.

On the Create codespace page, review the codespace configuration settings, then select Create new codespace.
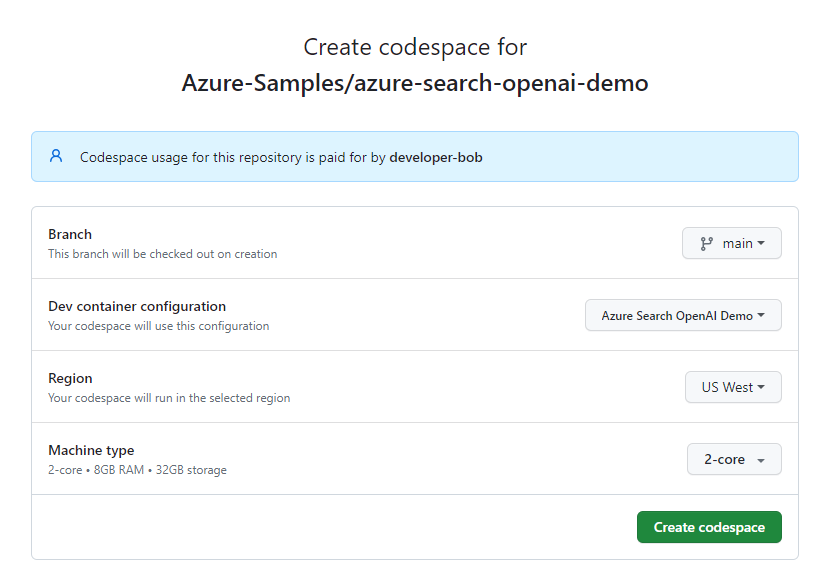
Wait for the codespace to start. This startup process can take a few minutes.
In the terminal at the bottom of the screen, sign in to Azure with the Azure Developer CLI.
azd auth loginComplete the authentication process.
The remaining tasks in this article take place in the context of this development container.
Get required information with the Azure CLI
Get your subscription ID and tenant ID with the following Azure CLI command. Copy the value to use as your AZURE_TENANT_ID value.
az account list --query "[].{subscription_id:id, name:name, tenantId:tenantId}" -o table
If you get an error about your tenant's conditional access policy, you need a second tenant without a conditional access policy.
- Your first tenant, associated with your user account, is used for the
AZURE_TENANT_IDenvironment variable. - Your second tenant, without conditional access, is used for the
AZURE_AUTH_TENANT_IDenvironment variable to access Microsoft Graph. For tenants with a conditional access policy, find the ID of a second tenant without a conditional access policy or create a new tenant.
Set environment variables
Run the following commands to configure the application for the Enterprise profile.
azd env set AZURE_USE_AUTHENTICATION true
azd env set AZURE_ENABLE_GLOBAL_DOCUMENTS_ACCESS true
azd env set AZURE_ENFORCE_ACCESS_CONTROL true
Run the following command to set the tenant, which authorizes the user sign-in to the hosted application environment. Replace
<YOUR_TENANT_ID>with the tenant ID.azd env set AZURE_TENANT_ID <YOUR_TENANT_ID>
Note
If you have a conditional access policy on your user tenant, you need to specify an authentication tenant.
Deploy the chat app to Azure
Deployment consists of the following steps:
- Create the Azure resources.
- Upload the documents.
- Create the Microsoft Entra identity apps (client and server).
- Turn on identity for the hosting resource.
Provision the Azure resources and deploy the source code.
azd upUse the following table to answer the
AZDdeployment prompts.Prompt Answer Environment name Use a short name with identifying information such as your alias and app. And example is tjones-secure-chat.Subscription Select a subscription in which to create the resources. Location for Azure resources Select a location near you. Location for documentIntelligentResourceGroupLocationSelect a location near you. Location for openAIResourceGroupLocationSelect a location near you. Wait 5 or 10 minutes after the app deploys to allow the app to start up.
After the application successfully deploys, a URL appears in the terminal.
Select the URL labeled
(✓) Done: Deploying service webappto open the chat application in a browser.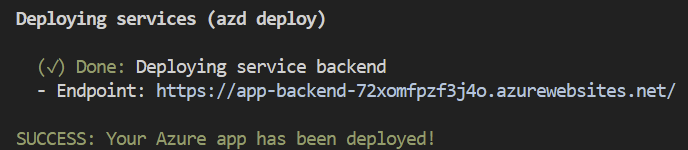
Agree to the app authentication pop-up.
When the chat app appears, notice in the upper-right corner that your user is signed in.
Open Developer settings and notice that both of the following options are selected and disabled for change:
- Use oid security filter
- Use groups security filter
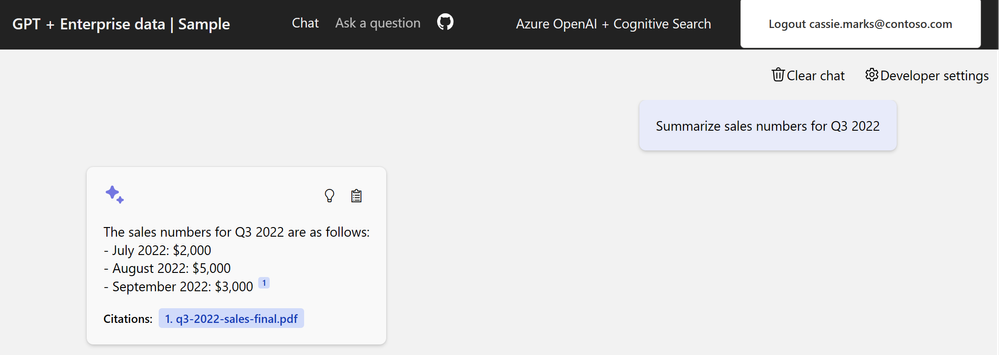
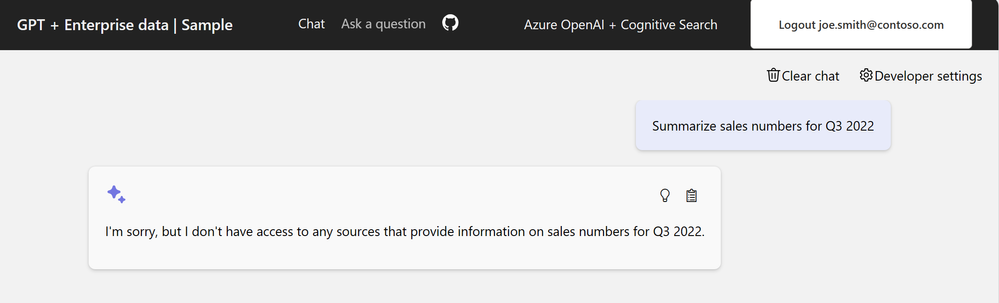
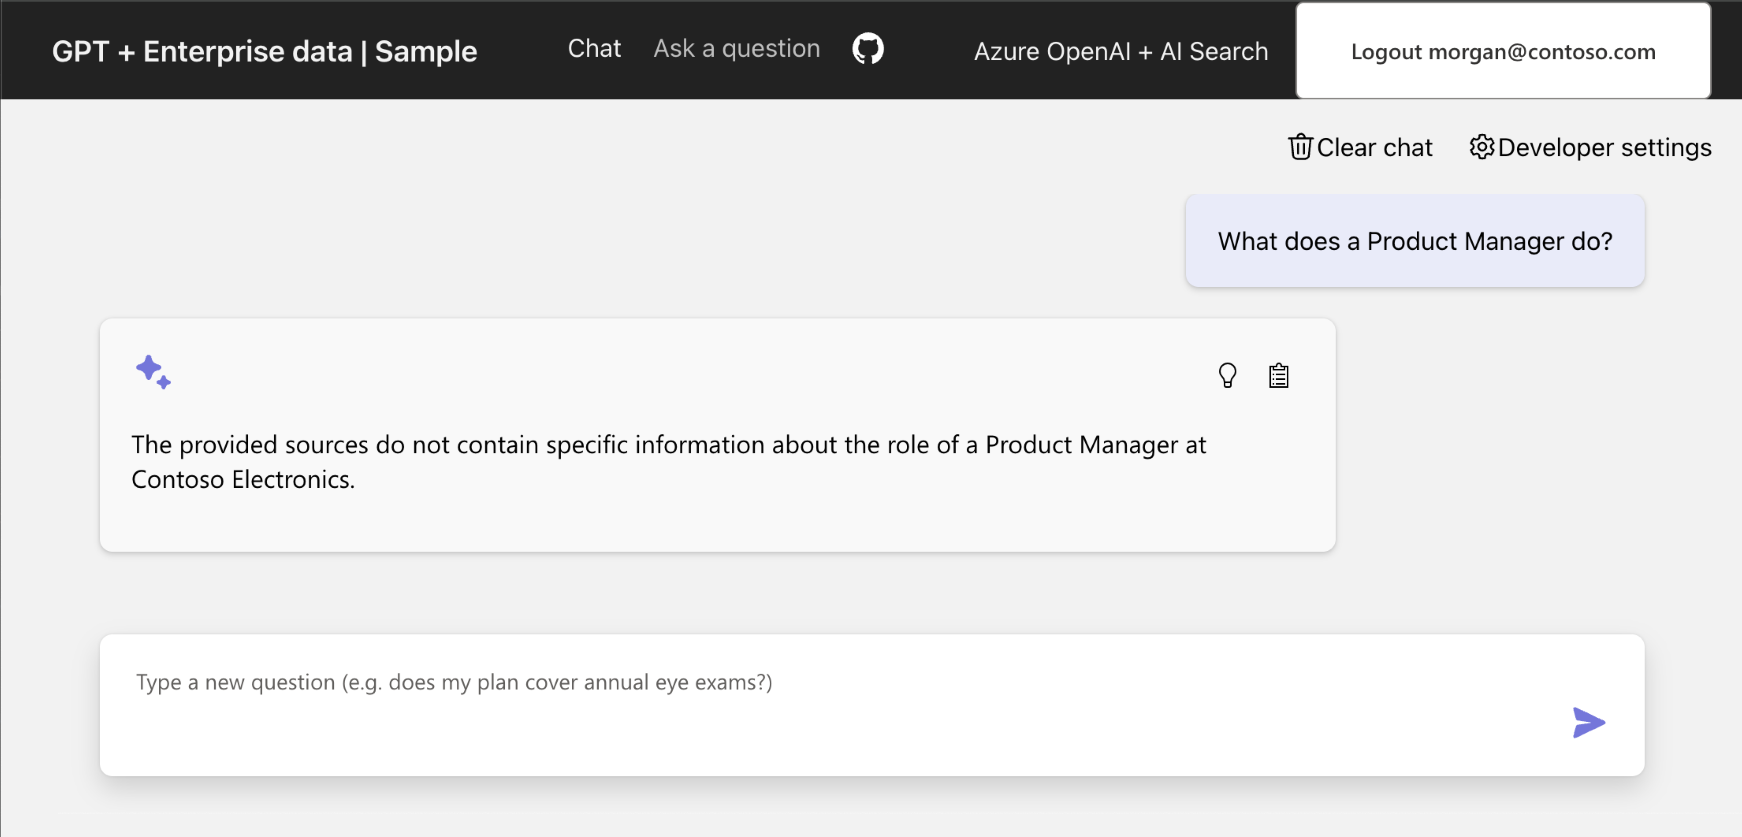
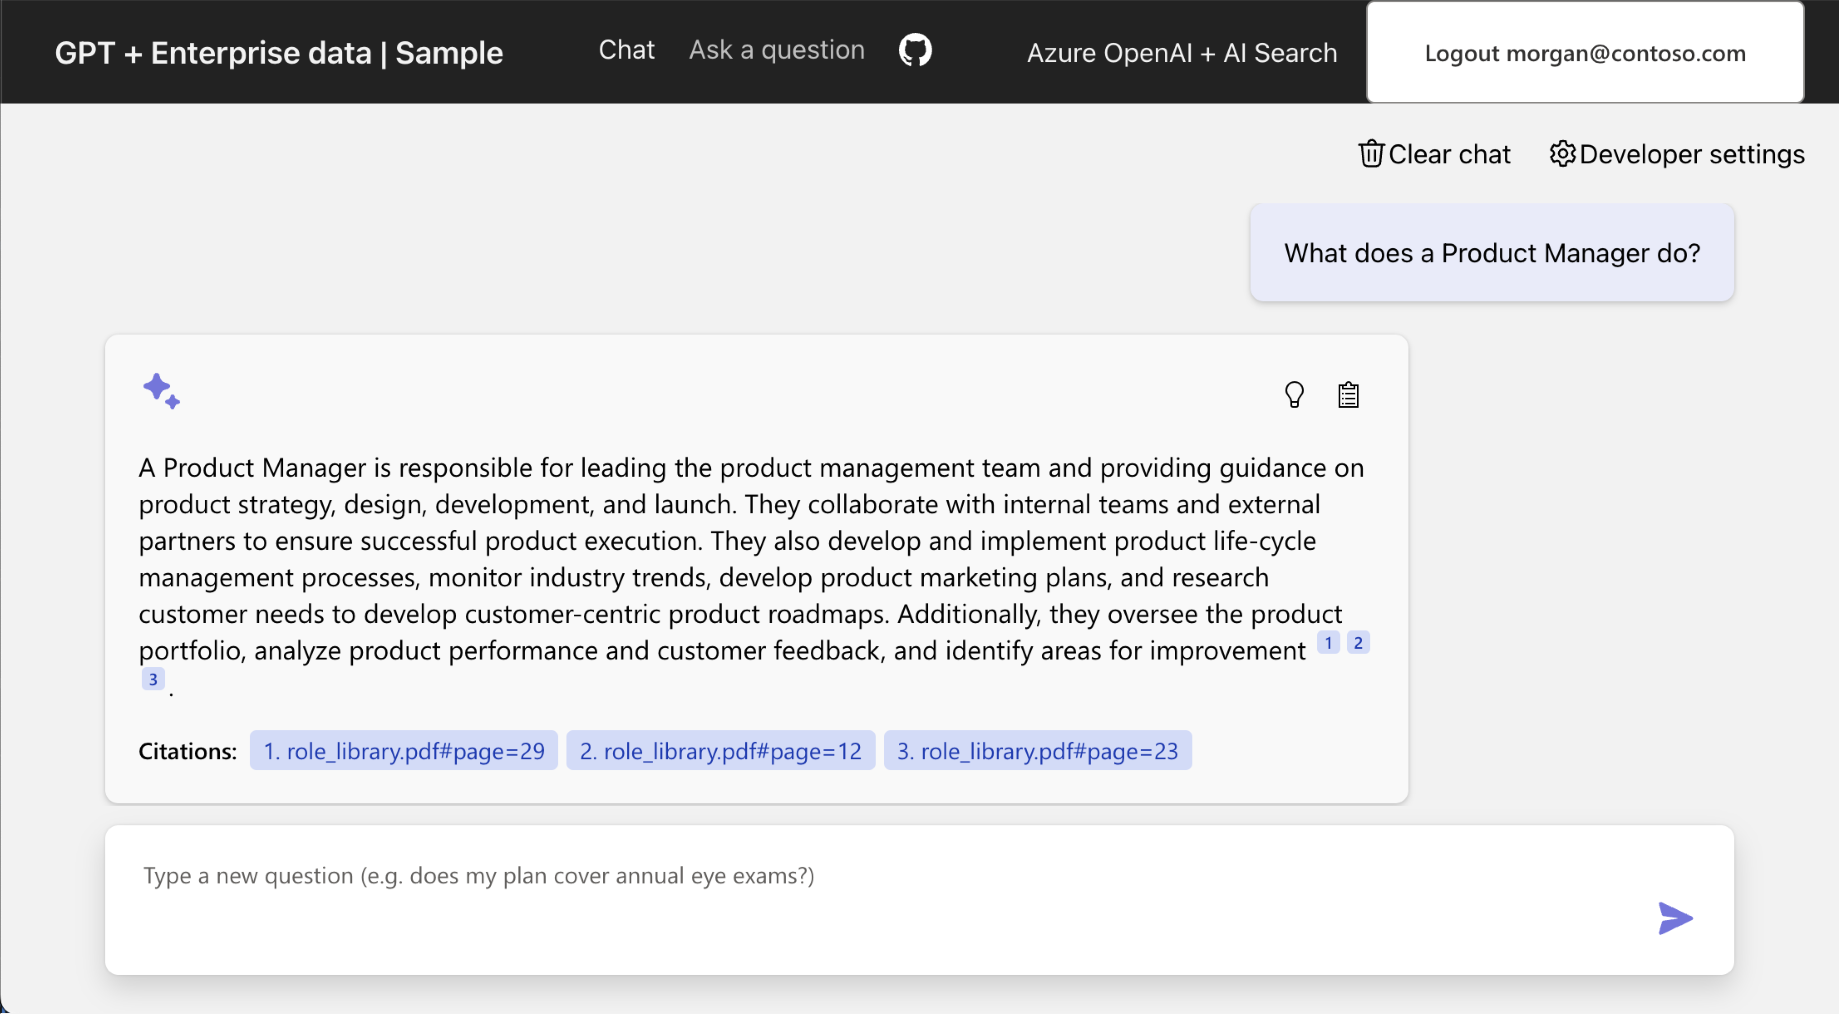
Select the card with What does a product manager do?.
You get an answer like: The provided sources do not contain specific information about the role of a Product Manager at Contoso Electronics.
Open access to a document for a user
Turn on your permissions for the exact document so that you can get the answer. You need several pieces of information:
- Azure Storage
- Account name
- Container name
- Blob/document URL for
role_library.pdf
- User's ID in Microsoft Entra ID
When this information is known, update the Azure AI Search index oids field for the role_library.pdf document.
Get the URL for a document in storage
In the
.azurefolder at the root of the project, find the environment directory, and open the.envfile with that directory.Search for the
AZURE_STORAGE_ACCOUNTentry and copy its value.Use the following Azure CLI commands to get the URL of the
role_library.pdfblob in thecontentcontainer.az storage blob url \ --account-name <REPLACE_WITH_AZURE_STORAGE_ACCOUNT \ --container-name 'content' \ --name 'role_library.pdf'Parameter Purpose --account-name Azure Storage account name. --container-name The container name in this sample is content.--name The blob name in this step is role_library.pdf.Copy the blob URL to use later.
Get your user ID
- In the chat app, select Developer settings.
- In the ID Token claims section, copy your
objectidentifierparameter. This parameter is known in the next section asUSER_OBJECT_ID.
Provide user access to a document in Azure Search
Use the following script to change the
oidsfield in Azure AI Search forrole_library.pdfso that you have access to it.python ./scripts/manageacl.py --acl-type oids --acl-action add --acl <REPLACE_WITH_YOUR_USER_OBJECT_ID> --url <REPLACE_WITH_YOUR_DOCUMENT_URL>Parameter Purpose -v Verbose output. --acl-type Group or user OIDs: oids.--acl-action Add to a Search index field. Other options include enable_acls,remove,remove_all, andview.--acl Group or user USER_OBJECT_ID.--url The file's location in Azure Storage, such as https://MYSTORAGENAME.blob.core.windows.net/content/role_library.pdf. Don't surround the URL with quotation marks in the CLI command.The console output for this command looks like:
Loading azd .env file from current environment...
Creating Python virtual environment "app/backend/.venv"...
Installing dependencies from "requirements.txt" into virtual environment (in quiet mode)...
Running manageacl.py. Arguments to script: -v --acl-type oids --acl-action add --acl 00000000-0000-0000-0000-000000000000 --url https://mystorage.blob.core.windows.net/content/role_library.pdf
Found 58 search documents with storageUrl https://mystorage.blob.core.windows.net/content/role_library.pdf
Adding acl 00000000-0000-0000-0000-000000000000 to 58 search documents
Optionally, use the following command to verify that your permission is listed for the file in Azure AI Search.
python ./scripts/manageacl.py -v --acl-type groups --acl-action view --url <REPLACE_WITH_YOUR_DOCUMENT_URL>Parameter Purpose -v Verbose output. --acl-type Group or user OIDs: oids.--acl-action View a Search index field oids. Other options includeenable_acls,remove,remove_all, andadd.--url The file's location in that shows, such as https://MYSTORAGENAME.blob.core.windows.net/content/role_library.pdf. Don't surround the URL with quotation marks in the CLI command.The console output for this command looks like:
Loading azd .env file from current environment...
Creating Python virtual environment "app/backend/.venv"...
Installing dependencies from "requirements.txt" into virtual environment (in quiet mode)...
Running manageacl.py. Arguments to script: -v --acl-type oids --acl-action view --acl 00000000-0000-0000-0000-000000000000 --url https://mystorage.blob.core.windows.net/content/role_library.pdf
Found 58 search documents with storageUrl https://mystorage.blob.core.windows.net/content/role_library.pdf
[00000000-0000-0000-0000-000000000000]
The array at the end of the output includes your
USER_OBJECT_IDparameter and is used to determine if the document is used in the answer with Azure OpenAI.
Verify that Azure AI Search contains your USER_OBJECT_ID
Open the Azure portal and search for
AI Search.Select your search resource from the list.
Select Search management > Indexes.
Select gptkbindex.
Select View > JSON view.
Replace the JSON with the following JSON:
{
  "search": "*",
  "select": "sourcefile, oids",
  "filter": "oids/any()"
}
This JSON searches all documents where the
oidsfield has any value and returns thesourcefileandoidsfields.If the
role_library.pdfdoesn't have your OID, return to the Provide user access to a document in Azure Search section and complete the steps.
Verify user access to the document
If you completed the steps but didn't see the correct answer, verify that your USER_OBJECT_ID parameter is set correctly in Azure AI Search for role_library.pdf.
Return to the chat app. You might need to sign in again.
Enter the same query so that the
role_librarycontent is used in the Azure OpenAI answer:What does a product manager do?.View the result, which now includes the appropriate answer from the role library document.
Clean up resources
The following steps walk you through the process of cleaning up the resources you used.
Clean up Azure resources
The Azure resources created in this article are billed to your Azure subscription. If you don't expect to need these resources in the future, delete them to avoid incurring more charges.
Run the following Azure Developer CLI command to delete the Azure resources and remove the source code.
azd down --purge
Clean up GitHub Codespaces and Visual Studio Code
The following steps walk you through the process of cleaning up the resources you used.
Deleting the GitHub Codespaces environment ensures that you can maximize the amount of free per-core hours entitlement that you get for your account.
Important
For more information about your GitHub account's entitlements, see GitHub Codespaces monthly included storage and core hours.
Sign in to the GitHub Codespaces dashboard.
Locate your currently running codespaces that are sourced from the Azure-Samples/azure-search-openai-demo GitHub repository.
Open the context menu for the codespace and then select Delete.

Get help
The sample repository offers troubleshooting information.
Troubleshooting
This section helps you troubleshoot issues specific to this article.
Provide authentication tenant
When your authentication is in a separate tenant from your hosting application, you need to set that authentication tenant with the following process.
Run the following command to configure the sample to use a second tenant for the authentication tenant.
azd env set AZURE_AUTH_TENANT_ID <REPLACE-WITH-YOUR-TENANT-ID>Parameter Purpose AZURE_AUTH_TENANT_IDIf AZURE_AUTH_TENANT_IDis set, it's the tenant that hosts the app.Redeploy the solution with the following command:
azd up
Related content
- Build a chat app with Azure OpenAI best-practices solution architecture.
- Learn about access control in generative AI apps with Azure AI Search.
- Build an enterprise-ready Azure OpenAI solution with Azure API Management.
- See Azure AI Search: Outperforming vector search with hybrid retrieval and ranking capabilities.