Note
Access to this page requires authorization. You can try signing in or changing directories.
Access to this page requires authorization. You can try changing directories.
In this tutorial, you deploy a Django web app to Azure App Service. The web app uses a user-assigned managed identity (passwordless connections) with Azure role-based access control to access Azure Storage and Azure Database for PostgreSQL - Flexible Server resources. The code uses the DefaultAzureCredential class of the Azure Identity client library for Python. The DefaultAzureCredential class automatically detects that a managed identity exists for the App Service and uses it to access other Azure resources.
In this tutorial, you create a user-assigned managed identity and assign it to the App Service so that it can access the database and storage account resources. For an example of using a system-assigned managed identity, see Create and deploy a Flask Python web app to Azure with system-assigned managed identity. User-assigned managed identities are recommended because they can be used by multiple resources, and their life cycles are decoupled from the resource life cycles with which they're associated. For more information about best practices for using managed identities, see Managed identity best practice recommendations.
This tutorial shows you how to deploy the Python web app and create Azure resources using the Azure CLI. While the commands in this tutorial use the Bash shell, you can run the tutorial commands in any Bash environment with the CLI installed, such as your local environment or the Azure Cloud Shell. With some modification you can run these commands in other environments like Windows command shell (ex. modifying syntax to set and use environment variables).
Get the sample app
Use the sample Django sample application to follow along with this tutorial. Download or clone the sample application to your development environment.
Clone the sample.
git clone https://github.com/Azure-Samples/msdocs-django-web-app-managed-identity.gitNavigate to the application folder.
cd msdocs-django-web-app-managed-identity
Examine authentication code
The sample web app needs to authenticate to two different data stores:
- Azure blob storage server where it stores and retrieves photos submitted by reviewers.
- An Azure Database for PostgreSQL - Flexible Server database where it stores restaurants and reviews.
It uses DefaultAzureCredential to authenticate to both data stores. With DefaultAzureCredential, the app can be configured to run under the identity of different service principals, depending on the environment it's running in, without making changes to code. For example, in a local development environment, the app can run under the identity of the developer signed in to the Azure CLI, while in Azure, as in this tutorial, it can run under a user-assigned managed identity.
In either case, the security principal that the app runs under must have a role on each Azure resource the app uses that permits it to perform the actions on the resource that the app requires. In this tutorial, you use Azure CLI commands to create a user-assigned managed identity and assign it to your app in Azure. You then manually assign that identity appropriate roles on your Azure storage account and Azure Database for PostgreSQL server. Finally, you set the AZURE_CLIENT_ID environment variable for your app in Azure to configure DefaultAzureCredential to use the managed identity.
After the user-assigned managed identity is configured on your app and its runtime environment, and is assigned appropriate roles on the data stores, you can use DefaultAzureCredential to authenticate with the required Azure resources.
The following code is used to create a blob storage client to upload photos in ./restaurant_review/views.py. An instance of DefaultAzureCredential is supplied to the client, which it uses to acquire access tokens to perform operations against Azure storage.
from azure.identity import DefaultAzureCredential
from azure.storage.blob import BlobServiceClient

azure_credential = DefaultAzureCredential()
blob_service_client = BlobServiceClient(
    account_url=account_url,
    credential=azure_credential)
An instance of DefaultAzureCredential is also used to get an access token for Azure Database for PostgreSQL in ./azureproject/get_conn.py. In this case, the token is acquired directly by calling get_token on the credential instance and passing it the appropriate scope value. The token is then used to set the password in the PostgreSQL connection URI.
azure_credential = DefaultAzureCredential()
token = azure_credential.get_token("https://ossrdbms-aad.database.windows.net")
conf.settings.DATABASES['default']['PASSWORD'] = token.token
To learn more about authenticating your apps with Azure services, see Authenticate Python apps to Azure services by using the Azure SDK for Python. To learn more about DefaultAzureCredential, including how to customize the credential chain it evaluates for your environment, see DefaultAzureCredential overview.
Create an Azure PostgreSQL flexible server
Set up the environment variables needed for the tutorial.
LOCATION="eastus"
RAND_ID=$RANDOM
RESOURCE_GROUP_NAME="msdocs-mi-web-app"
APP_SERVICE_NAME="msdocs-mi-web-$RAND_ID"
DB_SERVER_NAME="msdocs-mi-postgres-$RAND_ID"
ADMIN_USER="demoadmin"
ADMIN_PW="ChAnG33#ThsPssWD$RAND_ID"
UA_NAME="UAManagedIdentityPythonTest$RAND_ID"
Important
The
ADMIN_PWmust contain 8 to 128 characters from three of the following categories: English uppercase letters, English lowercase letters, numbers, and nonalphanumeric characters. When creating usernames or passwords do not use the$character. Later you create environment variables with these values where the$character has special meaning within the Linux container used to run Python apps.Create a resource group with the az group create command.
az group create --location $LOCATION --name $RESOURCE_GROUP_NAMECreate a PostgreSQL flexible server with the az postgres flexible-server create command. (This and subsequent commands use the line continuation character for Bash Shell ('\'). Change the line continuation character for other shells.)
az postgres flexible-server create \
  --resource-group $RESOURCE_GROUP_NAME \
  --name $DB_SERVER_NAME \
  --location $LOCATION \
  --admin-user $ADMIN_USER \
  --admin-password $ADMIN_PW \
  --sku-name Standard_D2ds_v4 \
  --active-directory-auth Enabled \
  --public-access 0.0.0.0
The sku-name is the name of the pricing tier and compute configuration. For more information, see Azure Database for PostgreSQL pricing. To list available SKUs, use
az postgres flexible-server list-skus --location $LOCATION.Add your Azure account as a Microsoft Entra admin for the server with the az postgres flexible-server ad-admin create command.
ACCOUNT_EMAIL=$(az ad signed-in-user show --query userPrincipalName --output tsv)
ACCOUNT_ID=$(az ad signed-in-user show --query id --output tsv)
echo $ACCOUNT_EMAIL, $ACCOUNT_ID
az postgres flexible-server ad-admin create \
  --resource-group $RESOURCE_GROUP_NAME \
  --server-name $DB_SERVER_NAME \
  --display-name $ACCOUNT_EMAIL \
  --object-id $ACCOUNT_ID \
  --type User
Configure a firewall rule on your server with the az postgres flexible-server firewall-rule create command. This rule allows your local environment access to connect to the server. (If you're using the Azure Cloud Shell, you can skip this step.)
IP_ADDRESS=<your IP>
az postgres flexible-server firewall-rule create \
   --resource-group $RESOURCE_GROUP_NAME \
   --name $DB_SERVER_NAME \
   --rule-name AllowMyIP \
   --start-ip-address $IP_ADDRESS \
   --end-ip-address $IP_ADDRESS
Use any tool or website that shows your IP address to substitute
<your IP>in the command. For example, you can use the What's My IP Address? website.Create a database named
restaurantusing the az postgres flexible-server execute command.az postgres flexible-server execute \ --name $DB_SERVER_NAME \ --admin-user $ADMIN_USER \ --admin-password $ADMIN_PW \ --database-name postgres \ --querytext 'create database restaurant;'
Create an Azure App Service and deploy the code
To create an App Service and deploy the code, run these commands in the root folder of the sample app.
Create an app service using the az webapp up command.
az webapp up \
  --resource-group $RESOURCE_GROUP_NAME \
  --location $LOCATION \
  --name $APP_SERVICE_NAME \
  --runtime PYTHON:3.9 \
  --sku B1
The sku defines the size (CPU, memory) and cost of the App Service plan. The B1 (Basic) service plan incurs a small cost in your Azure subscription. For a full list of App Service plans, view the App Service pricing page.
Configure App Service to use the start.sh in the sample repo with the az webapp config set command.
az webapp config set \
  --resource-group $RESOURCE_GROUP_NAME \
  --name $APP_SERVICE_NAME \
  --startup-file "start.sh"
Create a storage account and container
The sample app stores photos submitted by reviewers as blobs in Azure Storage.
When a user submits a photo with their review, the sample app writes the image to the container using managed identity and
DefaultAzureCredentialto access the storage account.When a user views the reviews for a restaurant, the app returns a link to the photo in blob storage for each review that has one associated with it. For the browser to display the photo, it must be able to access it in your storage account. The blob data must be available for read publicly through anonymous (unauthenticated) access.
In this section, you create a storage account and container that permits public read access to blobs in the container. In later sections, you create a user-assigned managed identity and configure it to write blobs to the storage account.
Use the az storage create command to create a storage account.
STORAGE_ACCOUNT_NAME="msdocsstorage$RAND_ID"
az storage account create \
  --name $STORAGE_ACCOUNT_NAME \
  --resource-group $RESOURCE_GROUP_NAME \
  --location $LOCATION \
  --sku Standard_LRS \
  --allow-blob-public-access true
Create a container called photos in the storage account with the az storage container create command.
az storage container create \
  --account-name $STORAGE_ACCOUNT_NAME \
  --name photos \
  --public-access blob \
  --auth-mode login
Note
It's possible that the command fails. For example, you might get an error indicating that network rules are blocking the request to create the storage account. If the command fails, enter the following command to make sure to assign an Azure role with the permission to create containers to your Azure user account.
az role assignment create --role "Storage Blob Data Contributor" --assignee $ACCOUNT_EMAIL --scope "/subscriptions/$SUBSCRIPTION_ID/resourceGroups/$RESOURCE_GROUP_NAME/providers/Microsoft.Storage/storageAccounts/$STORAGE_ACCOUNT_NAME"For more information, see Quickstart: Create, download, and list blobs with Azure CLI. Several Azure roles permit you to create containers in a storage account, including Owner, Contributor, Storage Blob Data Owner, and Storage Blob Data Contributor.
Create a user-assigned managed identity
Create a user-assigned managed identity and assign it to the App Service. The managed identity is used to access the database and storage account.
Use the az identity create command to create a user-assigned managed identity and output the client ID to a variable for later use.
UA_CLIENT_ID=$(az identity create --name $UA_NAME --resource-group $RESOURCE_GROUP_NAME --query clientId --output tsv)
echo $UA_CLIENT_ID
Use the az account show command to get your subscription ID and output it to a variable that can be used to construct the resource ID of the managed identity.
SUBSCRIPTION_ID=$(az account show --query id --output tsv)
RESOURCE_ID="/subscriptions/$SUBSCRIPTION_ID/resourceGroups/$RESOURCE_GROUP_NAME/providers/Microsoft.ManagedIdentity/userAssignedIdentities/$UA_NAME"
echo $RESOURCE_ID
Assign the managed identity to the App Service with the az webapp identity assign command.
export MSYS_NO_PATHCONV=1
az webapp identity assign \
    --resource-group $RESOURCE_GROUP_NAME \
    --name $APP_SERVICE_NAME \
    --identities $RESOURCE_ID
Create App Service app settings that contain the client ID of the managed identity and other configuration info with the az webapp config appsettings set command.
az webapp config appsettings set \
  --resource-group $RESOURCE_GROUP_NAME \
  --name $APP_SERVICE_NAME \
  --settings AZURE_CLIENT_ID=$UA_CLIENT_ID \
    STORAGE_ACCOUNT_NAME=$STORAGE_ACCOUNT_NAME \
    STORAGE_CONTAINER_NAME=photos \
    DBHOST=$DB_SERVER_NAME \
    DBNAME=restaurant \
    DBUSER=$UA_NAME
The sample app uses environment variables (app settings) to define connection information for the database and storage account but these variables don't include passwords. Instead, authentication is done passwordless with DefaultAzureCredential.
The sample app code uses the DefaultAzureCredential class constructor without passing the user-assigned managed identity client ID to the constructor. In this scenario, the fallback is to check for the AZURE_CLIENT_ID environment variable, which you set as an app setting.
If the AZURE_CLIENT_ID environment variable doesn't exist, the system-assigned managed identity is used if configured. For more information, see Introducing DefaultAzureCredential.
Create roles for the managed identity
In this section, you create role assignments for the managed identity to enable access to the storage account and database.
Create a role assignment for the managed identity to enable access to the storage account with the az role assignment create command.
export MSYS_NO_PATHCONV=1
az role assignment create \
--assignee $UA_CLIENT_ID \
--role "Storage Blob Data Contributor" \
--scope "/subscriptions/$SUBSCRIPTION_ID/resourcegroups/$RESOURCE_GROUP_NAME"
The command specifies the scope of the role assignment to the resource group. For more information, see Understand role assignments.
Use the az postgres flexible-server execute command to connect to the Postgres database and run the same commands to assign roles to the managed identity.
ACCOUNT_EMAIL_TOKEN=$(az account get-access-token --resource-type oss-rdbms --output tsv --query accessToken)
az postgres flexible-server execute \
  --name $DB_SERVER_NAME \
  --admin-user $ACCOUNT_EMAIL \
  --admin-password $ACCOUNT_EMAIL_TOKEN \
  --database-name postgres \
  --querytext "select * from pgaadauth_create_principal('"$UA_NAME"', false, false);select * from pgaadauth_list_principals(false);"
If you have trouble running the command, make sure you added your user account as Microsoft Entra admin for the PosgreSQL server and that you allow access to your IP address in the firewall rules. For more information, see section Create an Azure PostgreSQL flexible server.
Test the Python web app in Azure
The sample Python app uses the azure.identity package and its DefaultAzureCredential class. When the app is running in Azure, DefaultAzureCredential automatically detects if a managed identity exists for the App Service and, if so, uses it to access other Azure resources (storage and PostgreSQL in this case). There's no need to provide storage keys, certificates, or credentials to the App Service to access these resources.
Browse to the deployed application at the URL
http://$APP_SERVICE_NAME.azurewebsites.net.It can take a minute or two for the app to start. If you see a default app page that isn't the default sample app page, wait a minute and refresh the browser.
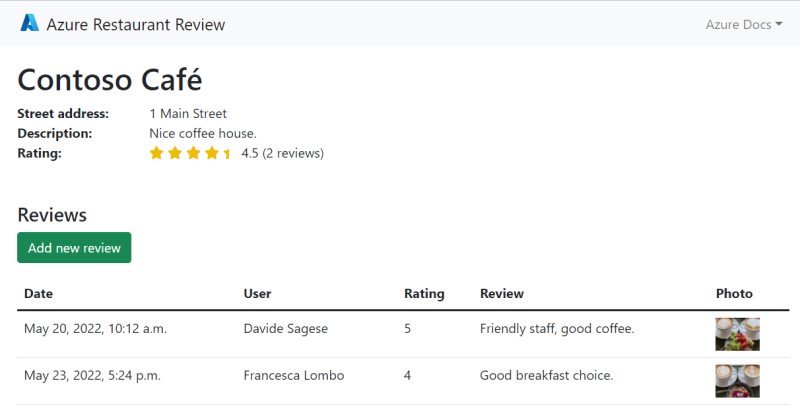
Test the functionality of the sample app by adding a restaurant and some reviews with photos for the restaurant.
The restaurant and review information is stored in Azure Database for PostgreSQL and the photos are stored in Azure Storage. Here's an example screenshot:

Clean up
In this tutorial, all the Azure resources were created in the same resource group. Removing the resource group removes with the az group delete command removes all resources in the resource group and is the fastest way to remove all Azure resources used for your app.
az group delete --name $RESOURCE_GROUP_NAME
You can optionally add the --no-wait argument to allow the command to return before the operation is complete.