Azure Virtual Machine Scale Set agents
Azure DevOps Services
Azure Virtual Machine Scale Set agents, hereafter referred to as scale set agents, are a form of self-hosted agents that can be autoscaled to meet your demands. This elasticity reduces your need to run dedicated agents all the time. Unlike Microsoft-hosted agents, you have flexibility over the size and the image of machines on which agents run.
If you like Microsoft-hosted agents but are limited by what they offer, you should consider scale set agents. Here are some examples:
- You need more memory, more processor, more storage, or more IO than what we offer in native Microsoft-hosted agents.
- You need NCv2 VM with particular instruction sets for machine learning.
- You need to deploy to a private Azure App Service in a private VNET with no inbound connectivity.
- You need to open corporate firewall to specific IP addresses so that Microsoft-hosted agents can communicate with your servers.
- You need to restrict network connectivity of agent machines and allow them to reach only approved sites.
- You can't get enough agents from Microsoft to meet your needs.
- Your jobs exceed the Microsoft-hosted agent timeout.
- You can't partition Microsoft-hosted parallel jobs to individual projects or teams in your organization.
- You want to run several consecutive jobs on an agent to take advantage of incremental source and machine-level package caches.
- You want to run configuration or cache warmup before an agent begins accepting jobs.
If you like self-hosted agents but wish that you could simplify managing them, you should consider scale set agents. Here are some examples:
- You don't want to run dedicated agents around the clock. You want to de-provision agent machines that aren't being used to run jobs.
- You run untrusted code in your pipeline and want to reimage agent machines after each job.
- You want to simplify periodically updating the base image for your agents.
Note
You cannot run Mac agents using scale sets. You can only run Windows or Linux agents this way.
Using VMSS agent pools for Azure DevOps Services is only supported for Azure Public (global service) cloud. Currently, VMSS agent pools does not support any other national cloud offerings.
You should not associate a VMSS to multiple pools.
Create the scale set
In preparation for creating scale set agents, you must first create a Virtual Machine Scale Set in the Azure portal. You must create the Virtual Machine Scale Set in a certain way so that Azure Pipelines can manage it. In particular, you must disable autoscaling so that Azure Pipelines can determine how to perform scaling based on number of incoming pipeline jobs. We recommend that you use the following steps to create the scale set.
In the following example, a new resource group and Virtual Machine Scale Set are created with Azure Cloud Shell using the UbuntuLTS VM image.
Note
In this example, the UbuntuLTS VM image is used for the scale set. If you require a customized VM image as the basis for your agent, create the customized image before creating the scale set, by following the steps in Create a scale set with custom image, software, or disk size.
Browse to Azure Cloud Shell at
https://shell.azure.com/.Run the following command to verify your default Azure subscription.
az account list -o tableIf your desired subscription isn't listed as the default, select your desired subscription.
az account set -s <your subscription ID>Create a resource group for your Virtual Machine Scale Set.
az group create \
--location westus \
--name vmssagents
Create a Virtual Machine Scale Set in your resource group. In this example, the Ubuntu2204 VM image is specified.
az vmss create \
--name vmssagentspool \
--resource-group vmssagents \
--image Ubuntu2204 \
--vm-sku Standard_D2_v4 \
--storage-sku StandardSSD_LRS \
--authentication-type SSH \
--generate-ssh-keys \
--instance-count 2 \
--disable-overprovision \
--upgrade-policy-mode manual \
--single-placement-group false \
--platform-fault-domain-count 1 \
--load-balancer "" \
--orchestration-mode Uniform
Note
Azure Pipelines does not support scale set overprovisioning and autoscaling. Make sure both features are disabled for your scale set.
Because Azure Pipelines manages the scale set, the following settings are required or recommended:
--disable-overprovision- required--upgrade-policy-mode manual- required--load-balancer ""- Azure Pipelines doesn't require a load balancer to route jobs to the agents in the scale set agent pool, but configuring a load balancer is one way to get an IP address for your scale set agents that you could use for firewall rules. Another option for getting an IP address for your scale set agents is to create your scale set using the--public-ip-addressoptions. For more information about configuring your scale set with a load balancer or public IP address, see the Virtual Machine Scale Sets documentation and az vmss create.--instance-count 2- this setting isn't required, but it gives you an opportunity to verify that the scale set is fully functional before you create an agent pool. Creation of the two VMs can take several minutes. Later, when you create the agent pool, Azure Pipelines deletes these two VMs and create new ones.
Important
If you run this script using Azure CLI on Windows, you must enclose the
""in--load-balancer ""with single quotes like this:--load-balancer '""'If your VM size supports Ephemeral OS disks, the following parameters to enable Ephemeral OS disks are optional but recommended to improve virtual machine reimage times.
--ephemeral-os-disk true--os-disk-caching readonly
Important
Ephemeral OS disks are not supported on all VM sizes. For list of supported VM sizes, see Ephemeral OS disks for Azure VMs.
Select any Linux or Windows image - either from Azure Marketplace or your own custom image - to create the scale set. Don't pre-install Azure Pipelines agent in the image. Azure Pipelines automatically installs the agent as it provisions new virtual machines. In the above example, we used a plain
UbuntuLTSimage. For instructions on creating and using a custom image, see FAQ.Select any VM SKU and storage SKU.
Note
Licensing considerations limit us from distributing Microsoft-hosted images. We are unable to provide these images for you to use in your scale set agents. But, the scripts that we use to generate these images are open source. You are free to use these scripts and create your own custom images.
After creating your scale set, navigate to your scale set in the Azure portal and verify the following settings:
Upgrade policy - Manual
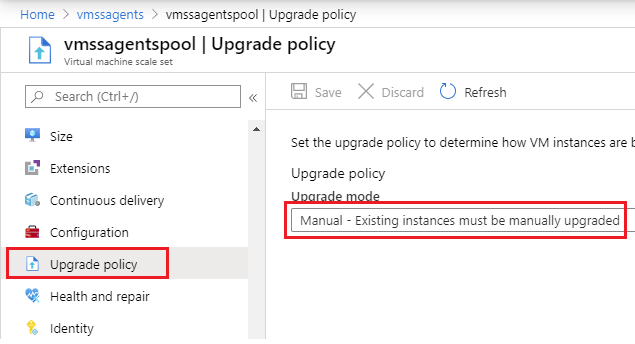
You can also verify this setting by running the following Azure CLI command.
az vmss show --resource-group vmssagents --name vmssagentspool --output table

Name            ResourceGroup    Location    Zones    Capacity    Overprovision    UpgradePolicy
--------------  ---------------  ----------  -------  ----------  ---------------  ---------------
vmssagentspool  vmssagents       westus               0           False            Manual
Scaling - Manual scale
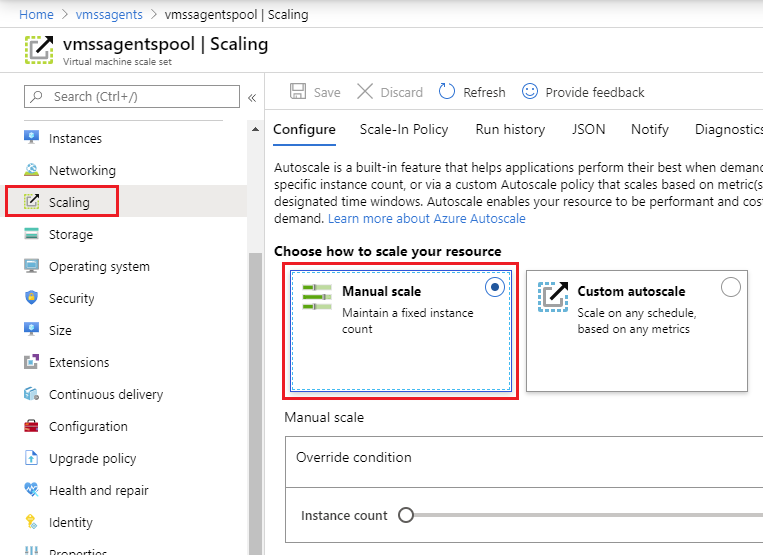
Important
Azure Pipelines does not support instance protection. Make sure you have the scale-in and scale set actions instance protections disabled.
Orchestration modes
Azure virtual machine scale sets can be configured with two orchestration modes: Uniform and Flexible. Azure Pipelines support for the Uniform orchestration mode is generally available, to all customers.
The Flexible orchestration mode enables Azure Pipelines to queue multiple scale set operations in parallel. Azure Pipelines support for Flexible orchestration is available upon request and is subject to evaluation. Customers' usage patterns need to indicate a significant benefit from it. Such customers have large scale sets, do not reuse agents for multiple jobs, run multiple, short-lived jobs in parallel, and exclusively use ephemeral disks in their VMs. If you would like to use this feature, reach out to our support team.
Create the scale set agent pool
Navigate to your Azure DevOps Project settings, select Agent pools under Pipelines, and select Add pool to create a new agent pool.

Important
You may create your scale set pool in Project settings or Organization settings, but when you delete a scale set pool, you must delete it from Organization settings, and not Project settings.
Select Azure Virtual Machine Scale Set for the pool type. Select the Azure subscription that contains the scale set, choose Authorize, and choose the desired Virtual Machine Scale Set from that subscription. If you have an existing service connection, you can choose that from the list instead of the subscription.
Important
To configure a scale set agent pool, you must have either Owner or User Access Administrator permissions on the selected subscription. If you have one of these permissions but get an error when you choose Authorize, see troubleshooting.
The only service connection currently supported is an Azure Resource Manager (ARM) service connection based on a service principal key. ARM service connections based on a certificate credential or a Managed Identity will fail. When you attempt to list the existing scale sets in your subscription, you'll see an error like this:
Invalid Service Endpoint with Id <guid> and Scope <guid>
Choose the desired Virtual Machine Scale Set from that subscription.
Specify a name for your agent pool.
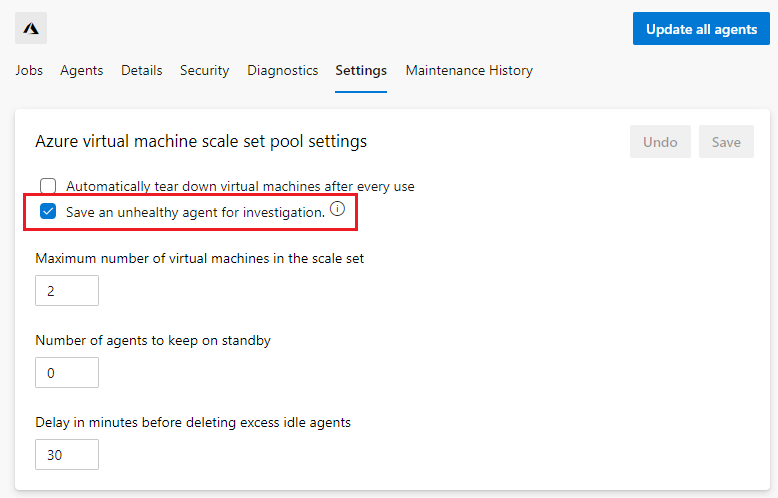
Configure the following options:
- Automatically tear down virtual machines after every use - A new VM instance is used for every job. The VM goes offline after running a job and is reimaged before picking up another job.
- Save an unhealthy agent for investigation - Whether to save unhealthy agent VMs for troubleshooting instead of deleting them.
- Maximum number of virtual machines in the scale set - Azure Pipelines will automatically scale out the number of agents, but won't exceed this limit.
- Number of agents to keep on standby - Azure Pipelines will automatically scale in the number of agents, but will ensure that there are always this many agents available to run new jobs. If you set Number of agents to keep on standby to 0, for example to conserve cost for a low volume of jobs, Azure Pipelines will start a VM only when it has a job.
- Delay in minutes before deleting excess idle agents - To account for the variability in build load throughout the day, Azure Pipelines will wait for the specified duration before deleting an excess idle agent.
- Configure VMs to run interactive tests (Windows Server OS Only) - Windows agents can either be configured to run unelevated with autologon and with interactive UI, or they can be configured to run with elevated permissions. Check this box to run unelevated with interactive UI. In either case, the agent user is a member of the Administrators group.
When your settings are configured, choose Create to create the agent pool.
Use scale set agent pool
Using a scale set agent pool is similar to any other agent pool. You can use it in classic build, release, or YAML pipelines. User permissions, pipeline permissions, approvals, and other checks work the same way as in any other agent pool. For more information, see Agent pools.
Important
Caution must be exercised when making changes directly to the scale set in the Azure portal.
- You may not change many of the the scale set configuration settings in the Azure portal. Azure Pipelines updates the configuration of the scale set. Any manual changes you make to the scale set may interfere with the operation of Azure Pipelines.
- You may not rename or delete a scale set without first deleting the scale set pool in Azure Pipelines.
How Azure Pipelines manages the scale set
Once the scale set agent pool is created, Azure Pipelines automatically scales the agent machines.
Azure Pipelines samples the state of the agents in the pool and virtual machines in the scale set every 5 minutes. The decision to scale in or out is based on the number of idle agents at that time. An agent is considered idle if it's online and isn't running a pipeline job. Azure Pipelines performs a scale-out operation if either of the following conditions is satisfied:
- The number of idle agents falls below the number of standby agents you specify
- There are no idle agents to service pipeline jobs waiting in the queue
If one of these conditions is met, Azure Pipelines grows the number of VMs. Scaling out is done in increments of a certain percentage of the maximum pool size. Allow 20 minutes for machines to be created for each step.
Azure Pipelines scales in the agents when the number of idle agents exceeds the standby count for more than 30 minutes (configurable using Delay in minutes before deleting excess idle agents).
To put all of this into an example, consider a scale set agent pool that is configured with two standby agents and four maximum agents. Let us say that you want to tear down the VM after each use. Also, let us assume that there are no VMs to start with in the scale set.
Since the number of idle agents is 0, and since the number of idle agents is below the standby count of 2, Azure Pipelines scales out and adds two VMs to the scale set. Once these agents come online, there will be two idle agents.
Let us say that one pipeline job arrives and is allocated to one of the agents.
At this time, the number of idle agents is 1, and that is less than the standby count of 2. So, Azure Pipelines scales out and adds 2 more VMs (the increment size used in this example). At this time, the pool has three idle agents and one busy agent.
Let us say that the job on the first agent completes. Azure Pipelines takes that agent offline to reimage that machine. After a few minutes, it comes back with a fresh image. At this time, we'll have four idle agents.
If no other jobs arrive for 30 minutes (configurable using Delay in minutes before deleting excess idle agents), Azure Pipelines determines that there are more idle agents than are necessary. So, it scales in the pool to two agents.
Throughout this operation, the goal for Azure Pipelines is to reach the desired number of idle agents on standby. Pools scale out and in slowly. Over the course of a day, the pool will scale out as requests are queued in the morning and scale in as the load subsides in the evening. You may observe more idle agents than you desire at various times, which is expected as Azure Pipelines converges gradually to the constraints that you specify.
Note
It can take an hour or more for Azure Pipelines to scale out or scale in the virtual machines. Azure Pipelines will scale out in steps, monitor the operations for errors, and react by deleting unusable machines and by creating new ones in the course of time. This corrective operation can take over an hour.
To achieve maximum stability, scale set operations are done sequentially. For example if the pool needs to scale out and there are also unhealthy machines to delete, Azure Pipelines will first scale out the pool. Once the pool has scaled out to reach the desired number of idle agents on standby, the unhealthy machines will be deleted, depending on the Save an unhealthy agent for investigation setting. For more information, see Unhealthy agents.
Due to the sampling size of 5 minutes, it's possible that all agents can be running pipelines for a short period of time and no scaling out will occur.
Customizing Pipeline Agent Configuration
You can customize the configuration of the Azure Pipelines Agent by defining environment variables in your operating system custom image for your scale set. For example, the scale set agent working directory defaults to C:\a for Windows and /agent/_work for Linux. If you want to change the working directory, set an environment variable named VSTS_AGENT_INPUT_WORK with the desired working directory. More information can be found in the Pipelines Agent Unattended Configuration documentation. Some examples include:
VSTS_AGENT_INPUT_WORKVSTS_AGENT_INPUT_PROXYURLVSTS_AGENT_INPUT_PROXYUSERNAMEVSTS_AGENT_INPUT_PROXYPASSWORD
Important
Caution must be exercised when customizing the Pipelines agent. Some settings will conflict with other required settings, causing the agent to fail to register, and the VM to be deleted. These settings should not be set or altered:
VSTS_AGENT_INPUT_URLVSTS_AGENT_INPUT_AUTHVSTS_AGENT_INPUT_TOKENVSTS_AGENT_INPUT_USERNAMEVSTS_AGENT_INPUT_PASSWORDVSTS_AGENT_INPUT_POOLVSTS_AGENT_INPUT_AGENTVSTS_AGENT_INPUT_RUNASSERVICE- ... and anything related to Deployment Groups.
Customizing Virtual Machine Startup via the Custom Script Extension
Users may want to execute startup scripts on their scaleset agent machines before those machines start running pipeline jobs. Some common use cases for startup scripts include installing software, warming caches, or fetching repos. You can execute startup scripts by installing the Custom Script Extension for Windows or Custom Script Extension for Linux.
This extension will be executed on every virtual machine in the scaleset immediately after it's created or reimaged. The custom script extension will be executed before the Azure Pipelines agent extension is executed.
Here's an example to create a custom script extension for Linux.
az vmss extension set \
--vmss-name <scaleset name> \
--resource-group <resource group> \
--name CustomScript \
--version 2.0 \
--publisher Microsoft.Azure.Extensions \
--settings '{ \"fileUris\":[\"https://<myGitHubRepoUrl>/myScript.sh\"], \"commandToExecute\": \"bash ./myScript.sh /myArgs \" }'
Here's an example to create a custom script extension for Windows.
az vmss extension set \
--vmss-name <scaleset name> \
--resource-group <resource group> \
--name CustomScriptExtension \
--version 1.9 \
--publisher Microsoft.Compute \
--settings '{ \"FileUris\":[\"https://<myGitHubRepoUrl>/myscript.ps1\"], \"commandToExecute\": \"Powershell.exe -ExecutionPolicy Unrestricted -File myscript.ps1 -myargs 0 \" }'
Important
The scripts executed in the Custom Script Extension must return with exit code 0 in order for the VM to finish the VM creation process. If the custom script extension throws an exception or returns a non-zero exit code, the Azure Pipeline extension will not be executed and the VM will not register with Azure DevOps agent pool.
It might happen that your extension runs before all VM resources are provisioned, in which case you'll see an error similar to "failed installing basic prerequisites." You can fix this by adding a sleep command at the beginning of your script, for example, sleep 30.
Lifecycle of a Scale Set Agent
Here's the flow of operations for an Azure Pipelines Virtual Machine Scale Set Agent
The Azure DevOps Scale Set Agent Pool sizing job determines the pool has too few idle agents and needs to scale out. Azure Pipelines makes a call to Azure Scale Sets to increase the scale set capacity.
The Azure Scale Set begins creating the new virtual machines. Once the virtual machines are running, Azure Scale Sets sequentially executes any installed VM extensions.
If the Custom Script Extension is installed, it's executed before the Azure Pipelines Agent extension. If the Custom Script Extension returns a non-zero exit code, the VM creation process is aborted and will be deleted.
The Azure Pipelines Agent extension is executed. This extension downloads the latest version of the Azure Pipelines Agent along with the latest version of configuration script. The configuration scripts can be found at URLs with the following formats:
- Linux:
https://vstsagenttools.blob.core.windows.net/tools/ElasticPools/Linux/<script_version>/enableagent.sh, for example, version 15 - Windows:
https://vstsagenttools.blob.core.windows.net/tools/ElasticPools/Windows/<script_version>/enableagent.ps1, for example, version 17
- Linux:
The configuration script creates a local user named
AzDevOpsif the operating system is Windows Server or Linux. For Windows 10 Client OS, the agent runs as LocalSystem. The script then unzips, installs, and configures the Azure Pipelines Agent. As part of configuration, the agent registers with the Azure DevOps agent pool and appears in the agent pool list in the Offline state.For most scenarios, the configuration script then immediately starts the agent to run as the local user
AzDevOps. The agent goes Online and is ready to run pipeline jobs.If the pool is configured for interactive UI, the virtual machine reboots after the agent is configured. After reboot, the local user automatically logs in and pipelines agent starts. The agent then goes online and is ready to run pipeline jobs.
Create a scale set with custom image, software, or disk size
If you just want to create a scale set with the default 128-GB OS disk using a publicly available Azure image, then skip straight to step 10 and use the public image name (UbuntuLTS, Win2019DataCenter, etc.) to create the scale set. Otherwise follow these steps to customize your VM image.
Create a VM with your desired OS image and optionally expand the OS disk size from 128 GB to
<myDiskSizeGb>.If starting with an available Azure Image, for example <myBaseImage> = (Win2019DataCenter, UbuntuLTS):
az vm create --resource-group <myResourceGroup> --name <MyVM> --image <myBaseImage> --os-disk-size-gb <myDiskSize> --admin-username myUserName --admin-password myPasswordIf starting with a generalized VHD:
First create the VM with an unmanaged disk of the desired size and then convert to a managed disk:
az vm create --resource-group <myResourceGroup> --name <MyVM> --image <myVhdUrl> --os-type windows --os-disk-size-gb <myDiskSizeGb> --use-unmanaged-disk --admin-username <myUserName> --admin-password <myPassword> --storage-account <myVhdStorageAccount>Shut down the VM
az vm stop --resource-group <myResourceGroup> --name <MyVM>Deallocate the VM
az vm deallocate --resource-group <myResourceGroup> --name <MyVM>Convert to a managed disk
az vm convert --resource-group <myResourceGroup> --name <MyVM>Restart the VM
az vm start --resource-group <myResourceGroup> --name <MyVM>
Remote Desktop (or SSH) to the VM's public IP address to customize the image. You may need to open ports in the firewall to unblock the RDP (3389) or SSH (22) ports.
Windows - If
<MyDiskSizeGb>is greater than 128 GB, extend the OS disk size to fill the disk size you specified by<MyDiskSizeGb>.Open DiskPart tool as administrator and run these DiskPart commands:
list volume(to see the volumes)select volume 2(depends on which volume is the OS drive)extend size 72000(to extend the drive by 72 GB, from 128 GB to 200 GB)
Install any desired additional software on the VM.
To customize the permissions of the pipeline agent user, you can create a user named
AzDevOps, and grant that user the permissions you require. This user will be created by the scaleset agent startup script if it doesn't already exist.Reboot the VM when finished with customizations
Generalize the VM.
- Windows - From an admin console window:
C:\Windows\System32\sysprep\sysprep.exe /generalize /oobe /shutdown - Linux:
sudo waagent -deprovision+user -force
Important
Wait for the VM to finish generalization and shutdown. Do not proceed until the VM has stopped. Allow 60 minutes.
- Windows - From an admin console window:
Deallocate the VM
az vm deallocate --resource-group <myResourceGroup> --name <MyVM>Mark the VM as Generalized
az vm generalize --resource-group <myResourceGroup> --name <MyVM>Create a VM Image based on the generalized image. When performing these steps to update an existing scaleset image, make note of the image ID url in the output.
az image create --resource-group <myResourceGroup> --name <MyImage> --source <MyVM>Create the scale set based on the custom VM image
az vmss create --resource-group <myResourceGroup> --name <myScaleSet> --image <MyImage> --admin-username <myUsername> --admin-password <myPassword> --instance-count 2 --disable-overprovision --upgrade-policy-mode manual --load-balancer '""'Verify that both VMs created in the scale set come online, have different names, and reach the Succeeded state
You're now ready to create an agent pool using this scale set.
Update an existing scale set with a new custom image
To update the image on an existing scaleset, follow the steps in the previous Create a scale set with custom image, software, or disk size section up through the az image create step to generate the custom OS image. Make note of the ID property URL that is output from the az image create command. Then update the scaleset with the new image as shown in the following example. After the scaleset image has been updated, all future VMs in the scaleset will be created with the new image.
az vmss update --resource-group <myResourceGroup> --name <myScaleSet> --set virtualMachineProfile.storageProfile.imageReference.id=<id url>
Supported Operating Systems
Scale set agents currently support Ubuntu Linux, Windows Server/DataCenter 2016/2019, and Windows 10 client.
Known issues
- Debian or RedHat Linux distributions aren't supported. Only Ubuntu is.
- Windows 10 client doesn't support running the pipeline agent as a local user and therefore the agent can't interact with the UI. The agent will run as Local Service instead.
Troubleshooting issues
Navigate to your Azure DevOps Project settings, select Agent pools under Pipelines, and select your agent pool. Select the tab labeled Diagnostics.
The Diagnostic tab shows all actions executed by Azure DevOps to Create, Delete, or Reimage VMs in your Azure Scale Set. Diagnostics also logs any errors encountered while trying to perform these actions. Review the errors to make sure your scaleset has sufficient resources to scale out. If your Azure subscription has reached the resource limit in VMs, CPU cores, disks, or IP Addresses, those errors will show up here.
Unhealthy Agents
When agents or virtual machines are failing to start, not connecting to Azure DevOps, or going offline unexpectedly, Azure DevOps logs the failures to the Agent Pool's Diagnostics tab and tries to delete the associated virtual machine. Networking configuration, image customization, and pending reboots may cause these issues. Connecting to the VM to debug and gather logs can help with the investigation.
If you would like Azure DevOps to save an unhealthy agent VM for investigation and not automatically delete it when it detects the unhealthy state, navigate to your Azure DevOps Project settings, select Agent pools under Pipelines, and select your agent pool. Choose Settings, select the option Save an unhealthy agent for investigation, and choose Save.
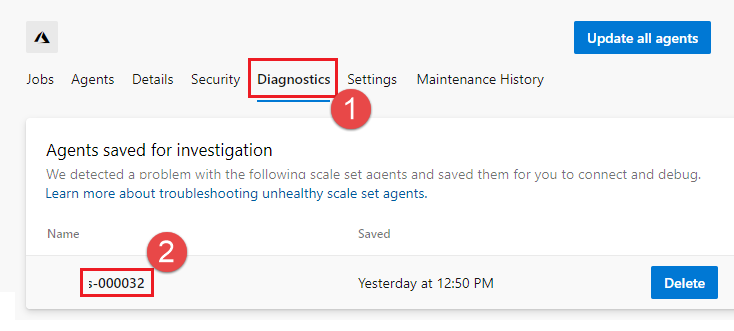
Now, when an unhealthy agent is detected in the scale set, Azure DevOps saves that agent and associated virtual machine. The saved agent will be visible on the Diagnostics tab of the Agent pool UI. Navigate to your Azure DevOps Project settings, select Agent pools under Pipelines, select your agent pool, choose Diagnostics, and make note of the agent name.
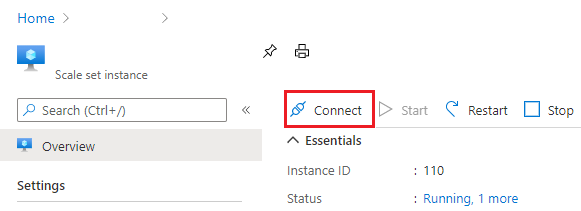
Find the associated virtual machine in your Azure Virtual Machine Scale Set via the Azure portal, in the Instances list.

Select the instance, choose Connect, and perform your investigation.
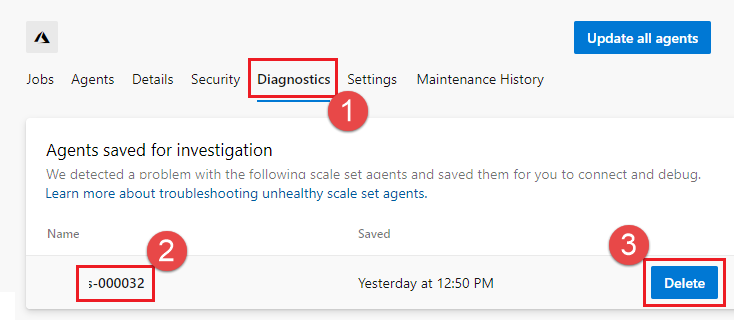
To delete the saved agent when you're done with your investigation, navigate to your Azure DevOps Project settings, select Agent pools under Pipelines, and select your agent pool. Choose the tab labeled Diagnostics. Find the agent on the Agents saved for investigation card, and choose Delete. This removes the agent from the pool and deletes the associated virtual machine.
FAQ
- Where can I find the images used for Microsoft-hosted agents?
- How do I configure scale set agents to run UI tests?
- How can I delete agents?
- Can I configure the scale set agent pool to have zero agents on standby?
- How much do scale set agents cost?
- What are some common issues and their solutions?
- You observe more idle agents than desired at various times
- VMSS scale up isn't happening in the expected five-minute interval
- Azure DevOps Linux VM Scale Set frequently fails to start the pipeline
- You check the option to automatically tear down virtual machines after every use for the agent pool, but you see that the VMs aren't re-imaging as they should and just pick up new jobs as they're queued
- VMSS shows the agent as offline if the VM restarts
- You can see multiple tags like _AzureDevOpsElasticPoolTimeStamp for VMSS in cost management
- You can't create a new scale set agent pool and get an error message that a pool with the same name already exists
- VMSS maintenance job isn't running on agents or getting logs
- If you specify
AzDevOpsas the primary administrator in your script for VMSS, you may observe issues with the agent configurations on scale set instances - Agent extension installation fails on scale set instances due to network security and firewall configurations
- Why does my scale set agent configuration script call Add-MpPreference and configure Windows Defender on the agent?
- I want to increase my pool size. What should I take into consideration?
Where can I find the images used for Microsoft-hosted agents?
Licensing considerations limit us from distributing Microsoft-hosted images. We're unable to provide these images for you to use in your scale set agents. But, the scripts that we use to generate these images are open source. You're free to use these scripts and create your own custom images.
How do I configure scale set agents to run UI tests?
Create a Scale Set with a Windows Server OS and when creating the Agent Pool select the "Configure VMs to run interactive tests" option.
How can I delete agents?
` Navigate to your Azure DevOps Project settings, select Agent pools under Pipelines, and select your agent pool. Select the tab labeled Agents. Click the 'Enabled' toggle button to disable the agent. The disabled agent will complete the pipeline it's currently running and won't pick up additional work. Within a few minutes after completing its current pipeline job, the agent will be deleted.
Can I configure the scale set agent pool to have zero agents on standby?
Yes, if you set Number of agents to keep on standby to zero, for example to conserve cost for a low volume of jobs, Azure Pipelines starts a VM only when it has a job.
How much do scale set agents cost?
Pricing for scale set agents is similar to other self-hosted agents. You provide the infrastructure on which to run the agent software and the jobs, and you pay for the desired number of jobs that can run concurrently by purchasing parallel jobs.
For scale set agents, the infrastructure to run the agent software and jobs is Azure Virtual Machine Scale Sets, and the pricing is described in Virtual Machine Scale Sets pricing.
For information on purchasing parallel jobs, see Configure and pay for parallel jobs.
What are some common issues and their solutions?
You observe more idle agents than desired at various times
To better understand why this happens, see How Azure Pipelines manages the scale set. Throughout the scaling operation, the goal for Azure Pipelines is to reach the desired number of idle agents on standby. Pools scale out and in slowly. Over a day, the pool will scale out as requests are queued in the morning and scale in as the load subsides in the evening. This is an expected behavior as Azure Pipelines converges gradually to the constraints that you specify.
VMSS scale up isn't happening in the expected five-minute interval
The scaling job runs every five minutes, but if only one operation is processed, you may observe that scale up isn’t happening within five minutes; this is currently by design.
Azure DevOps Linux VM Scale Set frequently fails to start the pipeline
The first place to look when experiencing issues with scale set agents is the Diagnostics tab in the agent pool.
Also, consider saving the unhealthy VM for debugging purposes. For more information, see Unhealthy Agents.
Saved agents are there unless you delete them. If the agent doesn't come online in 10 minutes, it's marked as unhealthy and saved if possible. Only one VM is kept in a saved state. If the agent goes offline unexpectedly (due to a VM reboot or something happening to the image), it isn't saved for investigation.
Only VMs for which agents fail to start are saved. If a VM has a failed state during creation, it isn't saved. In this case, the message in the Diagnostics tab is "deleting unhealthy machine" instead of "failed to start".
You check the option to automatically tear down virtual machines after every use for the agent pool, but you see that the VMs aren't re-imaging as they should and just pick up new jobs as they're queued
The option to tear down the VM after each build will only work for Windows Server and supported Linux images. It isn’t supported for Windows client images.
VMSS shows the agent as offline if the VM restarts
Showing the agents as offline if the VM restarts is the expected behavior. The agent service runs in the systemd context only. However, if the machine restarts for some reason, it's considered an unhealthy VM and deleted. For more information, see Unhealthy Agents.
When agents or virtual machines fail to start, can't connect to Azure DevOps, or go offline unexpectedly, Azure DevOps logs the failures to the Agent Pool's Diagnostics tab and tries to delete the associated virtual machine. Networking configuration, image customization, and pending reboots may cause these issues. To avoid the issue, disable the software update on the image. You can also connect to the VM to debug and gather logs to help investigate the issue.
You can see multiple tags like _AzureDevOpsElasticPoolTimeStamp for VMSS in cost management
When the pool is created, a tag is added to the scale set to mark the scale set as in use (to avoid two pools using the same scale set), and another tag is added for the timestamp that updates each time the configuration job runs (every two hours).
You can't create a new scale set agent pool and get an error message that a pool with the same name already exists
You may get an error message like This virtual machine scale set is already in use by pool <pool name> because the tag still exists on the scale set even after it's deleted. When an agent pool is deleted, you attempt to delete the tag from the scale set, but this is a best-effort attempt, and you give up after three retries. Also, there can be a maximum of a two-hour gap, in which a Virtual Machine Scale Set that isn't used by any agent pool can't be assigned to a new one. The fix for this is to wait for that time interval to pass, or manually delete the tag for the scale set from the Azure portal. When viewing the scale set in the Azure portal, select the Tags link on the left and delete the tag labeled _AzureDevOpsElasticPool.
VMSS maintenance job isn't running on agents or getting logs
The maintenance job runs once every 24 hours. It's possible that VMs are getting filled up before this time. Consider increasing the disk size on the VM and adding a script in the pipeline to delete the contents.
If you specify AzDevOps as the primary administrator in your script for VMSS, you may observe issues with the agent configurations on scale set instances
If you specify AzDevOps as the primary administrator in your script for Virtual Machine Scale Set, you may observe issues with the agent configurations on scale set instances (the password for the user is changed if it already exists).
This issue occurs because agent extension scripts attempt to create the user AzDevOps and change its password.
Note
It's OK to create the user and grant it extra permissions, but it should not be the primary administrator, and nothing should depend on the password, as the password will be changed. To avoid the issue, pick a different user as the primary administrator when creating the scale set, instead of AzDevOps.
Agent extension installation fails on scale set instances due to network security and firewall configurations
The extension needs to be able to download the build agent files from https://vstsagentpackage.azureedge.net/agent, and the build agent needs to be able to register with Azure DevOps Services. Make sure that this URL and Azure DevOps Services-related IPs and URLs are open on the instance. For IPs and URLs that need to be unblocked on your firewall, see Allowed IP addresses and domain URLs.
Why does my scale set agent configuration script call Add-MpPreference and configure Windows Defender on the agent?
To improve performance and reliability, the configuration scripts call Add-MpPreference with an ExclusionPath containing C:\ and D:\, which disables Windows Defender scheduled and real-time scanning for files in these folders on the agent. To change the default behavior, set an environment variable named ELASTIC_POOLS_SKIP_DEFENDER_EXCLUSION to true.
I want to increase my pool size. What should I take into consideration?
Before you increase the size of your pool, make sure the Azure Virtual Network configured for your Virtual Machine Scale Sets pool has a large enough Address space range to accommodate all your new agents. If not, you may get an error similar to Failed to increase capacity. Subnet azure-devops-agent-pool-fabrikam-fiber with address prefix 12.123.45.224/28 does not have enough capacity for 5 IP addresses.
Feedback
Coming soon: Throughout 2024 we will be phasing out GitHub Issues as the feedback mechanism for content and replacing it with a new feedback system. For more information see: https://aka.ms/ContentUserFeedback.
Submit and view feedback for