Note
Access to this page requires authorization. You can try signing in or changing directories.
Access to this page requires authorization. You can try changing directories.
Azure DevOps Services | Azure DevOps Server 2022 - Azure DevOps Server 2019
This article walks you through setting up a CI/CD pipeline for deploying an application to app services in an Azure Stack Hub instance using Azure Pipelines.
In this article you can learn to create or validate:
- Azure Stack Hub service principal (SPN) credentials for the pipeline.
- A web app in your Azure Stack Hub instance.
- A service connection to your Azure Stack Hub instance.
- A repo with your app code to deploy to your app
Prerequisites
- Access to Azure Stack Hub instance with the App Service RP enabled.
- An Azure DevOps solution associated with your Azure Stack Hub tenant.
Create or validate your SPN
An SPN provides role-based credentials so that processes outside of Azure can connect to and interact with resources. You’ll need an SPN with contributor access and the attributes specified in these instructions to use with your Azure DevOps pipeline.
As a user of Azure Stack Hub you don’t have the permission to create the SPN. You’ll need to request this principal from your cloud operator. The instructions are being provided here so you can create the SPN if you’re a cloud operator, or you can validate the SPN if you’re a developer using an SPN in your workflow provided by a cloud operator.
The cloud operator will need to create the SPN using Azure CLI.
The following code snippets are written for a Windows machine using the PowerShell prompt with Azure CLI for Azure Stack Hub. If you’re using CLI on a Linux machine and bash, either remove the line extension or replace them with a \.
Prepare the values of the following parameters used to create the SPN:
Parameter Example Description endpoint-resource-manager "https://management.orlando.azurestack.corp.microsoft.com" The resource management endpoint. suffix-storage-endpoint "orlando.azurestack.corp.microsoft.com" The endpoint suffix for storage accounts. suffix-keyvault-dns ".vault.orlando.azurestack.corp.microsoft.com" The Key Vault service dns suffix. endpoint-active-directory-graph-resource-id "https://graph.windows.net/" The Active Directory resource ID. endpoint-sql-management https://notsupported The sql server management endpoint. Set this to https://notsupportedprofile 2019-03-01-hybrid Profile to use for this cloud. Open your command-line tool such as Windows PowerShell or Bash and sign in. Use the following command:
az loginUse the
registercommand for a new environment or theupdatecommand if you’re using an existing environment. Use the following command.az cloud register ` -n "AzureStackUser" ` --endpoint-resource-manager "https://management.<local>.<FQDN>" ` --suffix-storage-endpoint ".<local>.<FQDN>" ` --suffix-keyvault-dns ".vault.<local>.<FQDN>" ` --endpoint-active-directory-graph-resource-id "https://graph.windows.net/" ` --endpoint-sql-management https://notsupported ` --profile 2019-03-01-hybridGet your subscription ID and resource group that you want to use for the SPN.
Create the SPN with the following command with the subscription ID and resource group:
az ad sp create-for-rbac --name "myApp" --role contributor `
    --scopes /subscriptions/{subscription-id}/resourceGroups/{resource-group} `
    --sdk-auth
If you don’t have cloud operator privileges, you can also sign in with the SPN provided to you by your cloud operator. You’ll need the client ID, the secret, and your tenant ID. With these values, you can use the following Azure CLI commands to create the JSON object that contains the values you’ll need to create your service connection.
az login --service-principal -u "<client-id>" -p "<secret>" --tenant "<tenant-ID>" --allow-no-subscriptions
az account show
Check the resulting JSON object. You’ll use the JSON object to create your service connection. The JSON object should have the following attributes:
{
  "environmentName": "<Environment name>",
  "homeTenantId": "<Tenant ID for the SPN>",
  "id": "<Application ID for the SPN>",
  "isDefault": true,
  "managedByTenants": [],
  "name": "<Tenant name>",
  "state": "Enabled",
  "tenantId": "<Tenant ID for the SPN>",
  "user": {
    "name": "<User email address>",
    "type": "user"
  }
}
Create the web app target
- Sign in to your Azure Stack Hub portal.
- Select Create a resource > Web + Mobile > Web App.
- Select your Subscription.
- Create or select a Resource Group.
- Type the Name of your app. The name of the app will appear in the URL for your app, for example,
yourappname.appservice.<region>.<FQDN> - Select the Runtime stack for your app. The runtime must match the code you plan to use for your web app.
- Select the Operating System (OS) that will host your runtime and app.
- Select or type the Region for your Azure Stack Hub instance.
- Select the plan based on your Azure Stack Hub instance, region, and app OS.
- Select Review + Create.
- Review your web app. Select Create.
- Select Go to resource.
- Make note of your app name. You’ll add the name to the yml document that defines your pipeline in your repository.
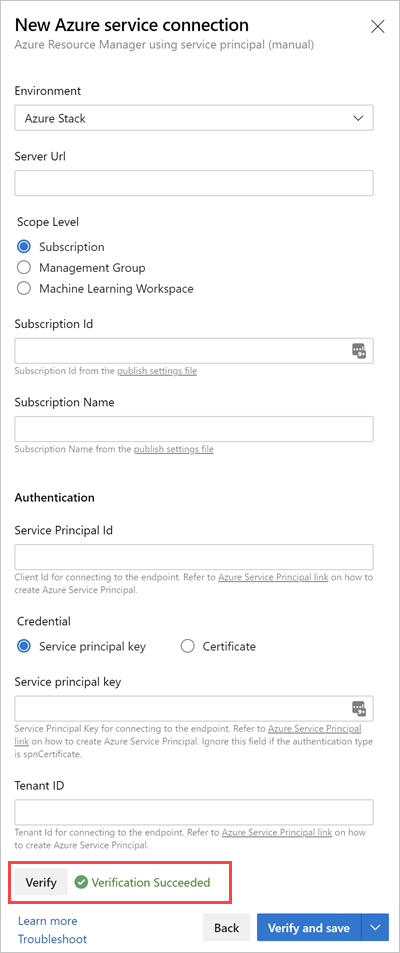
Create a service connection
Create a service connection. You’ll need the values from your SPN and the name of your Azure Stack Hub subscription.
Sign in to your Azure DevOps organization, and then navigate to your project.
Select Project settings, and then select Service connections.
Select Service connections > New service connection.
Select Azure Resource Manager, and then select Next.
Select Service principal (manual).
Select Azure Stack from Environment.
Fill out the form, and then select Verify and save.
Give your service connection a name. (You will need the service connection name to create your yaml pipeline).
Create your repository and add pipeline
If you haven’t added your web app code to the repository, add it now.
Open the repository. Select the repo and select Browse.
Select Pipelines
Select New pipeline.
Select Azure Repos Git.
Select your repository.
Select Starter pipeline.
Navigate back to the repo and open the
azure-pipelines.yml.Add the following yaml:
# Starter pipeline
# Start with a minimal pipeline that you can customize to build and deploy your code.
# Add steps that build, run tests, deploy, and more:
# https://aka.ms/yaml
trigger:
- main
variables:
  azureSubscription: '<your connection name>'
  VSTS_ARM_REST_IGNORE_SSL_ERRORS: true
steps:
- task: AzureWebApp@1
  displayName: Azure Web App Deploy
  inputs:
    azureSubscription: $(azureSubscription)
    appName: <your-app-name>
    package: '$(System.DefaultWorkingDirectory)'
Note
To ignore SSL errors, set a variable named
VSTS_ARM_REST_IGNORE_SSL_ERRORSto the valuetruein the build or release pipeline, as in this example.Update the
azureSubscriptionvalue with the name of your service connection.Update the
appNamewith your app name. You’re now ready to deploy.
Notes about using Azure tasks with Azure Stack Hub
The following Azure tasks are validated with Azure Stack Hub:
- Azure PowerShell
- Azure File Copy
- Azure Resource Group Deployment
- Azure App Service Deploy
- Azure App Service Manage
- Azure SQL Database Deployment