Note
Access to this page requires authorization. You can try signing in or changing directories.
Access to this page requires authorization. You can try changing directories.
Azure DevOps Services | Azure DevOps Server 2022 - Azure DevOps Server 2019
Important
This article applies to project customization for Hosted XML and On-premises XML process models. For the Inheritance process model, see Customize your backlogs or boards for a process. For an overview of process models, see Customize your work tracking experience.
To satisfy select business processes, your team may want to track additional work item types (WITs) as requirements or as tasks. This way, you can add them and track them within the product and sprint backlogs or board and Taskboards.
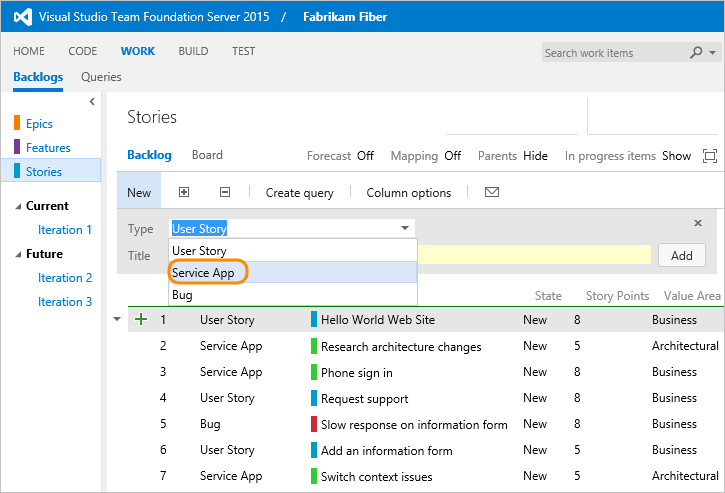
For example, you may want to track different types of requirements based on their target customer, or different types of bugs based on their source. Here the Fabrikam Fiber team has added the Service App WIT to track work that supports their customer service team.
Tip
If all you want to do is add bugs to your backlogs and boards, see Show bugs on backlogs and boards to make your team's selection. If you want to add another WIT and portfolio backlog, see Add a portfolio backlog level.
To add a WIT to track as requirements, tasks, or as bugs perform the corresponding steps:
Note
We recommend that you add a WIT to one and only one of the following categories: Requirement Category, Task Category, or Bug Category. The system prevents you from adding the same WIT to both the Requirement Category and Task Category. WITs that you add to the Bug Category will follow the bug behavior set for the team.
Customization sequence
Hosted XML process model customization sequence
Note
Use the following guidance if you customize your process through import/export of definition files. Otherwise, if you customize your process through the admin UI, see Add or modify a custom work item type for a process.
You'll make your changes to your process definition files, and then import that process to either update existing projects or use the process to create a project.
- If you aren't the organization owner or a member of the Project Collection Administrator's group, get added.
- Export the process you want to update
- If you're new to customizing a process, read Customize a process for import.
On-premises XML process model customization sequence
You'll first export your work tracking definition files, update them, and then import them to your project.
- If you aren't a member of the Project Administrator or Project Collection Administrator's group, get added.
- Update your project to enable the latest features
- Export the following objects from your project:
- WIT you want to add to backlogs and boards (if you haven't created it, do that now)
- ProcessConfiguration
- If you're new to customizing work tracking objects, familiarize yourself with the following resources:
Add a WIT to track it like a requirement
WITs that you add to the Requirement Category show up on the product backlog and board. You must make sure that the WIT definition contains required fields to support the Agile planning tools.
Export your process (Hosted XML) or your definition files (On-premises XML) as indicated in First steps.
Edit the WIT definition to support planning tools.
Customize / Syntax to add or update
Stack Rank field (Agile, CMMI)
<FIELD name="Stack Rank" refname="Microsoft.VSTS.Common.StackRank" type="Double" reportable="dimension">
<HELPTEXT>Work first on items with lower-valued stack rank. Set in triage.
</HELPTEXT>
</FIELD>
Backlog Priority field (Scrum)
<FIELD name="Backlog Priority" refname="Microsoft.VSTS.Common.BacklogPriority" type="Double" reportable="detail" />Value Area field
<FIELD name="Value Area" refname="Microsoft.VSTS.Common.ValueArea" type="String">
<REQUIRED />
<ALLOWEDVALUES>
<LISTITEM value="Architectural" />
<LISTITEM value="Business"/>
</ALLOWEDVALUES>
<DEFAULT from="value" value="Business" />
<HELPTEXT>Business = delivers value to a user or another system; Architectural = work to support other stories or components
</HELPTEXT>
</FIELD>
Requirement Type field (CMMI)
<FIELD name="Requirement Type" refname="Microsoft.VSTS.CMMI.RequirementType" type="String" reportable="dimension"> <REQUIRED /> <ALLOWEDVALUES> <LISTITEM value="Scenario" /> <LISTITEM value="Quality of Service" /> <LISTITEM value="Functional" /> <LISTITEM value="Operational" /> <LISTITEM value="Interface" /> <LISTITEM value="Security" /> <LISTITEM value="Safety" /> <LISTITEM value="Business Objective" /> <LISTITEM value="Feature" /> </ALLOWEDVALUES> <DEFAULT from="value" value="Functional" /> </FIELD>WORKFLOWsection Update or verify theWORKFLOWsection as follows:- Agile, User Story: Add transitions from
ActivetoRemovedandResolvedtoRemoved; remove rules that populateActivated ByandActivated Datefields when state=Resolved - Scrum, Product backlog item: Add transition from
CommittedtoRemoved
If you've customized theWORKFLOW, make sure to define the required state-to-metastate mappings in the ProcessConfigurationRequirementBacklogsection.
FORMsection Add or verify the following fields have been added to theFORMsection:- Agile:
<Control FieldName="Microsoft.VSTS.Scheduling.StoryPoints" Type="FieldControl" Label="Story Points" LabelPosition="Left" /> <Control FieldName="Microsoft.VSTS.Common.ValueArea" Type="FieldControl" Label="Value area" LabelPosition="Left" />- CMMI:
<Control Type="FieldControl" FieldName="Microsoft.VSTS.Scheduling.Size" Label="Size" LabelPosition="Left" /> <Control Type="FieldControl" FieldName="Microsoft.VSTS.CMMI.RequirementType" Label="Type" LabelPosition="Left" /> <Control FieldName="Microsoft.VSTS.Common.ValueArea" Type="FieldControl" Label="Value area" LabelPosition="Left" />- Scrum:
<Control FieldName="Microsoft.VSTS.Scheduling.Effort" Type="FieldControl" Label="Effort" LabelPosition="Left" /> <Control FieldName="Microsoft.VSTS.Common.ValueArea" Type="FieldControl" Label="Value area" LabelPosition="Left" />- Agile, User Story: Add transitions from
Edit the Categories definition. Add the WIT to the Requirement category. Here we add Service App.
<CATEGORY name="Requirement Category" refname="Microsoft.RequirementCategory">
   <DEFAULTWORKITEMTYPE name="User Story" />
   <WORKITEMTYPE name="Service App" />
</CATEGORY>
Update or verify ProcessConfiguration definition:
RequirementBacklogsection for the WIT you're adding. Specifically, make sure that the following conditions are met:- Map the start of each workflow state to
type="Proposed" - Map each intermediate workflow state you want to have show up on the board to
type="InProgress" - Map the end of each workflow state to
type="Complete" - Make sure that you have only one State mapped to
type="Complete"
For example, add the Pending workflow state:
<States> <State value="New" type="Proposed" /> <State value="Active" type="InProgress" /> <State value="Pending" type="InProgress" /> <State value="Resolved" type="InProgress" /> <State value="Closed" type="Complete" /> </States>- Map the start of each workflow state to
Add the WIT color definition to the ProcessConfiguration
WorkItemColorssection. For example:<WorkItemColor primary="FF33CC33" secondary="FFD6F5D6" name="Service App" />Update your project:
- Hosted XML: Import your process.
- On-premises XML: Import the definition files you updated in this order:
a. WIT b. Categories
c. ProcessConfiguration
Add a WIT to track it like a task
WITs that you add to the Task Category show up on the sprint backlogs and task boards. The WIT you add must specify required fields to support the Agile planning tools.
Export your process (Hosted XML) or your definition files (On-premises XML) as indicated in First steps.
Edit the WIT definition to support planning tools.
Customize / Syntax to add or update
Stack Rank field(Agile, CMMI)
<FIELD name="Stack Rank" refname="Microsoft.VSTS.Common.StackRank" type="Double" reportable="dimension">
<HELPTEXT>Work first on items with lower-valued stack rank. Set in triage.
</HELPTEXT>
</FIELD>
** Backlog Priority** field (Scrum)
<FIELD name="Backlog Priority" refname="Microsoft.VSTS.Common.BacklogPriority" type="Double" reportable="detail" />Activity field (Agile, Scrum)
<FIELD name="Activity" refname="Microsoft.VSTS.Common.Activity" type="String" reportable="dimension"> <HELPTEXT>Type of work involved</HELPTEXT> <SUGGESTEDVALUES> <LISTITEM value="Development" /> <LISTITEM value="Testing" /> <LISTITEM value="Requirements" /> <LISTITEM value="Design" /> <LISTITEM value="Deployment" /> <LISTITEM value="Documentation" /> </SUGGESTEDVALUES> </FIELD>Discipline field (CMMI)
<FIELD name="Discipline" refname="Microsoft.VSTS.Common.Discipline" type="String" reportable="dimension"> <ALLOWEDVALUES> <LISTITEM value="Analysis" /> <LISTITEM value="User Experience" /> <LISTITEM value="User Education" /> <LISTITEM value="Development" /> <LISTITEM value="Test" /> </ALLOWEDVALUES> </FIELD>Remaining Work field (all)
<FIELD name="Remaining Work" refname="Microsoft.VSTS.Scheduling.RemainingWork" type="Double" reportable="measure" formula="sum">
<HELPTEXT>
An estimate of the work remaining to complete the task (in person hours)
</HELPTEXT>
</FIELD>
Additional scheduling fields (Agile, CMMI)
<FIELD name="Original Estimate" refname="Microsoft.VSTS.Scheduling.OriginalEstimate" type="Double" reportable="measure" formula="sum"> <HELPTEXT> The original estimate of work required to complete the task (in person hours)</HELPTEXT> </FIELD> <FIELD name="Remaining Work" refname="Microsoft.VSTS.Scheduling.RemainingWork" type="Double" reportable="measure" formula="sum"> <HELPTEXT>An estimate of the work remaining to complete the task (in person hours) </HELPTEXT> </FIELD> <FIELD name="Completed Work" refname="Microsoft.VSTS.Scheduling.CompletedWork" type="Double" reportable="measure" formula="sum"> <HELPTEXT> The work that has been completed for this task (in person hours) <HELPTEXT> </FIELD> <FIELD name="Start Date" refname="Microsoft.VSTS.Scheduling.StartDate" type="DateTime" reportable="dimension" /> <FIELD name="Finish Date" refname="Microsoft.VSTS.Scheduling.FinishDate" type="DateTime" reportable="dimension" />WORKFLOWsection
Update or verify theWORKFLOWsection as follows:- Agile, User Story: Add transitions from
ActivetoRemovedandResolvedtoRemoved; remove rules that populateActivated ByandActivated Datefields when state=Resolved - Scrum, Product backlog item: Add transition from
CommittedtoRemoved
If you've customized theWORKFLOW, make sure to define the required state-to-metastate mappings in the ProcessConfigurationTestBacklogsection.
FORMsection
Add or verify the following fields have been added to theFORMsection:- Agile:
<Control FieldName="Microsoft.VSTS.Scheduling.StoryPoints" Type="FieldControl" Label="Story Points" LabelPosition="Left" /> <Control FieldName="Microsoft.VSTS.Common.ValueArea" Type="FieldControl" Label="Value area" LabelPosition="Left" />- CMMI:
<Control Type="FieldControl" FieldName="Microsoft.VSTS.Scheduling.Size" Label="Size" LabelPosition="Left" /> <Control FieldName="Microsoft.VSTS.Common.ValueArea" Type="FieldControl" Label="Value area" LabelPosition="Left" />- Scrum:
<Control FieldName="Microsoft.VSTS.Scheduling.Effort" Type="FieldControl" Label="Effort" LabelPosition="Left" /> <Control FieldName="Microsoft.VSTS.Common.ValueArea" Type="FieldControl" Label="Value area" LabelPosition="Left" />- Agile, User Story: Add transitions from
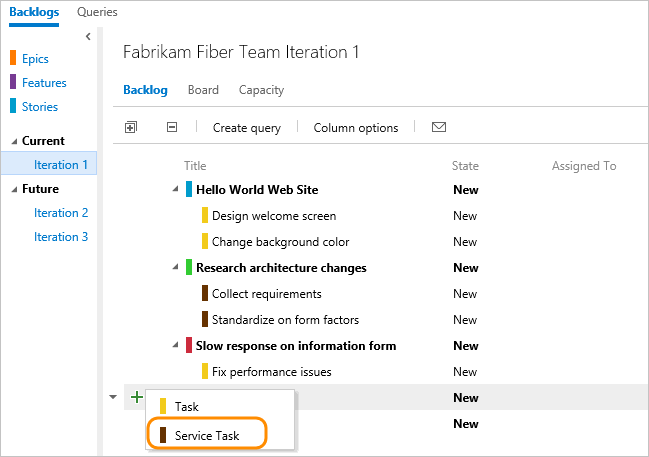
Edit the Categories definition. Add the WIT to the Task category. Here we add Service Task.
<CATEGORY name="Task Category" refname="Microsoft.TaskCategory">
   <DEFAULTWORKITEMTYPE name="Task" />
   <WORKITEMTYPE name="Service Task" />
</CATEGORY>
Update or verify ProcessConfiguration definition:
TaskBacklogsection for the WIT you're adding.
Specifically, make sure that the following conditions are met:- Map the start of each workflow state to
type="Proposed" - Map each intermediate workflow state you want to have show up on the task board to
type="InProgress" - Map the end of each workflow state to
type="Complete" - Make sure that you have only one State mapped to
type="Complete"
For example, add the
Blockedworkflow state:<States> <State value="New" type="Proposed" /> <State value="Active" type="InProgress" /> <State value="Blocked" type="InProgress" /> <State value="Resolved" type="InProgress" /> <State value="Closed" type="Complete" /> </States>- Map the start of each workflow state to
Add the WIT color definition to the ProcessConfiguration
WorkItemColorssection. For example:<WorkItemColor primary="FFF2CB1D" secondary="FFF6F5D2" name="Service Task" />Update your project:
- Hosted XML: Import your process.
- On-premises XML: Import the definition files you updated in this order:
a. WIT
b. Categories
c. ProcessConfiguration
Confirm that you can add the WIT to the task board. Open the task board page, or refresh the page if it's already open.
You should be able to select either Task or Service Task as a linked work item to a user story.
On the task board, drag the work item to update its status. You'll notice that you can't drag an item to a column for which the state isn't valid. For example, you can't drag Task to the Blocked state, or a Task into a resolved state. If you want to use these states, then add them to the workflow definition for the corresponding WIT definition.
Add a WIT to the Bug Category
WITs that you add to the Bug Category will be treated based on the team setting. Because these WITs may be treated either as requirements or tasks, they must meet Agile planning tool requirements for both requirements and tasks.
Export your process (Hosted XML) or your definition files (On-premises XML) as indicated in First steps.
Edit the WIT definition to support planning tools by meeting the conditions listed for Step 2 of Add a WIT to track as requirements and Add a WIT to track as tasks.
Edit the Categories definition. Add the WIT to the Bug Category. Here we add two WITs.
<CATEGORY name="Bug Category" refname="Microsoft.BugCategory">
   <DEFAULTWORKITEMTYPE name="Bug" />
   <WORKITEMTYPE name="Service Bug" />
   <WORKITEMTYPE name="Feedback" />
</CATEGORY>
Update or verify ProcessConfiguration definition:
BugWorkItemssection for the WIT you're adding.Specifically, make sure that the following conditions are met:
- Map the start of each workflow state to
type="Proposed" - Map each intermediate workflow state you want to have show up on the board or Taskboard to
type="InProgress" - Map the end of each workflow state to
type="Complete" - Make sure that you have only one State mapped to
type="Complete"
For example, add the
Investigateworkflow state:<States> <State value="New" type="Proposed" /> <State value="Active" type="InProgress" /> <State value="Investigate" type="InProgress" /> <State value="Resolved" type="InProgress" /> <State value="Closed" type="Complete" /> </States>- Map the start of each workflow state to
Add the WIT color definition to the ProcessConfiguration
WorkItemColorssection. For example:<WorkItemColor primary="FFF2CB1D" secondary="FFF6F5D2" name="Service Bug" /> <WorkItemColor primary="FFFF00FF" secondary="FFFFCCFF" name="Feedback" />Update your project:
- Hosted XML: Import your process.
- On-premises XML: Import the definition files you updated in this order:
a. WIT
b. Categories
c. ProcessConfiguration
Confirm that the WIT appears on the backlogs and boards as expected and that you can add it through the backlogs as expected.
Import and export definition files (On-premises XML)
Use the witadmin commands to import and export definition files. For details, see witAdmin: Customize and manage objects for tracking work.
Tip
With witadmin, you can import and export definition files. Other tools you can use include the Process Editor (requires that you have installed a version of Visual Studio). Install the Process Template editor from the Visual Studio Marketplace.
- Open a Command Prompt window according to the instructions provided in witAdmin: Customize and manage objects for tracking work. For example:
Enter the
witadmincommand, substituting your data for the arguments that are shown. For example, to import a WIT:witadmin importwitd /collection:CollectionURL /p:"ProjectName" /f:"DirectoryPath\WITDefinitionFile.xml"For CollectionURL specify the URL of a project collection and for ProjectName specify the name of a project defined within the collection. You must specify the URL in the following format:
http://ServerName:Port/VirtualDirectoryName/CollectionName.For DirectoryPath, specify the path to the
WorkItem Tracking/TypeDefinitionsfolder that holds the process template that you downloaded. The directory path must follow this structure:Drive:\TemplateFolder\WorkItem Tracking\TypeDefinitions.For example, import the ServiceApp WIT:
witadmin importwitd /collection:"http://MyServer:8080/tfs/DefaultCollection"/p:MyProject /f:"DirectoryPath/ServiceApp.xml"
Use these commands to export and import WITs, categories, and process configuration:
witadmin exportwitd /collection:CollectionURL /p:"ProjectName" /n:TypeName /f:"DirectoryPath\WITDefinitionFile.xml"
witadmin importwitd /collection:CollectionURL /p:"ProjectName" /f:"DirectoryPath\WITDefinitionFile.xml"
witadmin exportcategories /collection:"CollectionURL" /p:"ProjectName" /f:"DirectoryPath/categories.xml"
witadmin importcategories /collection:"CollectionURL" /p:"ProjectName" /f:"DirectoryPath/categories.xml"
witadmin exportprocessconfig /collection:"CollectionURL" /p:"ProjectName" /f:"DirectoryPath/ProcessConfiguration.xml"
witadmin importprocessconfig /collection:"CollectionURL" /p:"ProjectName" /f:"DirectoryPath/ProcessConfiguration.xml"
Related articles
We've just shown how to add another WIT to your backlogs or boards. However, if you want to add another WIT to act as a portfolio backlog, see Add portfolio backlogs.
See Customize your work tracking experience for an overview of all the options available for customizing work tracking objects.
To learn how hierarchical or nested elements are displayed on a backlog or board, see How backlogs and boards display hierarchical (nested) items.