Note
Access to this page requires authorization. You can try signing in or changing directories.
Access to this page requires authorization. You can try changing directories.
In this article, you learn how to create a private reverse lookup DNS zone and add pointer (PTR) records to the zone using the Azure portal.
What is reverse DNS?
Reverse DNS (as the name indicates) is the opposite process to forward DNS. Reverse enables you to resolve an IP address to a name (for example: 10.1.2.5 --> myvm.contoso.com), whereas forward DNS resolves a name to an IP address. Azure Private DNS supports both IPv6 and IPv4 reverse DNS.
IPv6 reverse DNS
IPv6 reverse DNS zones use the special domain ip6.arpa. For more information about IPv6 reverse zones and records, see the IPv6 sections that describe creating an IPv6 reverse zone and adding an IPv6 reverse DNS record in the Host reverse DNS lookup zones in Azure DNS article for public DNS. Azure Private DNS also supports IPv6 reverse DNS zones under the requirements and restrictions described in this article.
IPv4 reverse DNS zones
IPv4 reverse DNS zones contain pointer (PTR) records and use the reserved domain name: in-addr.arpa. These reverse DNS zones follow a hierarchical naming pattern. For example:
- 10.in-addr.arpa contains all PTR records for IPv4 addresses in the 10.0.0.0/8 address space.
- 1.10.in-addr.arpa contains all PTR records for IPv4 addresses in the 10.1.0.0/16 address space.
- 2.1.10.in-addr.arpa contains only PTR records for IPv4 addresses in the 10.1.2.0/24 address space.
Private IPv4 reverse DNS zones are intended for use with private IP address space as defined in RFC 1918.
IPv4 reverse DNS records
To create an IPv4 reverse DNS record in your zone, add the remaining IP address octets in reverse order into the appropriate in-addr.arpa zone and provide a fully qualified domain name value (also called a ptrdname). The number of remaining IP address octets depend on the scope of the reverse DNS zone. For example:
- 10.1.2.5 in the 10.in-addr.arpa zone appears as:
5.2.1 IN PTR myvm.contoso.com. - 10.1.2.5 in the 1.10.in-addr.arpa zone appears as:
5.2 IN PTR myvm.contoso.com. - 10.1.2.5 in the 2.1.10.in-addr.arpa zone appears as:
5 IN PTR myvm.contoso.com.
Important
A reverse DNS zone for address space with a longer prefix takes precedence. For example, if all three zones contain entries for the IPv4 address 10.1.2.5 as shown here, only the entry in the 2.1.10.in-addr.arpa zone will be used. If the longer prefix zone (2.1.10.in-addr.arpa) exists, then all reverse DNS entries for the corresponding /24 address space must be entered in this zone.
Requirements and restrictions
- Autoregistration isn't supported for reverse DNS.
- A virtual network link from the reverse zone is required to enable DNS resolution of PTR records. The process of adding a virtual network link is demonstrated in this article. This is different from reverse DNS for public IP addresses, which don't require a virtual network link.
- You can also forward DNS queries to a DNS resolver if the reverse zone is linked to the resolver's VNet.
- Reverse zones must follow the naming guidelines described in this article and in RFC 3172.
Create a reverse lookup DNS zone
Sign in to the Azure portal.
Select Create a resource, search for and select Private DNS zones, then select + Create.
On the Create DNS zone page, select, or enter the following settings:
Setting Details Subscription Select your subscription. Resource group Select or create a new resource group. Name Enter a name for the DNS zone. In this example, the class C reverse DNS zone name 2.1.10.in-addr.arpa is used. Location Select the location for the resource group. The location is already be selected if you're using a previously created resource group. See the following example:

Select Review create, and then select Create.
Create a DNS PTR record
Select + Record set to open the Add record set pane.
As described previously in this article, PTR records in a class C reverse DNS zone are single digit entries. In this example, enter the following:
Setting Details Name Enter 5.Type Select PTR - Pointer record type.TTL and TTL unit Use default values. Domain name Enter myvm.contoso.com.See the following example:

Select OK to create the reverse DNS record.

Add a virtual network link
In order for resources to resolve the reverse DNS zone, you must add a virtual network link pointing to the VNet that contains those resources. You can add multiple virtual network links. In this example, a link is added to the VNet: myeastvnet that contains a virtual machine. The virtual machine is then used to verify reverse DNS resolution.
Open the private zone overview, and then select Virtual network links under Settings.
Select + Add.
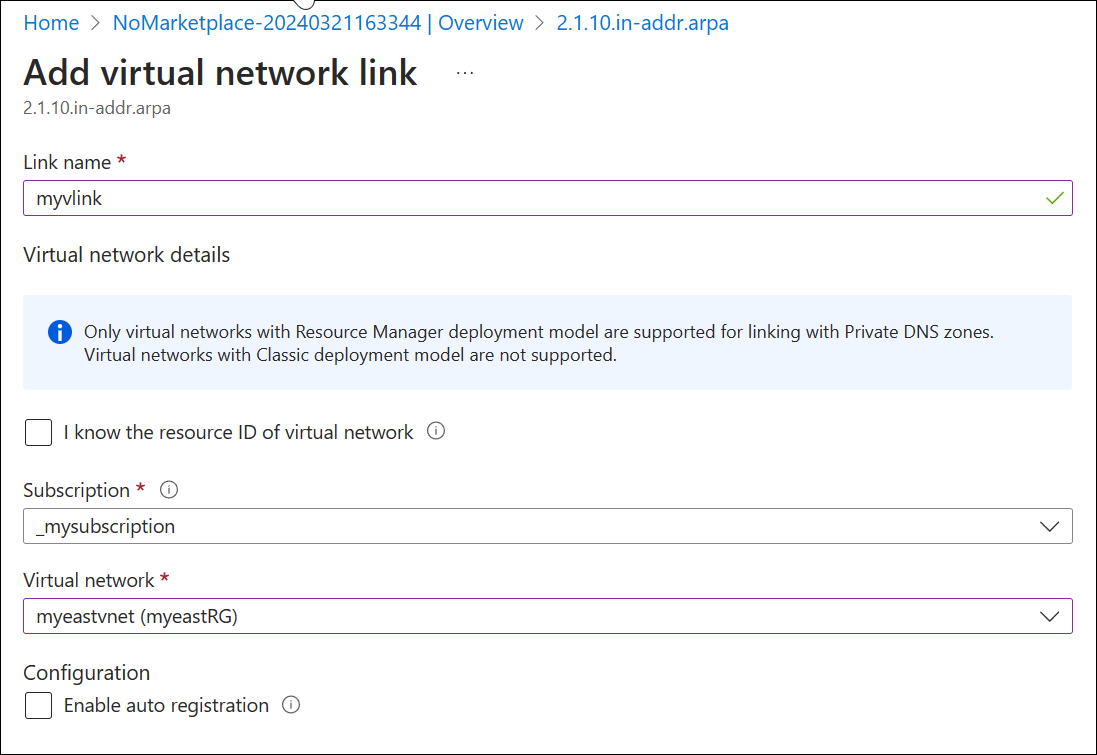
Enter the following values on the Add virtual network link page:
Setting Details Link name Enter a name for your link. For example: myvlink. Subscription Select your subscription. Virtual network Choose the virtual network that you wish to link to this private DNS zone. Configuration Don't select the checkbox to enable auto registration. Selecting this setting prevents creation of the virtual network link. See the following example:

Select OK and verify that the link is displayed on the Virtual network links page.
Test DNS resolution
Using a VM in the linked virtual network: open a command line, type nslookup 10.1.2.5 and press ENTER.
If reverse DNS resolution is working, you see the ptrdname (FQDN value) that you entered into the reverse DNS zone:
C:\>nslookup 10.1.2.5
Server:  UnKnown
Address:  168.63.129.16

Name:    myvm.contoso.com
Address:  10.1.2.5
Next steps
- For more information on reverse DNS, see reverse DNS lookup on Wikipedia.
- Learn how to manage reverse DNS records for your Azure services.