Note
Access to this page requires authorization. You can try signing in or changing directories.
Access to this page requires authorization. You can try changing directories.
Important
Items marked preview in this article are currently in preview. This preview is provided without a service-level agreement, and Microsoft doesn't recommend it for production workloads. Certain features might not be supported or might have constrained capabilities. For more information, see Supplemental Terms of Use for Microsoft Azure Previews.
Note
This feature is gradually rolling out and is currently available in the West Central US and Japan West regions.
A skill is a bundle of files plus a SKILL.md manifest that codifies a process—a report format, a data-cleanup routine, or a multistep build workflow. When you attach a skill to the shell tool, the model reads the manifest, decides when the skill applies, and runs the skill's scripts in the shell environment.
This article shows how to attach skills to the shell tool in a toolbox, connect a prompt agent to that toolbox, and keep skill content up to date. A prompt agent can use skills only through the shell tool. A toolbox versions the shell configuration once and lets you reuse it across agents.
Important
Skills can influence planning, tool selection, and command execution. Treat every skill as privileged code and review it before you attach it. For more information, see Risks and safety.
Prerequisites
An active Microsoft Foundry project.
A model deployment that supports the Responses API and the shell tool.
RBAC: Foundry User role on the Foundry project.
Important
The Foundry RBAC roles were recently renamed. Foundry User, Foundry Owner, Foundry Account Owner, and Foundry Project Manager were previously named Azure AI User, Azure AI Owner, Azure AI Account Owner, and Azure AI Project Manager. You might still see the previous names in some places while the rename rolls out. The role IDs and core permissions are unchanged by the rename.
The tools for your language:
- Python:
pip install azure-ai-projects azure-identity openai - .NET:
dotnet add package Azure.Identity. The .NET samples call the REST API withHttpClient. - JavaScript: Node.js 18 or later. The samples use the built-in
fetchfunction and top-levelawait, so run them as ES modules, for example in a.mjsfile. - Java: Java 17 or later. The samples use the built-in
java.net.http.HttpClient.
- Python:
For the JavaScript and Java samples, an access token in the
FOUNDRY_ACCESS_TOKENenvironment variable. To get a token with the Azure CLI, runaz account get-access-token --resource https://ai.azure.com --query accessToken --output tsv.A skill bundle uploaded to your project. See Use skills in Foundry.
Important
Shell tool requests and model calls can incur charges. Review current Azure pricing before you use this feature in production. You're responsible for understanding the behavior of deployed skills and the data handling practices of external endpoints that receive data.
Feature support
| Capability | REST API | Python | .NET | JavaScript | Java | Prompt agent |
|---|---|---|---|---|---|---|
| Attach skills to a shell tool in a toolbox | ✔️ | ✔️ | ✔️ | ✔️ | ✔️ | ✔️ |
What's in a skill
A skill bundle has a single top-level folder that contains a SKILL.md manifest and any supporting files:
csv-insights/
├── SKILL.md
├── scripts/
│   └── summarize.py
└── templates/
    └── report.md
The SKILL.md file declares the skill's name and description in YAML front matter and provides the instructions that the model follows when it invokes the skill. Front matter validation follows the Agent Skills specification.
Attach a skill to the shell tool in a toolbox
Add the shell tool to a toolbox version and choose a container option. The following examples use container_auto, which is the recommended option. Foundry provisions a sandboxed container for the request and mounts the skill files before the model runs any commands. The environment field is required on the toolbox form of the shell tool. For an explicit container ID, see Choose a container option.
In the following examples, replace <skill_id> with the skill_id value from the skill object returned when you uploaded the skill.
from azure.identity import DefaultAzureCredential
from azure.ai.projects import AIProjectClient
from azure.ai.projects.models import MCPTool, PromptAgentDefinition

# Format: "https://<resource-name>.services.ai.azure.com/api/projects/<project-name>"
PROJECT_ENDPOINT = "your_project_endpoint"

project = AIProjectClient(
    endpoint=PROJECT_ENDPOINT,
    credential=DefaultAzureCredential(),
    allow_preview=True,
)

# Create a toolbox version that mounts a skill in a shell container.
toolbox = project.toolboxes.create_version(
    name="csv-insights-toolbox",
    description="Shared shell environment with the csv-insights skill.",
    tools=[{
        "type": "shell",
        "name": "csv-insights-shell",
        "environment": {
            "type": "container_auto",
            "skills": [
                {"type": "skill_reference", "skill_id": "<skill_id>"}
            ],
        },
    }],
)

# The toolbox exposes an MCP-compatible endpoint.
TOOLBOX_MCP_URL = (
    f"{PROJECT_ENDPOINT}/toolboxes/{toolbox.name}"
    f"/versions/{toolbox.version}/mcp?api-version=v1"
)
print(TOOLBOX_MCP_URL)
Reference: Azure AI Projects client library for Python | Group tools with a toolbox
Create a toolbox with the Azure Developer CLI
Save the following content as shell-toolbox.json:
{
  "tools": [
    {
      "type": "shell",
      "name": "pdf-skill-shell",
      "environment": {
        "type": "container_auto",
        "skills": [
          { "type": "skill_reference", "skill_id": "<pdf_skill_id>" }
        ]
      }
    }
  ]
}
Create the toolbox from the JSON file:
azd ai toolbox create <toolbox-name> --from-file ./shell-toolbox.json --project-endpoint <project-endpoint> --no-prompt
The azd ai toolbox create command with --from-file forwards raw shell tool entries, including environment.skills. The azd ai toolbox skill add command is different. It attaches skills at the toolbox level and doesn't configure a shell tool's environment.skills. To mount skills in a shell tool, define them in the shell tool entry.
To check the result, run azd ai toolbox show for the toolbox and confirm that the shell tool includes the environment.skills entry. Then connect an agent to the toolbox and ask it to list its tools. The list should include pdf-skill-shell.
Select a skill in the Foundry portal
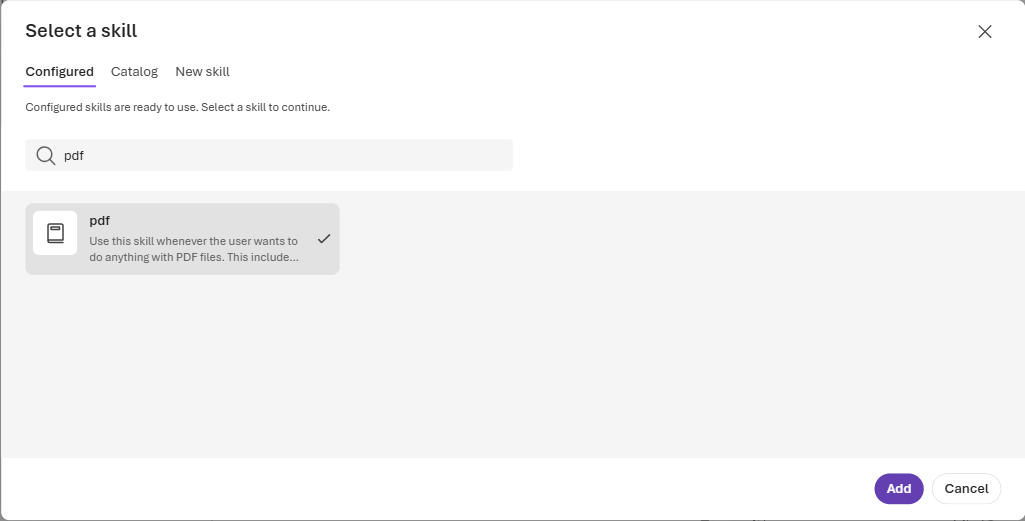
You can also select an uploaded skill for a prompt agent in the Foundry portal. In the agent's Tools section, select Add > Add skills. On the Configured tab, select the skill, and then select Add. Select Configure for the skill to choose container_auto or a specific container ID.
Connect an agent to the toolbox
Attach the toolbox to the agent as an MCP tool. The agent discovers the shell tool and its mounted skills through the toolbox endpoint.
agent = project.agents.create_version(
    agent_name="csv-insights-agent",
    definition=PromptAgentDefinition(
        model="gpt-5-mini",
        instructions="You analyze CSV files and produce short reports.",
        tools=[
            MCPTool(
                server_label="toolbox",
                server_url=TOOLBOX_MCP_URL,
                require_approval="never",
            )
        ],
    ),
    description="Prompt agent that runs the csv-insights skill.",
)

with project.get_openai_client(agent_name=agent.name) as openai:
    response = openai.responses.create(
        input="Use the csv-insights skill to explain its purpose. Don't read or process any files."
    )

print(response.output_text)
Replace gpt-5-mini with the name of your own model deployment. For authentication options on the toolbox endpoint, see Group tools with a toolbox.
Note
A newly created toolbox endpoint takes a short time to become available. If the first request fails with HTTP 404 (Not Found) while enumerating tools, wait a few seconds and retry.
Test the skill in the agent playground
In the agent playground, ask the agent to use the skill for a specific task. The response shows the toolbox call and the result.

Choose a container option
The shell tool supports two container options. Set the container option through the API by using the type field in the environment object:
| Option | type |
When to use | Skills |
|---|---|---|---|
| Automatic container (recommended) | container_auto |
Use for most skill workflows. Foundry creates and manages the container for the request. | Set skills on the shell tool. It accepts skill_reference and inline entries. |
| Explicit container ID | container_reference |
Use when you need to keep files and state across requests. Pass the ID of an existing container in container_id. |
Select the container ID when you configure the skill in the Foundry portal. |
An explicit container expires after 20 minutes without activity. Foundry deletes it one hour after it's created, even if it stays active. When the container is deleted, its data is removed.
To use an explicit container ID, add the skill to your agent in the Foundry portal, select Configure for the skill, and then choose the container ID. For more information, see Select a skill in the Foundry portal.
Sample toolbox configurations
Use these request bodies with the toolbox version request shown earlier. Each shell tool needs a unique name when a toolbox contains more than one shell tool. These samples mount skills in each shell tool's environment.skills array. They don't use the toolbox-level skills array, which exposes skills as MCP resources.
One skill in one shell tool
{
  "description": "One shell tool with one skill.",
  "tools": [
    {
      "type": "shell",
      "name": "pdf-shell",
      "description": "Run PDF workflows.",
      "environment": {
        "type": "container_auto",
        "skills": [
          { "type": "skill_reference", "skill_id": "<pdf_skill_id>" }
        ]
      }
    }
  ]
}
Two skills in one shell tool
{
  "description": "One shell tool with two skills.",
  "tools": [
    {
      "type": "shell",
      "name": "document-shell",
      "description": "Run PDF and CSV workflows.",
      "environment": {
        "type": "container_auto",
        "skills": [
          { "type": "skill_reference", "skill_id": "<pdf_skill_id>" },
          { "type": "skill_reference", "skill_id": "<csv_skill_id>" }
        ]
      }
    }
  ]
}
One skill in each of two shell tools
{
  "description": "Two shell tools, each with one skill.",
  "tools": [
    {
      "type": "shell",
      "name": "pdf-shell",
      "description": "Run PDF workflows.",
      "environment": {
        "type": "container_auto",
        "skills": [
          { "type": "skill_reference", "skill_id": "<pdf_skill_id>" }
        ]
      }
    },
    {
      "type": "shell",
      "name": "csv-shell",
      "description": "Run CSV workflows.",
      "environment": {
        "type": "container_auto",
        "skills": [
          { "type": "skill_reference", "skill_id": "<csv_skill_id>" }
        ]
      }
    }
  ]
}
A container_auto environment also accepts these optional fields:
| Field | Description |
|---|---|
file_ids |
Up to 50 uploaded file IDs to mount under /mnt/data. See Mount uploaded files. |
skills |
Up to 200 skills to mount. |
Each skill_reference entry takes a skill_id (1–64 characters) and an optional version, which accepts a positive integer or latest. Omit version to use the skill's default version.
Tip
After a skill is mounted, the model decides when to use it. For more deterministic behavior, name the skill in your prompt. For example, Use the csv-insights skill to summarize the report.
Mount uploaded files
You can't give a shell skill an input file, such as a PDF, by attaching the file to an agent message. Upload the file and mount it in the shell container with environment.file_ids before you ask the agent to process it. Adding a skill in environment.skills mounts the skill bundle, not your input files. In a container_auto environment, Foundry mounts uploaded files under /mnt/data.
Upload files through the account-level Files API. Use the account endpoint rather than the project endpoint, and identify the project with the x-aml-project-id header:
POST https://{resource-name}.services.ai.azure.com/openai/v1/files
Authorization: Bearer {token}
x-aml-project-id: {project_guid}
Content-Type: multipart/form-data

purpose=assistants&file=@report.csv
Wait until the response reports a status of processed, then add the file ID to the environment:
{
  "type": "shell",
  "name": "csv-insights-shell",
  "environment": {
    "type": "container_auto",
    "file_ids": ["<file_id>"],
    "skills": [
      { "type": "skill_reference", "skill_id": "<skill_id>" }
    ]
  }
}
Tell the agent where to look, because the model doesn't know the mount path on its own. For example, The uploaded CSV is under /mnt/data.
Mount an inline skill
Use an inline skill when you don't want to upload the bundle first. Supply the zipped bundle as base64-encoded data in the skills array:
{
  "type": "shell",
  "environment": {
    "type": "container_auto",
    "skills": [
      {
        "type": "inline",
        "name": "csv-insights",
        "description": "Summarize CSV files and produce a markdown report.",
        "source": {
          "type": "base64",
          "media_type": "application/zip",
          "data": "<base64-encoded-zip>"
        }
      }
    ]
  }
}
An inline skill lives only for the lifetime of the container.
Shell runtime details
The hosted container gives each request or container session a managed Linux environment:
- The default working directory is
/mnt/data, which is the supported path for user-downloadable artifacts. - The following runtimes are preinstalled:
- Python 3.11
- Node.js 22.16.0
- Java 17
- PHP 8.2
- Ruby 3.1
- Go 1.23.2
- Commands are non-interactive, and they don't run with
sudo. - Network access isn't supported. Hosted containers don't have outbound network access, so skills can't download or install packages at runtime. Include the files, scripts, and dependencies that your skill needs in the skill bundle.
For container reuse, lifetime, and artifact download details, see Use the shell tool with the Azure OpenAI Responses API.
Update a skill
Skills are versioned, and each upload creates a new version. A skill_reference uses the skill's default version unless you set the version field to an integer or "latest". To roll out an updated skill, upload a new version and either promote it to the default version or create a new toolbox version pinned to the new version number.
Troubleshooting
Use this section to fix common problems with skills in the shell tool.
A skill script fails because a package isn't installed
Symptom: The skill script fails with an error such as ModuleNotFoundError in Python or Cannot find module in Node.js. If the agent tries to run pip install or npm install, that command also fails.
Cause: The container has only the preinstalled runtimes and their default packages. It has no outbound network access, so the skill can't download packages while it runs.
Fix:
- Find out which packages the container already has. Ask the agent to run a command such as
python -m pip listand return the output. - Compare that list with the imports in your skill scripts to find what's missing.
- Remove the dependency, replace it with a preinstalled package, or include the package files in the skill bundle. For Python, put pure-Python packages in a folder in the bundle and add that folder to
sys.pathin your script. - Upload a new version of the skill. For more information, see Update a skill.
The agent doesn't use the skill from an existing toolbox
Symptom: The agent is connected to a toolbox that has the skill, but the agent doesn't load the skill or run its scripts.
Cause: A prompt agent can run skills only through the shell tool. If the toolbox doesn't include a shell tool, or the skill isn't attached to the shell tool, the agent can't run the skill.
Fix:
- Check that the toolbox version has a tool with
"type": "shell". - Check that the skill is attached to the shell tool:
- API, SDK, or Azure Developer CLI: The skill is listed in the shell tool's
environment.skillsarray. Theazd ai toolbox skill addcommand doesn't add skills to this array. - Foundry portal: Select Configure for the skill, and then choose
container_autoor a container ID.
- API, SDK, or Azure Developer CLI: The skill is listed in the shell tool's
- If either is missing, create a new toolbox version with a shell tool that mounts the skill. For more information, see Attach a skill to the shell tool in a toolbox.
- Make sure the agent uses the new toolbox version, and then ask the agent to list its tools. The shell tool should be in the list.
- To make the agent use the skill, name the skill in your prompt.
A file attached to a message isn't available to the skill
Symptom: You attach a file, such as a PDF, to an agent message. The skill can't find the file in the container.
Cause: Files attached to a message aren't copied to the shell container. A skill can only read files that are mounted in the container.
Fix: Upload the file through the Files API and add its file ID to the shell tool's environment.file_ids array. Then tell the agent where the file is, for example, /mnt/data. For more information, see Mount uploaded files.
The container expired
Symptom: A shell tool that uses an explicit container ID stops working, and earlier files or state are gone.
Cause: An explicit container expires after 20 minutes without activity. Foundry also deletes it one hour after it's created, even if it stays active. The container data is removed when the container is deleted.
Fix: Use container_auto unless you need to keep files and state across requests. With container_auto, Foundry creates and manages the container for each request, so you don't need to track container expiration. If you need an explicit container, select Configure for the skill in the Foundry portal and choose an active container ID. For more information, see Choose a container option.
Risks and safety
Inspect a skill before you attach it to an agent. Skills introduce security risks such as prompt-injection-driven data exfiltration and unauthorized command execution. Follow these practices:
- Treat skills as privileged code and instructions. Skill content can influence planning, tool usage, and command execution.
- Don't expose an open skills catalog to end users. Open selection of arbitrary skills increases the risk of prompt injection, policy bypass, and destructive actions.
- Integrate skills at the developer level. Map each skill to a specific product workflow instead of letting users pick skills.
- Require approval for sensitive actions. Gate write or high-impact actions behind explicit approval and policy checks.