Auto Scale HDInsight on AKS Clusters
Important
This feature is currently in preview. The Supplemental Terms of Use for Microsoft Azure Previews include more legal terms that apply to Azure features that are in beta, in preview, or otherwise not yet released into general availability. For information about this specific preview, see Azure HDInsight on AKS preview information. For questions or feature suggestions, please submit a request on AskHDInsight with the details and follow us for more updates on Azure HDInsight Community.
The sizing of any cluster to meet job performance and manage costs ahead of time is always tricky, and hard to determine! One of the lucrative benefits of building data lake house over Cloud is its elasticity, which means to use autoscale feature to maximize the utilization of resources at hand. Auto scale with Kubernetes is one key to establishing a cost optimized ecosystem. With varied usage patterns in any enterprise, there could be variations in cluster loads over time that could lead to clusters being under-provisioned (lousy performance) or overprovisioned (unnecessary costs due to idle resources).
The autoscale feature offered in HDInsight on AKS can automatically increase or decrease the number of worker nodes in your cluster. Auto scale uses the cluster metrics and scaling policy used by the customers.
This feature is well suited for mission-critical workloads, which may have
- Variable or unpredictable traffic patterns and require SLAs on high performance and scale or
- Predetermined schedule for required worker nodes to be available to successfully execute the jobs on the cluster.
Auto Scale with HDInsight on AKS Clusters makes the clusters cost efficient, and elastic on Azure.
With Auto scale, customers can scale down clusters without affecting workloads. It's enabled with advanced capabilities such as graceful decommissioning and cooling period. These capabilities empower users to make informed choices on addition and removal of nodes based on the current load of the cluster.
How it works
This feature works by scaling the number of nodes within preset limits based on cluster metrics or a defined schedule of scale-up and scale-down operations. There are two types of conditions to trigger autoscale events: threshold-based triggers for various cluster performance metrics (called load-based scaling) and time-based triggers (called schedule-based scaling).
Load-based scaling changes the number of nodes in your cluster, within a range that you set, to ensure optimal CPU usage and minimize running cost.
Schedule-based scaling changes the number of nodes in your cluster based on a schedule of scale-up and scale-down operations.
Note
Auto scale does not support changing SKU type of an existing cluster.
Cluster compatibility
The following table describes the cluster types that are compatible with the Auto scale feature, and what’s available or planned.
| Workload | Load Based | Schedule Based |
|---|---|---|
| Flink | Planned | Yes |
| Trino | Yes** | Yes** |
| Spark | Yes** | Yes** |
**Graceful decommissioning is configurable.
Scaling Methods
Schedule-based scaling:
When your jobs are expected to run on fixed schedules and for a predictable duration or when you anticipate low usage during specific times of the day For example, test and dev environments in post-work hours, end-of day jobs.
Load based scale:
When the load patterns fluctuate substantially and unpredictably during the day, for example, Order data processing with random fluctuations in load patterns based on various factors.
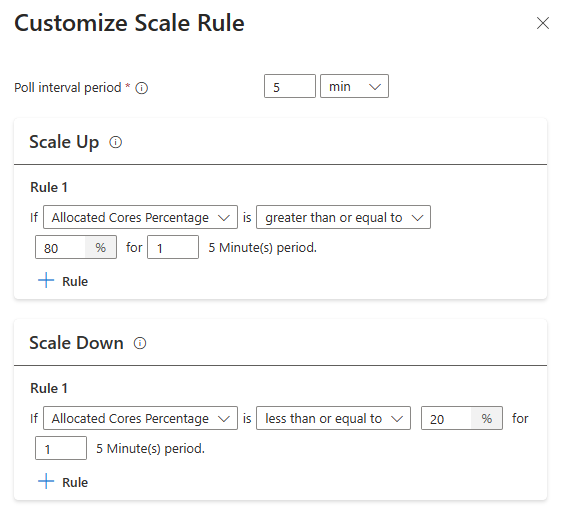
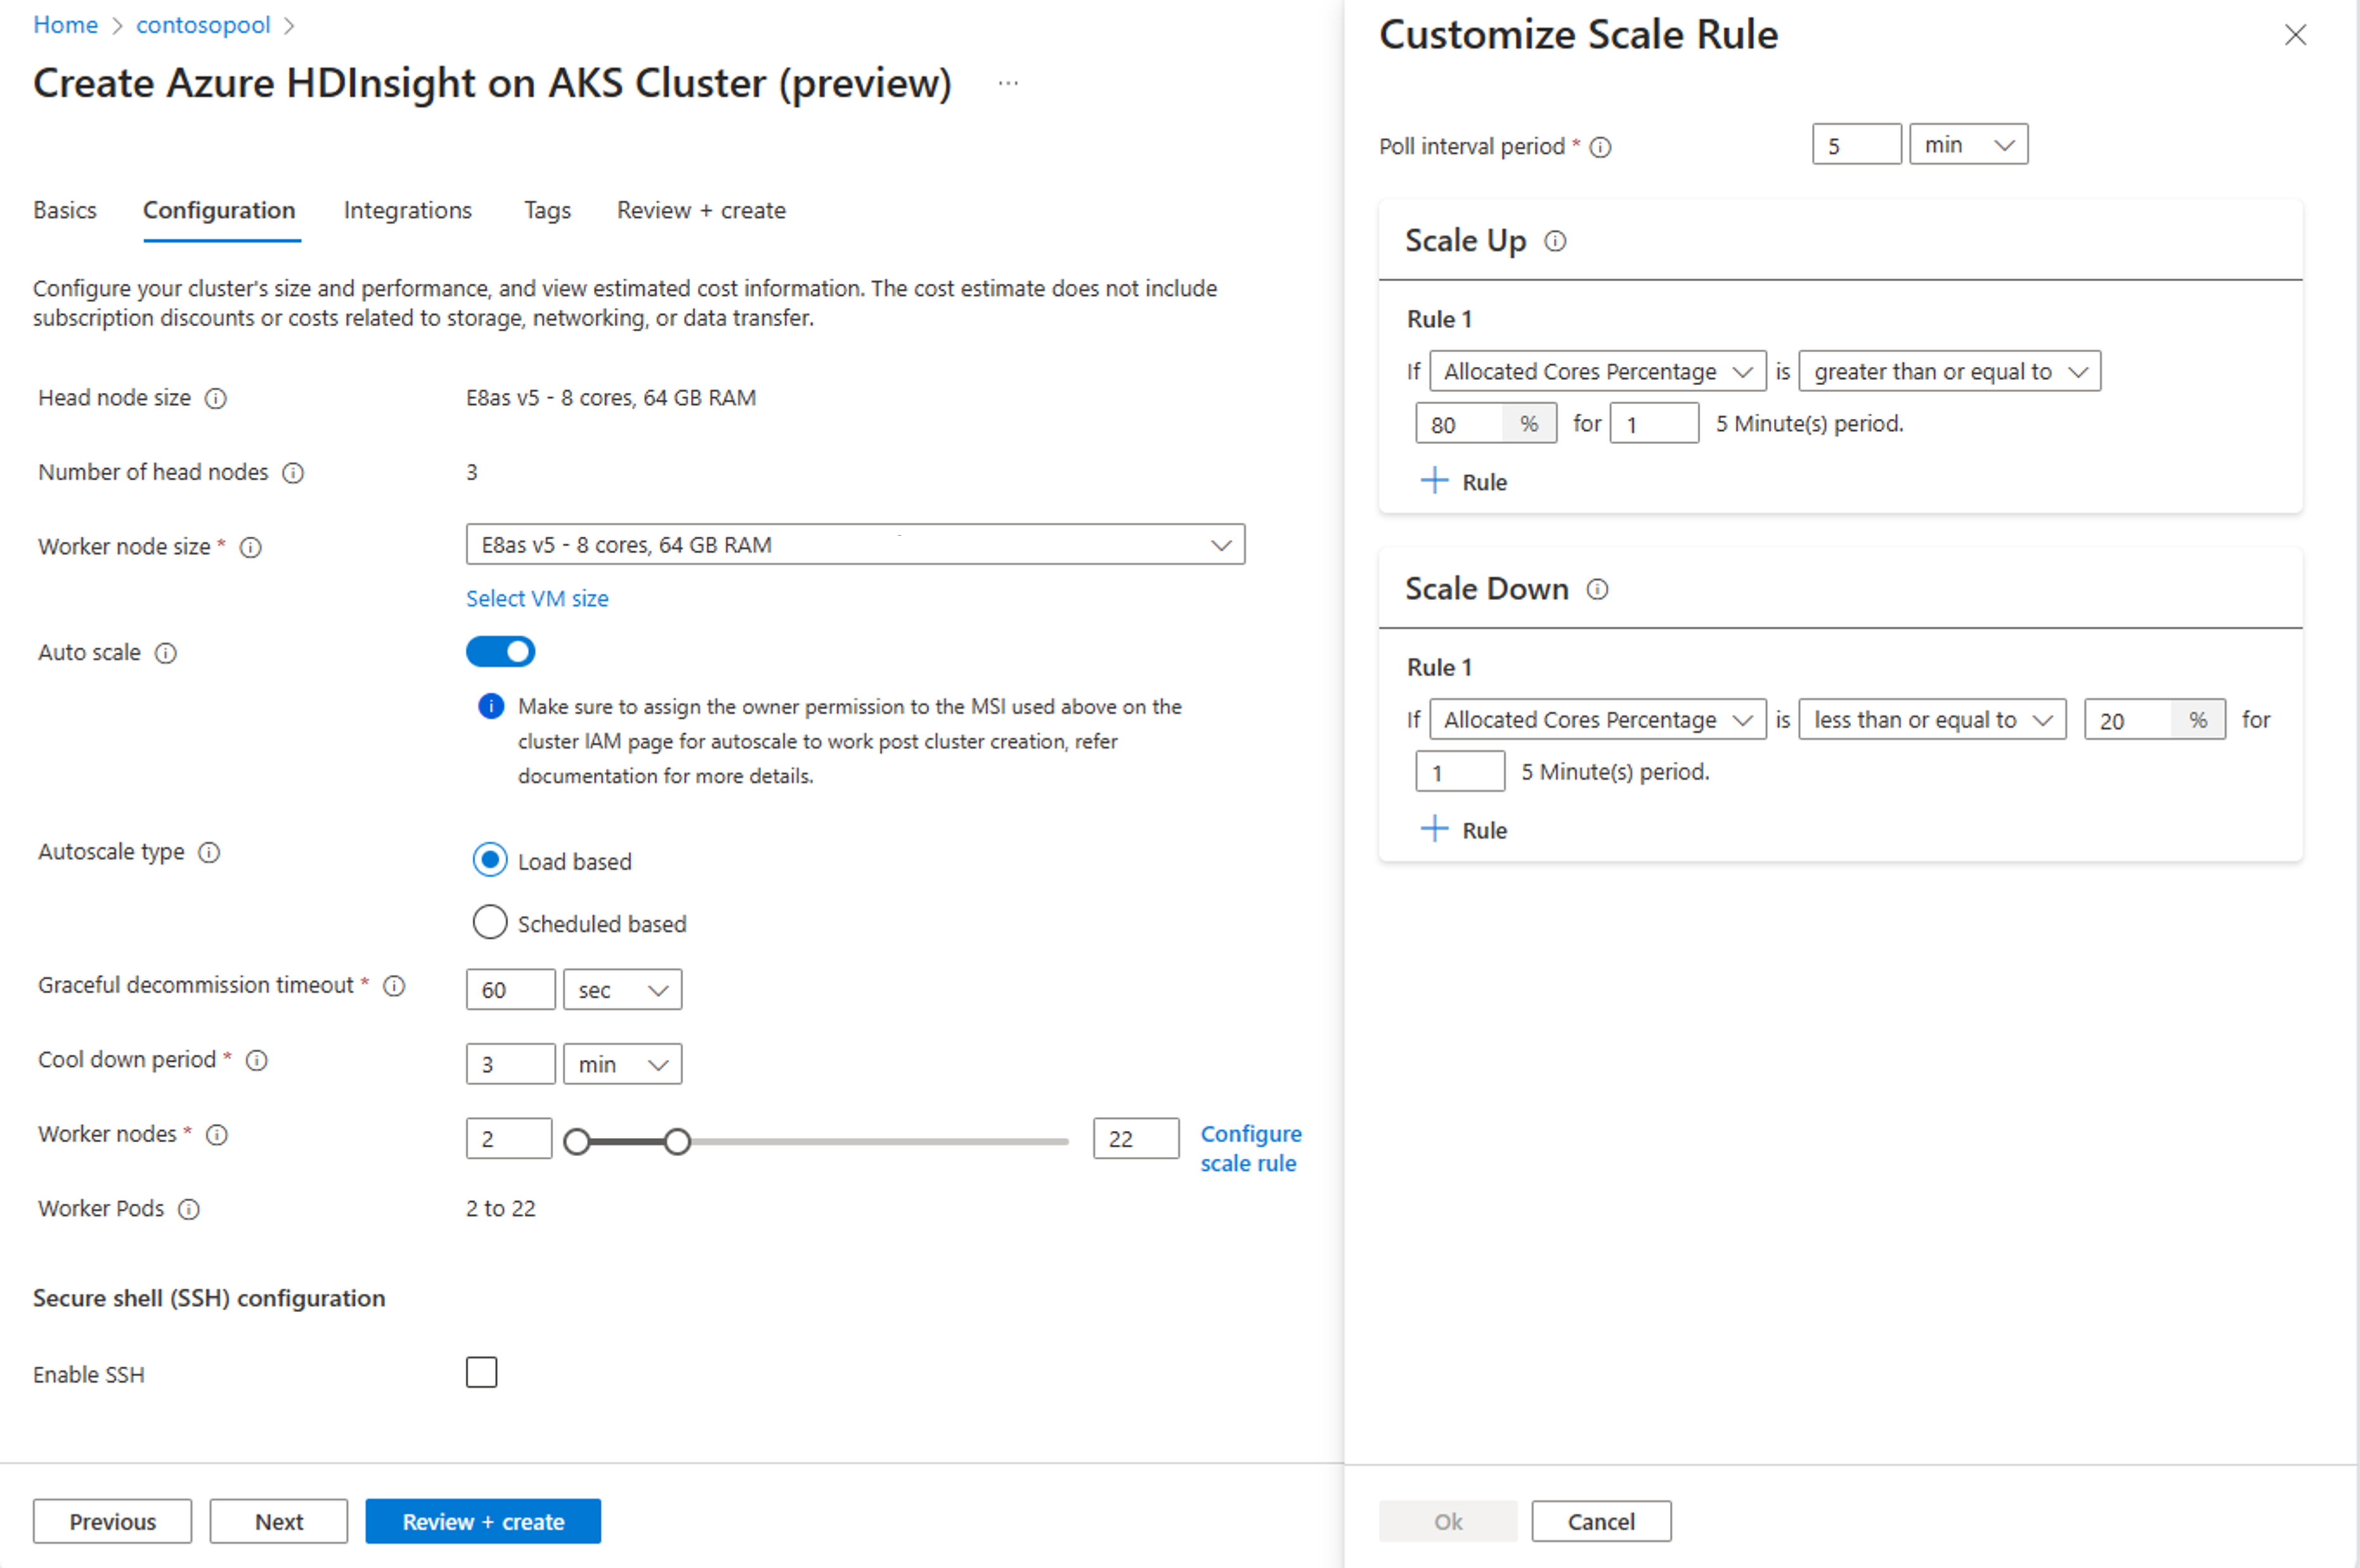
With the new, configure scale rule option, you can now customize the scale rules.
Tip
- Scale Up rules take precedence when one or more rules are triggered. Even if only one of the rules for scale up suggest cluster being under-provisioned, cluster will try to scale up. For scale down to happen, no scale up rule should be triggered.


Load-based scale conditions
When the following conditions are detected, Auto scale issues a scale request
| Scale-up | Scale-down |
|---|---|
| Allocated Cores are greater than 80% for 5-minutes poll interval (1-minute check period) | Allocated Cores are less than or equal to 20% for 5-minutes poll interval (1-minute check period) |
For scale-up, Auto scale issues a scale-up request to add the required number of nodes. The scale-up is based on how many new worker nodes are needed to meet the current CPU and memory requirements. This value is capped to maximum number of worker nodes set.
For scale-down, Auto scale issues a request to remove some nodes. The scale-down considerations include the number of pods per node, the current CPU and memory requirements, and worker nodes, which are candidates for removal based on current job execution. The scale down operation first decommissions the nodes, and then removes them from the cluster.
Important
The Auto scale Rule Engine proactively flushes old events every 30 minutes to optimize system memory. As a result, there exists an upper bound limit of 30 minutes on the scaling rule interval. To ensure the consistent and reliable triggering of scaling actions, it's imperative to set the scaling rule interval to a value which is lesser than the limit. By adhering to this guideline, you can guarantee a smooth and efficient scaling process while effectively managing system resources.
Cluster metrics
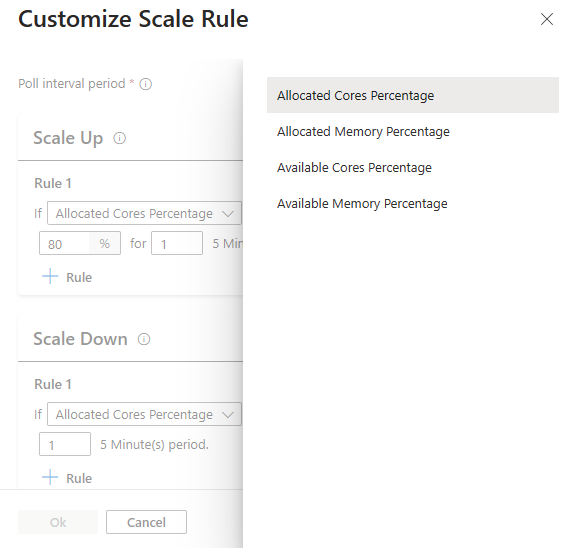
Auto scale continuously monitors the cluster and collects the following metrics for Load based autoscale:
Cluster Metrics Available for Scaling Purposes
| Metric | Description |
|---|---|
| Available Cores Percentage | The total number of cores available in the cluster compared to the total number of cores in the cluster. |
| Available Memory Percentage | The total memory (in MB) available in the cluster compared to the total amount of memory in the cluster. |
| Allocated Cores Percentage | The total number of cores allocated in the cluster compared to the total number of cores in the cluster. |
| Allocated Memory Percentage | The amount of memory allocated in the cluster compared to the total amount of memory in the cluster. |
By default, the above metrics are checked every 300 seconds, it is also configurable when you customize the poll interval with customize autoscale option. Auto scale makes scale-up or scale-down decisions based on these metrics.
Note
By default Auto scale uses default resource calculator for YARN for Apache Spark. Load based scaling is available for Apache Spark Clusters.
Graceful Decommissioning
Enterprises need ways to achieve petabyte scale with autoscaling and to decommission resources gracefully when they're no longer needed. In such scenario, graceful decommissioning feature comes handy.
Graceful decommissioning allows jobs to complete even after autoscale has triggered decommissioning of the worker nodes. This feature allows nodes to continue to be provisioned until jobs are complete.
Trino : Workers have Graceful Decommission enabled by default. Coordinator allows terminating worker to finish its tasks for configured amount of time before removing the worker from the cluster. You can configure the timeout either using native Trino parameter
shutdown.grace-period, or on Azure portal service configuration page.Apache Spark : Scaling down may impact/stop any running jobs in the cluster. If you enable Graceful Decommissioning settings on the Azure portal, it incorporates Graceful Decommission of YARN Nodes and ensures that any work in progress on a worker node is complete before the node removed from the HDInsight on AKS cluster.
Cool down period
To avoid continuous scale up operations, autoscale engine waits for a configurable interval before initiating another set of scale up operations. The default value is set to 180 seconds
Note
- In custom scale rules, no rule trigger can have a trigger interval greater than 30 minutes. After an auto scaling event occurs, the amount of time to wait before enforcing another scaling policy.
- Cool down period should be greater than policy interval, so the cluster metrics can get reset.
Get started
For autoscale to function, you're required to assign the owner or contributor permission to the MSI (used during cluster creation) at the cluster level, using IAM on the left pane.
Refer to the following illustration and steps listed on how to add role assignment
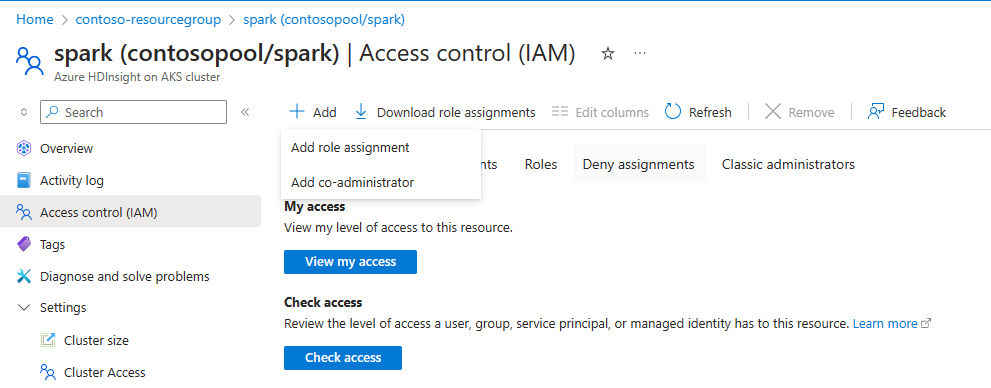
Select add role assignment,
- Assignment type: Privileged administrator roles
- Role: Owner or Contributor
- Members: Choose Managed identity and select the User-assigned managed identity, which was given during cluster creation phase.
- Assign the role.

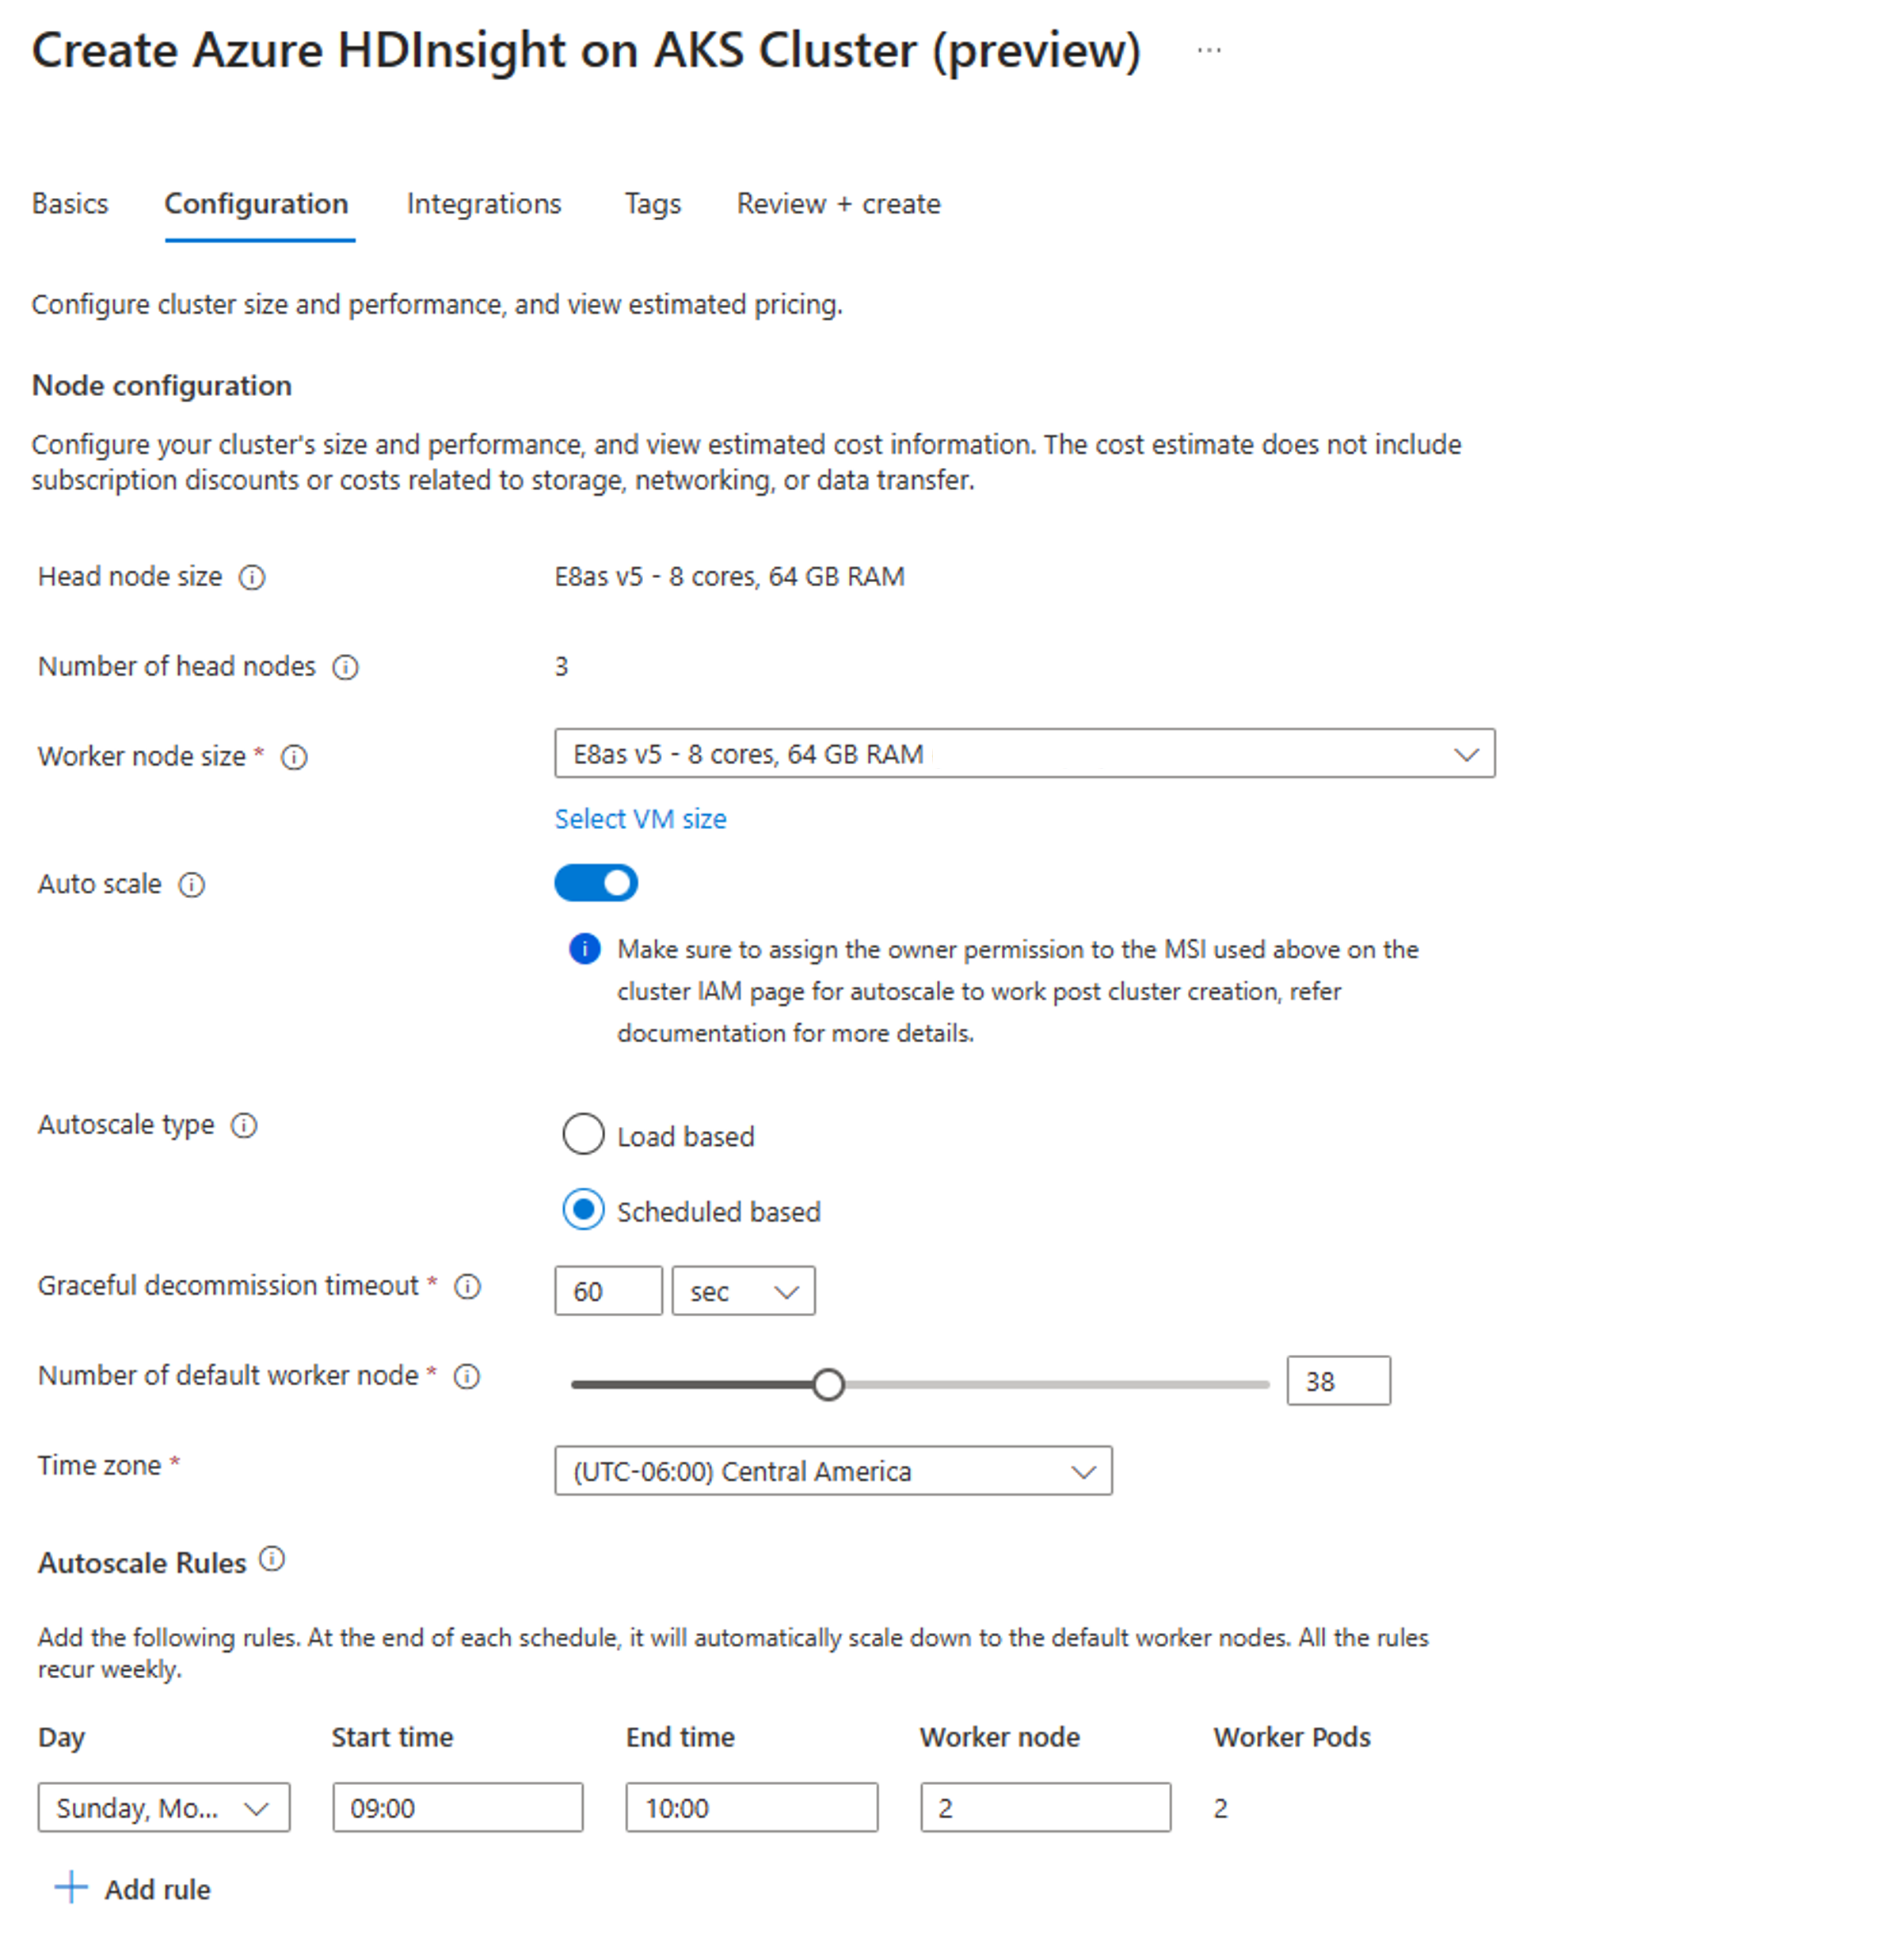
Create a cluster with Schedule based Auto scale
Once your cluster pool is created, create a new cluster with your desired workload (on the Cluster type), and complete the other steps as part of the normal cluster creation process.
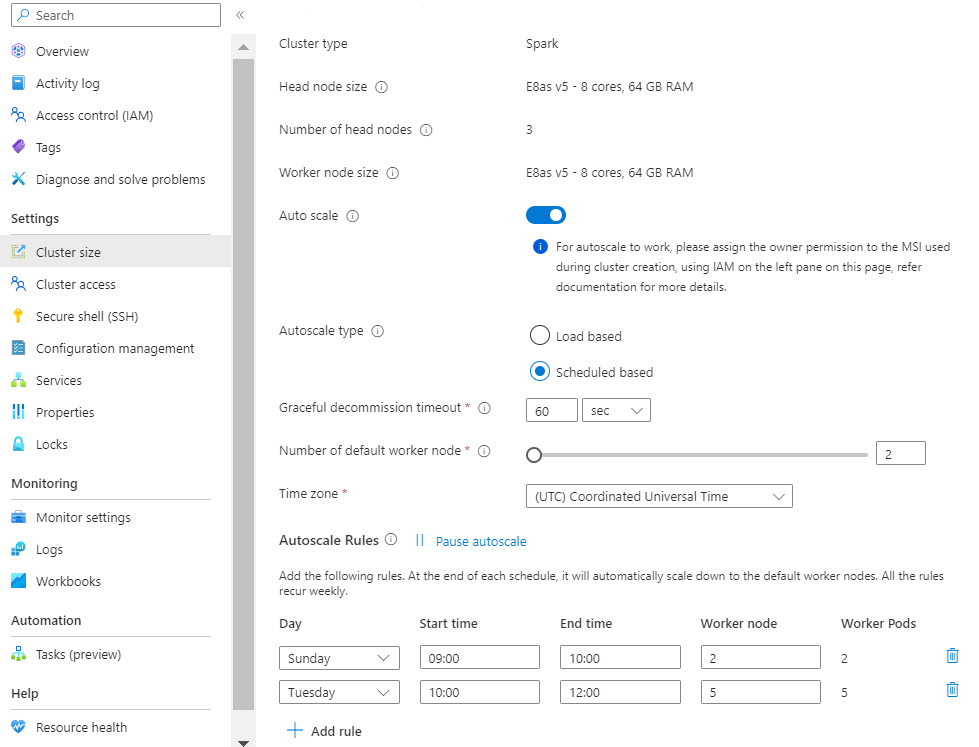
On the Configuration tab, enable Auto scale toggle.
Select Schedule based autoscale
Select your timezone and then click + Add rule
Select the days of the week that the new condition should apply to.
Edit the time the condition should take effect and the number of nodes that the cluster should be scaled to.
Note
- User should have “owner” or “contributor” role on the cluster MSI for autoscale to work.
- The default value defines the initial size of the cluster when it's created.
- The difference between two schedules is set to default by 30 minutes.
- The time value follows 24-hour format
- In case of a continuous window of beyond 24 hours across days, you're required to set Auto scale schedule across days, and autoscale assumes 23:59 as 00:00 (with same node count) spanning across two days from 22:00 to 23:59, 00:00 to 02:00 as 22:00 to 02:00.
- The schedules are set in Coordinated Universal Time (UTC), by default. You can always update to time zone that corresponds to your local time zone in the drop down available. When you are on a time zone that observes Daylight Savings, the schedule does not adjust automatically, you are required to manage the schedule updates accordingly.

Create a cluster with Load based Auto scale
Once your cluster pool is created, create a new cluster with your desired workload (on the Cluster type), and complete the other steps as part of the normal cluster creation process.
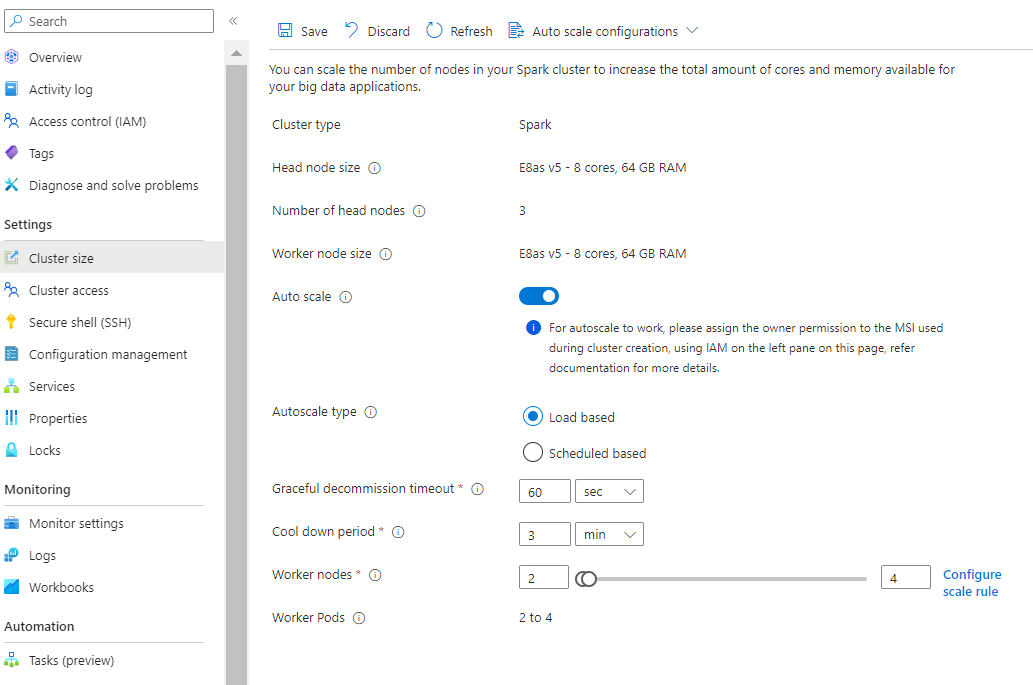
On the Configuration tab, enable Auto scale toggle.
Select Load based autoscale
Based on the type of workload, you have options to add graceful decommission timeout, cool down period
Select the minimum and maximum nodes, and if necessary configure the scale rules to customize Auto scale to your needs.
Tip
- Your subscription has a capacity quota for each region. The total number of cores of your head nodes and the maximum worker nodes can't exceed the capacity quota. However, this quota is a soft limit; you can always create a support ticket to get it increased easily.
- If you exceed the total core quota limit, You'll receive an error message saying
The maximum node count you can select is {maxCount} due to the remaining quota in the selected subscription ({remaining} cores). - Scale Up rules take precedence when one or more rules are triggered. Even if only one of the rules for scale up suggest cluster being under-provisioned, cluster will try to scale up. For scale down to happen, no scale up rule should be triggered.
- In public preview, HDInsight on AKS supports upto 500 nodes in a cluster.

Create a cluster with a Resource Manager template
Schedule based auto scale
You can create an HDInsight on AKS cluster with schedule-based Autoscaling using an Azure Resource Manager template, by adding an autoscale to the clusterProfile -> autoscaleProfile section.
The autoscale node contains a recurrence that has a timezone and schedule that describes when the change takes place. For a complete Resource Manager template, see sample JSON
{
  "autoscaleProfile": {
    "enabled": true,
    "autoscaleType": "ScheduleBased",
    "gracefulDecommissionTimeout": 60,
    "scheduleBasedConfig": {
      "schedules": [
        {
          "days": [
            "Monday",
            "Tuesday",
            "Wednesday"
          ],
          "startTime": "09:00",
          "endTime": "10:00",
          "count": 2
        },
        {
          "days": [
            "Sunday",
            "Saturday"
          ],
          "startTime": "12:00",
          "endTime": "22:00",
          "count": 5
        },
        {
          "days": [
            "Monday",
            "Tuesday",
            "Wednesday",
            "Thursday",
            "Friday"
          ],
          "startTime": "22:00",
          "endTime": "23:59",
          "count": 6
        },
        {
          "days": [
            "Monday",
            "Tuesday",
            "Wednesday",
            "Thursday",
            "Friday"
          ],
          "startTime": "00:00",
          "endTime": "05:00",
          "count": 6
        }
      ],
      "timeZone": "UTC",
      "defaultCount": 110
    }
  }
}
Tip
- You are required to set non-conflicting schedules using ARM deployments, to avoid scaling operation failures.
Load based auto scale
You can create an HDInsight on AKS cluster with load-based Autoscaling using an Azure Resource Manager template, by adding an autoscale to the clusterProfile -> autoscaleProfile section.
The autoscale node contains
- a poll interval, cool down period,
- graceful decommission,
- minimum and maximum nodes,
- standard threshold rules,
- scaling metrics that describes when the change takes place.
For a complete Resource Manager template, see sample JSON as follows
  {
  "autoscaleProfile": {
    "enabled": true,
    "autoscaleType": "LoadBased",
    "gracefulDecommissionTimeout": 60,
    "loadBasedConfig": {
      "minNodes": 2,
      "maxNodes": 157,
      "pollInterval": 300,
      "cooldownPeriod": 180,
      "scalingRules": [
        {
          "actionType": "scaleup",
          "comparisonRule": {
            "threshold": 80,
            "operator": " greaterThanOrEqual"
          },
          "evaluationCount": 1,
          "scalingMetric": "allocatedCoresPercentage"
        },
        {
          "actionType": "scaledown",
          "comparisonRule": {
            "threshold": 20,
            "operator": " lessThanOrEqual"
          },
          "evaluationCount": 1,
          "scalingMetric": "allocatedCoresPercentage"
        }
      ]
    }
  }
}
Using the REST API
To enable or disable Auto scale on a running cluster using the REST API, make a PATCH request to your Auto scale endpoint: https://management.azure.com/subscriptions/{{USER_SUB}}/resourceGroups/{{USER_RG}}/providers/Microsoft.HDInsight/clusterpools/{{CLUSTER_POOL_NAME}}/clusters/{{CLUSTER_NAME}}?api-version={{HILO_API_VERSION}}
- Use the appropriate parameters in the request payload. The json payload could be used to enable Auto scale.
- Use the payload (autoscaleProfile: null) or use flag (enabled, false) to disable Auto scale.
- Refer to the JSON samples mentioned on the above step for reference.
Pause Auto scale for a running cluster
We have introduced pause feature in Auto scale. Now, using the Azure portal, you can pause Auto scale on a running cluster. The below diagram illustrates how to select the pause and resume autoscale

You can resume once you would like to resume the autoscale operations.

Tip
When you configure multiple schedules, and you're pausing the autoscale, it doesn't trigger the next schedule. The node count remains same, even if the nodes are in a decommissioned state.
Copy Auto Scale Configurations
Using the Azure portal, you can now copy the same autoscale configurations for a same cluster shape across your cluster pool, you can use this feature and export or import the same configurations.

Monitoring Auto scale activities
Cluster status
The cluster status listed in the Azure portal can help you monitor Auto scale activities. All of the cluster status messages that you might see are explained in the list.
| Cluster status | Description |
|---|---|
| Succeeded | The cluster is operating normally. All of the previous Auto scale activities have been completed successfully. |
| Accepted | The cluster operation (for example: scale up) is accepted, waiting for the operation to be completed. |
| Failed | This means a current operation failed due to some reason, the cluster maybe not functional. |
| Canceled | The current operation stands canceled. |
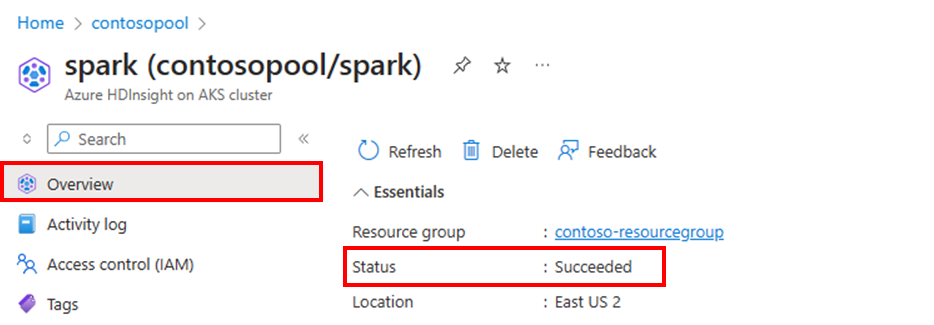
To view the current number of nodes in your cluster, go to the Cluster size chart on the Overview page for your cluster.

Operation history
You can view the cluster scale-up and scale-down history as part of the cluster metrics. You can also list all scaling actions over the past day, week, or other period.

Additional resources
Feedback
Coming soon: Throughout 2024 we will be phasing out GitHub Issues as the feedback mechanism for content and replacing it with a new feedback system. For more information see: https://aka.ms/ContentUserFeedback.
Submit and view feedback for