Create cluster pool and cluster

Important

This feature is currently in preview. The Supplemental Terms of Use for Microsoft Azure Previews include more legal terms that apply to Azure features that are in beta, in preview, or otherwise not yet released into general availability. For information about this specific preview, see Azure HDInsight on AKS preview information. For questions or feature suggestions, please submit a request on AskHDInsight with the details and follow us for more updates on Azure HDInsight Community.

HDInsight on AKS has the concept of cluster pools and clusters.

  • Cluster pools are a logical grouping of clusters and maintain a set of clusters in the same pool, which helps in building robust interoperability across multiple cluster types. It can be created within an existing virtual network or outside a virtual network.

    A cluster pool in HDInsight on AKS corresponds to one cluster in AKS infrastructure.

  • Clusters are individual compute workloads, such as Apache Spark, Apache Flink, or Trino, which can be created in the same cluster pool.

For creating Apache Spark, Apache Flink, or Trino clusters, you need to first create a cluster pool.

Prerequisites

Ensure that you have completed the subscription prerequisites and resource prerequisites before creating a cluster pool.

Create a cluster pool

  1. Sign in to Azure portal.

  2. In the Azure portal search bar, type "HDInsight on AKS cluster pool" and select "Azure HDInsight on AKS cluster pools" from the drop-down list.

    Diagram showing search bar in Azure portal.

  3. Click + Create.

    Diagram showing create button.

  4. In the Basics tab, enter the following information:

    Diagram showing cluster pool creation basic tab.

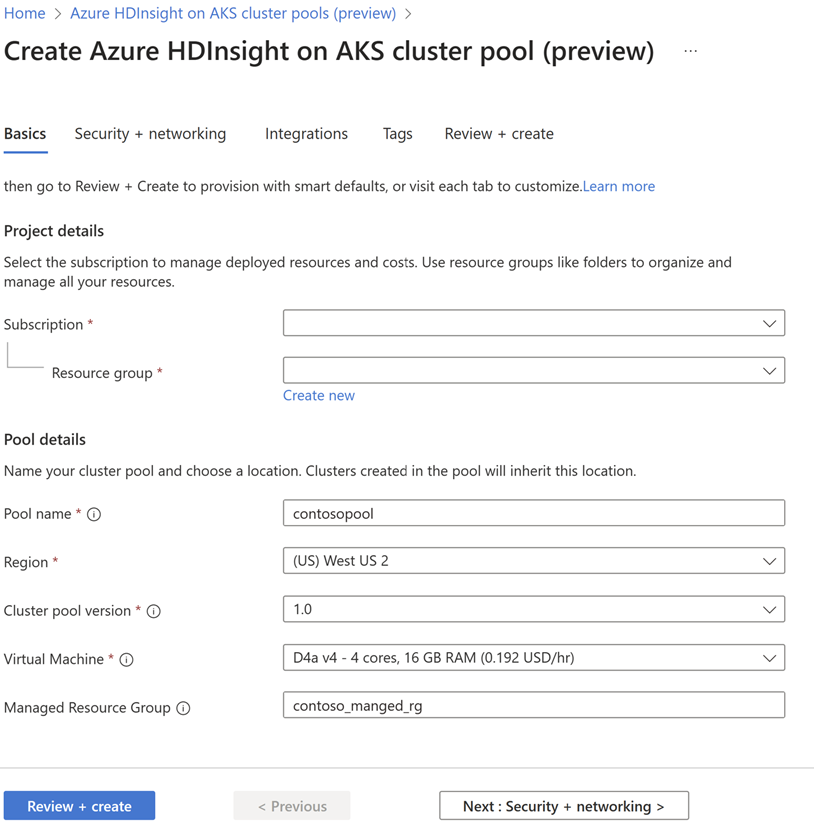
    Property Description
    Subscription From the drop-down list, select the Azure subscription under which you want to create HDInsight on AKS cluster pool.
    Resource group From the drop-down list, select an existing resource group, or select Create new.
    Pool name Enter the name of the cluster pool to be created. Cluster pool name length can't be more than 26 characters. It must start with an alphabet, end with an alphanumeric character, and must only contain alphanumeric characters and hyphens.
    Region From the drop-down list, select the region for the cluster pool. Check region availability. For cluster pools in a virtual network, the region for the virtual network and the cluster pool must be same.
    Cluster pool version From the drop-down list, select the HDInsight on AKS cluster pool version.
    Virtual machine From the drop-down list, select the virtual machine size for the cluster pool based on your requirement.
    Managed resource group (Optional) Provide a name for managed resource group. It holds ancillary resources created by HDInsight on AKS.

    Select Next: Security + networking to continue.

  5. On the Security + networking page, provide the following information:

    Diagram showing cluster pool creation network and security tab.

    Property Description
    Virtual network (VNet) From the drop-down list, select a virtual network, which is in the same region as the cluster pool.
    Subnet From the drop-down list, select the name of the subnet that you plan to associate with the cluster pool.

    Select Next: Integrations to continue.

  6. On the Integrations page, provide the following information:

    Diagram showing cluster pool creation integration tab.

    Property Description
    Log Analytics (Optional) Select this option to enable Log analytics to view insights and logs directly in your cluster by sending metrics and logs to a Log Analytics Workspace.
    Azure Prometheus You can enable this option after cluster pool creation is completed.

    Select Next: Tags to continue.

  7. On the Tags page, enter any tags (optional) you’d like to assign to the cluster pool.

    Diagram showing cluster pool creation tags tab.

    Property Description
    Name Enter a name (key) that help you identify resources based on settings that are relevant to your organization. For example, "Environment" to track the deployment environment for your resources.
    Value Enter the value that helps to relate to the resources. For example, "Production" to identify the resources deployed to production.
    Resource Select the applicable resource type.

    Select Next: Review + create to continue.

  8. On the Review + create page, look for the Validation succeeded message at the top of the page and then click Create.

    The Deployment is in process page is displayed while the cluster pool is being created, and the Your deployment is complete page is displayed once the cluster pool is fully deployed and ready for use.

    Diagram showing cluster pool review and create tab.

    If you navigate away from the page, you can check the status of the deployment by clicking Notifications icon.

    Tip

    For troubleshooting any deployment errors, you can refer this page.

Once the cluster pool deployment completes, continue to use the Azure portal to create a Trino, Flink, and Spark cluster.

Create a cluster

There are three ways to create an Azure HDInsight on AKS cluster from the Azure portal:

  • Search and create “Azure HDInsight on AKS cluster” from the marketplace.
  • Search and select “Azure HDInsight on AKS clusters” in the Azure portal to create cluster from the page listing all HDInsight on AKS clusters.
  • Create cluster by selecting New in the Overview page of an existing cluster pool. In this option you have two ways of creating clusters.
    • Create cluster by providing minimum number of inputs by not using advanced configuration. This option prefills the prerequisite configuration fields with smart defaults and autocreates mandatory resources.

      Virtual Machine SKU size is prefilled with the least costing recommended SKU. In the absence of any recommended SKU, it is prefilled with the SKU with the least vCores and maximum quota available at the time of cluster creation. The cluster would be created with a default constant number of five nodes. Flink and Trino clusters would have two head nodes while Spark clusters would have three head nodes.

      The user assigned managed identity and storage account will be autocreated in the managed resource group. You can review the configurations of the cluster, which would be created on the Review+create tab. Once you click Create, “The Deployment is in progress” page is displayed while the cluster is being created. A message that "Your deployment is complete" would be displayed once the cluster is fully deployed and ready for use.

      Diagram showing basic mode of cluster creation.

    • If you wish to have more flexibility to customize the cluster configurations, toggle “Use advanced configuration” to On.

Important

For creating a cluster in a new cluster pool, assign AKS agentpool MSI "Managed Identity Operator" role on the user-assigned managed identity created as part of resource prerequisites. When a user has permission to assign the Azure RBAC roles, it's assigned automatically.

AKS agentpool managed identity is created during cluster pool creation. You can identify the AKS agentpool managed identity by (your clusterpool name)-agentpool. Follow these steps to assign the role.

For a quickstart, refer to the following steps.

  1. When the cluster pool creation completes, click Go to resource from the Your deployment is complete page or the Notifications area. If the Go to resource option isn't available, type HDInsight on AKS cluster pool in the search bar on the Azure portal, and then select the cluster pool you created.

  2. Click + New cluster from and then provide the following information:

    Screenshot showing create new cluster option.

    Diagram showing how to create a new cluster.

    Property Description
    Subscription By default, it's populated with the subscription used for the cluster pool.
    Resource group By default, it's populated with the resource group used for the cluster pool.
    Cluster pool Represents the cluster pool in which the cluster has to be created. To create a cluster in a different pool, find that cluster pool in the portal and click + New cluster.
    Region By default, it's populated with the region used for the cluster pool.
    Cluster pool version By default, it's populated with the version used for the cluster pool.
    HDInsight on AKS version From the drop-down list, select the HDInsight on AKS version. For more information, see versioning.
    Cluster type From the drop-down list, select the type of Cluster you want to create: Trino, Flink, or Spark.
    Cluster package Select the cluster package with component version available for the selected cluster type.
    Cluster name Enter the name of the new cluster.
    User-assigned managed identity Select the managed identity to use with the cluster.
    Storage account (ADLS Gen2) Select a storage account and a container that is the default location for cluster logs and other output. It's mandatory for Apache Flink and Spark cluster type.
    Virtual network (VNet) The virtual network for the cluster. It's derived from the cluster pool.
    Subnet The virtual network subnet for the cluster. It's derived from the cluster pool.

    Click Next: Configuration to continue.

  3. On the Configuration page, provide the following information:

    Diagram showing configuration tab.

    Property Description
    Head node size This value is same as the worker node size.
    Number of head nodes This value is set by default based on the cluster type.
    Worker node size From the drop-down list, select the recommended SKU or you can choose the SKU available in your subscription by clicking Select VM size.
    Number of worker nodes Select the number of worker nodes required for your cluster.
    Autoscale (Optional) Select this option to enable the autoscale capability
    Secure shell (SSH) configuration (Optional) Select this option to enable SSH node. By enabling SSH, more VM nodes are created.

    Note

    You will see extra section to provide service configurations for Apache Flink clusters.

    Click Next: Integrations to continue.

  4. On the Integrations page, provide the following information:

    Diagram showing integration tab.

    Property Description
    Log Analytics (Optional) Select this option to enable Log analytics to view insights and logs directly in your cluster by sending metrics and logs to a Log Analytics Workspace.
    Azure Prometheus (Optional) Select this option to enable Azure Managed Prometheus to view Insights and Logs directly in your cluster by sending metrics and logs to an Azure Monitor workspace.

    Note

    To enable Log Analytics and Azure Prometheus, it should be first enabled at the cluster pool level.

    Click Next: Tags to continue.

  5. On the Tags page, enter any tags(optional) you’d like to assign to the cluster.

    Screenshot showing tags page.

    Property Description
    Name Enter a name (key) that help you identify resources based on settings that are relevant to your organization. "Environment" to track the deployment environment for your resources.
    Value Enter the value that helps to relate to the resources. "Production" to identify the resources deployed to production.
    Resource Select the applicable resource type.

    Select Next: Review + create to continue.

  6. On the Review + create page, look for the Validation succeeded message at the top of the page and then click Create.

    Diagram showing cluster review and create tab.

    The Deployment is in process page is displayed while the cluster is being created, and the "Your deployment is complete" page is displayed once the cluster is fully deployed and ready for use.

    Tip

    For troubleshooting any deployment errors, you can refer to this page.