Note
Access to this page requires authorization. You can try signing in or changing directories.
Access to this page requires authorization. You can try changing directories.
Storage targets are back-end storage for files that are accessed through an Azure HPC Cache. You can add NFS storage (like an on-premises hardware system), or store data in Azure Blob.
The cache presents all of the storage targets in one aggregated namespace. The namespace paths are configured separately after you add the storage targets.
Remember that the storage exports must be accessible from your cache's virtual network. For on-premises hardware storage, you might need to set up a DNS server that can resolve hostnames for NFS storage access. Read more in DNS access.
Add storage targets after creating your cache. Follow this process:
- Create the cache
- Define a storage target (information in this article)
- Create the client-facing paths (for the aggregated namespace)
The procedure to add a storage target is slightly different depending on the type of storage it uses. Details for each are below.
Choose the correct storage target type
You can select from three storage target types: NFS, Blob, and ADLS-NFS. Choose the type that matches the kind of storage system you'll use to store your files during this HPC Cache project.
NFS - Create an NFS storage target to access data on a network-attached storage (NAS) system. This can be an on-premises storage system or another storage type that's accessible with NFS.
- Requirements: NFS storage requirements
- Instructions: Add a new NFS storage target
Blob - Use a blob storage target to store your working files in a new Azure Blob container. This container can only be read or written to from the Azure HPC Cache.
- Prerequisites: Blob storage requirements
- Instructions: Add a new Azure Blob storage target
ADLS-NFS - The ADLS-NFS storage target accesses data from an NFS-enabled Blob container. You can pre-load the container by using standard NFS commands, and the files can be read later with NFS.
- Prerequisites: ADLS-NFS storage requirements
- Instructions: Add a new ADLS-NFS storage target
Add a new Azure Blob storage target
A new Blob storage target needs an empty Blob container or a container that is populated with data in the Azure HPC Cache cloud file system format. Read more about pre-loading a Blob container in Move data to Azure Blob storage.
The Azure portal Add storage target page includes the option to create a new Blob container just before you add it.
Note
- For NFS-mounted blob storage, use the ADLS-NFS storage target type.
- High-throughput cache configurations do not support standard Azure Blob storage targets. Use NFS-enabled blob storage (ADLS-NFS) instead.
From the Azure portal, open your cache instance and click Storage targets on the left sidebar.
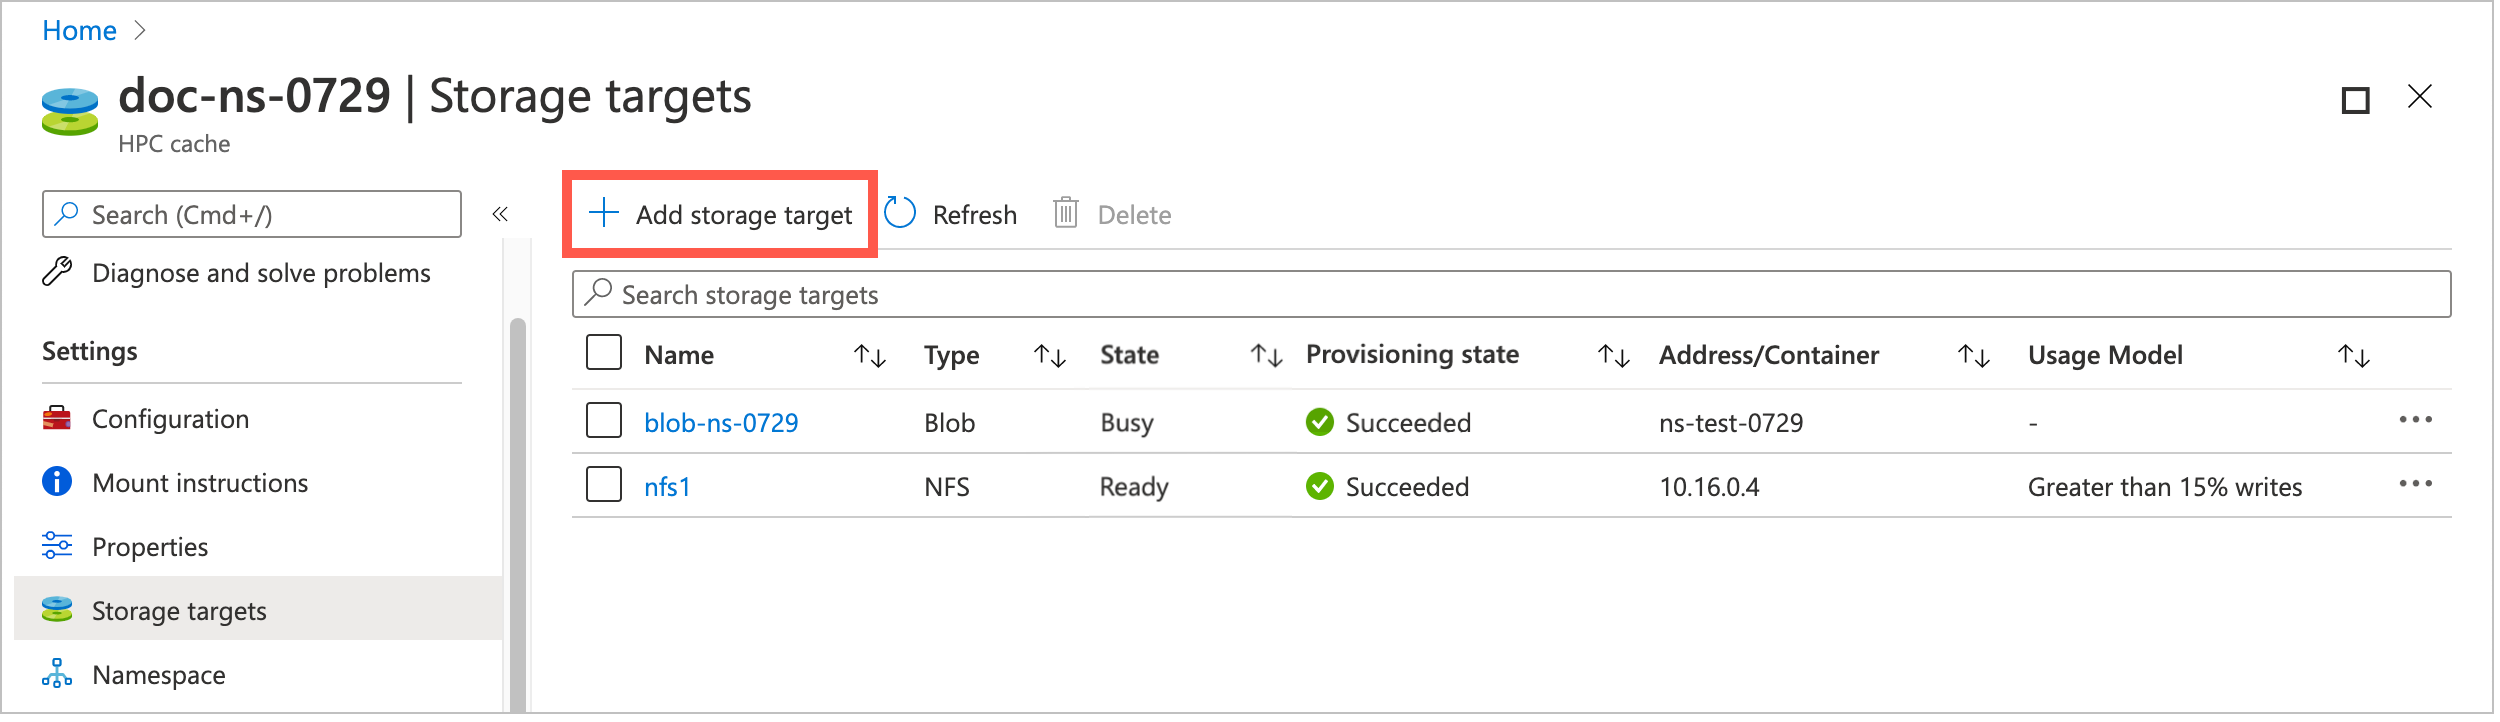
The Storage targets page lists all existing targets and gives a link to add a new one.
Click the Add storage target button.
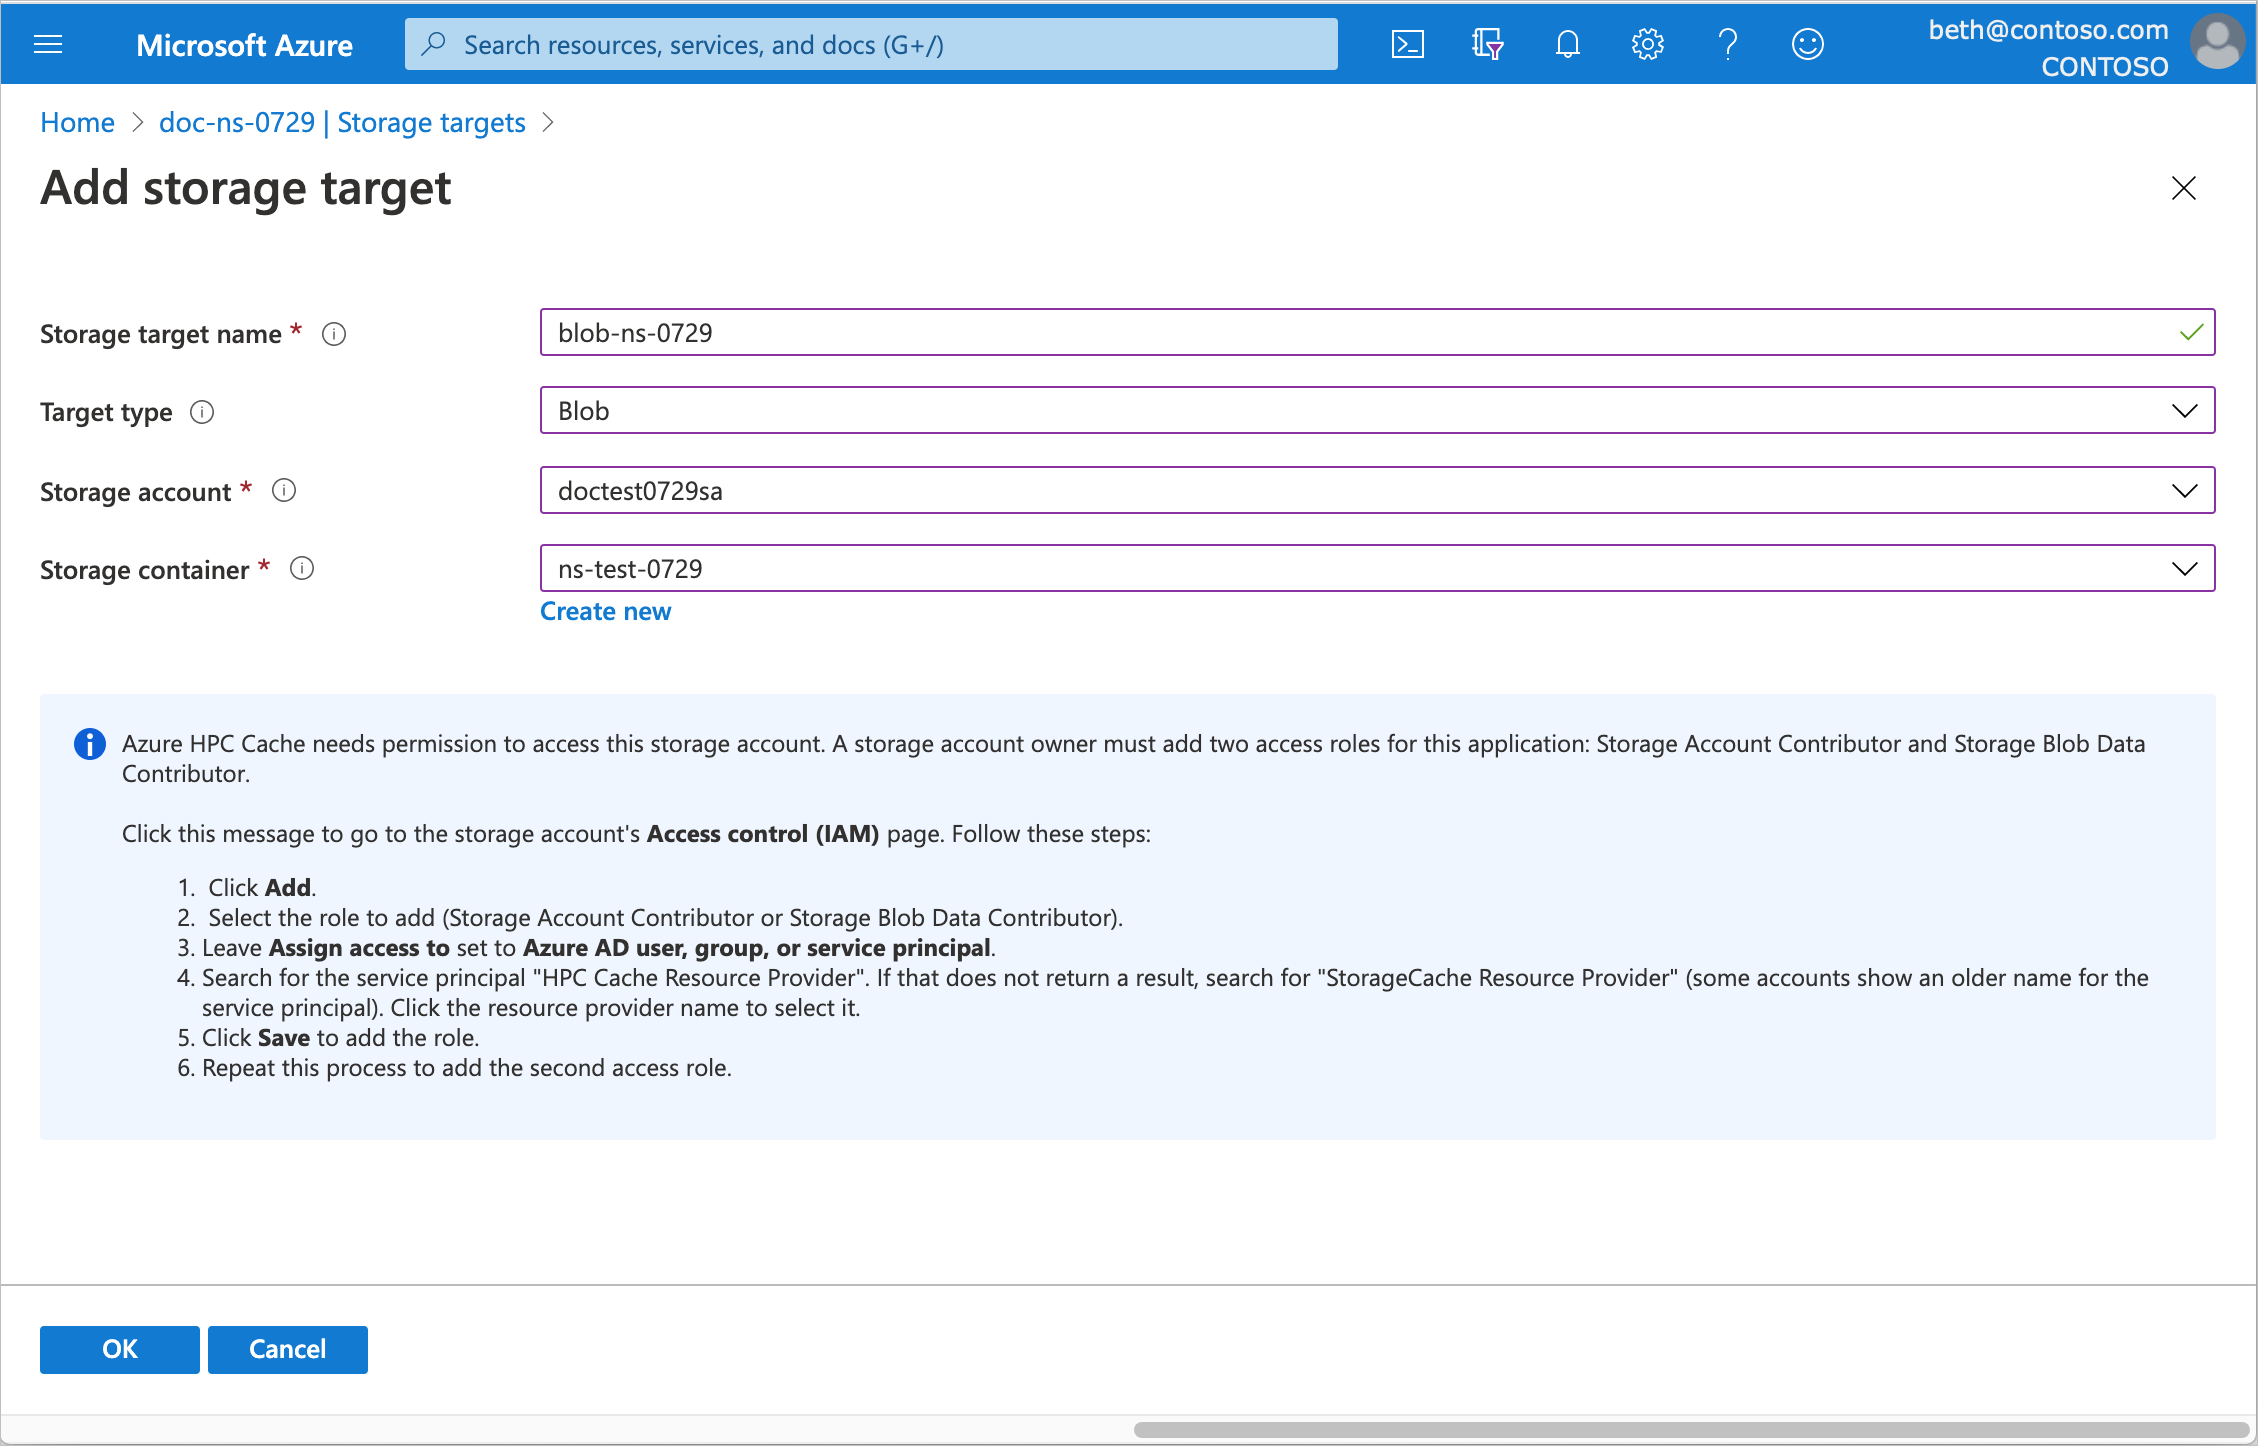
To define an Azure Blob container, enter this information.
Storage target name - Set a name that identifies this storage target in the Azure HPC Cache.
Target type - Choose Blob.
Storage account - Select the account that you want to use.
You'll need to authorize the cache instance to access the storage account as described in Add the access roles.
For information about the kind of storage account you can use, read Blob storage requirements.
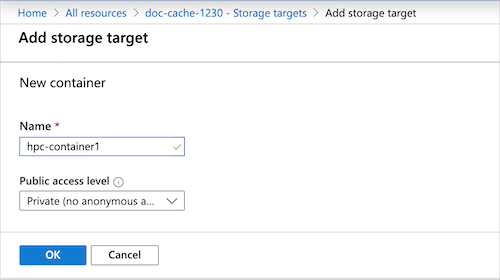
Storage container - Select the Blob container for this target, or click Create new.
When finished, click OK to add the storage target.
Note
If your storage account firewall is set to restrict access to only "selected networks," use the temporary workaround documented in Work around Blob storage account firewall settings.
Add the access control roles to your account
Azure HPC Cache uses Azure role-based access control (Azure RBAC) to authorize the cache service to access your storage account for Azure Blob storage targets.
The storage account owner must explicitly add the roles Storage Account Contributor and Storage Blob Data Contributor for the user "HPC Cache Resource Provider".
You can do this ahead of time, or by clicking a link on the portal page where you add a Blob storage target. Keep in mind that it can take up to five minutes for the role settings to propagate through the Azure environment. Wait a few minutes after adding the roles before creating a storage target.
Open Access control (IAM) for your storage account.
Select Add > Add role assignment to open the Add role assignment page.
Assign the following roles, one at a time. For detailed steps, see Assign Azure roles using the Azure portal.
Setting Value Roles Storage Account Contributor
Storage Blob Data ContributorAssign access to "HPC Cache Resource Provider" or "StorageCache Resource Provider" 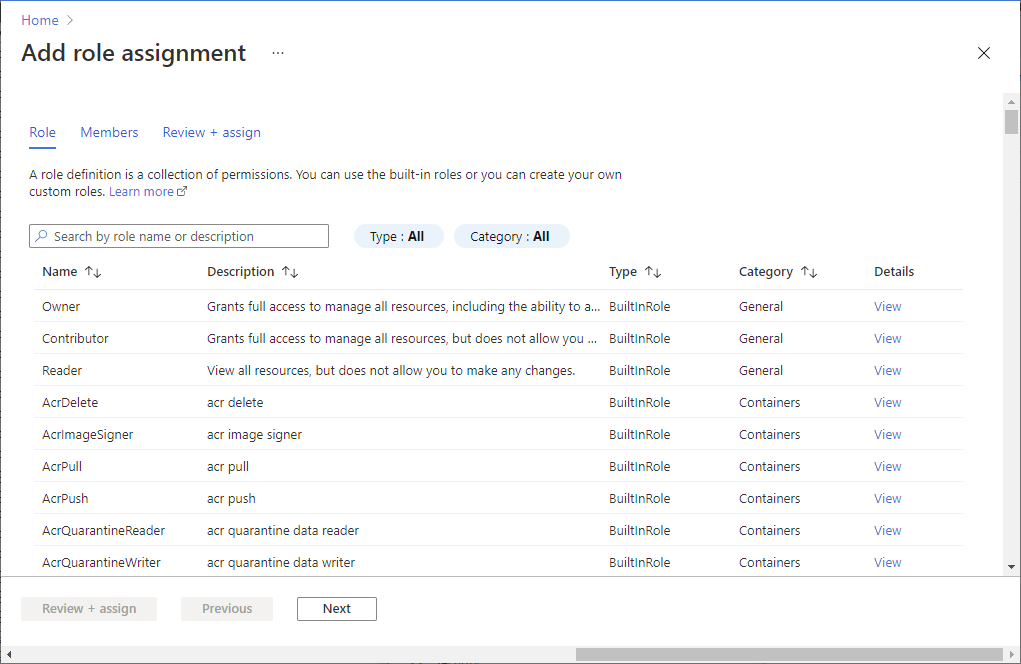
Add a new NFS storage target
An NFS storage target has different settings from a Blob storage target, including a usage model setting that tells the cache how to store data from this storage system.
Note
Before you create an NFS storage target, make sure your storage system is accessible from the Azure HPC Cache and meets permission requirements. Storage target creation will fail if the cache can't access the storage system. Read NFS storage requirements and Troubleshoot NAS configuration and NFS storage target issues for details.
Choose a usage model
When you create a storage target that uses NFS to reach its storage system, you need to choose a usage model for that target. This model determines how your data is cached.
Read Understand usage models for more details about all of these settings.
HPC Cache's built-in usage models let you choose how to balance fast response with the risk of getting stale data. If you want to optimize speed for reading files, you might not care whether the files in the cache are checked against the back-end files. Alternatively, if you want to make sure your files are always up to date with the remote storage, choose a model that checks frequently.
Note
High-throughput style caches support read caching only.
These three options cover most situations:
Read heavy, infrequent writes - Speeds up read access to files that are static or rarely changed.
This option caches files from client reads, but passes client writes through to the back-end storage immediately. Files stored in the cache are not automatically compared to the files on the NFS storage volume.
Don't use this option if there is a risk that a file might be modified directly on the storage system without first writing it to the cache. If that happens, the cached version of the file will be out of sync with the back-end file.
Greater than 15% writes - This option speeds up both read and write performance.
Client reads and client writes are both cached. Files in the cache are assumed to be newer than files on the back-end storage system. Cached files are only automatically checked against the files on back-end storage every eight hours. Modified files in the cache are written to the back-end storage system after they have been in the cache for an hour with no other changes.
Do not use this option if any clients mount the back-end storage volume directly, because there is a risk it will have outdated files.
Clients write to the NFS target, bypassing the cache - Choose this option if any clients in your workflow write data directly to the storage system without first writing to the cache, or if you want to optimize data consistency.
Files that clients request are cached, but any changes to those files from the client are passed through to the back-end storage system immediately. Files in the cache are frequently checked against the back-end versions for updates. This verification maintains data consistency when files are changed directly on the storage system instead of through the cache.
For details about the other options, read Understand usage models.
This table summarizes the differences among all of the usage models:
| Usage model | Caching mode | Verification timer | Write-back timer |
|---|---|---|---|
| Read-only caching | Read | 30 seconds | None |
| Read-write caching | Read/write | 8 hours | 1 hour |
Note
The Back-end verification value shows when the cache automatically compares its files with source files in remote storage. However, you can trigger a comparison by sending a client request that includes a readdirplus operation on the back-end storage system. Readdirplus is a standard NFS API (also called extended read) that returns directory metadata, which causes the cache to compare and update files.
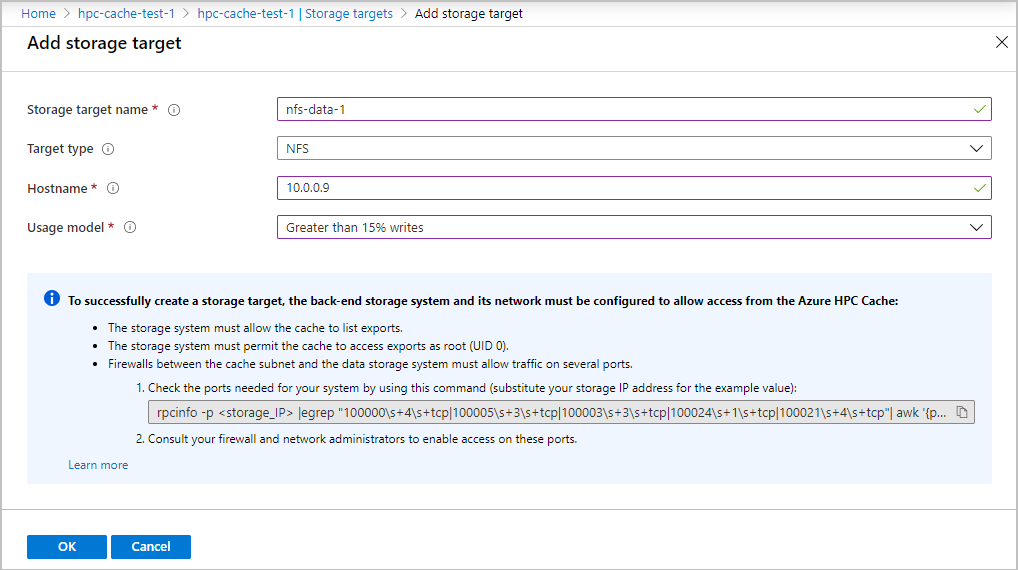
Create an NFS storage target
From the Azure portal, open your cache instance and click Storage targets on the left sidebar.
The Storage targets page lists all existing targets and gives a link to add a new one.
Click the Add storage target button.
Provide this information for an NFS-backed storage target:
Storage target name - Set a name that identifies this storage target in the Azure HPC Cache.
Target type - Choose NFS.
Hostname - Enter the IP address or fully qualified domain name for your NFS storage system. (Use a domain name only if your cache has access to a DNS server that can resolve the name.) You can enter multiple IP addresses if your storage system is referenced by multiple IPs.
Usage model - Choose one of the data caching profiles based on your workflow, described in Choose a usage model above.
When finished, click OK to add the storage target.
Add a new ADLS-NFS storage target
ADLS-NFS storage targets use Azure Blob containers that support the Network File System (NFS) 3.0 protocol.
Read NFS 3.0 protocol support to learn more about this feature.
ADLS-NFS storage targets have some similarities with Blob storage targets and some with NFS storage targets. For example:
Like a Blob storage target, you need to give Azure HPC Cache permission to access your storage account.
Like an NFS storage target, you need to set a cache usage model.
Because NFS-enabled blob containers have an NFS-compatible hierarchical structure, you don't need to use the cache to ingest data, and the containers are readable by other NFS systems.
You can pre-load data in an ADLS-NFS container, then add it to an HPC Cache as a storage target, and then access the data later from outside of an HPC Cache. When you use a standard blob container as an HPC Cache storage target, the data is written in a proprietary format and can only be accessed from other Azure HPC Cache-compatible products.
Before you can create an ADLS-NFS storage target, you must create an NFS-enabled storage account. Follow the steps in Prerequisites for Azure HPC Cache and the instructions in Mount Blob storage by using NFS. If you don't use the same virtual network for the cache and the storage account, make sure that the cache's vnet can access the storage account's vnet.
After your storage account is set up you can create a new container when you create the storage target.
Read Use NFS-mounted blob storage with Azure HPC Cache to learn more about this configuration.
To create an ADLS-NFS storage target, open the Add storage target page in the Azure portal. (Other methods are in development.)
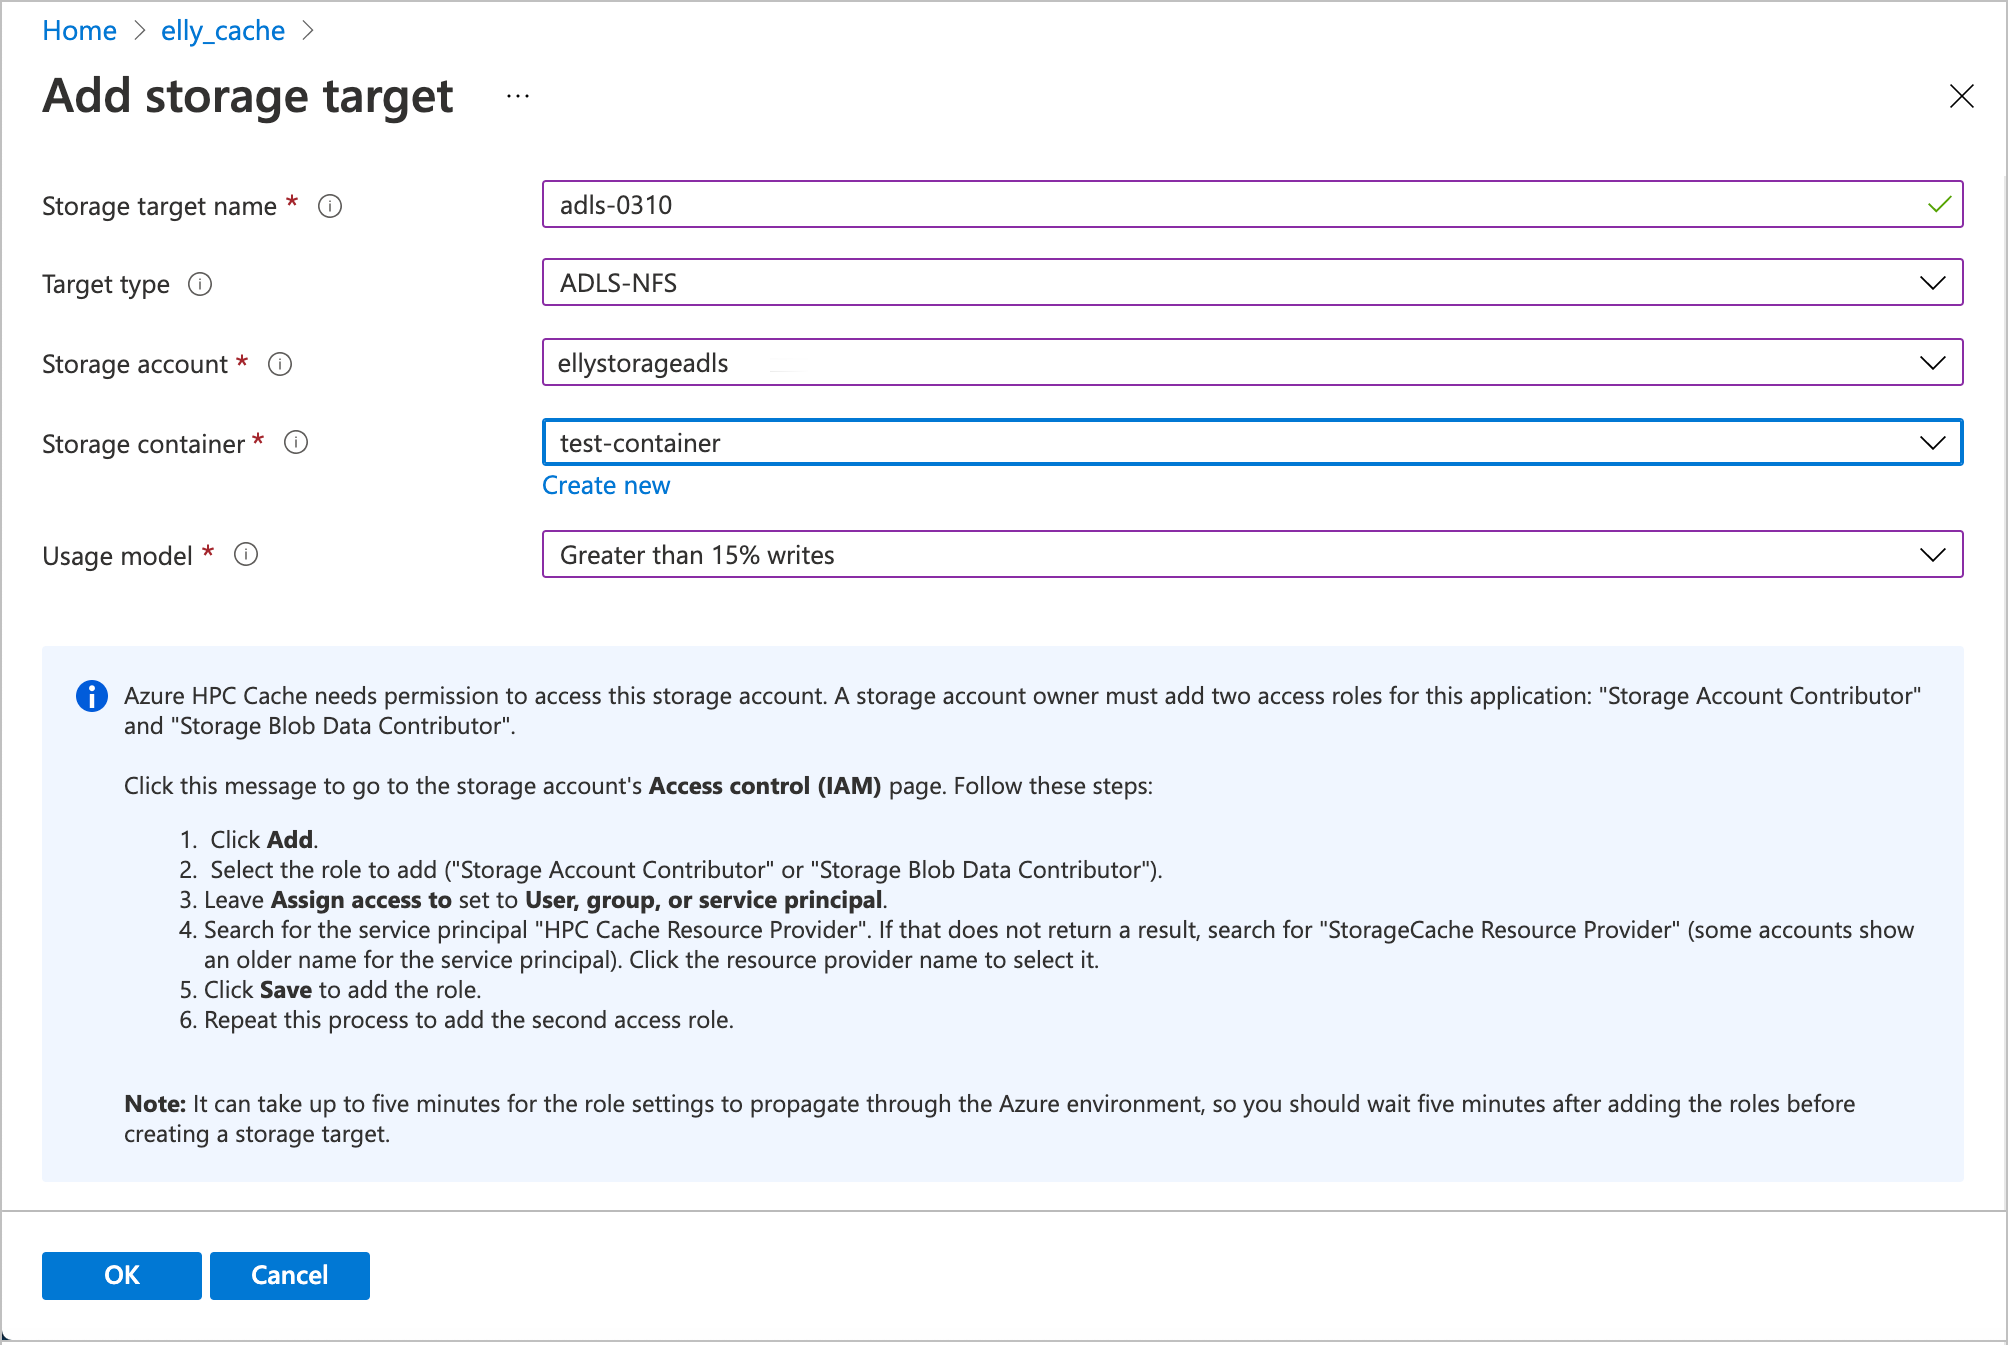
Enter this information.
Storage target name - Set a name that identifies this storage target in the Azure HPC Cache.
Target type - Choose ADLS-NFS.
Storage account - Select the account that you want to use. If your NFS-enabled storage account doesn't appear in the list, check that it conforms to the prerequisites and that the cache can access it.
You'll need to authorize the cache instance to access the storage account as described in Add the access roles.
Storage container - Select the NFS-enabled blob container for this target, or click Create new.
Usage model - Choose one of the data caching profiles based on your workflow, described in Choose a usage model above.
When finished, click OK to add the storage target.
View storage targets
You can use the Azure portal or the Azure CLI to show the storage targets already defined for your cache.
From the Azure portal, open your cache instance and click Storage targets, which is under the Settings heading on the left sidebar. The storage targets page lists all existing targets and controls for adding or deleting them.
Click on a storage target's name to open its details page.
Read View and manage storage targets and Edit storage targets to learn more.
Next steps
After creating storage targets, continue with these tasks to get your cache ready to use:
If you need to update any settings, you can edit a storage target.