Configure login identity for the platform
Prerequisite
Please follow installation article to Deploy your CT instance. In the step “Set up your Login type”, select the suitable identity type and follow the below documentation to configure login identity.
Configure login identity
Community Training platform provides two types of login:
- Social email-based login via your Microsoft, Google or Facebook account
- Microsoft Work or School account
Note
Please note this article is in continuation of the installation article.
In this article, we will walk you through on how to configure login identity for the platform.
Work or School Account based authentication
Option 1 - Run script to Configure Work or School account for your training portal by following the instructions below
Step 1 - Login to Azure portal
Use an existing subscription for login to portal
Step 2 - Create Microsoft EntraID (Azure AD) application
Pre-requisite: CT requires Microsoft EntraID (Azure AD) application creation and registration. To successfully run the AAD creation script, the following permissions are needed:
- Tenant - AAD app creator
- Subscription - Owner
Further Steps:
Open Cloud Shell in azure portal
Run the following steps in a Cloud Shell instance using the PowerShell environment.
Download the AAD app creation script using following command:
wget -q https://raw.githubusercontent.com/MicrosoftDocs/microsoft-community-training/live/microsoft-community-training/media/aad_app_creation.ps1 -O ./aad_app_creation.ps1By default, the file is downloaded to your home directory. Navigate to the home directory with following command: cd
Run the AAD script downloaded in step 1: ./aad_app_creation.ps1
The script asks for the following two inputs:
Training Portal’s Website Name: Training portal’s website name. For example: If training portal URL is https://contosolearning.azurefd.net/ , you need to enter “contosolearning”
Microsoft EntraID (Azure AD)’s Tenant Domain Name: Microsoft EntraID (Azure AD)’s tenant domain name. For example: contoso.onmicrosoft.com
The AAD script takes ~2 minutes to run and outputs 4 values on screen (Client ID, Client Secret, Tenant Id, Tenant name). Make a note of the output values as they will be needed in next step. If someone else ran the script, ask them to share this output. A new app is created. If an app already exists with the same name, the script will delete the existing app and create a new app.
Option 2 - Follow the Manual steps to Configure Work or School account for your training portal by following the instructions below
Step 1 - Setup your Microsoft EntraID (Azure AD)
You can create a new Microsoft EntraID (Azure AD) tenant or use an existing one based on your organization requirement.
- Create a new Microsoft EntraID (Azure AD) tenant and copy the tenant name required later as Tenant Name. If you already have an existing Microsoft EntraID (Azure AD), use the same and copy the tenant name required later as Tenant Name. For example, if the default domain for your Microsoft EntraID (Azure AD) tenant is contoso.onmicrosoft.com, then enter contoso.
- Go to the Show diagnostics section on the right and copy the tenant ID required later as Tenant ID.
Step 2 - Create an Microsoft EntraID (Azure AD) application
Create a new Microsoft EntraID (Azure AD) application by following this article. You only need to follow the section titled Register an application. Please ensure to set the Redirect URIs as per below:
Redirect URIs
- Set to type "Web"
- Add following to Redirect URIs:
https://name.azurefd.net/signin-azureAD,https://name.azurewebsites.net/signin-azureADandhttps://name-staging.azurewebsites.net/signin-azureADwhere "name" corresponds to your website name.
Click on Expose an API from the left menu of your application.

Click on "Add a scope". Ensure that the auto-populated value of Application ID URI is of the form "api://{ClientID}"
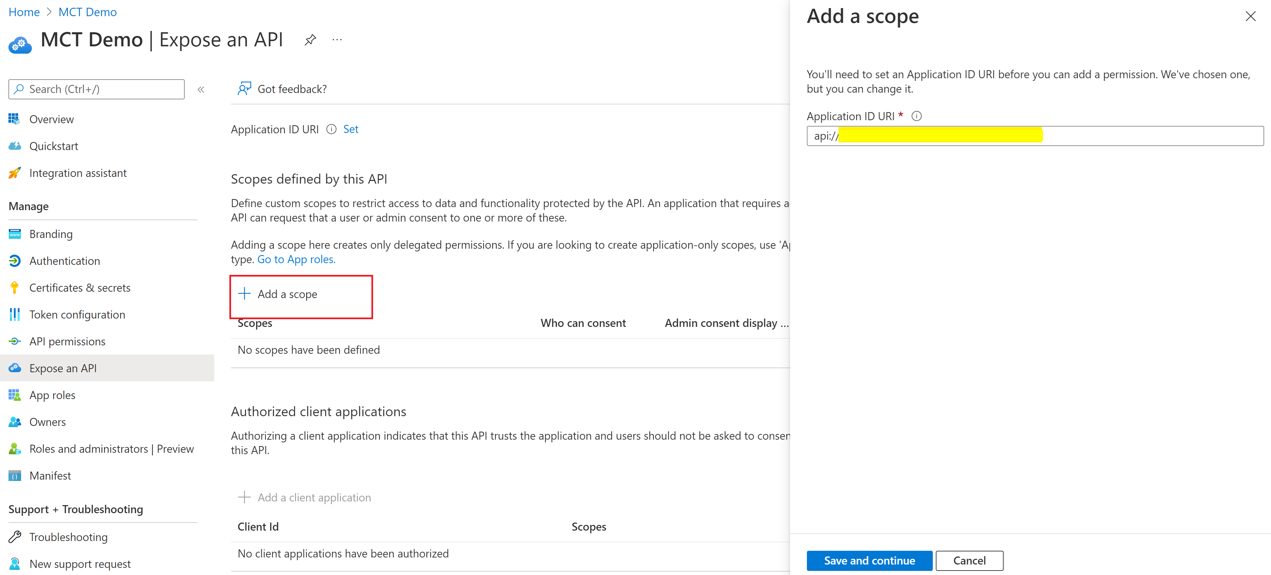
Click on Save and continue.
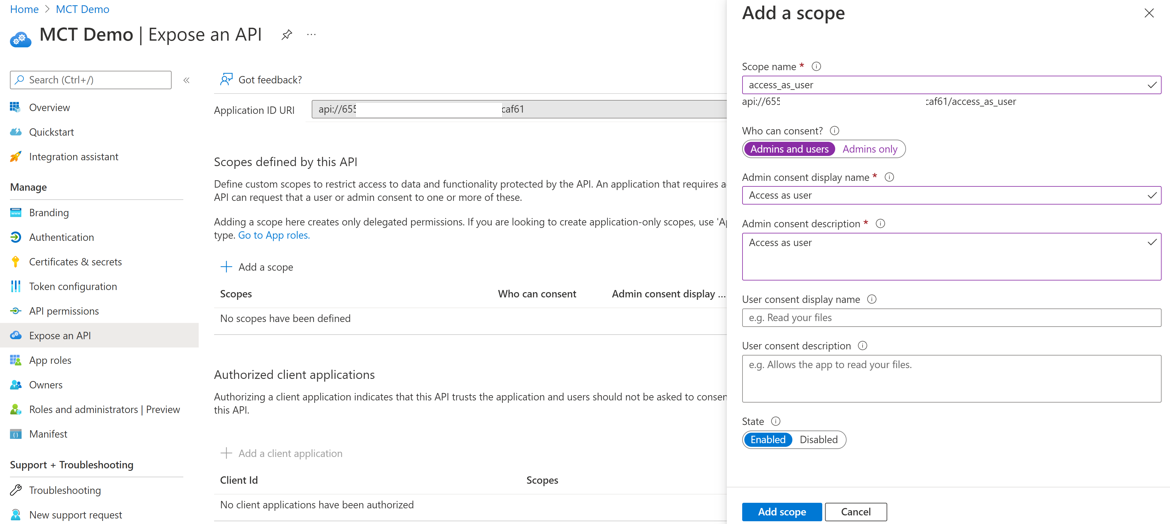
Enter the value "access_as_user" under Scope name.
Select Admins and users under Who can consent?
Populate the remaining values. These values appear on the login screen (unless global consent is granted by admin)
Obtain Client ID and Client Secret:
- Copy the value of Application ID required later as Client ID
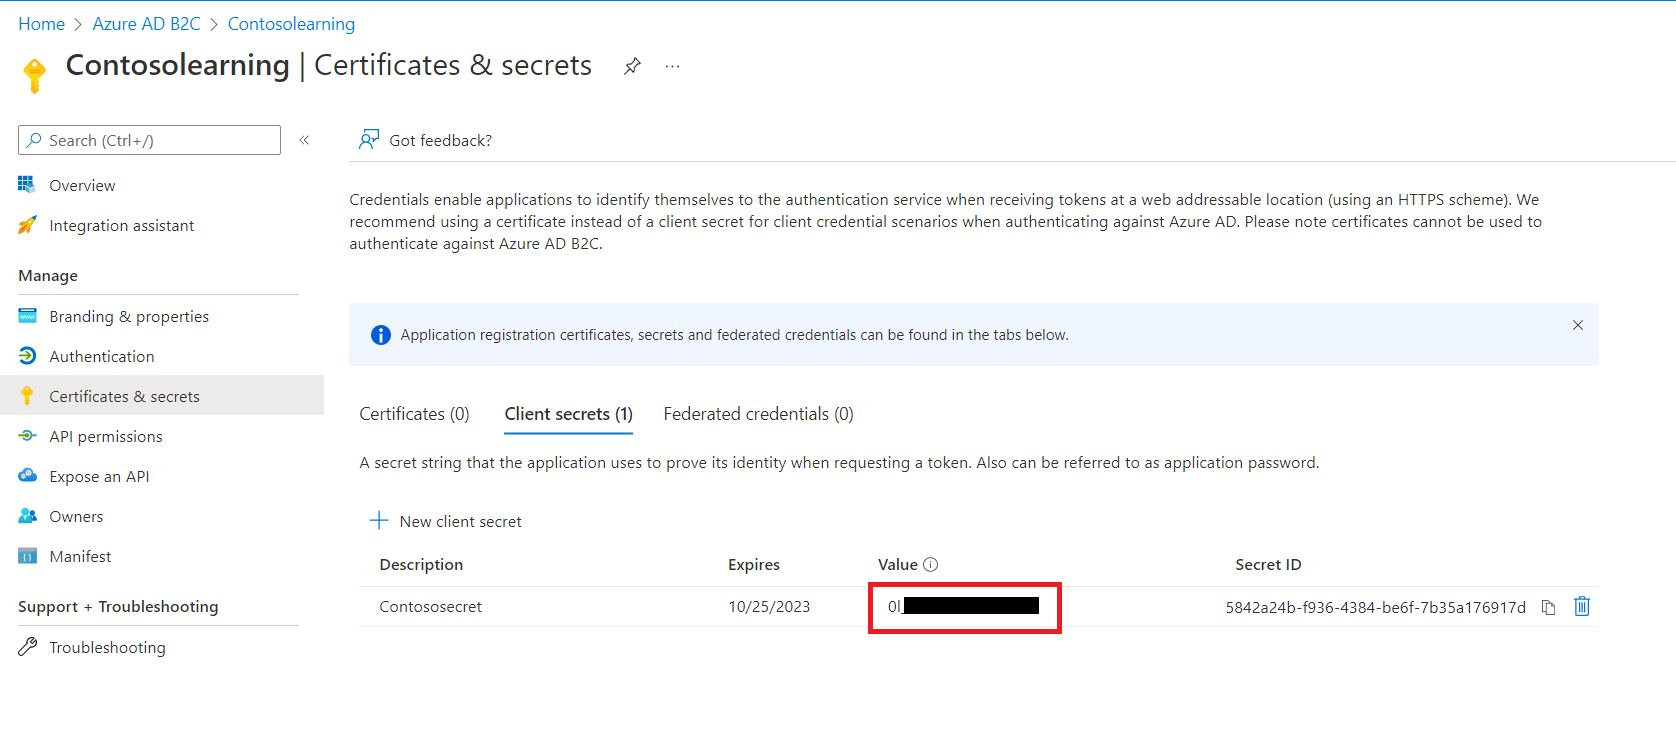
- Click on Certificates & Secrets from the left menu.
- Click on New client secret.
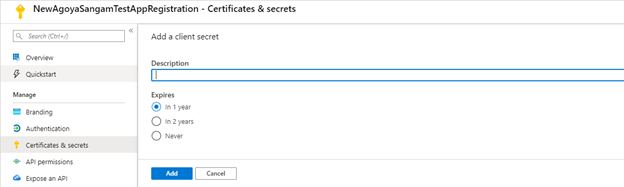
- Enter the description and expiry time of the secret (recommended to select maximum allowed time for expiry) and click on Save button. A value would be shown. Save this Client secret value. Would be required later as the ClientSecret.

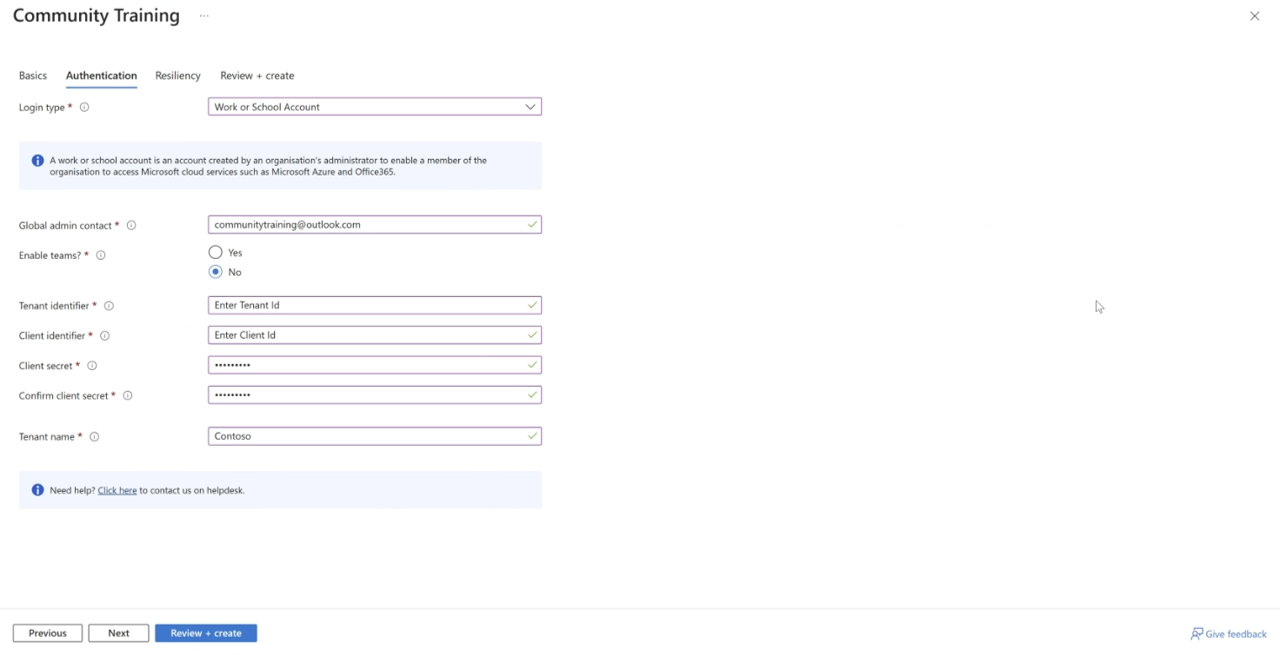
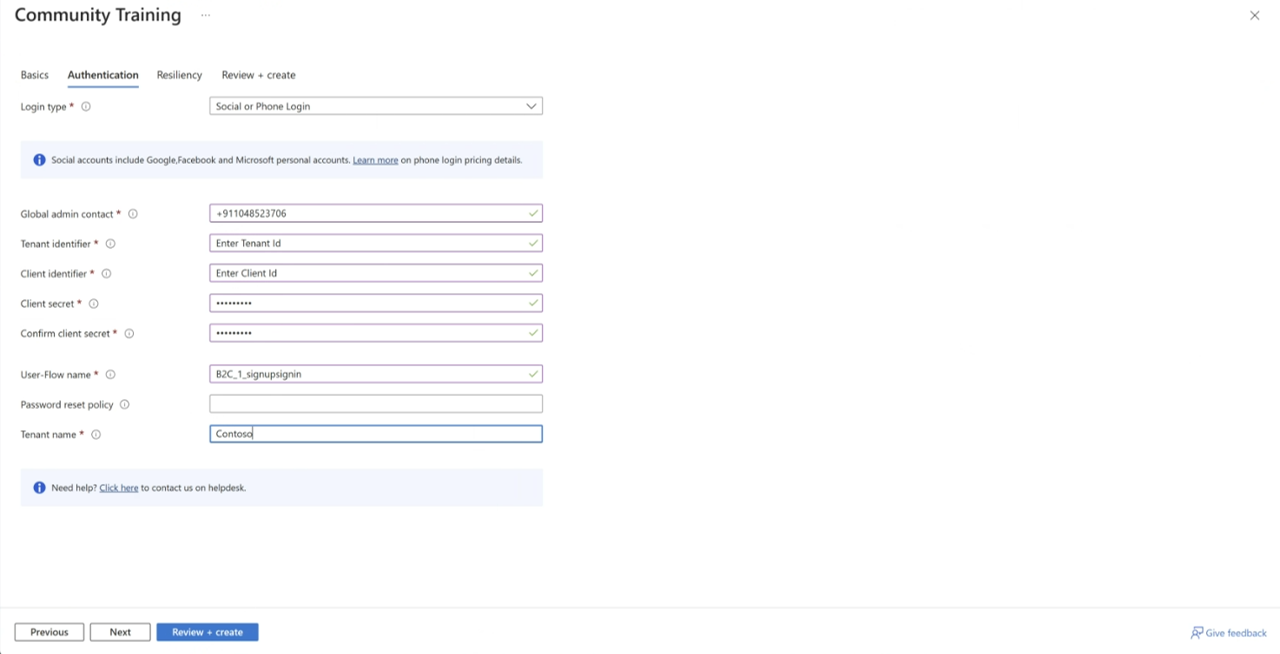
Make a note of the values and follow installation article to complete the Deployment by configuring obtained values as below.
Note
If you are facing any issues while Deploying your AD instance, Please reach out to us via HelpDesk.
Multi-Tenant support for Microsoft EntraID (Azure AD) based Authentication
CT supports login via multiple tenants for AAD authentication. This can be done with few configurations while following steps during AAD set up (Configurations on the Training Platform). Follow this documentation to reach App configuration section from your Azure portal.
Steps to enable multi-tenant login for an AAD based instance
Login to your Azure portal
Navigate to Configurations on the Training Platform
Search for idp:AzureADExternalAuthTenantIds.
List the tenantIDs separated by semicolon that you would like to grant access
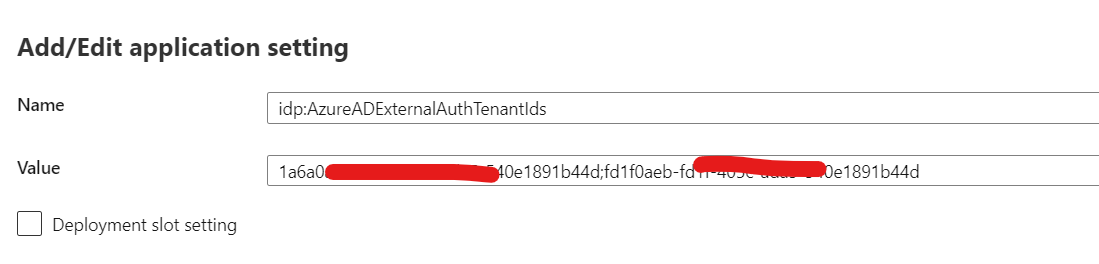
If you want to grant access to all AAD tenants, then set the value as ‘’ (blank) replacing the existing tenant id (we suggest you keep a copy of your original Tenant ID value as a reference). Click ‘Ok’.
Now while in Configurations section, search for idp:AzureADExternalAuthTenant and note the Tenant name.
Search for idp:AzureADExternalAuthClientId and note Client ID.
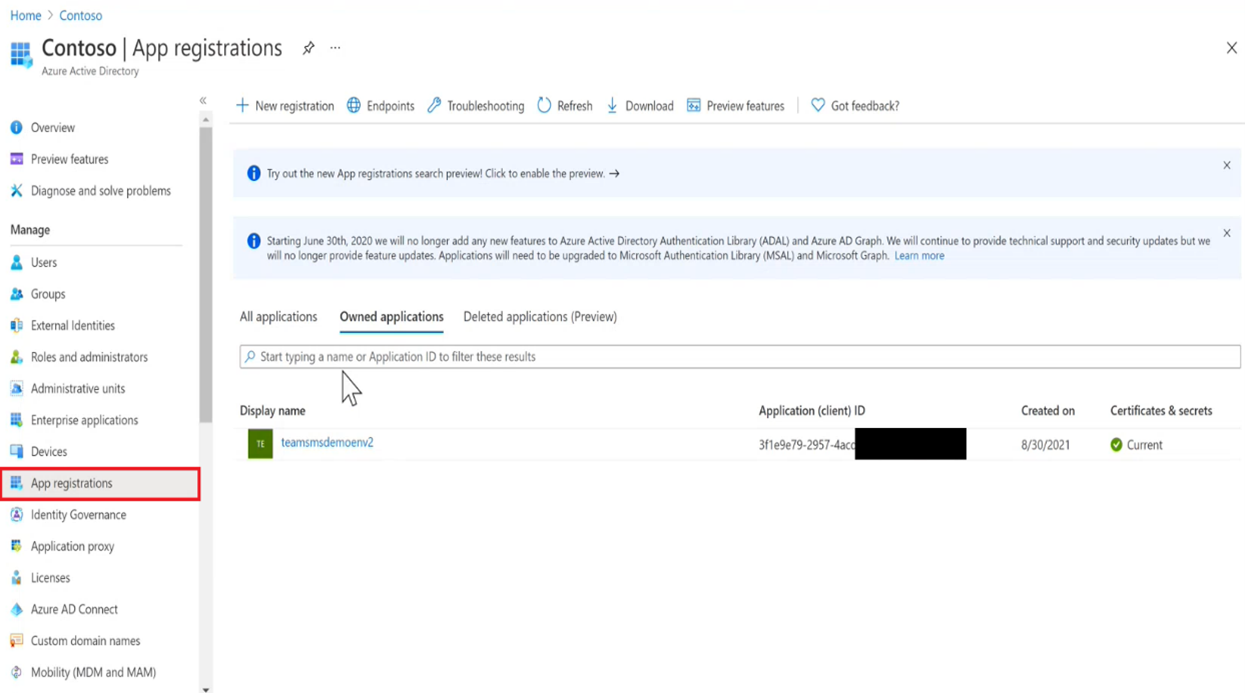
Navigate to your tenant (tenant name from step 4) where your AAD exists, click on App registrations and search for application which corresponds to client id from step 5.
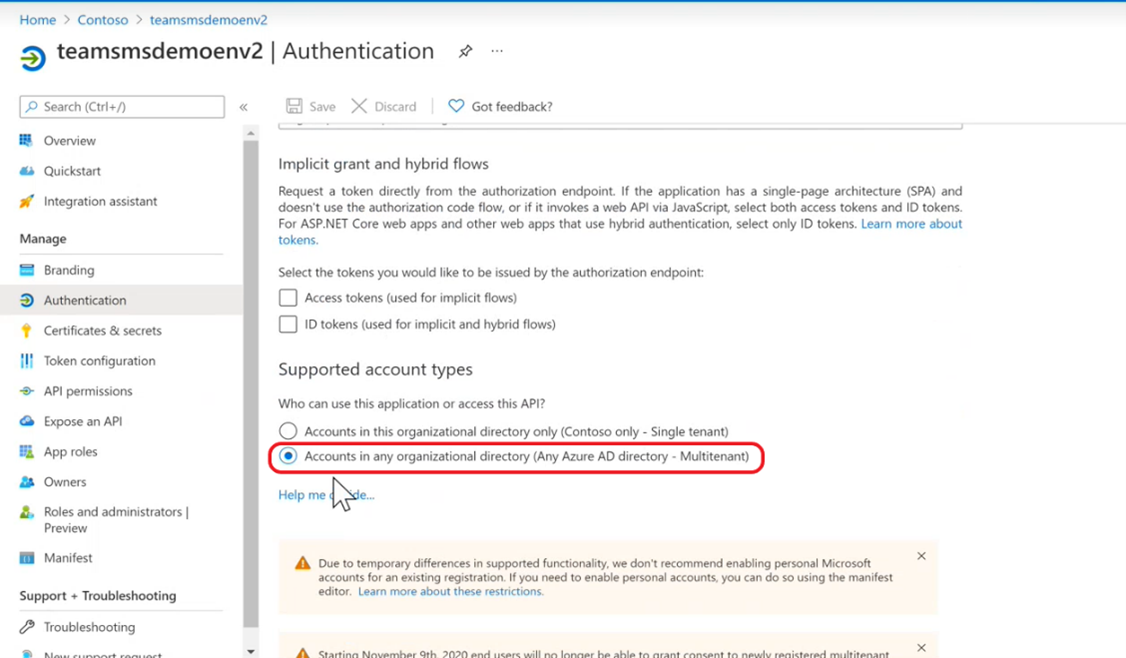
Click on the application and navigate to ‘Authentication’ and select ‘Accounts in any organizational directory (Any Microsoft EntraID (Azure AD) directory - Multitenant)’ under Supported account types and click ‘Save’
For first time login using multiple tenants, admin of those tenants needs to approve the client ID of the CT application by using URL, in below url replace the placeholder with clientID from step 5.
https://login.microsoftonline.com/common/adminconsent?client_id=<client_ID_of_your_application >
Social account or email based authentication
You can configure social account for your training portal by following the instructions below:
Step 1 - Setup your Azure AD B2C
You can create a new Azure AD B2C tenant or create an existing one based on your organization requirement.
Login to Azure portal.
Create a new Azure AD B2C tenant.
Link the Azure AD B2C tenant just created to your Azure subscription.
Step 2 - Create Azure AD B2C application
Here are the steps an create on Azure AD B2C tenant and link the same with your training portal instance:
- Create a new Azure AD B2C application by following this article. Please ensure application properties are set as following:
Web app / Web API - set to "Yes"
Allow implicit flow - set to "No"
Add following to Reply URL
- "https://name.azurefd.net/signin-b2c"
- "https://name.azurewebsites.net/signin-b2c"
- "https://name-staging.azurewebsites.net/signin-b2c" where "name" corresponds to your website name.
If you are setting up Password reset flow, then add following to Reply URL
- "https://name.azurefd.net/signin-b2c-pwd"
- "https://name.azurewebsites.net/signin-b2c-pwd"
- "https://name-staging.azurewebsites.net/signin-b2c-pwd"
where "name" corresponds to your website name.
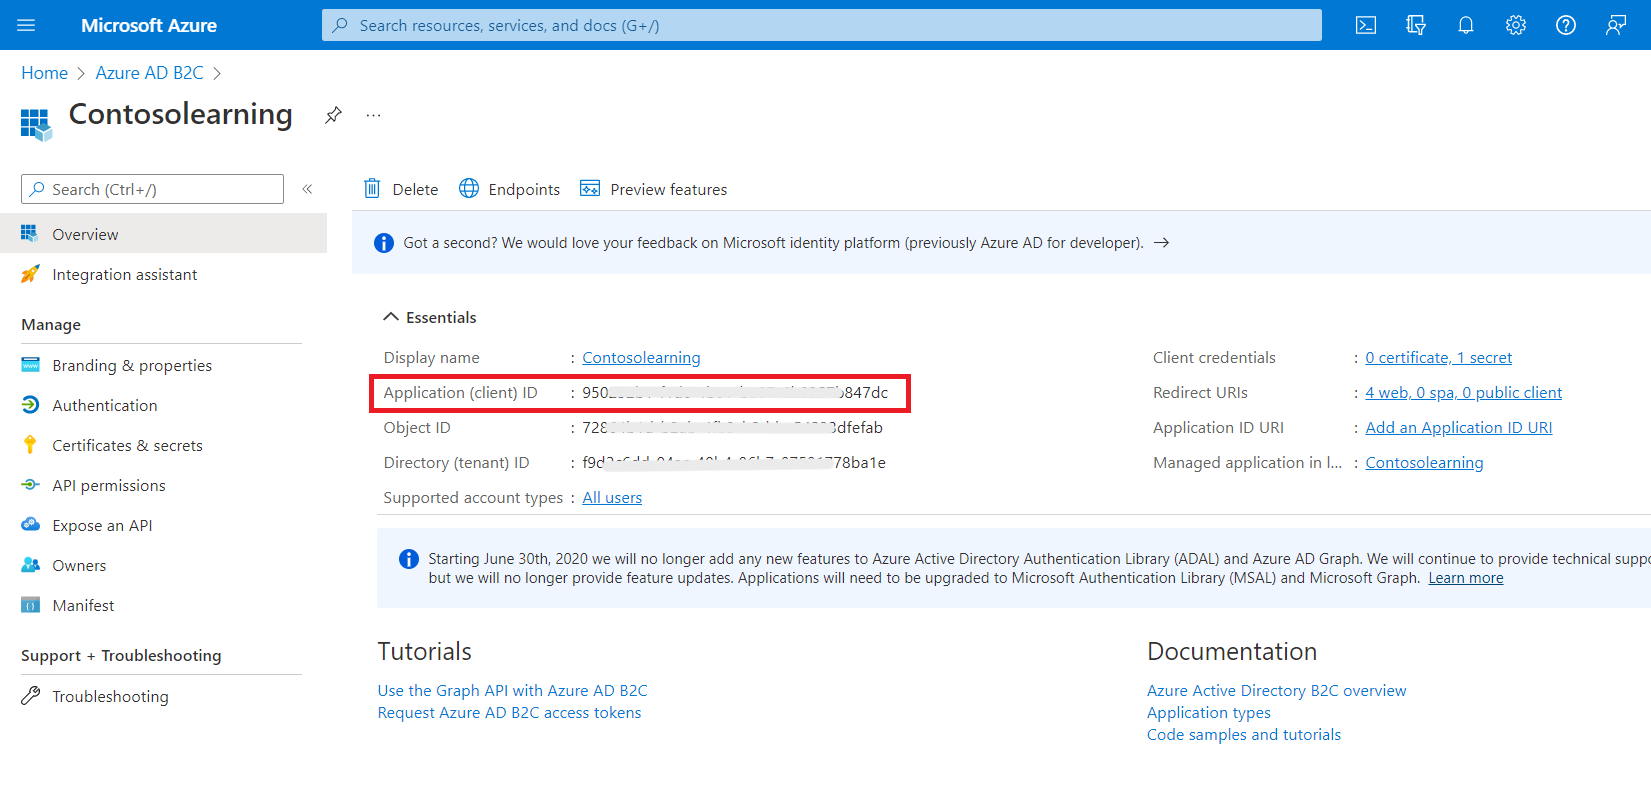
- Copy the Application ID value to be required later for Client ID.
- In your Application, under Manage, go to Certificates & Secrets and click on Generate Key.
- Click on Save and the app key will appear. Copy the value to be required later for Client Secret.
- Go to Microsoft EntraID (Azure AD) from the left menu of your Azure portal, click on Domain Names and copy the tenant name under Name to be required later for Tenant Name. For example, if the default domain for your Microsoft EntraID (Azure AD) tenant is contoso.onmicrosoft.com, then enter contoso.
- Refer this article article to create a signing flow (a sign-up and sign-in user flow) and a password reset flow (for local account)
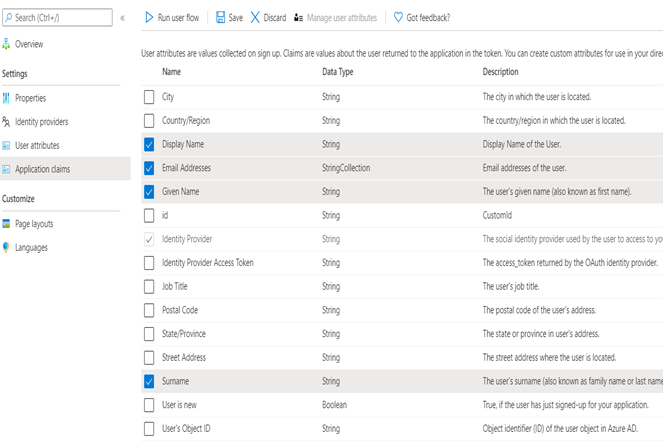
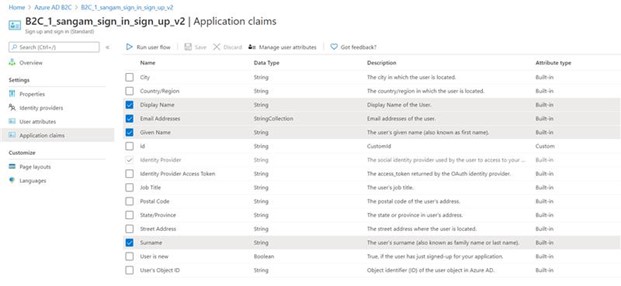
- Select Email Addresses, Given Name, Identity Provider and Surname in Application claims
- Application claims should be same as following screenshot
- Don’t select any Sign-up attributes
- Copy the user-flow(s) name to be required later (These will be required during CT platform installation)
- Follow the installation article to complete the Deployment by configuring obtained values as per the below screenshot
Step 3 - Configure your Identity provider
Here are the steps to create policies based on the Identity Provider:
Configure the identity provider – based on your chosen provider such as Microsoft, Google and Facebook
Configure you Local Account - You can configure local account for your training portal by following the instructions below:
Navigate to the Azure AD B2C tenant.
Under Policies select User Flow and click on the required User Flow from the populated list.
Under Settings, select Identity Providers and check whether the configuration matches exactly as below.
.png)
In the same window, select Application Claims and check whether the configuration matches exactly as below.
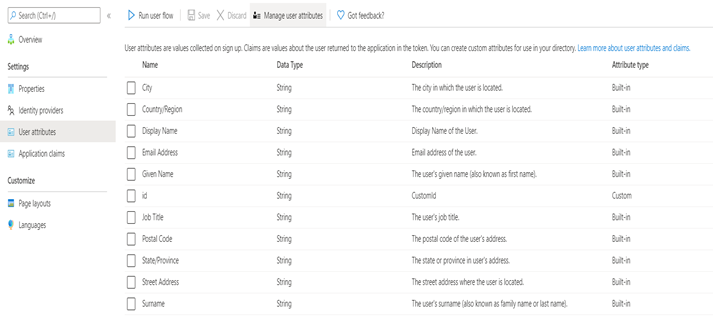
Select User Attributes and ensure no options are selected.
The portal automatically restarts and the changes take effect.
Please reach out to us via HelpDesk if you have any further queries.
Feedback
Coming soon: Throughout 2024 we will be phasing out GitHub Issues as the feedback mechanism for content and replacing it with a new feedback system. For more information see: https://aka.ms/ContentUserFeedback.
Submit and view feedback for