Note
Access to this page requires authorization. You can try signing in or changing directories.
Access to this page requires authorization. You can try changing directories.
You can connect your devices to your IoT Central application by using a private endpoint in an Azure Virtual Network.
Private endpoints use private IP addresses from a virtual network address space to connect your devices privately to your IoT Central application. Network traffic between devices on the virtual network and the IoT platform traverses the virtual network and a private link on the Microsoft backbone network, eliminating exposure on the public internet. This article shows you how to create a private endpoint for your IoT Central application.
Prerequisites
- An active Azure subscription. If you don't have an Azure subscription, create a free account before you begin.
- An IoT Central application. To learn more, see Create an IoT Central application.
- A virtual network in your Azure subscription. To learn more, see Create a virtual network. To complete the steps in this guide, you don't need a Bastion host or virtual machines.
Create a private endpoint
There are several ways to create a private endpoint for IoT Central application:
- Use the Azure portal to create a private endpoint resource directly. Use this option if you don't have access to the IoT Central application that needs the private endpoint.
- Create private endpoint on an existing IoT Central application
To create a private endpoint on an existing IoT Central application:
In the Azure portal, navigate to your application and then select Networking.
Select the Private endpoint connections tab, and then select + Private endpoint.
On the Basics tab, enter a name and select a region for your private endpoint. Then select Next: Resource.
The Resource tab is autopopulated for you. Select Next: Virtual Network.
On the Virtual Network tab, select the Virtual network and Subnet where you want to deploy your private endpoint.
On the same tab, in the Private IP configuration section, select Dynamically allocate IP address.
Select Next: DNS.
On the DNS tab, select Yes for Integrate with private DNS zone. The private DNS resolves all the required endpoints to private IP addresses in your virtual network:

Note
Because of the autoscale capabilities in IoT Central, you should use the Private DNS integration option if at all possible. If for some reason you can't use this option, see Use a custom DNS server.
Select Next: Tags.
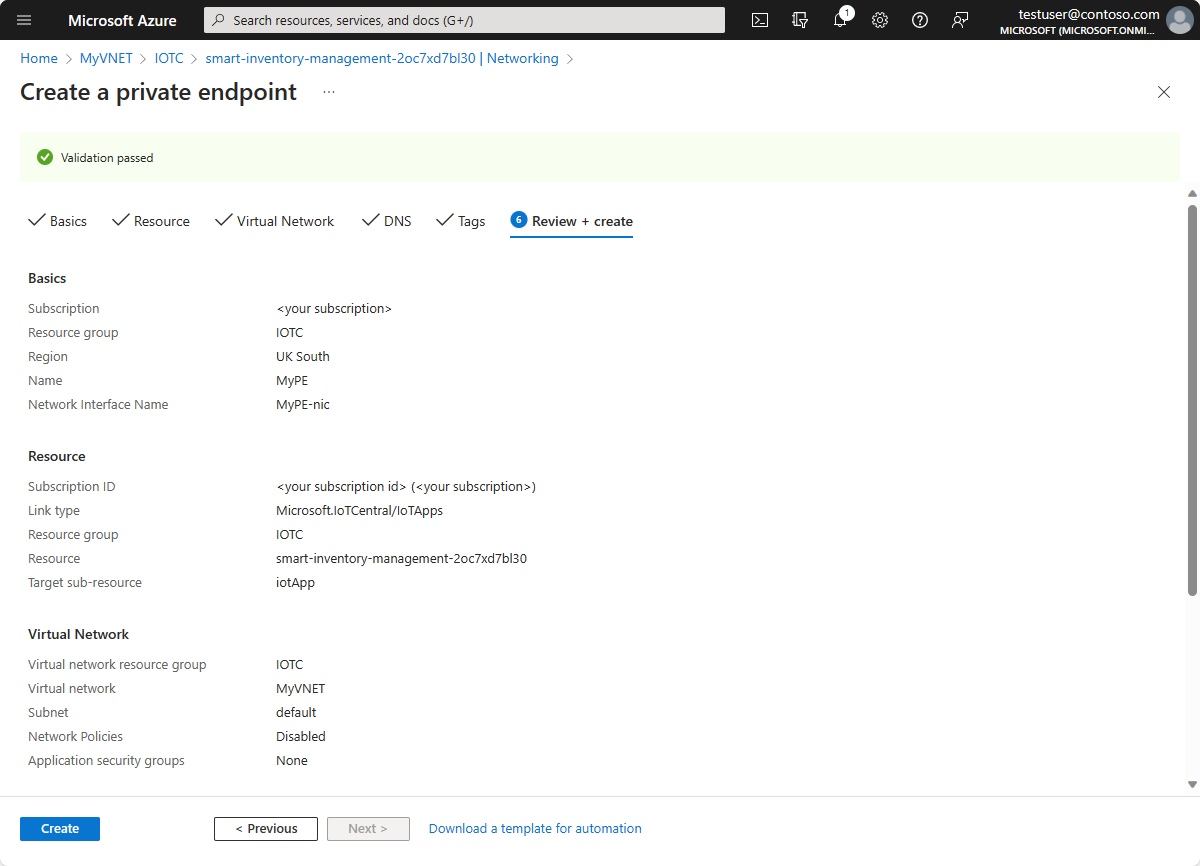
On the Tags tab, configure any tags you require, and then select Next: Review + Create.
Review the configuration details and then select Create to create your private endpoint resource.
Verify private endpoint creation
When the creation of the private endpoint is complete, you can access it in the Azure portal.
To see all the private endpoints created for your application:
In the Azure portal, navigate to your IoT Central application, and then select Networking.
Select the Private endpoint connections tab. The table shows all the private endpoints created for your application.
Use a custom DNS server
In some situations, you might not be able to integrate with the private DNS zone of the virtual network. For example, you might use your own DNS server or create DNS records using the host files on your virtual machines. This section describes how to get to the DNS zones.
Install chocolatey.
Install ARMClient:
choco install armclientSign in with ARMClient:
armclient loginUse the following command to get the private DNS zones for your IoT Central application. Replace the placeholders with the details for your IoT Central application:
armclient GET /subscriptions/<subscriptionId>/resourceGroups/<resourceGroupName>/providers/Microsoft.IoTCentral/IoTApps/<AppName>/privateLinkResources?api-version=2021-11-01-previewCheck the response. The required DNS zones are in the
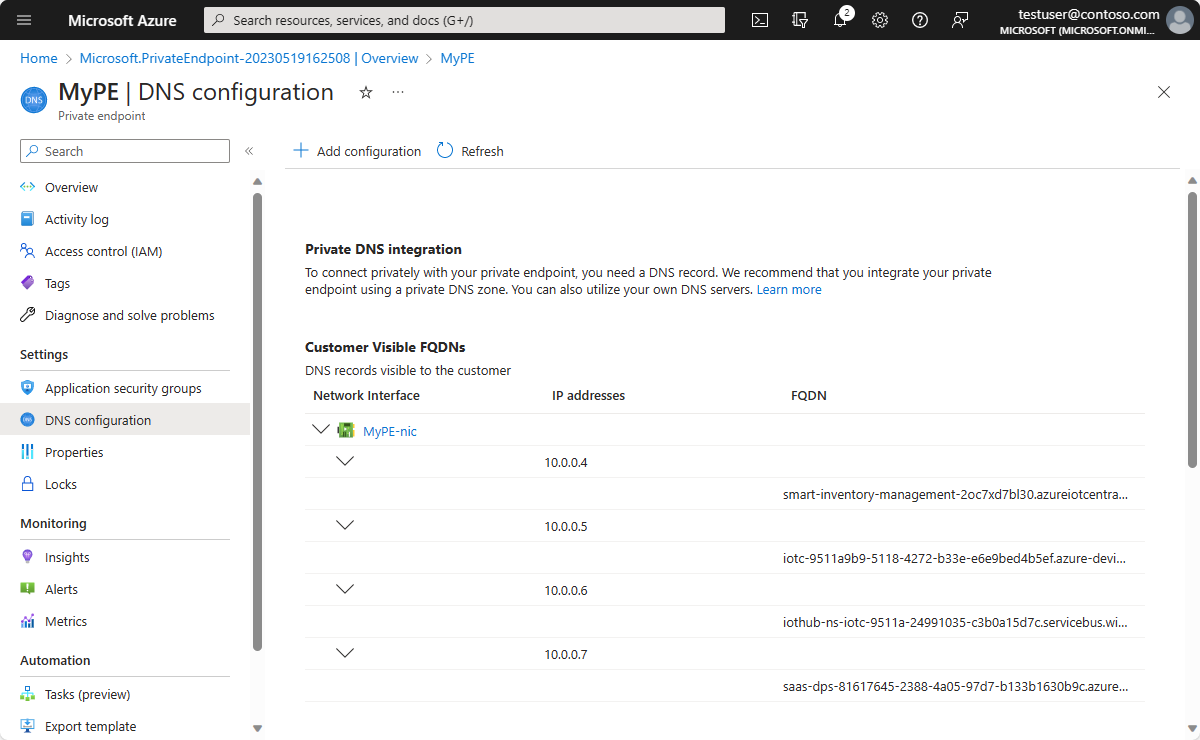
requiredZoneNamesarray in the response payload:{ "value": [ { "id": "/subscriptions/<subscriptionId>/resourceGroups/<resourceGroupName>/providers/Microsoft.IoTCentral/IoTApps/<AppName>/privateLinkResources/iotApp", "name": "ioTApp", "type": "Microsoft.IoTCentral/IoTApps/privateLinkResources", "location": "<the region of your application>", "properties": { "groupId": "iotApp", "requiredMembers":[ "<IoTCentral Name>", "<DPS Name>", "<IoTHub1 Name>", "<IoTHub2 Name>", "<EH1 Name>", "<EH2 Name>"], "requiredZoneNames": [ "privatelink.azureiotcentral.com", "privatelink.azure-devices.net", "privatelink.servicebus.windows.net", "privatelink.azure-devices-provisioning.net"], "provisioningState": "Succeeded"} } ] }In the Azure portal, navigate to your private endpoint, and select DNS configuration. On this page, you can find the required information for the IP address mapping to the DNS name.
Warning
This information lets you populate your custom DNS server with the necessary records. If at all possible, you should integrate with the private DNS Zones of the virtual network and not configure your own custom DNS server. Private endpoints for IoT Central applications differ from other Azure PaaS services. In some situations, such as IoT Central autoscaling, IoT Central scales out the number of IoT Hubs accessible through the private endpoint. If you choose to populate your own custom DNS server, it's your responsibility to update the DNS records whenever IoT Central autoscales, and later remove records when the number of IoT hubs scales in.
Restrict public access
To restrict public access for your devices to IoT Central, turn off access from public endpoints. After you turn off public access, devices can't connect to IoT Central from public networks, and must use a private endpoint:
In the Azure portal, navigate to your IoT Central application and then select Networking.
On the Public access tab, select Disabled for public network access.
Optionally, you can define a list of IP addresses/ranges that can connect to the public endpoint of your IoT Central application.
Select Save.
Tip
If you choose to define a list of IP addresses/ranges that can connect to the public endpoint of your IoT Central application, be sure to include the IP address of any proxy that your devices use to connect to your IoT Central application.
Connect to a private endpoint
When you disable public network access for your IoT Central application, your devices aren't able to connect to the Device Provisioning Service (DPS) global endpoint. This happens because the only FQDN for DPS has a direct IP address in your virtual network. The global endpoint is now unreachable.
When you configure a private endpoint for your IoT Central application, the IoT Central service endpoint is updated to reflect the direct DPS endpoint.
Update your device code to use the direct DPS endpoint.

Best practices
Don't use private link subdomain URLs to connect your devices to IoT Central. Always use the DPS URL shown in your IoT Central application after you create the private endpoint.
Use Azure provided private DNS zones for DNS management. Avoid using your own DNS server because you would need to constantly update your DNS configuration to keep up as IoT Central autoscales its resources.
If you create multiple private endpoints for same IoT Central resource, the DNS Zone might overwrite the FQDNs so you should add them again.
Limitations
Currently, private connectivity is only enabled for device connections to the underlying IoT hubs and DPS in the IoT Central application. The IoT Central web UI and APIs continue to work through their public endpoints.
The private endpoint must be in the same region as your virtual network.
When you disable public network access:
IoT Central simulated devices don't work because they don't have connectivity to your virtual network.
The global DPS endpoint (
global.device-provisioning.net) isn't accessible. Update your device firmware to connect to the direct DPS instance. You can find the direct DPS URL in the Device connection groups page in your IoT Central application.
You can't rename your IoT Central application after you configure a private endpoint.
You can't move your private endpoint or the IoT Central application to another resource group or subscription.
Support is limited to IPv4. IPv6 isn't supported.
Troubleshooting
If you're having trouble connecting to a private endpoint, use the following troubleshooting guidance:
Check the connection state
Make sure your private endpoint's connection state is set to approved.
- In the Azure portal, navigate to your application and then select Networking.
- Select the Private endpoints connection tab. Verify that the connection state is Approved for your private endpoint.
Run checks within the virtual network
Use the following checks to investigate connectivity issues from within the same virtual network. Deploy a virtual machine in the same virtual network where you created the private endpoint. Sign in to the virtual machine, to run the following tests.
To make sure that name resolution is working properly, iterate over all the FQDNs in the private endpoint DNS configuration and run the tests using nslookup, Test-NetConnection, or other similar tools to verify that each DNS matches its corresponding IP address.
In addition, run the following command to verify the DNS name of each FQDN matches with the corresponding IP address.
#replace the <...> placeholders with the correct values
nslookup iotc-….azure-devices.net
The result looks like the following output:
#Results in the following output:
Server:127.0.0.53
Address:127.0.0.53#53

Non-authoritative answer: xyz.azure-devices.net
canonical name = xyz.privatelink.azure-devices.net
Name:xyz.privatelink.azure-devices.net
Address: 10.1.1.12
If you find an FQDN that doesn't match its corresponding IP address, fix your custom DNS server. If you aren't using a custom DNS server, create a support ticket.
Check if you have multiple private endpoints
DNS configuration can be overwritten if you create or delete multiple private endpoints for a single IoT Central application:
- In the Azure portal, navigate to the private endpoint resource.
- In the DNS section, make sure there are entries for all required resources: IoT Hubs, Event Hubs, DPS, and IoT Central FQDNs.
- Verify that the IPs (and IPs for other private endpoints using this DNS zone) are reflected in the A record of the DNS.
- Remove any A records for IPs from older private endpoints that were previously deleted.
Other troubleshooting tips
If after trying all these checks you're still experiencing an issue, try the private endpoint troubleshooting guide.
If all the checks are successful and your devices still can't establish a connection to IoT Central, contact the corporate security team responsible for firewalls and networking in general. Potential reasons for failure include:
- Misconfiguration of your Azure virtual network
- Misconfiguration of a firewall appliance
- Misconfiguration of user defined routes in your Azure virtual network
- A misconfigured proxy between the device and IoT Central resources
Next steps
Now that you've learned how to create a private endpoint for your application, here's the suggested next step: