Note
Access to this page requires authorization. You can try signing in or changing directories.
Access to this page requires authorization. You can try changing directories.
You can use an Azure Resource Manager template (ARM template) to programmatically set up the Azure cloud resources necessary for provisioning your devices. These steps show how to create an IoT hub and a new IoT Hub Device Provisioning Service with an ARM template. The IoT hub is also linked to the DPS resource using the template. This linking allows the DPS resource to assign devices to the hub based on allocation policies you configure.
An Azure Resource Manager template is a JavaScript Object Notation (JSON) file that defines the infrastructure and configuration for your project. The template uses declarative syntax. You describe your intended deployment without writing the sequence of programming commands to create the deployment.
This quickstart uses Azure portal and the Azure CLI to perform the programmatic steps necessary to create a resource group and deploy the template. However, you can also use PowerShell, .NET, Ruby, or other programming languages to perform these steps and deploy your template.
If your environment meets the prerequisites, and you're already familiar with using ARM templates, selecting the Deploy to Azure button opens the template for deployment in the Azure portal.

If you don't have an Azure account, create a free account before you begin.
Prerequisites
Use the Bash environment in Azure Cloud Shell. For more information, see Get started with Azure Cloud Shell.

If you prefer to run CLI reference commands locally, install the Azure CLI. If you're running on Windows or macOS, consider running Azure CLI in a Docker container. For more information, see How to run the Azure CLI in a Docker container.
If you're using a local installation, sign in to the Azure CLI by using the az login command. To finish the authentication process, follow the steps displayed in your terminal. For other sign-in options, see Authenticate to Azure using Azure CLI.
When you're prompted, install the Azure CLI extension on first use. For more information about extensions, see Use and manage extensions with the Azure CLI.
Run az version to find the version and dependent libraries that are installed. To upgrade to the latest version, run az upgrade.
Review the template
The template used in this quickstart is from Azure Quickstart Templates.
Note
Currently there's no ARM template support for creating enrollments with new DPS resources. This is a common and understood request that's being considered for implementation.
{
  "$schema": "https://schema.management.azure.com/schemas/2019-04-01/deploymentTemplate.json#",
  "contentVersion": "1.0.0.0",
  "metadata": {
    "_generator": {
      "name": "bicep",
      "version": "0.12.40.16777",
      "templateHash": "13184692430416822033"
    }
  },
  "parameters": {
    "iotHubName": {
      "type": "string",
      "metadata": {
        "description": "Specify the name of the Iot hub."
      }
    },
    "provisioningServiceName": {
      "type": "string",
      "metadata": {
        "description": "Specify the name of the provisioning service."
      }
    },
    "location": {
      "type": "string",
      "defaultValue": "[resourceGroup().location]",
      "metadata": {
        "description": "Specify the location of the resources."
      }
    },
    "skuName": {
      "type": "string",
      "defaultValue": "S1",
      "metadata": {
        "description": "The SKU to use for the IoT Hub."
      }
    },
    "skuUnits": {
      "type": "int",
      "defaultValue": 1,
      "metadata": {
        "description": "The number of IoT Hub units."
      }
    }
  },
  "variables": {
    "iotHubKey": "iothubowner"
  },
  "resources": [
    {
      "type": "Microsoft.Devices/IotHubs",
      "apiVersion": "2021-07-02",
      "name": "[parameters('iotHubName')]",
      "location": "[parameters('location')]",
      "sku": {
        "name": "[parameters('skuName')]",
        "capacity": "[parameters('skuUnits')]"
      },
      "properties": {}
    },
    {
      "type": "Microsoft.Devices/provisioningServices",
      "apiVersion": "2022-02-05",
      "name": "[parameters('provisioningServiceName')]",
      "location": "[parameters('location')]",
      "sku": {
        "name": "[parameters('skuName')]",
        "capacity": "[parameters('skuUnits')]"
      },
      "properties": {
        "iotHubs": [
          {
            "connectionString": "[format('HostName={0};SharedAccessKeyName={1};SharedAccessKey={2}', reference(resourceId('Microsoft.Devices/IotHubs', parameters('iotHubName')), '2021-07-02').hostName, variables('iotHubKey'), listkeys(resourceId('Microsoft.Devices/IotHubs', parameters('iotHubName')), '2021-07-02').value[0].primaryKey)]",
            "location": "[parameters('location')]"
          }
        ]
      },
      "dependsOn": [
        "[resourceId('Microsoft.Devices/IotHubs', parameters('iotHubName'))]"
      ]
    }
  ]
}
Two Azure resources are defined in the previous template:
- Microsoft.Devices/IotHubs: Creates a new Azure IoT hub.
- Microsoft.Devices/provisioningServices: Creates a new Azure IoT Hub Device Provisioning Service instance with the new IoT hub already linked to it.
Deploy the template
Deploy with the Portal
Select the following image to sign in to Azure and open the template for deployment. The template creates a new IoT hub and DPS resource. The new IoT hub is linked to the DPS resource.
Select or enter the following values and select Review + Create.
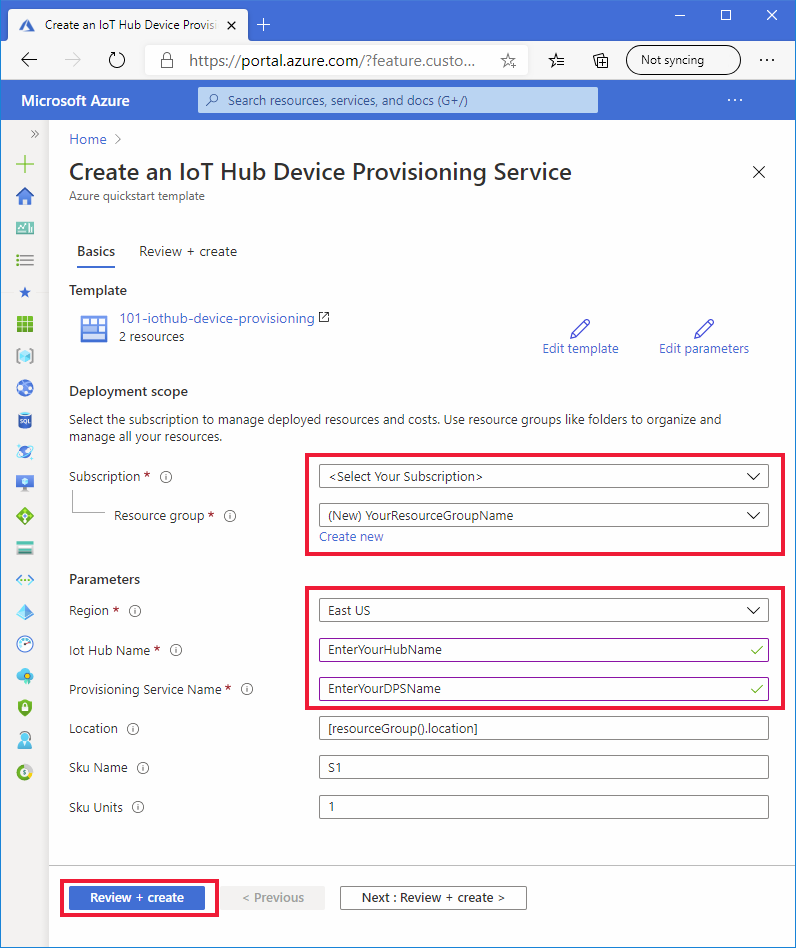
Unless otherwise specified for the following fields, use the default value to create the IoT hub and DPS resource.
Field Description Subscription Select your Azure subscription. Resource group Select Create new, and enter a unique name for the resource group, and then select OK. Region Select a region for your resources. For example, East US. For resiliency and reliability, we recommend deploying to one of the regions that support Availability Zones. IoT Hub Name Enter a name for the IoT hub that must be globally unique within the .azure-devices.net namespace. You need the hub name in the next section when you validate the deployment. Provisioning Service Name Enter a name for the new Device Provisioning Service (DPS) resource. The name must be globally unique within the .azure-devices-provisioning.net namespace. You need the DPS name in the next section when you validate the deployment. On the next screen, read the terms. If you agree to all terms, select Create.
The deployment takes a few moments to complete.
In addition to the Azure portal, you can also use the Azure PowerShell, Azure CLI, and REST API. To learn other deployment methods, see Deploy resources with ARM templates and Azure PowerShell.
Deploy with the Azure CLI
Using the Azure CLI requires version 2.6 or later. If you're running the Azure CLI locally, verify your version by running: az --version
Sign in to your Azure account and select your subscription.
If you're running the Azure CLI locally instead of running it in the portal, you need to sign in. To sign in at the command prompt, run the az login command:
az loginFollow the instructions to authenticate using the code and sign in to your Azure account through a web browser.
If you have multiple Azure subscriptions, signing in to Azure grants you access to all the Azure accounts associated with your credentials. Use the following az account list command to list the Azure accounts available for you to use:
az account list -o tableUse the following az account set command to select subscription that you want to use to run the commands to create your IoT hub and DPS resources. You can use either the subscription name or ID from the output of the previous command:
az account set --subscription {your subscription name or id}Copy and paste the following commands into your CLI prompt. Then execute the commands by selecting the Enter key.
Tip
The commands prompt for a resource group location. You can view a list of available locations by first running the following command:
az account list-locations -o tableread -p "Enter a project name that is used for generating resource names:" projectName && read -p "Enter the location (i.e. centralus):" location && templateUri="https://raw.githubusercontent.com/Azure/azure-quickstart-templates/master/quickstarts/microsoft.devices/iothub-device-provisioning/azuredeploy.json" && resourceGroupName="${projectName}rg" && az group create --name $resourceGroupName --location "$location" && az deployment group create --resource-group $resourceGroupName --template-uri $templateUri && echo "Press [ENTER] to continue ..." && readThe commands prompt you for the following information. Provide each value and select the Enter key.
Parameter Description Project name The value of this parameter is used to create a resource group to hold all resources. The string rgis added to the end of the value for your resource group name.location This value is the region where all resources are created. iotHubName Enter a name for the IoT hub that must be globally unique within the .azure-devices.net namespace. You need the hub name in the next section when you validate the deployment. provisioningServiceName Enter a name for the new Device Provisioning Service (DPS) resource. The name must be globally unique within the .azure-devices-provisioning.net namespace. You need the DPS name in the next section when you validate the deployment. The Azure CLI is used to deploy the template. In addition to the Azure CLI, you can also use the Azure PowerShell, Azure portal, and REST API. To learn other deployment methods, see Deploy templates.
Review deployed resources
To verify the deployment, run the following az resource list command to list resources and look for the new provisioning service and IoT hub in the output:
az resource list -g "${projectName}rg"To verify that the hub is already linked to the DPS resource, run the following az iot dps show command.
az iot dps show --name <Your provisioningServiceName>Notice the hubs that are linked on the
iotHubsmember.
Clean up resources
Other quickstarts in this collection build upon this quickstart. If you plan to continue on to work with subsequent quickstarts or with the tutorials, don't clean up the resources created in this quickstart. If you don't plan to continue, you can use the Azure portal or Azure CLI to delete the resource group and all of its resources.
To delete a resource group and all its resources from the Azure portal, just open the resource group and select Delete resource group at the top.
To delete the resource group deployed using the Azure CLI:
az group delete --name "${projectName}rg"
You can also delete resource groups and individual resources using any of the following options:
- Azure portal
- PowerShell
- REST APIs
- Supported platform SDKs published for Azure Resource Manager or IoT Hub Device Provisioning Service
Next steps
In this quickstart, you deployed an IoT hub and a Device Provisioning Service instance, and linked the two resources. To learn how to use this setup to provision a device, continue to the quickstart for creating a device.