How to configure Azure IoT Edge for Linux on Windows Industrial IoT & DMZ configuration
Applies to: ![]() IoT Edge 1.4
IoT Edge 1.4
Important
IoT Edge 1.4 is the supported release. If you are on an earlier release, see Update IoT Edge.
This article describes how to configure the Azure IoT Edge for Linux (EFLOW) virtual machine (VM) to support multiple network interface cards (NICs) and connect to multiple networks. By enabling multiple NIC support, applications running on the EFLOW VM can communicate with devices connected to the offline network, while using IoT Edge to send data to the cloud.
Prerequisites
- A Windows device with EFLOW already set up. For more information on EFLOW installation and configuration, see Create and provision an IoT Edge for Linux on Windows device using symmetric keys.
- A virtual switch different from the default one used during EFLOW installation. For more information on creating a virtual switch, see Create a virtual switch for Azure IoT Edge for Linux on Windows.
Industrial scenario
Industrial IoT is overtaking the era of information technology (IT) and operational technology (OT) convergence. However, making traditional OT assets more intelligent with IT technologies also means a larger exposure to cyber attacks. This scenario is one of the main reasons why multiple environments are designed using demilitarized zones, also known as, DMZs.
Imagine a workflow scenario where you have a networking configuration divided into two different networks or zones. In the first zone, you may have a secure network defined as the offline network. The offline network has no internet connectivity and is limited to internal access. In the second zone, you may have a demilitarized zone (DMZ), in which you may have a couple of devices that have limited internet connectivity. When moving the workflow to run on the EFLOW VM, you may have problems accessing the different networks since the EFLOW VM by default has only one NIC attached.
In this scenario, you have an environment with some devices like programmable logic controllers (PLCs) or open platform communications unified architecture (OPC UA)-compatible devices connected to the offline network, and you want to upload all the devices' information to Azure using the OPC Publisher module running on the EFLOW VM.
Since the EFLOW host device and the PLC or OPC UA devices are physically connected to the offline network, you can use the Azure IoT Edge for Linux on Windows virtual multiple NIC configurations to connect the EFLOW VM to the offline network. By using an external virtual switch, you can connect the EFLOW VM to the offline network and directly communicate with other offline devices.
For the other network, the EFLOW host device is physically connected to the DMZ (online network) with internet and Azure connectivity. Using an internal or external switch, you can connect the EFLOW VM to Azure IoT Hub using IoT Edge modules and upload the information sent by the offline devices through the offline NIC.

Scenario summary
Secure network:
- No internet connectivity - access restricted.
- PLCs or UPC UA-compatible devices connected.
- EFLOW VM connected using an External virtual switch.
DMZ:
- Internet connectivity - Azure connection allowed.
- EFLOW VM connected to Azure IoT Hub, using either an Internal/External virtual switch.
- OPC Publisher running as a module inside the EFLOW VM used to publish data to Azure.
Configure VM network virtual switches
The following steps are specific for the networking described in the example scenario. Ensure that the virtual switches used and the configurations used align with your networking environment.
Note
The steps in this article assume that the EFLOW VM was deployed with an external virtual switch connected to the secure network (offline). You can change the following steps to the specific network configuration you want to achieve. For more information about EFLOW multiple NICs support, see Azure IoT Edge for Linux on Windows virtual multiple NIC configurations.
To finish the provisioning of the EFLOW VM and communicate with Azure, you need to assign another NIC that is connected to the DMZ network (online).
For this scenario, you assign an external virtual switch connected to the DMZ network. For more information, review Create a virtual switch for Hyper-V virtual machines.
To create an external virtual switch, follow these steps:
- Open Hyper-V Manager.
- In Actions, select Virtual Switch Manager.
- In Virtual Switches, select New Virtual network switch.
- Choose type External then select Create Virtual Switch.
- Enter a name that represents the secure network. For example, OnlineOPCUA.
- Under Connection Type, select External Network then choose the network adapter connected to your DMZ network.
- Select Apply.
Once the external virtual switch is created, you need to attach it to the EFLOW VM using the following steps. If you need to attach multiple NICs, see EFLOW Multiple NICs.
For the custom new external virtual switch you created, use the following PowerShell commands to:
Attach the switch to your EFLOW VM.
Add-EflowNetwork -vswitchName "OnlineOPCUA" -vswitchType "External"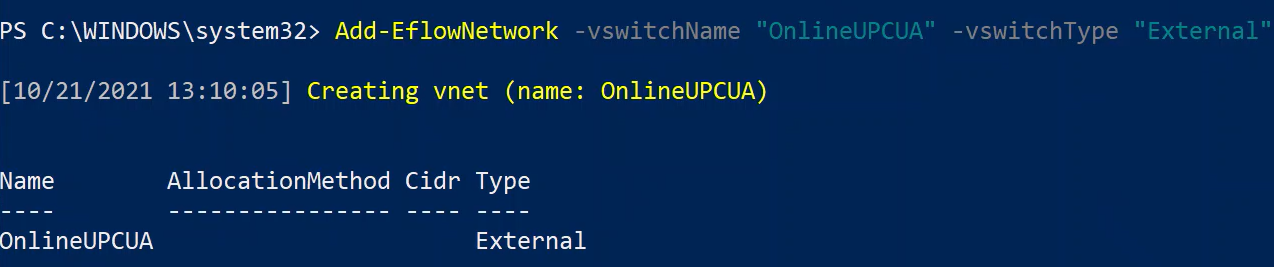
Set a static IP.
Add-EflowVmEndpoint -vswitchName "OnlineOPCUA" -vEndpointName "OnlineEndpoint" -ip4Address 192.168.0.103 -ip4PrefixLength 24 -ip4GatewayAddress 192.168.0.1


Once complete, you have the OnlineOPCUA switch assigned to the EFLOW VM. To check the multiple NIC attachment, use the following steps:
Open an elevated PowerShell session by starting with Run as Administrator.
Connect to the EFLOW virtual machine.
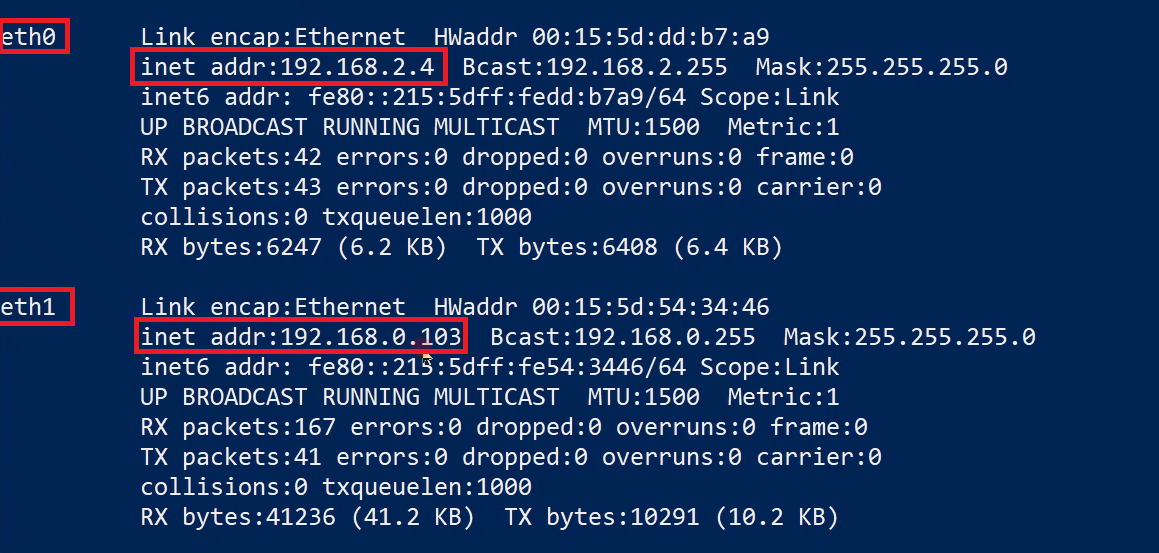
Connect-EflowVmOnce you're in your VM, list all the network interfaces assigned to the EFLOW virtual machine.
ifconfigReview the IP configuration and verify you see the eth0 interface (connected to the secure network) and the eth1 interface (connected to the DMZ network).
Configure VM network routing
When using the EFLOW multiple NICs feature, you may want to set up the different route priorities. By default, EFLOW creates one default route per ehtX interface assigned to the VM. EFLOW assigns the default route a random priority. If all interfaces are connected to the internet, random priorities may not be a problem. However, if one of the NICs is connected to an offline network, you may want to prioritize the online NIC over the offline NIC to get the EFLOW VM connected to the internet.
EFLOW uses the route service to manage the network routing alternatives. In order to check the available EFLOW VM routes, use the following steps:
Open an elevated PowerShell session by starting with Run as Administrator.
Connect to the EFLOW virtual machine.
Connect-EflowVmOnce you're in your VM, list all the network routes configured in the EFLOW virtual machine.
sudo route
Tip
The previous image shows the route command output with the two NIC's assigned (eth0 and eth1). The virtual machine creates two different default destinations rules with different metrics. A lower metric value has a higher priority. This routing table will vary depending on the networking scenario configured in the previous steps.
Static routes configuration
Every time EFLOW VM starts, the networking services recreates all routes, and any previously assigned priority could change. To work around this issue, you can assign the desired priority for each route every time the EFLOW VM starts. You can create a service that executes on every VM boot and uses the route command to set the desired route priorities.
First, create a bash script that executes the necessary commands to set the routes. For example, following the networking scenario mentioned earlier, the EFLOW VM has two NICs (offline and online networks). NIC eth0 is connected using the gateway IP xxx.xxx.xxx.xxx. NIC eth1 is connected using the gateway IP yyy.yyy.yyy.yyy.
The following script resets the default routes for both eth0 and *eth1 then adds the routes with the desired <number> metric. Remember that a lower metric value has higher priority.
#!/bin/sh

# Wait 30s for the interfaces to be up
sleep 30

# Delete previous eth0 route and create a new one with desired metric
sudo ip route del default via xxx.xxx.xxx.xxx dev eth0
sudo route add -net default gw xxx.xxx.xxx.xxx netmask 0.0.0.0 dev eth0 metric <number>

# Delete previous eth1 route and create a new one with desired metric
sudo ip route del default via yyy.yyy.yyy.yyy dev eth1
sudo route add -net default gw yyy.yyy.yyy.yyy netmask 0.0.0.0 dev eth1 metric <number>
You can use the previous script to create your own custom script specific to your networking scenario. Once script is defined, save it, and assign execute permission. For example, if the script name is route-setup.sh, you can assign execute permission using the command sudo chmod +x route-setup.sh. You can test if the script works correctly by executing it manually using the command sudo sh ./route-setup.sh and then checking the routing table using the sudo route command.
The final step is to create a Linux service that runs on startup, and executes the bash script to set the routes. You have to create a systemd unit file to load the service. The following is an example of that file.
[Unit]
after=network

[Service]
Type=simple
ExecStart=/bin/bash /home/iotedge-user/route-setup.sh

[Install]
WantedBy=default.target
To check the service works, reboot the EFLOW VM (Stop-EflowVm & Start-EflowVm) then Connect-EflowVm to connect to the VM. List the routes using sudo route and verify they're correct. You should be able to see the new default rules with the assigned metric.
Next steps
Follow the steps in How to configure networking for Azure IoT Edge for Linux on Windows to verify your networking configurations were applied correctly.
Feedback
Coming soon: Throughout 2024 we will be phasing out GitHub Issues as the feedback mechanism for content and replacing it with a new feedback system. For more information see: https://aka.ms/ContentUserFeedback.
Submit and view feedback for