Note
Access to this page requires authorization. You can try signing in or changing directories.
Access to this page requires authorization. You can try changing directories.
Applies to: ![]() IoT Edge 1.5
IoT Edge 1.5
Important
IoT Edge 1.5 LTS is the supported release. IoT Edge 1.4 LTS is end of life as of November 12, 2024. If you are on an earlier release, see Update IoT Edge.
Azure IoT Edge makes IoT solutions more efficient by moving workloads from the cloud to the edge. This capability lends itself well to services that process large amounts of data, like computer vision models. Azure AI Custom Vision lets you build custom image classifiers and deploy them to devices as containers. Together, these two services let users find insights from images or video streams without transferring all the data offsite first. Custom Vision provides a classifier that compares images against a trained model to generate insights.
For example, Custom Vision on an IoT Edge device might determine if a highway has higher or lower traffic than normal, or if a parking garage has available parking spots in a row. These insights can be shared with another service to take action.
In this tutorial, you learn how to:
- Build an image classifier with Custom Vision.
- Develop an IoT Edge module that queries the Custom Vision web server on the device.
- Send the image classifier results to IoT Hub.

If you don't have an Azure account, create a free account before you begin.
Prerequisites
Tip
This tutorial is a simplified version of the Custom Vision and Azure IoT Edge on a Raspberry Pi 3 sample project. It runs on a cloud VM and uses static images to train and test the image classifier, which helps someone new to Custom Vision on IoT Edge. The sample project uses physical hardware and sets up a live camera feed to train and test the image classifier, which is helpful for someone exploring a more detailed, real-life scenario.
Set up your environment for Linux container development by completing Tutorial: Develop IoT Edge modules using Visual Studio Code with the preferred Azure IoT Edge Dev Tool command-line (CLI) development tool. After completing the tutorial, ensure the following prerequisites are available in your development environment:
- A free or standard-tier IoT Hub in Azure
- A device running Azure IoT Edge with Linux containers. Use the quickstarts to set up a Linux device or Windows device.
- A container registry, such as Azure Container Registry.
- Visual Studio Code set up with the Azure IoT Hub extension.
- Download and install a Docker-compatible container management system on your development machine. Set it up to run Linux containers.
To develop an IoT Edge module with the Custom Vision service, ensure the following additional prerequisites are installed on your development machine:
Build an image classifier with Custom Vision
To build an image classifier, create a Custom Vision project and provide training images. For more information about the steps that you take in this section, see How to build a classifier with Custom Vision.
After building and training your image classifier, export it as a Docker container and deploy it to an IoT Edge device.
Create a new project
In your web browser, navigate to the Custom Vision web page.
Select Sign in and sign in with the same account that you use to access Azure resources.
Select New project.
Create your project with the following values:
Field Value Name Provide a name for your project, like EdgeTreeClassifier. Description Optional project description. Resource Select one of your Azure resource groups that includes a Custom Vision Service resource or create new if you haven't yet added one. Project Types Classification Classification Types Multiclass (single tag per image) Domains General (compact) Export Capabilities Basic platforms (TensorFlow, CoreML, ONNX, ...) Select Create project.
Upload images and train your classifier
Creating an image classifier requires a set of training images and test images.
Clone or download sample images from the Cognitive-CustomVision-Windows repo onto your local development machine.
git clone https://github.com/Microsoft/Cognitive-CustomVision-Windows.gitReturn to your Custom Vision project and select Add images.
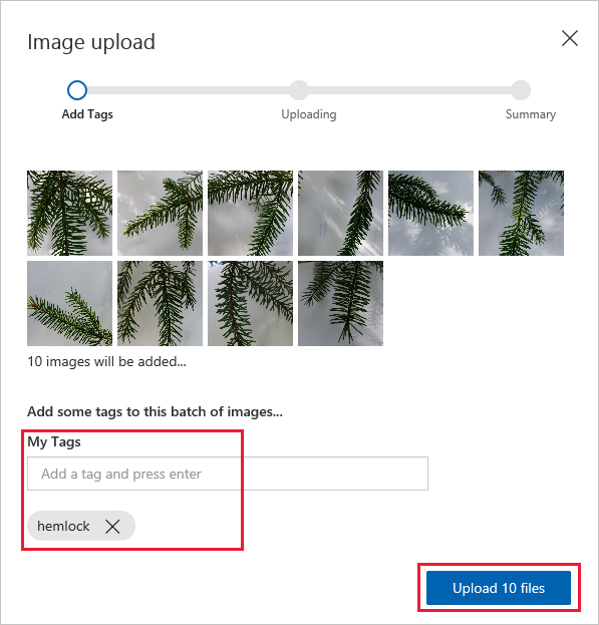
Browse to the git repo that you cloned locally, and navigate to the first image folder, Cognitive-CustomVision-Windows / Samples / Images / Hemlock. Select all 10 images in the folder, and then select Open.
Add the tag hemlock to this group of images, and then press enter to apply the tag.
Select Upload 10 files.
When the images are uploaded successfully, select Done.
Select Add images again.
Browse to the second image folder, Cognitive-CustomVision-Windows / Samples / Images / Japanese Cherry. Select all 10 images in the folder and then Open.
Add the tag japanese cherry to this group of images and press enter to apply the tag.
Select Upload 10 files. When the images are uploaded successfully, select Done.
After tagging and uploading both sets of images, select Train to train the classifier.
Export your classifier
After training your classifier, select Export on the Performance page of the classifier.
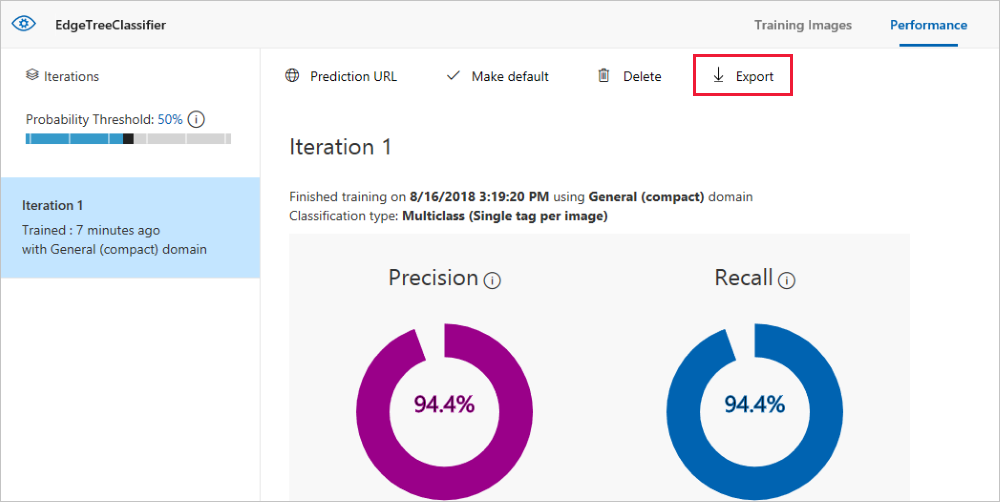
Select DockerFile for the platform.
Select Linux for the version.
Select Export.
After the export completes, select Download and save the .zip package locally on your computer. Extract all files from the package. Use these files to create an IoT Edge module that contains the image classification server.
When you reach this point, you've finished creating and training your Custom Vision project. You'll use the exported files in the next section, but you're done with the Custom Vision web page.
Create an IoT Edge solution
You now have the files for a container version of your image classifier on your development machine. In this section, you set up the image classifier container to run as an IoT Edge module. You also create a second module that posts requests to the classifier and sends the results as messages to IoT Hub.
Create a new solution
A solution is a logical way of developing and organizing multiple modules for a single IoT Edge deployment. A solution contains code for one or more modules and the deployment manifest that declares how to configure them on an IoT Edge device. Create the solution using the Azure IoT Edge Dev Tool command-line (CLI) development tool. The simplest way to use the tool is to Run the IoT Edge Dev Container with Docker.
Create a directory named classifier and change to the directory.
mkdir CustomVisionSolution
cd CustomVisionSolution
Run the iotedgedev tool init command to create a new IoT Edge solution. In the IoT Edge Dev Docker container, enter the following command:
iotedgedev solution init --template python --module classifierThe iotedgedev solution init script prompts you to complete several steps including:
- Authenticate to Azure
- Choose an Azure subscription
- Choose or create a resource group
- Choose or create an Azure IoT Hub
- Choose or create an Azure IoT Edge device
The command creates a new IoT Edge solution with a module named classifier in the current working directory.
Open the solution in Visual Studio Code.
Add your image classifier
The Python module template in Visual Studio Code contains some sample code that you can run to test IoT Edge. You won't use that code in this scenario. Instead, use the steps in this section to replace the sample code with the image classifier container that you exported previously.
In your file explorer, browse to the Custom Vision package that you downloaded and extracted. Copy all the contents from the extracted package. It should be two folders, app and azureml, and two files, Dockerfile and README.
In your file explorer, browse to the directory where you told Visual Studio Code to create your IoT Edge solution.
Open the classifier module folder. If you used the suggested names in the previous section, the folder structure looks like CustomVisionSolution / modules / classifier.
Paste the files into the classifier folder.
Return to the Visual Studio Code window. Your solution workspace should now show the image classifier files in the module folder.
Replace the original Dockerfile.amd64 file with the Dockerfile from the custom vision package by deleting the original Dockerfile.amd64 and renaming Dockerfile to Dockerfile.amd64.
Save your changes.
Create a simulated camera module
In a real custom vision deployment, a camera provides live images or video streams. For this scenario, you simulate the camera by building a module that sends a test image to the image classifier.
In this section, you add a new module to the same CustomVisionSolution and provide code to create the simulated camera.
Use the iotedgedev tool add a new module to the solution. The command creates a new folder named cameracapture in the modules folder of your solution.
iotedgedev solution add --template python cameracaptureOpen the main.py file in the modules / cameracapture folder.
Replace the entire file with the following code. This sample code sends POST requests to the image-processing service running in the classifier module. We provide this module container with a sample image to use in the requests. It then packages the response as an IoT Hub message and sends it to an output queue.
# Copyright (c) Microsoft. All rights reserved.
# Licensed under the MIT license. See LICENSE file in the project root for
# full license information.

import time
import sys
import os
import requests
import json
from azure.iot.device import IoTHubModuleClient, Message

# global counters
SENT_IMAGES = 0

# global client
CLIENT = None

# Send a message to IoT Hub
# Route output1 to $upstream in deployment.template.json
def send_to_hub(strMessage):
    message = Message(bytearray(strMessage, 'utf8'))
    CLIENT.send_message_to_output(message, "output1")
    global SENT_IMAGES
    SENT_IMAGES += 1
    print( "Total images sent: {}".format(SENT_IMAGES) )

# Send an image to the image classifying server
# Return the JSON response from the server with the prediction result
def sendFrameForProcessing(imagePath, imageProcessingEndpoint):
    headers = {'Content-Type': 'application/octet-stream'}

    with open(imagePath, mode="rb") as test_image:
        try:
            response = requests.post(imageProcessingEndpoint, headers = headers, data = test_image)
            print("Response from classification service: (" + str(response.status_code) + ") " + json.dumps(response.json()) + "\n")
        except Exception as e:
            print(e)
            print("No response from classification service")
            return None

    return json.dumps(response.json())

def main(imagePath, imageProcessingEndpoint):
    try:
        print ( "Simulated camera module for Azure IoT Edge. Press Ctrl-C to exit." )

        try:
            global CLIENT
            CLIENT = IoTHubModuleClient.create_from_edge_environment()
        except Exception as iothub_error:
            print ( "Unexpected error {} from IoTHub".format(iothub_error) )
            return

        print ( "The sample is now sending images for processing and will indefinitely.")

        while True:
            classification = sendFrameForProcessing(imagePath, imageProcessingEndpoint)
            if classification:
                send_to_hub(classification)
            time.sleep(10)

    except KeyboardInterrupt:
        print ( "IoT Edge module sample stopped" )

if __name__ == '__main__':
    try:
        # Retrieve the image location and image classifying server endpoint from container environment
        IMAGE_PATH = os.getenv('IMAGE_PATH', "")
        IMAGE_PROCESSING_ENDPOINT = os.getenv('IMAGE_PROCESSING_ENDPOINT', "")
    except ValueError as error:
        print ( error )
        sys.exit(1)

    if ((IMAGE_PATH and IMAGE_PROCESSING_ENDPOINT) != ""):
        main(IMAGE_PATH, IMAGE_PROCESSING_ENDPOINT)
    else:
        print ( "Error: Image path or image-processing endpoint missing" )
Save the main.py file.
Open the requirements.txt file.
Add a new line for a library to include in the container.
requestsSave the requirements.txt file.
Add a test image to the container
Instead of using a real camera to provide an image feed for this scenario, we're going to use a single test image. A test image is included in the GitHub repo that you downloaded for the training images earlier in this tutorial.
Navigate to the test image, located at Cognitive-CustomVision-Windows / Samples / Images / Test.
Copy test_image.jpg
Browse to your IoT Edge solution directory and paste the test image in the modules / cameracapture folder. The image should be in the same folder as the main.py file that you edited in the previous section.
In Visual Studio Code, open the Dockerfile.amd64 file for the cameracapture module.
After the line that establishes the working directory,
WORKDIR /app, add the following line of code:ADD ./test_image.jpg .Save the Dockerfile.
Prepare a deployment manifest
So far in this tutorial, you've trained a custom vision model to classify images of trees and packaged that model as an IoT Edge module. Then, you created a second module that queries the image classification server and reports its results to IoT Hub. Now, you're ready to create the deployment manifest that tells an IoT Edge device how to start and run these two modules together.
The IoT Edge extension for Visual Studio Code provides a template in each IoT Edge solution to help you create a deployment manifest.
Open the deployment.template.json file in the solution folder.
Set the registry credentials for the modules in the deployment manifest.
"registryCredentials": {
    "<registryName>": {
        "username": "<AcrUsername>",
        "password": "<AcrPassword>",
        "address": "<registryName>.azurecr.io"
    }
}
Replace <registryName> with the name of your Azure container registry, and replace <AcrUsername> and <AcrPassword> with the username and password for your registry. You can find these values in the Access keys section of your Azure container registry in the Azure portal.
Find the modules section, which contains three modules: the two you created, classifier and cameracapture, and a third included by default, tempSensor.
Delete the tempSensor module with all of its parameters. This module provides sample data for test scenarios, but it's not needed in this deployment.
If you named the image classification module something other than classifier, check the name now and ensure that it's all lowercase. The cameracapture module calls the classifier module using a requests library that formats all requests in lowercase, and IoT Edge is case-sensitive.
For each system module edgeAgent and edgeHub, change the createOptions value to a stringified version. For example:
"createOptions": "{\"HostConfig\":{\"PortBindings\":{\"5671/tcp\":[{\"HostPort\":\"5671\"}],\"8883/tcp\":[{\"HostPort\":\"8883\"}],\"443/tcp\":[{\"HostPort\":\"443\"}]}}}"For each system module edgeAgent and edgeHub, change the image version to the latest version 1.5. For example:
"image": "mcr.microsoft.com/azureiotedge-agent:1.5",
"image": "mcr.microsoft.com/azureiotedge-hub:1.5",
Update the createOptions parameter for the classifier module to a stringified version. For example:
"createOptions": "{\"HostConfig\":{\"PortBindings\":{\"5671/tcp\":[{\"HostPort\":\"5671\"}],\"8883/tcp\":[{\"HostPort\":\"8883\"}],\"443/tcp\":[{\"HostPort\":\"443\"}]}}}"Update the createOptions parameter for the cameracapture module with the following JSON. This information creates environment variables in the module container that are retrieved in the main.py process. Including this information in the deployment manifest lets you change the image or endpoint without rebuilding the module image.
"createOptions": "{\"Env\":[\"IMAGE_PATH=test_image.jpg\",\"IMAGE_PROCESSING_ENDPOINT=http://classifier/image\"]}"If you named your Custom Vision module something other than classifier, update the image-processing endpoint value to match.
For example, the classifier and cameracapture configuration should be similar to:
"modules": {
    "classifier": {
        "version": "1.0",
        "type": "docker",
        "status": "running",
        "restartPolicy": "always",
        "settings": {
            "image": "${MODULES.classifier}",
            "createOptions": "{\"HostConfig\":{\"PortBindings\":{\"5671/tcp\":[{\"HostPort\":\"5671\"}],\"8883/tcp\":[{\"HostPort\":\"8883\"}],\"443/tcp\":[{\"HostPort\":\"443\"}]}}}"
        }
    },
    "cameracapture": {
        "version": "1.0",
        "type": "docker",
        "status": "running",
        "restartPolicy": "always",
        "settings": {
            "image": "${MODULES.cameracapture}",
            "createOptions": "{\"Env\":[\"IMAGE_PATH=test_image.jpg\",\"IMAGE_PROCESSING_ENDPOINT=http://classifier/image\"]}"
        }
    }
}
Save the deployment.template.json file.
Build and push your IoT Edge solution
After creating both modules and configuring the deployment manifest template, build the container images and push them to your container registry.
Once the images are in your registry, you can deploy the solution to an IoT Edge device. You can set modules on a device through the IoT Hub. In this section, you set up access to your IoT Hub then use Azure CLI to deploy your solution to your IoT Edge device.
First, build and push the solution to the container registry.
Open the Visual Studio Code integrated terminal by selecting View > Terminal.
Sign in to Docker by entering the following command in the terminal using the username, password, and login server from the Azure container registry. You can retrieve these values from the Access keys section of your registry in the Azure portal.
docker login -u <AcrUsername> -p <AcrPassword> <AcrLoginServer>You might receive a security warning recommending the use of
--password-stdin. While that best practice is recommended for production scenarios, it's outside the scope of this tutorial. For more information, see the docker login reference.Use the module's Dockerfile to build and tag the module Docker image.
docker build --rm -f "<DockerFilePath>" -t <ImageNameAndTag> "<ContextPath>"For example, to build the image for the local registry or an Azure container registry, use the following commands:
# Build and tag the image for an Azure Container Registry. Replace <AcrRegistryName> with your own registry name.

docker build --rm -f "./modules/classifier/Dockerfile.amd64" -t <AcrRegistryName>.azurecr.io/classifier:0.0.1-amd64 "./modules/classifier"
docker build --rm -f "./modules/cameracapture/Dockerfile.amd64" -t <AcrRegistryName>.azurecr.io/cameracapture:0.0.1-amd64 "./modules/cameracapture"
Push module Docker image
Provide your container registry credentials to Docker so that it can push your container image to storage in the registry.
Sign in to Docker with the Azure Container Registry (ACR) credentials.
docker login -u <AcrUsername> -p <AcrPassword> <AcrLoginServer>You might receive a security warning recommending the use of
--password-stdin. While that's a recommended best practice for production scenarios, it's outside the scope of this tutorial. For more information, see the docker login reference.Sign in to the Azure Container Registry. You need to Install Azure CLI to use the
azcommand. This command asks for your user name and password found in your container registry in Settings > Access keys.az acr login -n <AcrRegistryName>Tip
If you get logged out at any point in this tutorial, repeat the Docker and Azure Container Registry sign in steps to continue.
Push your module image to the local registry or a container registry.
docker push <ImageName>For example:
# Push the Docker image to an Azure Container Registry. Replace <AcrRegistryName> with your Azure Container Registry name.

az acr login --name <AcrRegistryName>
docker push <AcrRegistryName>.azurecr.io/classifier:0.0.1-amd64
docker push <AcrRegistryName>.azurecr.io/cameracapture:0.0.1-amd64
Update the deployment template
Update the deployment.template.json file with the container registry image location. Change the image value to the image you pushed to the registry. For example, replace <AcrRegistryName> with your registry name in the image values for the classifier and cameracapture modules:
"classifier": {
    "version": "1.0",
    "type": "docker",
    "status": "running",
    "restartPolicy": "always",
    "settings": {
        "image": "<AcrRegistryName>.azurecr.io/classifier:0.0.1-amd64",
        "createOptions": "{\"HostConfig\":{\"PortBindings\":{\"5671/tcp\":[{\"HostPort\":\"5671\"}],\"8883/tcp\":[{\"HostPort\":\"8883\"}],\"443/tcp\":[{\"HostPort\":\"443\"}]}}}"
    },
    "cameracapture": {
        "version": "1.0",
        "type": "docker",
        "status": "running",
        "restartPolicy": "always",
        "settings": {
            "image": "<AcrRegistryName>.azurecr.io/cameracapture:0.0.1-amd64",
            "createOptions": "{\"Env\":[\"IMAGE_PATH=test_image.jpg\",\"IMAGE_PROCESSING_ENDPOINT=http://classifier/image\"]}"
        }
    }
}
The final deployment manifest looks similar to the following:
{
  "$schema-template": "4.0.0",
  "modulesContent": {
    "$edgeAgent": {
      "properties.desired": {
        "schemaVersion": "1.1",
        "runtime": {
          "type": "docker",
          "settings": {
            "minDockerVersion": "v1.25",
            "loggingOptions": "",
            "registryCredentials": {
              "<AcrRegistryName>": {
                "username": "<AcrUserName>",
                "password": "<AcrPassword>",
                "address": "<AcrRegistryName>.azurecr.io"
              }
            }
          }
        },
        "systemModules": {
          "edgeAgent": {
            "type": "docker",
            "settings": {
              "image": "mcr.microsoft.com/azureiotedge-agent:1.5",
              "createOptions": "{\"HostConfig\":{\"PortBindings\":{\"5671/tcp\":[{\"HostPort\":\"5671\"}],\"8883/tcp\":[{\"HostPort\":\"8883\"}],\"443/tcp\":[{\"HostPort\":\"443\"}]}}}"
            }
          },
          "edgeHub": {
            "type": "docker",
            "status": "running",
            "restartPolicy": "always",
            "settings": {
              "image": "mcr.microsoft.com/azureiotedge-hub:1.5",
              "createOptions": "{\"HostConfig\":{\"PortBindings\":{\"5671/tcp\":[{\"HostPort\":\"5671\"}],\"8883/tcp\":[{\"HostPort\":\"8883\"}],\"443/tcp\":[{\"HostPort\":\"443\"}]}}}"
            }
          }
        },
        "modules": {
          "classifier": {
            "version": "1.0",
            "type": "docker",
            "status": "running",
            "restartPolicy": "always",
            "settings": {
              "image": "<AcrRegistryName>.azurecr.io/classifier:0.0.1-amd64",
              "createOptions": "{\"HostConfig\":{\"PortBindings\":{\"5671/tcp\":[{\"HostPort\":\"5671\"}],\"8883/tcp\":[{\"HostPort\":\"8883\"}],\"443/tcp\":[{\"HostPort\":\"443\"}]}}}"
            }
          },
          "cameracapture": {
            "version": "1.0",
            "type": "docker",
            "status": "running",
            "restartPolicy": "always",
            "settings": {
              "image": "<AcrRegistryName>.azurecr.io/cameracapture:0.0.1-amd64",
              "createOptions": "{\"Env\":[\"IMAGE_PATH=test_image.jpg\",\"IMAGE_PROCESSING_ENDPOINT=http://classifier/image\"]}"
            }
          }
        }
      }
    },
    "$edgeHub": {
      "properties.desired": {
        "schemaVersion": "1.2",
        "routes": {
          "sensorToclassifier": "FROM /messages/modules/tempSensor/outputs/temperatureOutput INTO BrokeredEndpoint(\"/modules/classifier/inputs/input1\")",
          "classifierToIoTHub": "FROM /messages/modules/classifier/outputs/* INTO $upstream",
          "cameracaptureToIoTHub": "FROM /messages/modules/cameracapture/outputs/* INTO $upstream"
        },
        "storeAndForwardConfiguration": {
          "timeToLiveSecs": 7200
        }
      }
    }
  }
}
Deploy modules to device
Verify that built container images are stored in your container registry. Then, deploy them to a device using the deployment manifest deployment.template.json prepared for your scenario.
Use the IoT Edge Azure CLI set-modules command to deploy the modules to the Azure IoT Hub. For example, to deploy the modules defined in the deployment.template.json file to IoT Hub <IotHubName> for the IoT Edge device <DeviceName>, use the following command. Replace the values for hub-name, device-id, and login IoT Hub connection string with your own.
az iot edge set-modules --hub-name <IotHubName> --device-id <DeviceName> --content ./deployment.template.json --login "HostName=my-iot-hub.azure-devices.net;SharedAccessKeyName=iothubowner;SharedAccessKey=<SharedAccessKey>"
Tip
You can find your IoT Hub connection string including the shared access key in the Azure portal. Go to your IoT Hub > Security settings > Shared access policies > iothubowner.
Ensure your IoT Edge device is running.
Under your device, expand Modules to see a list of deployed and running modules. Select the refresh button. You see the new classifier and cameracapture modules running along with $edgeAgent and $edgeHub.
You can also check to see that all the modules are up and running on your device itself. On your IoT Edge device, run the following command to see the status of the modules.
iotedge list
It might take a few minutes for the modules to start. The IoT Edge runtime needs to receive its new deployment manifest, pull down the module images from the container runtime, then start each new module.
View classification results
On your device, view the logs of the cameracapture module to see the messages sent and confirm they are received by IoT Hub.
iotedge logs cameracapture
For example, you should see output like the following:
admin@vm:~$ iotedge logs cameracapture
Simulated camera module for Azure IoT Edge. Press Ctrl-C to exit.
The sample is now sending images for processing and will indefinitely.
Response from classification service: (200) {"created": "2023-07-13T17:38:42.940878", "id": "", "iteration": "", "predictions": [{"boundingBox": null, "probability": 1.0, "tagId": "", "tagName": "hemlock"}], "project": ""}

Total images sent: 1
Response from classification service: (200) {"created": "2023-07-13T17:38:53.444884", "id": "", "iteration": "", "predictions": [{"boundingBox": null, "probability": 1.0, "tagId": "", "tagName": "hemlock"}], "project": ""}
Note
Initially, you might see connection errors in the output from the cameracapture module because of the delay between modules being deployed and starting.
The cameracapture module automatically reattempts connection until it succeeds. After connecting successfully, you see the expected image classification messages.
The results from the Custom Vision module, sent as messages from the cameracapture module, include the probability that the image is a hemlock or cherry tree. Because the image is hemlock, you see the probability as 1.0.
Clean up resources
If you plan to continue to the next recommended article, keep the resources and configurations you created and reuse them. You can also keep using the same IoT Edge device as a test device.
Otherwise, delete the local configurations and the Azure resources you used in this article to avoid charges.
Delete Azure resources
Deleting Azure resources and resource groups is irreversible. Make sure that you don't accidentally delete the wrong resource group or resources. If you created the IoT Hub inside an existing resource group that has resources that you want to keep, delete only the IoT Hub resource itself, not the resource group.
To delete the resources:
Sign in to the Azure portal, and then select Resource groups.
Select the name of the resource group that contains your IoT Edge test resources.
Review the list of resources that your resource group contains. If you want to delete all of them, you can select Delete resource group. If you want to delete only some of them, you can select each resource to delete them individually.
Next steps
In this tutorial, you trained a Custom Vision model and deployed it as a module onto an IoT Edge device. Then you built a module that can query the image classification service and report its results back to IoT Hub.
Continue to the next tutorials to learn about other ways that Azure IoT Edge can help you turn data into business insights at the edge.