Note
Access to this page requires authorization. You can try signing in or changing directories.
Access to this page requires authorization. You can try changing directories.
This article shows you how to export your Azure IoT Hub template, add a route to your IoT hub, and then redeploy the template to your IoT hub by using the Azure CLI or Azure PowerShell. Use an Azure Resource Manager template to create routes and endpoints. IoT Hub supports the following Azure services as endpoints:
- Storage containers
- Event Hubs
- Service Bus queues
- Service Bus topics
- Cosmos DB
Azure Resource Manager templates are useful when you want to define resources by using a JSON file. Every Azure resource has a template that defines the components that are used in that resource. You can export all Azure resource templates.
Important
When you use a Resource Manager template to deploy a resource, the template replaces any existing resource of the type you're deploying.
When you create a new IoT hub, overwriting an existing deployed resource isn't a concern. To create a new IoT hub, you can use a basic template that has the required properties instead of exporting an existing template from an IoT hub that's already deployed.
However, if you add a route to an existing IoT hub, use a template that you export from your IoT hub to ensure that all existing resources and properties remain connected after you deploy the updated template. Resources that are already deployed won't be replaced. For example, an exported Resource Manager template that you previously deployed might contain storage information for your IoT hub if you've connected it to storage.
To learn more about how routing works in IoT Hub, see Use IoT Hub message routing to send device-to-cloud messages to different endpoints. To walk through the steps to set up a route that sends messages to storage and then test on a simulated device, see Tutorial: Send device data to Azure Storage by using IoT Hub message routing.
Prerequisites
Review the prerequisites for this article based on the type of endpoint you want to route the messages to.
An Azure subscription. If you don't have an Azure subscription, create a free Azure account before you begin.
An IoT hub. If you don't have a hub, you can follow the steps to create an IoT hub.
An Event Hubs resource (with container). If you need to create a new Event Hubs resource, see Quickstart: Create an event hub by using a Resource Manager template.
(Recommended) A managed identity with role-based access control permissions for the Event Hubs namespace. For more information, see Authenticate a managed identity with Microsoft Entra ID to access Event Hubs resources.
Azure Resource Manager template
This article uses an Azure Resource Manager template in the Azure portal to work with IoT Hub and other Azure services. To learn more about how to use Resource Manager templates, see What are Azure Resource Manager templates?
Create a route
In IoT Hub, you can create a route to send messages or capture events. Each route has a data source and an endpoint. The data source is where messages or event logs originate. The endpoint is where the messages or event logs end up. You choose locations for the data source and endpoint when you create a new route in your IoT hub. Then, you use routing queries to filter messages or events before they go to the endpoint.
You can use an event hub, a Service Bus queue or topic, or an Azure storage account to be the endpoint for your IoT hub route. The service that you use to create your endpoint must first exist in your Azure account.
Export your IoT hub's Resource Manager template
First, export a Resource Manager template from your IoT hub. By exporting the template from your IoT hub, you can add endpoint and route resources and redeploy without losing existing setting.
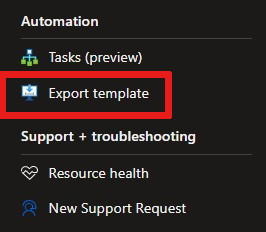
In the Azure portal, go to your IoT hub. In the resource menu under Automation, select Export template.
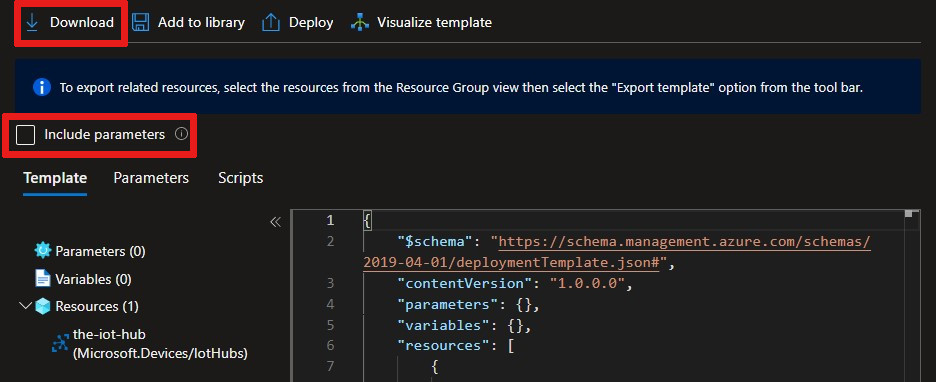
In Export template, on the Template tab, complete these steps:
View the JSON file that's generated for your IoT hub.
Clear the Include parameters checkbox.
Select Download to download a local copy of the JSON file.
The template has several placeholders you can use to add features or services to your IoT hub. For this article, add values only to properties that are in or nested under
routing.
Add an endpoint to the template
Each route points to an endpoint, which is where the messages or event logs end up. Create an endpoint in your IoT hub that the route can refer to. You can use an event hub, a Service Bus queue or topic, an Azure storage account, or a Cosmos DB container to be the endpoint for your IoT hub route. The service that you use to create your endpoint must first exist in your Azure account.
Your IoT hub needs access permissions for any endpoint resource that it sends messages or logs to. You can provide access by using managed identities and Microsoft Entra ID or by using connection strings. Microsoft recommends authenticating with Entra ID as the more secure option.
Add an Event Hubs endpoint to your Resource Manager template. For more information, see Azure Resource Manager template RoutingEventHubProperties.
In the JSON file, find the
"endpoints": []property that's nested under"routing".Replace the
"endpoints": []line with the following JSON:"endpoints": { "serviceBusQueues": [], "serviceBusTopics": [], "eventHubs": [ { "endpointUri": "", "entityPath": "", "authenticationType": "identityBased", "identity": { "userAssignedIdentity": "" }, "name": "", "id": "", "subscriptionId": "", "resourceGroup": "" } ], "storageContainers": [], "cosmosDBSqlContainers": [] },Update the JSON with the following information about your Event Hubs resource:
Property Value endpointUri (If authentication type is identityBased; otherwise, delete.) The host name of your Event Hubs namespace in the formatsb://<eventhubs_namespace_name>.servicebus.windows.netentityPath (If authentication type is identityBased; otherwise, delete.) The name of your event hub.authenticationType identityBasedorkeyBased. Microsoft recommends identity based authentication as the more secure option.identity (If authentication type is identityBased.) You can use a user-assigned managed identity or a system-assigned managed identity if your IoT Hub has system-assigned managed identity enabled.
For user-assigned: The external ID of the managed identity with access permissions to your event hub in the format/subscriptions/<subscription_id>/resourceGroups/<resource_group_name>/providers/Microsoft.ManagedIdentity/userAssignedIdentities/<identity_name>.
For system-assigned: Leave the identity parameter as an empty list. For example,"identity": {},connectionString (If authentication type is keyBased.) The primary connection string from one of your event hub's shared access policies in the format<connection_string>;EntityPath=<event_hub_name>.You can retrieve the connection string value from the Azure portal, then append the entity path.name Provide a unique value to name your endpoint. id Leave as an empty string. The Azure service provides a value when you create the endpoint. subscriptionId The ID of the subscription that contains your event hub. resourceGroup The name of the resource group that contains your event hub. Tip
For secrets management, you can Create a parameter file or Use Azure Key Vault to pass secure parameter values during deployment.
Add a route to the template
Add a route definition to your Resource Manager template. For more information, see Azure Resource Manager template RouteProperties.
In the JSON file, find the
"routes": []property, nested under"routing", and add a new route.Caution
If you replace any existing values for
"routes"with the route values that are used in the following code examples, the existing routes are removed when you deploy. To preserve existing routes, add the new route object to the"routes"list."routes": [ { "name": "", "source": "DeviceConnectionStateEvents", "condition": "true", "endpointNames": [ "" ], "isEnabled": true } ],Update the JSON with the following information about your Cosmos DB resource:
Property Value name Provide a unique value to name your route. source Select the message or event logs source to route to the endpoint. For a list of source options, see az iot hub message-route. condition A query to filter the source data. If no condition is required, say true. For more information, see IoT Hub message routing query syntax.endpointNames The name of the existing endpoint where this data will be routed. Currently only one endpoint is allowed. isEnabled Set to trueto enable the route, orfalseto disable the route.Save your JSON file.
Deploy the Resource Manager template
With your new endpoint and route added to the Resource Manager template, you can now deploy the JSON file back to your IoT hub.
Local deployment
az deployment group create \
  --name my-iot-hub-template \
  --resource-group my-resource-group \
  --template-file "my\path\to\template.json"
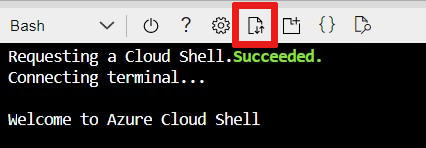
Azure Cloud Shell deployment
Because Azure Cloud Shell runs in a web browser, you can upload the template file before you run the deployment command. With the file uploaded, you need only the template file name (instead of the entire file path) to use in the template-file parameter.
az deployment group create \
  --name my-iot-hub-template \
  --resource-group my-resource-group \
  --template-file "template.json"
Note
If the deployment fails, use the -verbose switch to get information about the resources you're creating. Use the -debug switch to get more information for debugging.
Confirm deployment
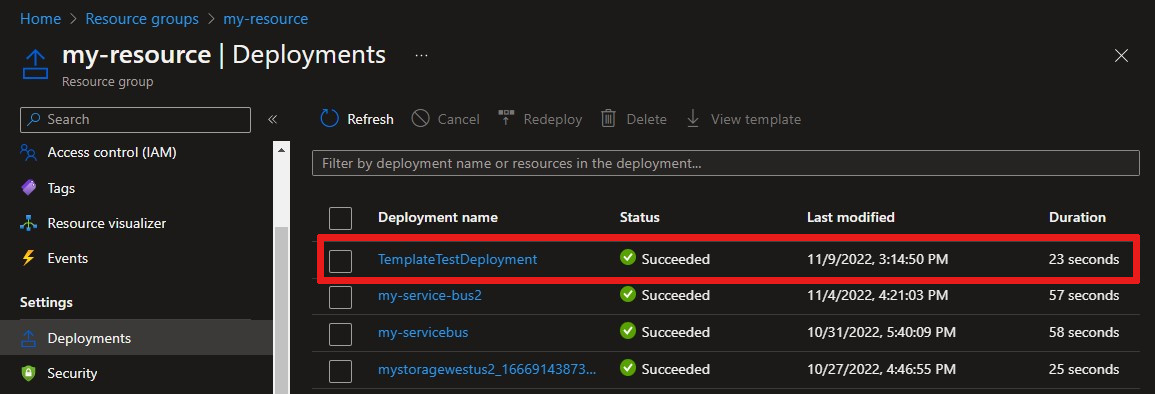
To confirm that your template deployed successfully to Azure, in the Azure portal, go to your resource group resource. In the resource menu under Settings, select Deployments to see the template in a list of your deployments.
To view your new route in the Azure portal, go to your IoT Hub resource. On the Message routing pane, on the Routes tab, confirm that your route is listed.
Next steps
In this how-to article, you learned how to create a route and endpoint for Event Hubs, Service Bus queues and topics, and Azure Storage.
To learn more about message routing, see Tutorial: Send device data to Azure Storage by using IoT Hub message routing. In the tutorial, you create a storage route and test it with a device in your IoT hub.