Get started with device management (Java)
Back-end apps can use Azure IoT Hub primitives, such as device twins and direct methods, to remotely start and monitor device management actions on devices. This article shows you how a back-end app and a device app can work together to initiate and monitor a remote device reboot using IoT Hub.
Note
The features described in this article are available only in the standard tier of IoT Hub. For more information about the basic and standard/free IoT Hub tiers, see Choose the right IoT Hub tier for your solution.
Use a direct method to initiate device management actions (such as reboot, factory reset, and firmware update) from a back-end app in the cloud. The device is responsible for:
Handling the method request sent from IoT Hub.
Initiating the corresponding device-specific action on the device.
Providing status updates through reported properties to IoT Hub.
You can use a back-end app in the cloud to run device twin queries to report on the progress of your device management actions.
This article shows you how to create:
simulated-device: a simulated device app with a direct method that reboots the device and reports the last reboot time. Direct methods are invoked from the cloud.
trigger-reboot: a Java app that calls the direct method in the simulated device app through your IoT hub. It displays the response and updated reported properties.
Note
For information about the SDKs that you can use to build applications to run on devices and your solution back end, see Azure IoT SDKs.
Prerequisites
An IoT hub. Create one with the CLI or the Azure portal.
A registered device. Register one in the Azure portal.
Java SE Development Kit 8. Make sure you select Java 8 under Long-term support to get to downloads for JDK 8.
Make sure that port 8883 is open in your firewall. The device sample in this article uses MQTT protocol, which communicates over port 8883. This port may be blocked in some corporate and educational network environments. For more information and ways to work around this issue, see Connecting to IoT Hub (MQTT).
Create a device app with a direct method
In this section, you create a Java console app that simulates a device. The app listens for the reboot direct method call from your IoT hub and immediately responds to that call. The app then sleeps for a while to simulate the reboot process before it uses a reported property to notify the trigger-reboot back-end app that the reboot is complete.
In the dm-get-started folder, create a Maven project called simulated-device using the following command at your command prompt:
mvn archetype:generate -DgroupId=com.mycompany.app -DartifactId=simulated-device -DarchetypeArtifactId=maven-archetype-quickstart -DinteractiveMode=falseAt your command prompt, navigate to the simulated-device folder.
Using a text editor, open the pom.xml file in the simulated-device folder and add the following dependency to the dependencies node. This dependency enables you to use the iot-service-client package in your app to communicate with your IoT hub:
<dependency>
  <groupId>com.microsoft.azure.sdk.iot</groupId>
  <artifactId>iot-device-client</artifactId>
  <version>1.17.5</version>
</dependency>
Note
You can check for the latest version of iot-device-client using Maven search.
Add the following dependency to the dependencies node. This dependency configures a NOP for the Apache SLF4J logging facade, which is used by the device client SDK to implement logging. This configuration is optional, but, if you omit it, you may see a warning in the console when you run the app. For more information about logging in the device client SDK, see Logging in the Samples for the Azure IoT device SDK for Java readme file.
<dependency>
  <groupId>org.slf4j</groupId>
  <artifactId>slf4j-nop</artifactId>
  <version>1.7.28</version>
</dependency>
Add the following build node after the dependencies node. This configuration instructs Maven to use Java 1.8 to build the app:
<build>
  <plugins>
    <plugin>
      <groupId>org.apache.maven.plugins</groupId>
      <artifactId>maven-compiler-plugin</artifactId>
      <version>3.3</version>
      <configuration>
        <source>1.8</source>
        <target>1.8</target>
      </configuration>
    </plugin>
  </plugins>
</build>
Save and close the pom.xml file.
Using a text editor, open the simulated-device\src\main\java\com\mycompany\app\App.java source file.
Add the following import statements to the file:
import com.microsoft.azure.sdk.iot.device.*;
import com.microsoft.azure.sdk.iot.device.DeviceTwin.*;

import java.io.IOException;
import java.net.URISyntaxException;
import java.time.LocalDateTime;
import java.util.Scanner;
import java.util.Set;
import java.util.HashSet;
Add the following class-level variables to the App class. Replace
{yourdeviceconnectionstring}with the device connection string you saw when you registered a device in the IoT Hub:private static final int METHOD_SUCCESS = 200; private static final int METHOD_NOT_DEFINED = 404; private static IotHubClientProtocol protocol = IotHubClientProtocol.MQTT; private static String connString = "{yourdeviceconnectionstring}"; private static DeviceClient client;To implement a callback handler for direct method status events, add the following nested class to the App class:
protected static class DirectMethodStatusCallback implements IotHubEventCallback
{
  public void execute(IotHubStatusCode status, Object context)
  {
    System.out.println("IoT Hub responded to device method operation with status " + status.name());
  }
}
To implement a callback handler for device twin status events, add the following nested class to the App class:
protected static class DeviceTwinStatusCallback implements IotHubEventCallback
{
    public void execute(IotHubStatusCode status, Object context)
    {
        System.out.println("IoT Hub responded to device twin operation with status " + status.name());
    }
}
To implement a callback handler for property events, add the following nested class to the App class:
protected static class PropertyCallback implements PropertyCallBack<String, String>
{
  public void PropertyCall(String propertyKey, String propertyValue, Object context)
  {
    System.out.println("PropertyKey:     " + propertyKey);
    System.out.println("PropertyKvalue:  " + propertyKey);
  }
}
To implement a thread to simulate the device reboot, add the following nested class to the App class. The thread sleeps for five seconds and then sets the lastReboot reported property:
protected static class RebootDeviceThread implements Runnable {
  public void run() {
    try {
      System.out.println("Rebooting...");
      Thread.sleep(5000);
      Property property = new Property("lastReboot", LocalDateTime.now());
      Set<Property> properties = new HashSet<Property>();
      properties.add(property);
      client.sendReportedProperties(properties);
      System.out.println("Rebooted");
    }
    catch (Exception ex) {
      System.out.println("Exception in reboot thread: " + ex.getMessage());
    }
  }
}
To implement the direct method on the device, add the following nested class to the App class. When the simulated app receives a call to the reboot direct method, it returns an acknowledgment to the caller and then starts a thread to process the reboot:
protected static class DirectMethodCallback implements com.microsoft.azure.sdk.iot.device.DeviceTwin.DeviceMethodCallback
{
  @Override
  public DeviceMethodData call(String methodName, Object methodData, Object context)
  {
    DeviceMethodData deviceMethodData;
    switch (methodName)
    {
      case "reboot" :
      {
        int status = METHOD_SUCCESS;
        System.out.println("Received reboot request");
        deviceMethodData = new DeviceMethodData(status, "Started reboot");
        RebootDeviceThread rebootThread = new RebootDeviceThread();
        Thread t = new Thread(rebootThread);
        t.start();
        break;
      }
      default:
      {
        int status = METHOD_NOT_DEFINED;
        deviceMethodData = new DeviceMethodData(status, "Not defined direct method " + methodName);
      }
    }
    return deviceMethodData;
  }
}
Modify the signature of the main method to throw the following exceptions:
public static void main(String[] args) throws IOException, URISyntaxExceptionTo instantiate a DeviceClient, replace the code in the main method with the following code:
System.out.println("Starting device client sample...");
client = new DeviceClient(connString, protocol);
To start listening for direct method calls, add the following code to the main method:
try
{
  client.open();
  client.subscribeToDeviceMethod(new DirectMethodCallback(), null, new DirectMethodStatusCallback(), null);
  client.startDeviceTwin(new DeviceTwinStatusCallback(), null, new PropertyCallback(), null);
  System.out.println("Subscribed to direct methods and polling for reported properties. Waiting...");
}
catch (Exception e)
{
  System.out.println("On exception, shutting down \n" + " Cause: " + e.getCause() + " \n" +  e.getMessage());
  client.close();
  System.out.println("Shutting down...");
}
To shut down the device simulator, add the following code to the main method:
System.out.println("Press any key to exit...");
Scanner scanner = new Scanner(System.in);
scanner.nextLine();
scanner.close();
client.close();
System.out.println("Shutting down...");
Save and close the simulated-device\src\main\java\com\mycompany\app\App.java file.
Build the simulated-device app and correct any errors. At your command prompt, navigate to the simulated-device folder and run the following command:
mvn clean package -DskipTests
Get the IoT hub connection string
In this article, you create a backend service that invokes a direct method on a device. To invoke a direct method on a device through IoT Hub, your service needs the service connect permission. By default, every IoT Hub is created with a shared access policy named service that grants this permission.
To get the IoT Hub connection string for the service policy, follow these steps:
In the Azure portal, select Resource groups. Select the resource group where your hub is located, and then select your hub from the list of resources.
On the left-side pane of your IoT hub, select Shared access policies.
From the list of policies, select the service policy.
Copy the Primary connection string and save the value.

For more information about IoT Hub shared access policies and permissions, see Access control and permissions.
Create a service app to trigger a reboot
In this section, you create a Java console app that:
Invokes the reboot direct method in the simulated device app.
Displays the response.
Polls the reported properties sent from the device to determine when the reboot is complete.
This console app connects to your IoT Hub to invoke the direct method and read the reported properties.
Create an empty folder called dm-get-started.
In the dm-get-started folder, create a Maven project called trigger-reboot using the following command at your command prompt:
mvn archetype:generate -DgroupId=com.mycompany.app -DartifactId=trigger-reboot -DarchetypeArtifactId=maven-archetype-quickstart -DinteractiveMode=falseAt your command prompt, navigate to the trigger-reboot folder.
Using a text editor, open the pom.xml file in the trigger-reboot folder and add the following dependency to the dependencies node. This dependency enables you to use the iot-service-client package in your app to communicate with your IoT hub:
<dependency>
  <groupId>com.microsoft.azure.sdk.iot</groupId>
  <artifactId>iot-service-client</artifactId>
  <version>1.17.1</version>
  <type>jar</type>
</dependency>
Note
You can check for the latest version of iot-service-client using Maven search.
Add the following build node after the dependencies node. This configuration instructs Maven to use Java 1.8 to build the app:
<build>
  <plugins>
    <plugin>
      <groupId>org.apache.maven.plugins</groupId>
      <artifactId>maven-compiler-plugin</artifactId>
      <version>3.3</version>
      <configuration>
        <source>1.8</source>
        <target>1.8</target>
      </configuration>
    </plugin>
  </plugins>
</build>
Save and close the pom.xml file.
Using a text editor, open the trigger-reboot\src\main\java\com\mycompany\app\App.java source file.
Add the following import statements to the file:
import com.microsoft.azure.sdk.iot.service.devicetwin.DeviceMethod;
import com.microsoft.azure.sdk.iot.service.devicetwin.MethodResult;
import com.microsoft.azure.sdk.iot.service.exceptions.IotHubException;
import com.microsoft.azure.sdk.iot.service.devicetwin.DeviceTwin;
import com.microsoft.azure.sdk.iot.service.devicetwin.DeviceTwinDevice;

import java.io.IOException;
import java.util.concurrent.TimeUnit;
import java.util.concurrent.Executors;
import java.util.concurrent.ExecutorService;
Add the following class-level variables to the App class. Replace
{youriothubconnectionstring}with the IoT Hub connection string you copied previously in Get the IoT hub connection string:public static final String iotHubConnectionString = "{youriothubconnectionstring}"; public static final String deviceId = "myDeviceId"; private static final String methodName = "reboot"; private static final Long responseTimeout = TimeUnit.SECONDS.toSeconds(30); private static final Long connectTimeout = TimeUnit.SECONDS.toSeconds(5);To implement a thread that reads the reported properties from the device twin every 10 seconds, add the following nested class to the App class:
private static class ShowReportedProperties implements Runnable {
  public void run() {
    try {
      DeviceTwin deviceTwins = DeviceTwin.createFromConnectionString(iotHubConnectionString);
      DeviceTwinDevice twinDevice = new DeviceTwinDevice(deviceId);
      while (true) {
        System.out.println("Get reported properties from device twin");
        deviceTwins.getTwin(twinDevice);
        System.out.println(twinDevice.reportedPropertiesToString());
        Thread.sleep(10000);
      }
    } catch (Exception ex) {
      System.out.println("Exception reading reported properties: " + ex.getMessage());
    }
  }
}
Modify the signature of the main method to throw the following exception:
public static void main(String[] args) throws IOExceptionTo invoke the reboot direct method on the simulated device, replace the code in the main method with the following code:
System.out.println("Starting sample...");
DeviceMethod methodClient = DeviceMethod.createFromConnectionString(iotHubConnectionString);

try
{
  System.out.println("Invoke reboot direct method");
  MethodResult result = methodClient.invoke(deviceId, methodName, responseTimeout, connectTimeout, null);

  if(result == null)
  {
    throw new IOException("Invoke direct method reboot returns null");
  }
  System.out.println("Invoked reboot on device");
  System.out.println("Status for device:   " + result.getStatus());
  System.out.println("Message from device: " + result.getPayload());
}
catch (IotHubException e)
{
    System.out.println(e.getMessage());
}
To start the thread to poll the reported properties from the simulated device, add the following code to the main method:
ShowReportedProperties showReportedProperties = new ShowReportedProperties();
ExecutorService executor = Executors.newFixedThreadPool(1);
executor.execute(showReportedProperties);
To enable you to stop the app, add the following code to the main method:
System.out.println("Press ENTER to exit.");
System.in.read();
executor.shutdownNow();
System.out.println("Shutting down sample...");
Save and close the trigger-reboot\src\main\java\com\mycompany\app\App.java file.
Build the trigger-reboot back-end app and correct any errors. At your command prompt, navigate to the trigger-reboot folder and run the following command:
mvn clean package -DskipTests
Run the apps
You're now ready to run the apps.
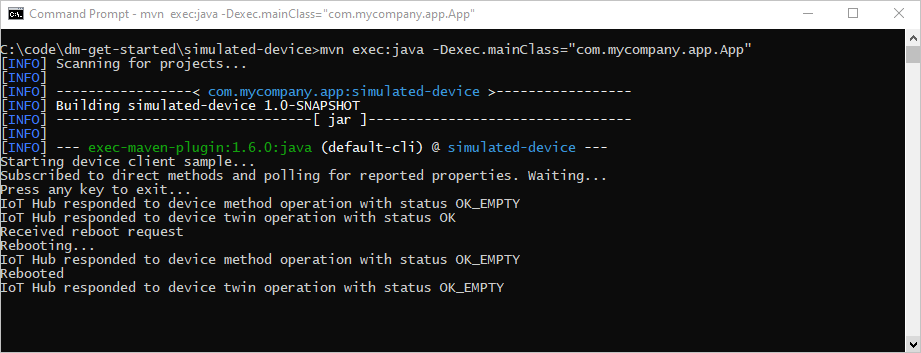
At a command prompt in the simulated-device folder, run the following command to begin listening for reboot method calls from your IoT hub:
mvn exec:java -Dexec.mainClass="com.mycompany.app.App"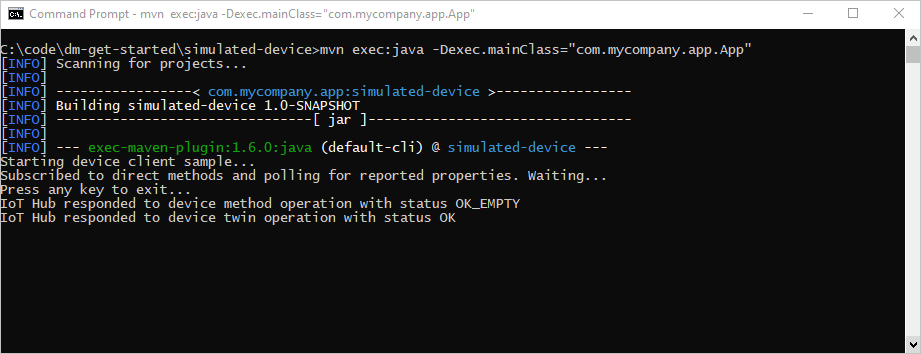
At a command prompt in the trigger-reboot folder, run the following command to call the reboot method on your simulated device from your IoT hub:
mvn exec:java -Dexec.mainClass="com.mycompany.app.App"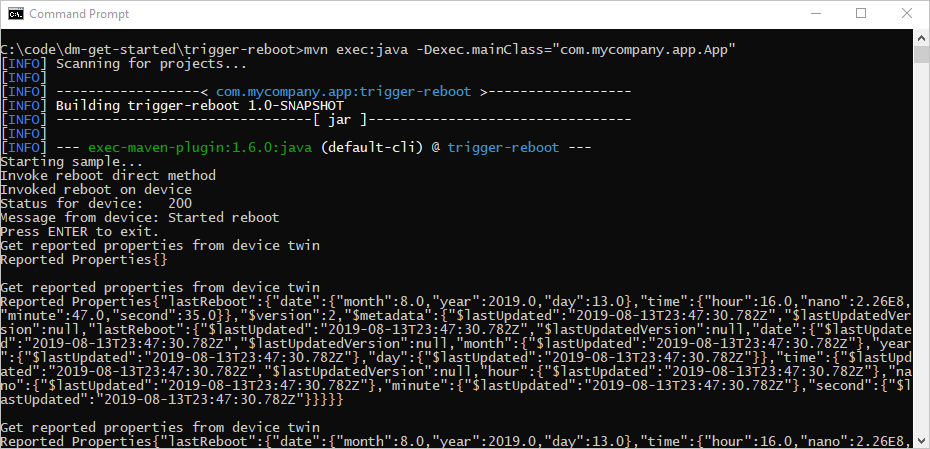
The simulated device responds to the reboot direct method call:
Customize and extend the device management actions
Your IoT solutions can expand the defined set of device management patterns or enable custom patterns by using the device twin and cloud-to-device method primitives. Other examples of device management actions include factory reset, firmware update, software update, power management, network and connectivity management, and data encryption.
Device maintenance windows
Typically, you configure devices to perform actions at a time that minimizes interruptions and downtime. Device maintenance windows are a commonly used pattern to define the time when a device should update its configuration. Your back-end solutions can use the desired properties of the device twin to define and activate a policy on your device that enables a maintenance window. When a device receives the maintenance window policy, it can use the reported property of the device twin to report the status of the policy. The back-end app can then use device twin queries to attest to compliance of devices and each policy.
Next steps
In this article, you used a direct method to trigger a remote reboot on a device. You used the reported properties to report the last reboot time from the device, and queried the device twin to discover the last reboot time of the device from the cloud.
ToTo continue getting started with IoT Hub and device management patterns such as end-to-end image-based update in Device Update for Azure IoT Hub article using the Raspberry Pi 3 B+ Reference Image.
To learn how to extend your IoT solution and schedule method calls on multiple devices, see Schedule and broadcast jobs.
Feedback
Coming soon: Throughout 2024 we will be phasing out GitHub Issues as the feedback mechanism for content and replacing it with a new feedback system. For more information see: https://aka.ms/ContentUserFeedback.
Submit and view feedback for