Note
Access to this page requires authorization. You can try signing in or changing directories.
Access to this page requires authorization. You can try changing directories.
Use Azure Logic Apps to monitor incoming device telemetry from IoT Hub and send notifications when alerts are triggered.
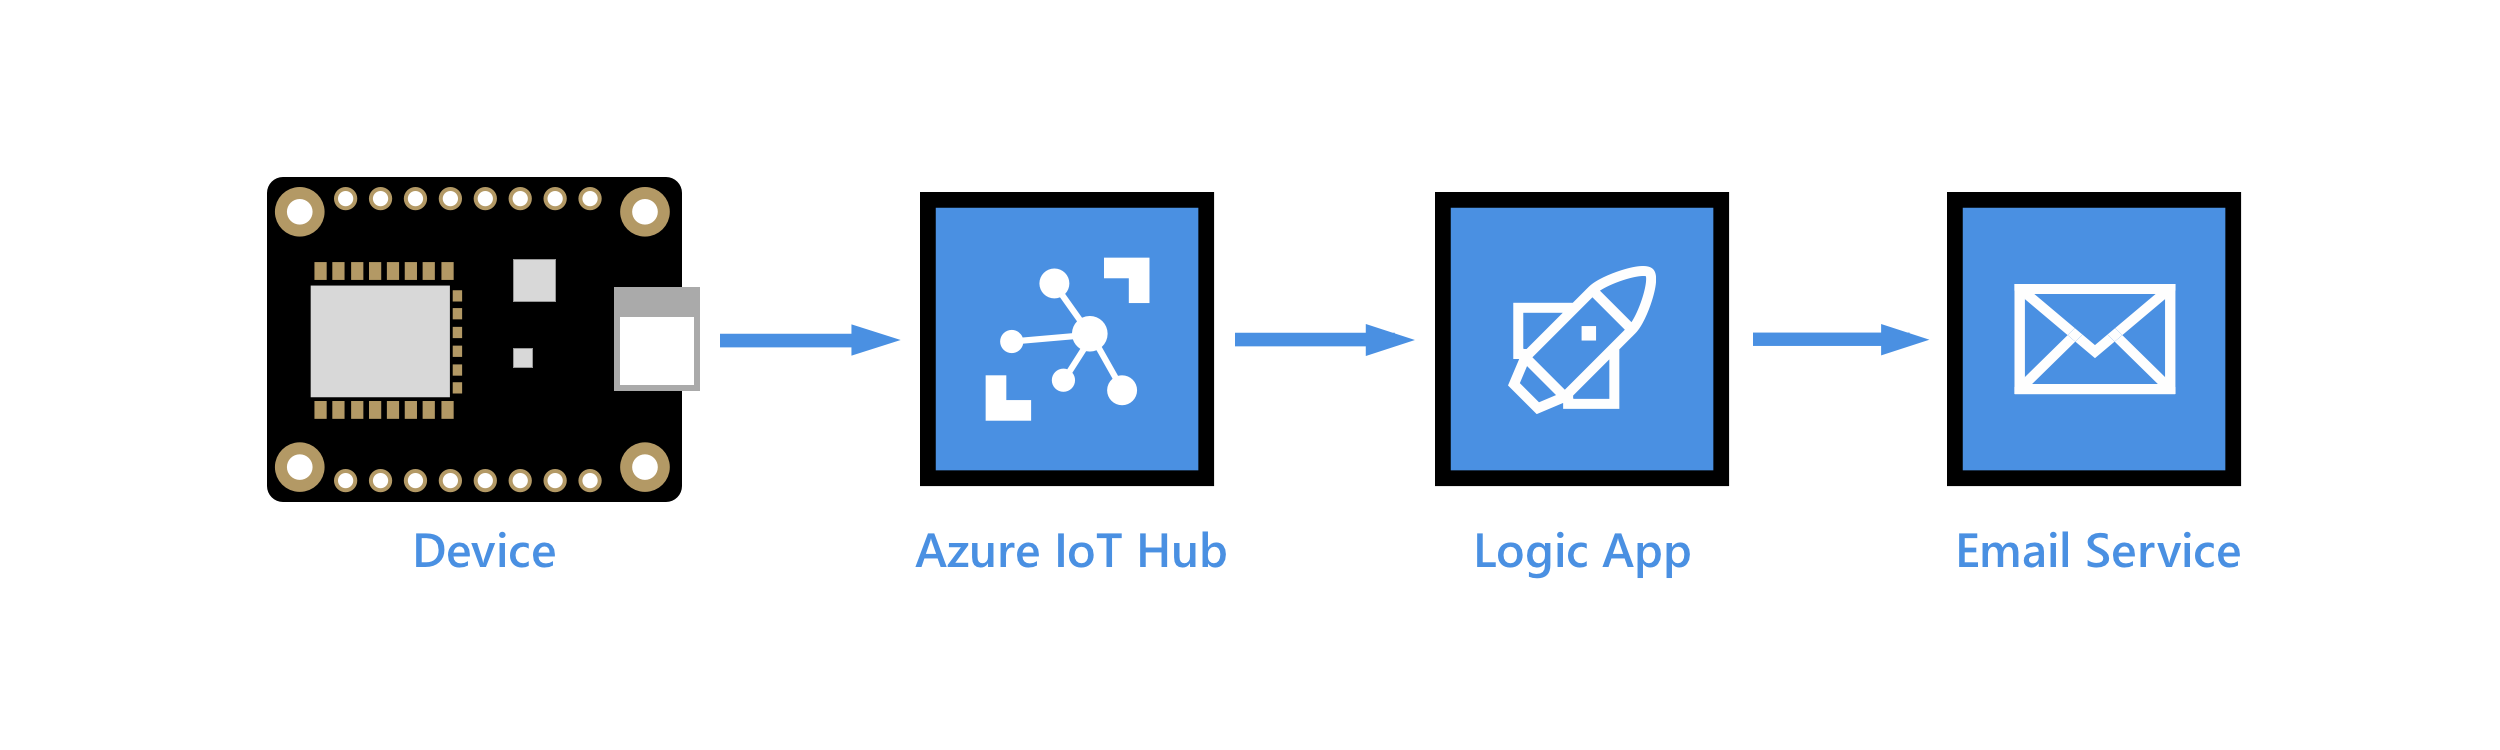
Azure Logic Apps can help you orchestrate workflows across on-premises and cloud services, multiple enterprises, and various protocols. A logic app begins with a trigger, which is then followed by one or more actions that can be sequenced using built-in controls, such as conditions and iterators. This flexibility makes Logic Apps an ideal IoT solution for IoT monitoring scenarios. For example, the arrival of data from a device at an IoT Hub endpoint can initiate logic app workflows to warehouse the data in an Azure Storage blob, send email alerts to warn of data anomalies, schedule a technician visit if a device reports a failure, and so on.
In this tutorial, you perform the following tasks:
Create a Service Bus queue. Create a route in your IoT hub that sends messages to the Service Bus queue if the messages contain anomalous temperature readings. Create a logic app that watches for messaging arriving in the queue and sends an email alert.
The client code running on your device sets an application property, temperatureAlert, on every telemetry message it sends to your IoT hub. When the client code detects a temperature above a given threshold, it sets this property to true; otherwise, it sets the property to false.
Messages arriving at your IoT hub look similar to the following, with the telemetry data contained in the body and the temperatureAlert property contained in the application properties (system properties aren't shown):
{
  "body": {
    "messageId": 18,
    "deviceId": "Raspberry Pi Web Client",
    "temperature": 27.796111770668457,
    "humidity": 66.77637926438427
  },
  "applicationProperties": {
    "temperatureAlert": "false"
  }
}
If you don't have an Azure subscription, create a free account before you begin.
Prerequisites
Prepare the following prerequisites before beginning this tutorial.
An active Azure subscription.
An IoT hub in your subscription.
A client app that sends temperature data to your Azure IoT hub. This tutorial filters device-to-cloud messages based on a message property called
temperatureAlert. Some samples that generate messages with this property include:- .NET SDK: SimulatedDevice
- Java SDK: send-event
- Node.js SDK: simple_sample_device
- C SDK: iothub_II_client_shared_sample
- Codeless: Raspberry Pi online simulator
Create Service Bus namespace and queue
Create a Service Bus namespace and queue. Later in this article, you create a routing rule in your IoT hub to direct messages that contain a temperature alert to the Service Bus queue. A logic app monitors the queue for incoming messages and sends a notification for each alert.
Create a Service Bus namespace
On the Azure portal, use the search bar to search for and select Service Bus.
Select Create to create a service bus namespace.
On the Create namespace pane, provide the following information:
Parameter Value Subscription Choose the same subscription that contains your IoT hub. Resource group Choose the same resource group that contains your IoT hub. Namespace name Provide a name for your service bus namespace. The namespace must be unique across Azure. Location Choose the same location that your IoT hub uses. Pricing tier Select Basic from the drop-down list. The Basic tier is sufficient for this tutorial. Select Review + create.
Select Create.
Wait for the deployment to complete, then select Go to resource.
Add a Service Bus queue to the namespace
On the Overview page of your Service Bus namespace, select Queue.
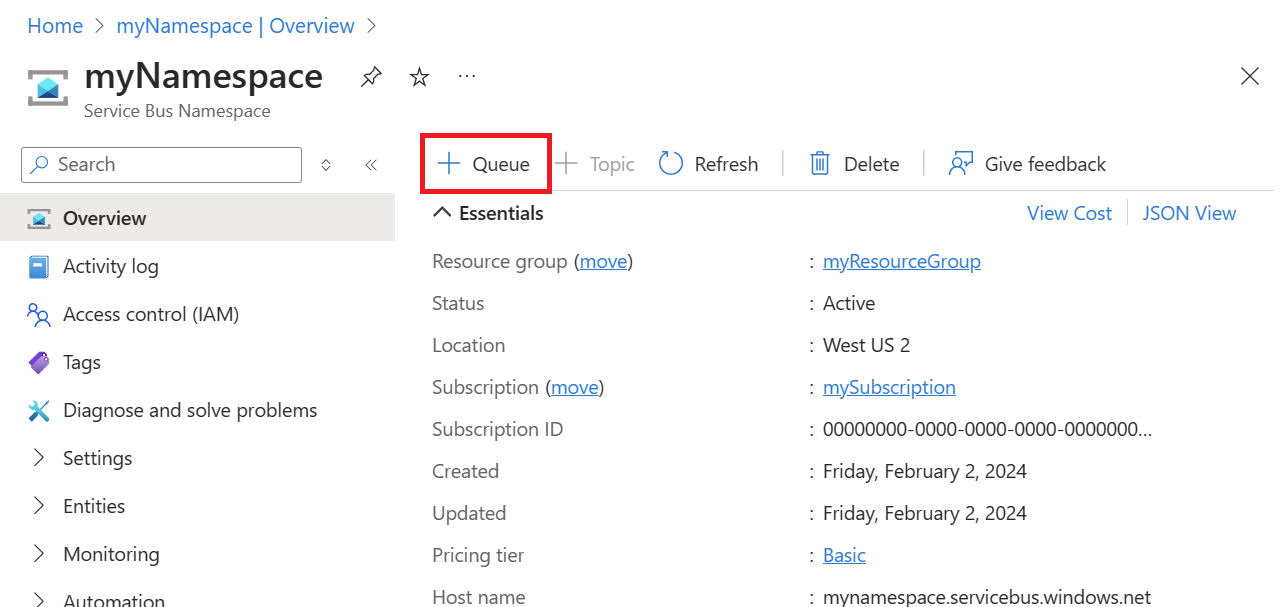
In the Name field, provide a name for the queue. Accept the default values for the other fields and select Create.
In your Service Bus namespace, select Shared access policies from the Settings section of the resource menu.
Select the RootManageSharedAccessKey policy to open its details.
Copy the value of Primary connection string and save it to use later in this tutorial when you configure the logic app.
Add a custom endpoint and routing rule to your IoT hub
Add a custom endpoint for the Service Bus queue to your IoT hub. Then, create a message routing rule to direct messages that contain a temperature alert to that endpoint, where they're picked up by your logic app. The routing rule uses a routing query, temperatureAlert = "true", to forward messages based on the value of the temperatureAlert application property set by the client code running on the device. To learn more, see Message routing query based on message properties.
Add a custom endpoint and route
In the Azure portal, go to your IoT hub.
In the resource menu under Hub settings, select Message routing then select Add.
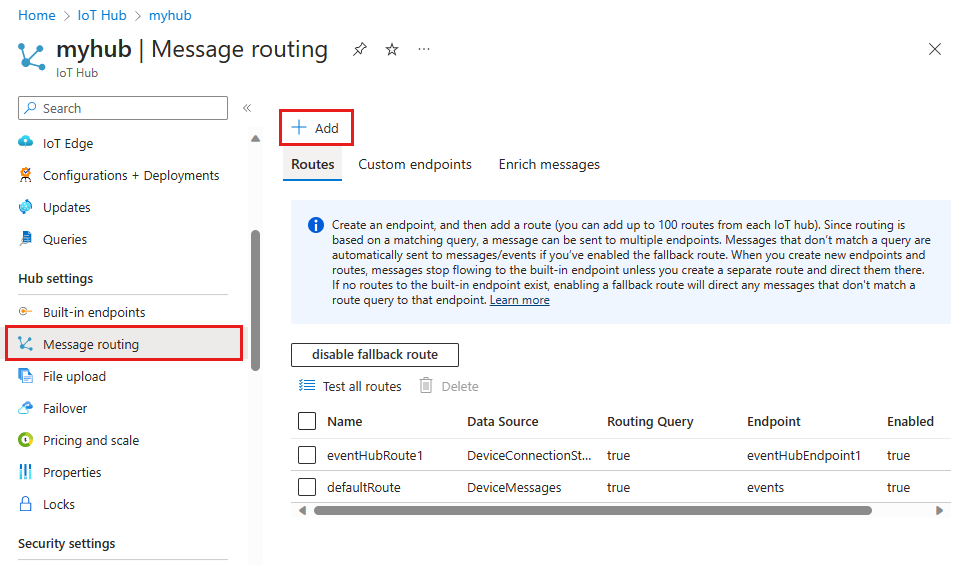
On the Endpoint tab, create an endpoint for your Service Bus queue by providing the following information:
Parameter Value Endpoint type Select Service Bus queue. Endpoint name Provide a name for the new endpoint that maps to your Service Bus queue. Service Bus namespace Use the drop-down menu to select the Service Bus namespace that you created in the previous section. Service Bus queue Use the drop-down menu to select the Service Bus queue that you created in your namespace. 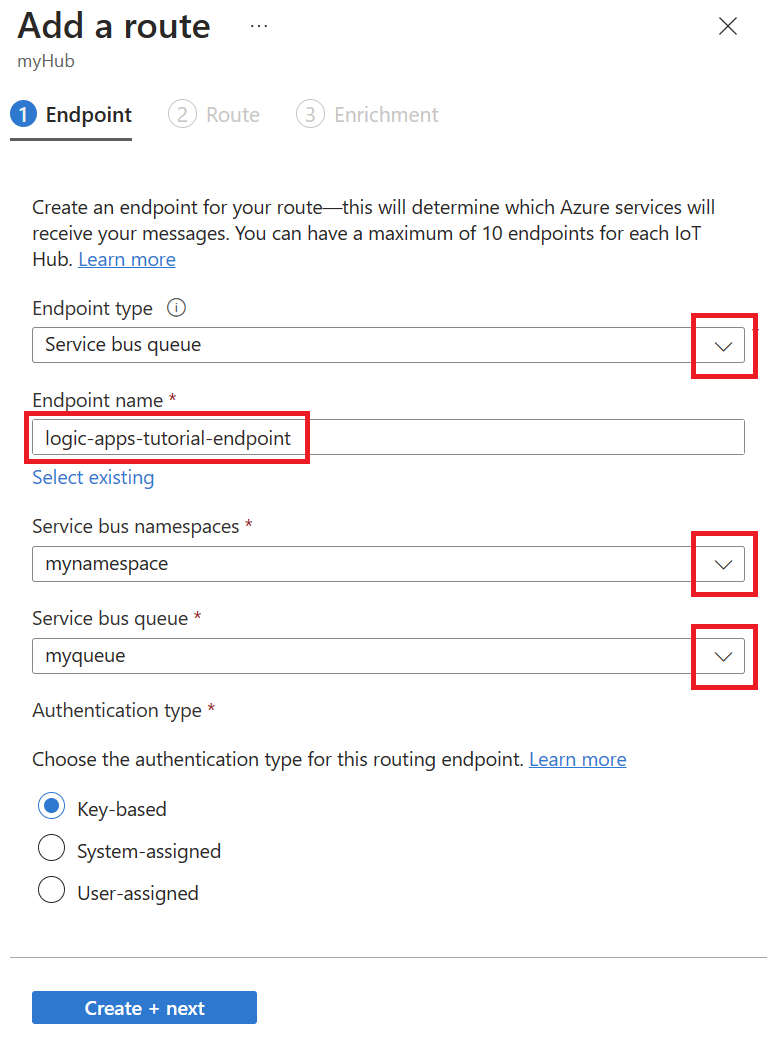
Select Create + next.
On the Route tab, enter the following information to create a route that points to your Service Bus queue endpoint:
Parameter Value Name Provide a unique name for the route. Data source Keep the default Device Telemetry Message data source. Routing query Enter temperatureAlert = "true"as the query string.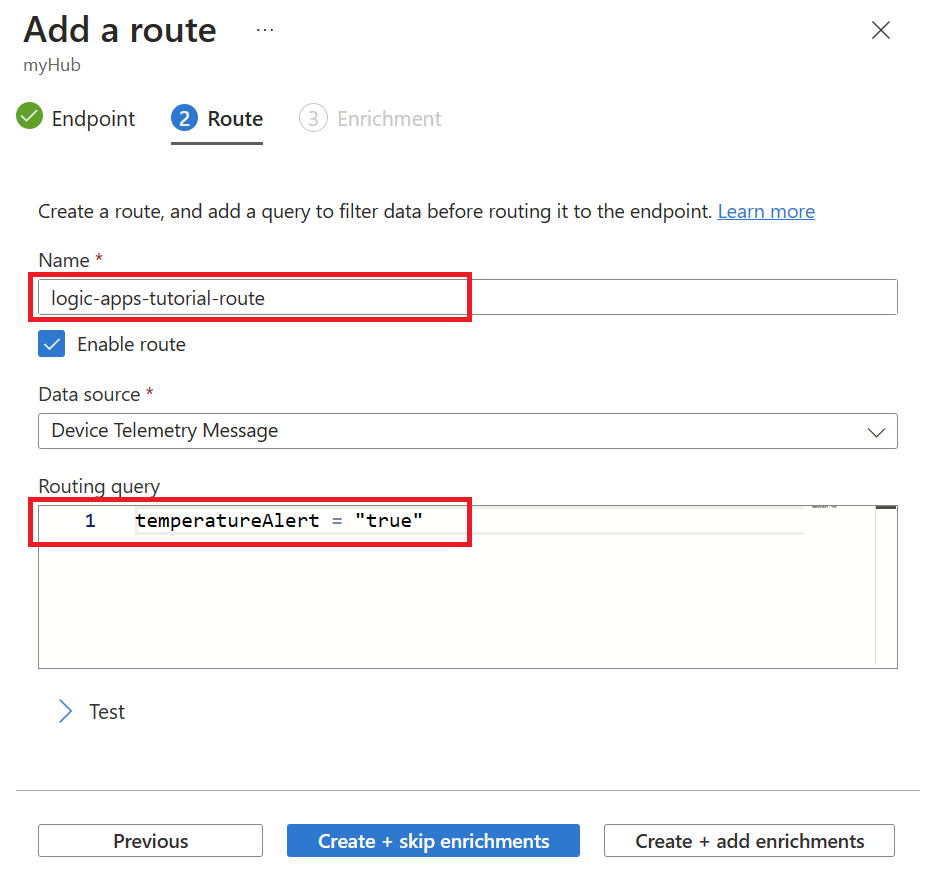
Select Create + skip enrichments.
Configure Logic Apps for notifications
In the preceding section, you set up your IoT hub to route messages containing a temperature alert to your Service Bus queue. Now, you set up a logic app to monitor the Service Bus queue and send an e-mail notification whenever a message is added to the queue.
Create a logic app
In the Azure portal, search for and select Logic Apps.
Select Add to create a new logic app.
Enter the following information on the Basics tab of Create Logic App:
Parameter Value Resource group Select the same resource group that contains your IoT hub. Name Provide a name for your logic app. Region Select a location close to you. Plan type Select Consumption, which is sufficient for this tutorial. 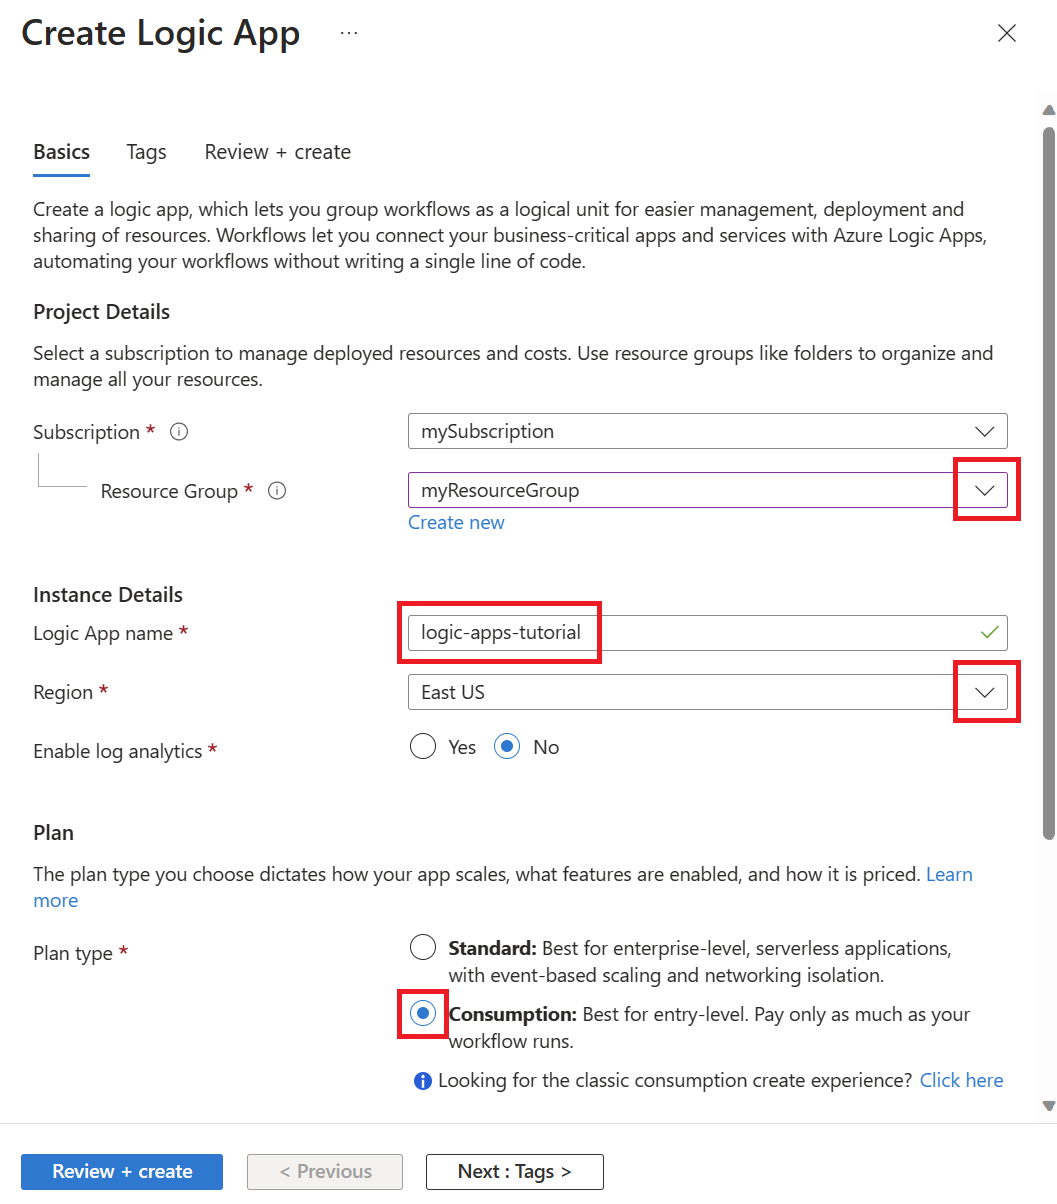
Select Review + create.
Select Create.
After the deployment completes, select Go to resource to open your logic app.
Configure the logic app trigger
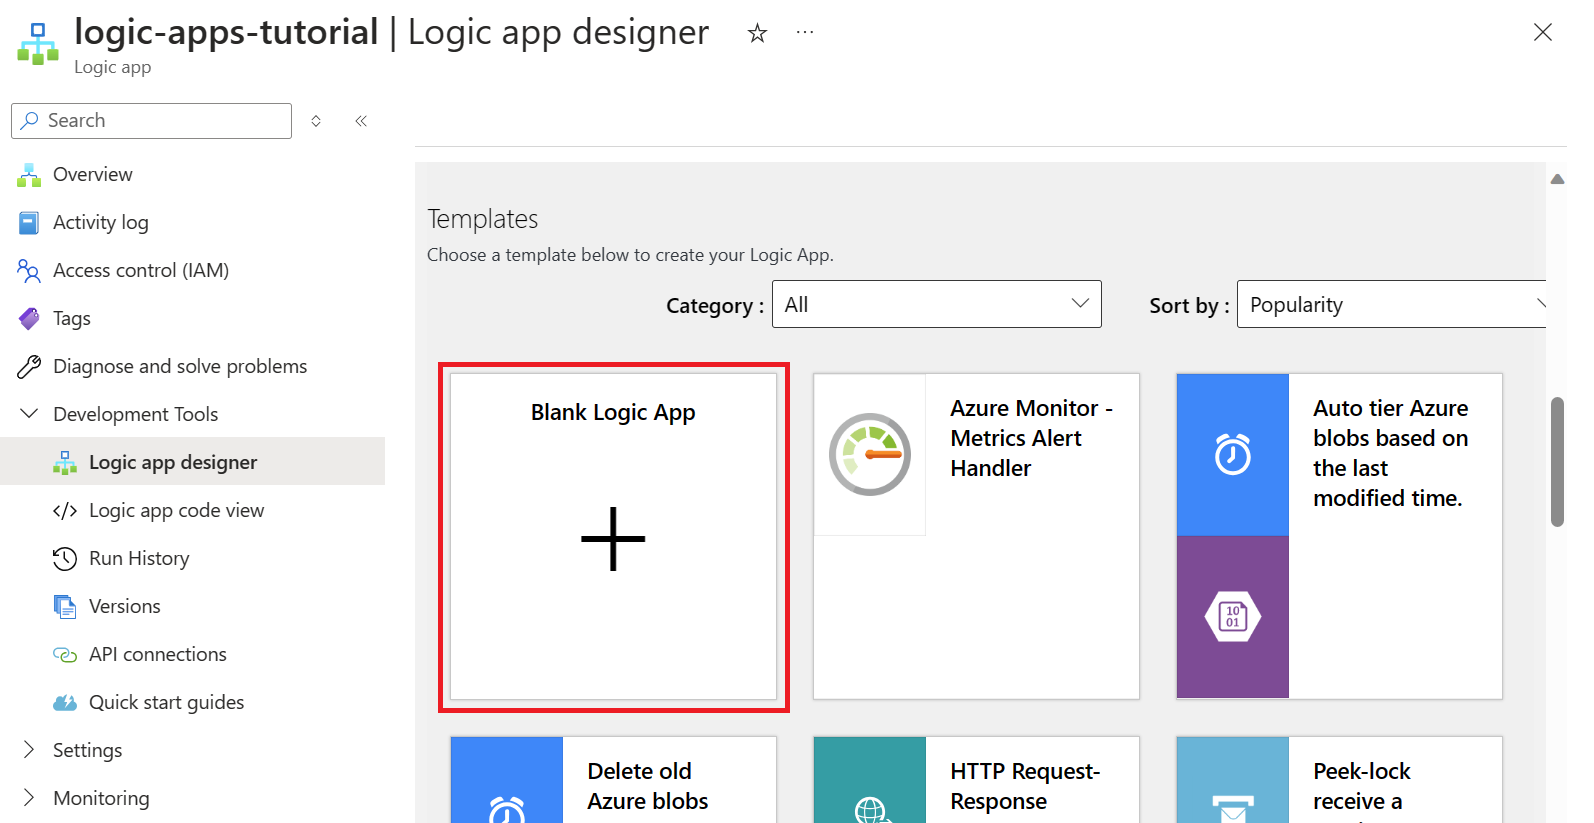
On your logic app resource page in the Azure portal, open the Logic app designer from the Development Tools section of the resource menu.
In the designer, scroll down to Templates and select Blank Logic App.
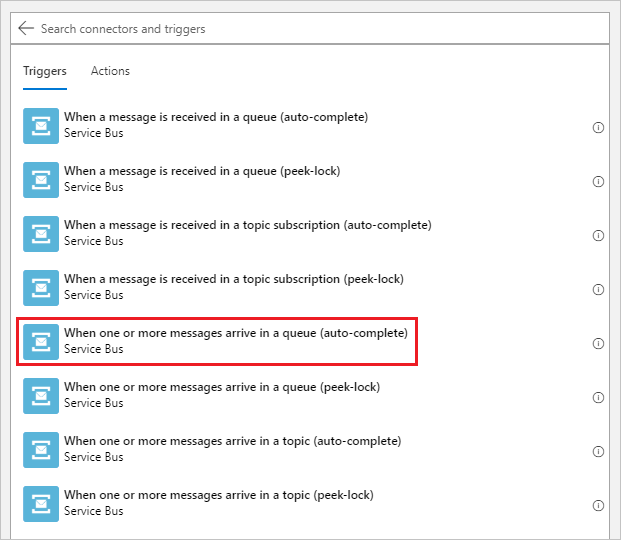
Select the All tab to show all connectors and triggers, then select Service Bus.

Under Triggers, select When one or more messages arrive in a queue (auto-complete).
Create a service bus connection.
Provide a Connection name and then paste the Connection string that you copied from your Service Bus namespace.
Select Create.
On the next screen, use the drop-down menu to select the queue that you created in your Service Bus namespace. Then, enter
175for Maximum message count.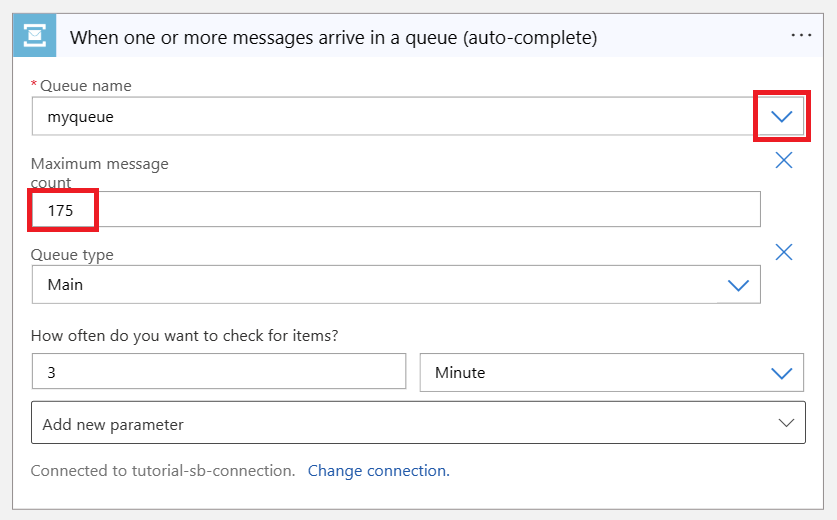
Select Save on the logic app designer menu to save your changes.
Configure the logic app action
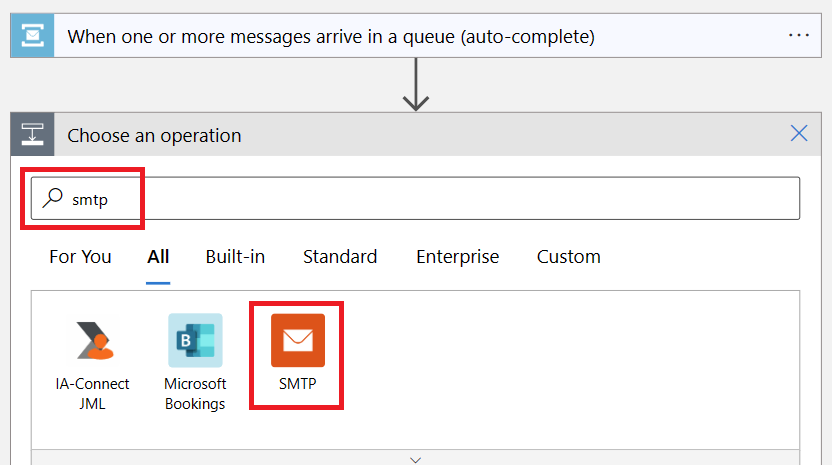
Select New step in the logic app designer.
Create an SMTP service connection.
Search for and select SMTP.
Select Send Email (V3) as the action for this step.
Provide a Connection name, then fill out the rest of the fields with the SMTP information for the email account you want to use to send the notification messages.
Use the following links to find your SMTP information, depending on your mail provider:
Note
You may need to disable TLS/SSL to establish the connection. If this is the case and you want to re-enable TLS after the connection has been established, see the optional step at the end of this section.
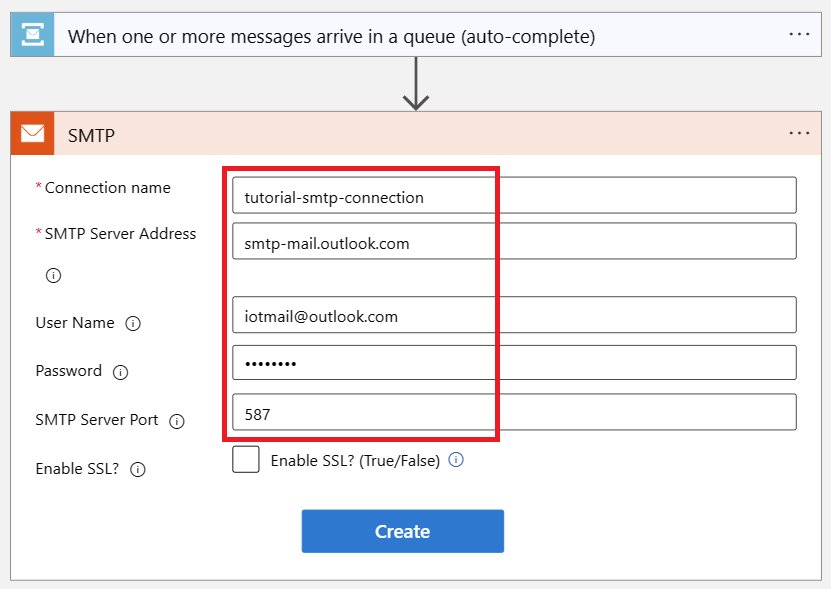
Select Create.
Configure the Send Email action.
From the Add new parameter drop-down on the Send Email step, select the following parameters:
- From
- To
- Subject
- Body
Click or tap anywhere on the screen to close the selection box.
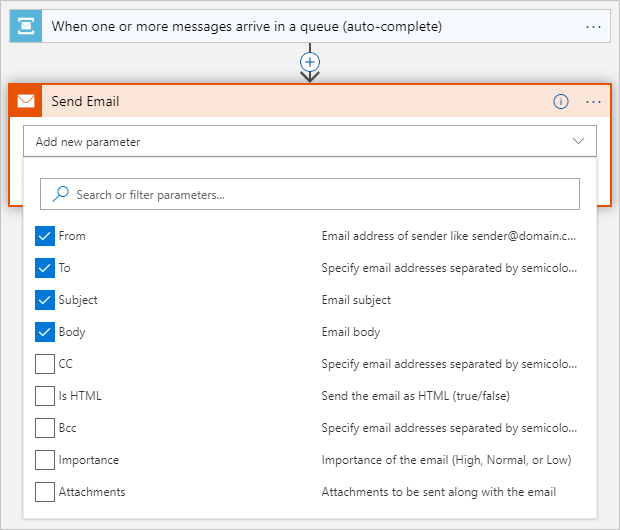
Enter the following information for the email parameters you selected in the previous step:
Parameter Value From The email address that you configured for the SMTP connection. To The email address or addresses where you want to send notification emails. Subject High temperature detected.Body High temperature detected.If the Add dynamic content dialog opens, select Hide to close it. You don't use dynamic content in this tutorial.
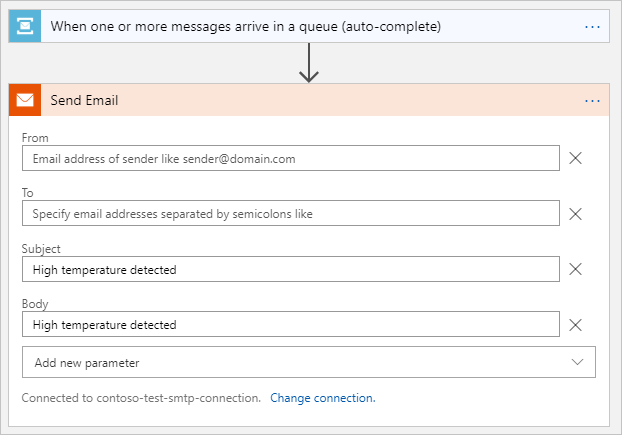
Select Save to save the SMTP connection.
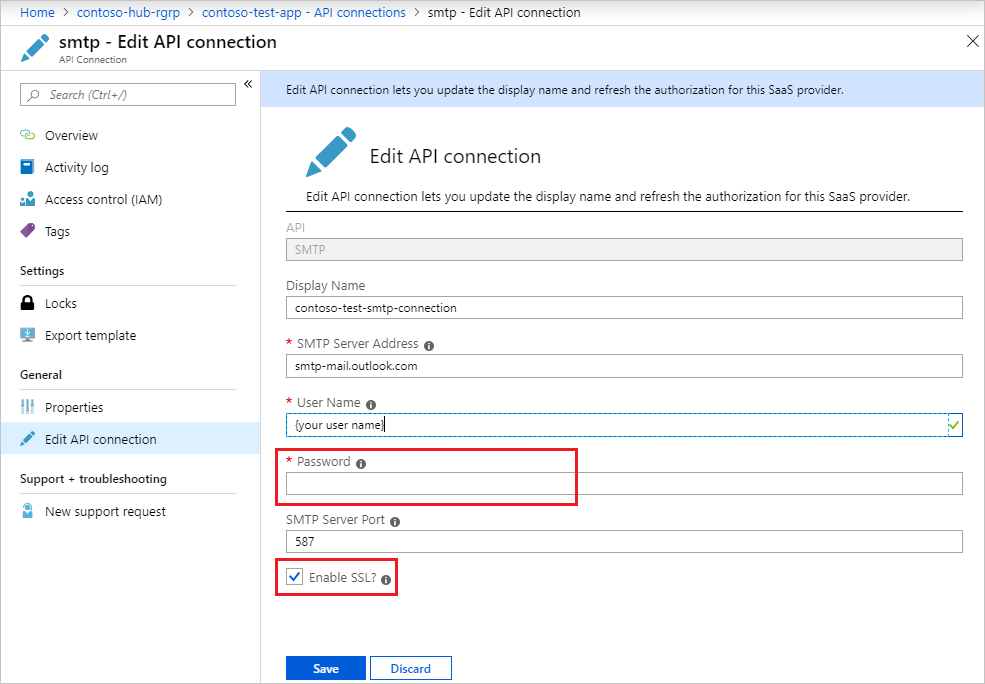
(Optional) If you had to disable TLS to establish a connection with your email provider and want to re-enable it, follow these steps:
On the Logic app pane, under Development Tools, select API connections.
From the list of API connections, select the SMTP connection.
On the smtp API Connection pane, under General, select Edit API connection.
On the Edit API Connection pane, select Enable SSL?, reenter the password for your email account, and select Save.
Your logic app is now ready to process temperature alerts from the Service Bus queue and send notifications to your email account.
Test the logic app
Start sending temperature messages from your IoT device to test the monitoring and notification pipeline.
Start the client application on your device. The client code randomly outputs telemetry messages, and sets the
temperatureAlertproperty totruewhen the temperature exceeds 30 C.You should begin receiving email notifications sent by the logic app.
Note
Your email service provider may need to verify the sender identity to make sure it is you who sends the email.
Clean up resources
If you don't need the resources that you created in this tutorial any longer, delete it and the resource group in the portal. To do so, select the resource group that contains your IoT hub and select Delete.
Alternatively, use the CLI:
# Delete your resource group and its contents
az group delete --name <RESOURCE_GROUP_NAME>
Next steps
In this tutorial, you created a logic app that connects your IoT hub and your mailbox for temperature monitoring and notifications.
To continue to get started with Azure IoT Hub and to explore all extended IoT scenarios, see the following: