Note
Access to this page requires authorization. You can try signing in or changing directories.
Access to this page requires authorization. You can try changing directories.
This article describes how to set up an Azure Device Registry namespace and connect the IoT Hub and Device Provisioning Service (DPS) resources it depends on. You can create new resources, connect an existing DPS instance and its linked IoT hubs, or connect existing IoT hubs to a new DPS instance.
Important
Azure Device Registry integration with Azure IoT Hub is in public preview and isn't recommended for production workloads. See the Supplemental Terms of Use for Microsoft Azure Previews for legal terms that apply to Azure features that are in beta, preview, or otherwise not yet released into general availability.
Important
Starting in October 2026, Azure Device Registry integration and certificate management remain available at no cost during preview. The IoT Hub and Device Provisioning Service (DPS) instances that you use with these features are billed at their standard rates. For details, see Azure IoT Hub pricing.
Prerequisites
- An active Azure subscription. If you don't have an Azure subscription, create a free account.
- Permissions to create resource groups, user-assigned managed identities, role assignments, IoT Hub instances, and DPS instances in the target subscription. Creating role assignments requires a privileged role, such as Owner or User Access Administrator at the appropriate scope.
- A supported region for Azure Device Registry, IoT Hub, and DPS. All new resources are created in the same region as the namespace.
Warning
Connecting an existing IoT hub or DPS instance to an Azure Device Registry namespace is permanent and can't be reversed. You're asked to acknowledge this effect when you select an existing resource. Azure Device Registry billing begins when you connect the resources.
Note
If you plan to enable software updates (preview), use IoT hubs that don't have an existing Device Update for IoT Hub instance. During the preview, software updates works only with these IoT hubs. If your IoT hub already has a Device Update for IoT Hub instance, use a different IoT hub, or delete the existing instance before you connect the hub to the namespace. To learn more, see Software updates concepts (preview).
Ways to get started
You can set up Azure Device Registry in two ways:
- Use the guided setup. A guided experience that walks you through creating or opening a namespace and connecting the services it depends on. Use this method to get to a working namespace without deep knowledge of the underlying services.
- Connect services individually. A step-by-step path where you open a namespace and connect each service one at a time. Use this method when you want full control over each resource or need to add resources to an existing namespace.
Both methods produce the same result: a namespace with connected IoT Hub and DPS resources that you can manage through the Azure control plane.
Option 1: Use the guided setup
You can start the guided setup from either of these locations in the Azure portal:
- From the Azure Device Registry page, on the Get started tab, select Start setup. This entry point creates a namespace as part of the setup.
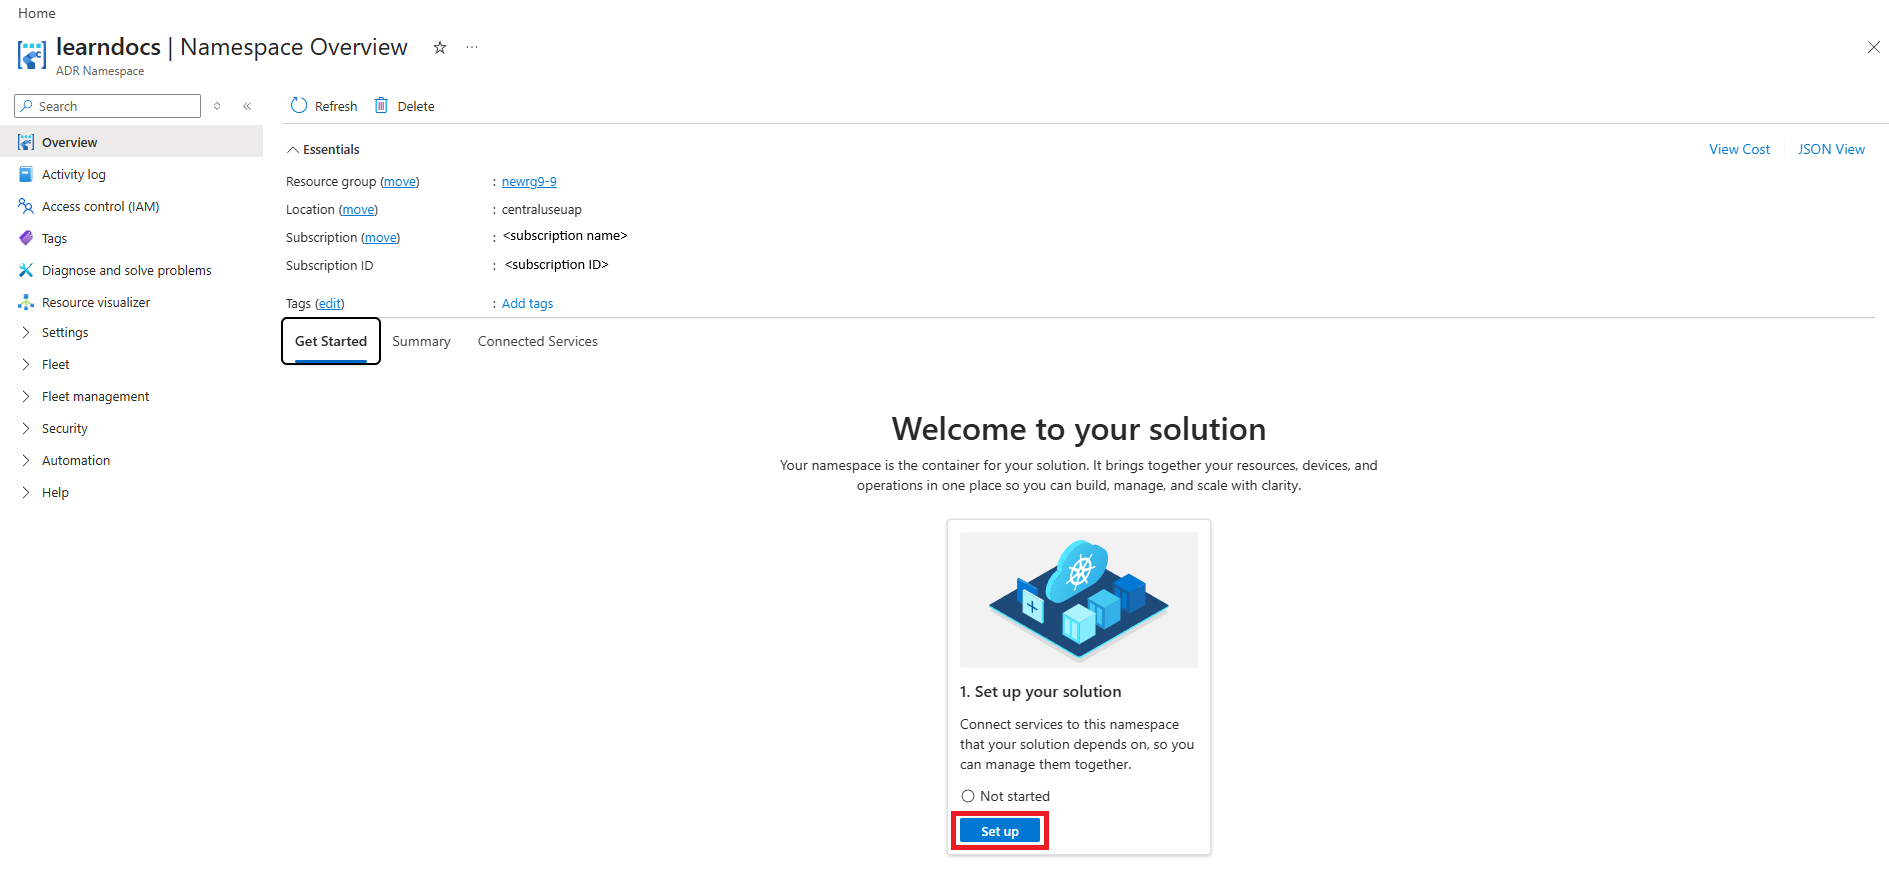
- From an existing Azure Device Registry namespace, on the Get started tab. This entry point uses the subscription, resource group, and region of the namespace and adds services to it.
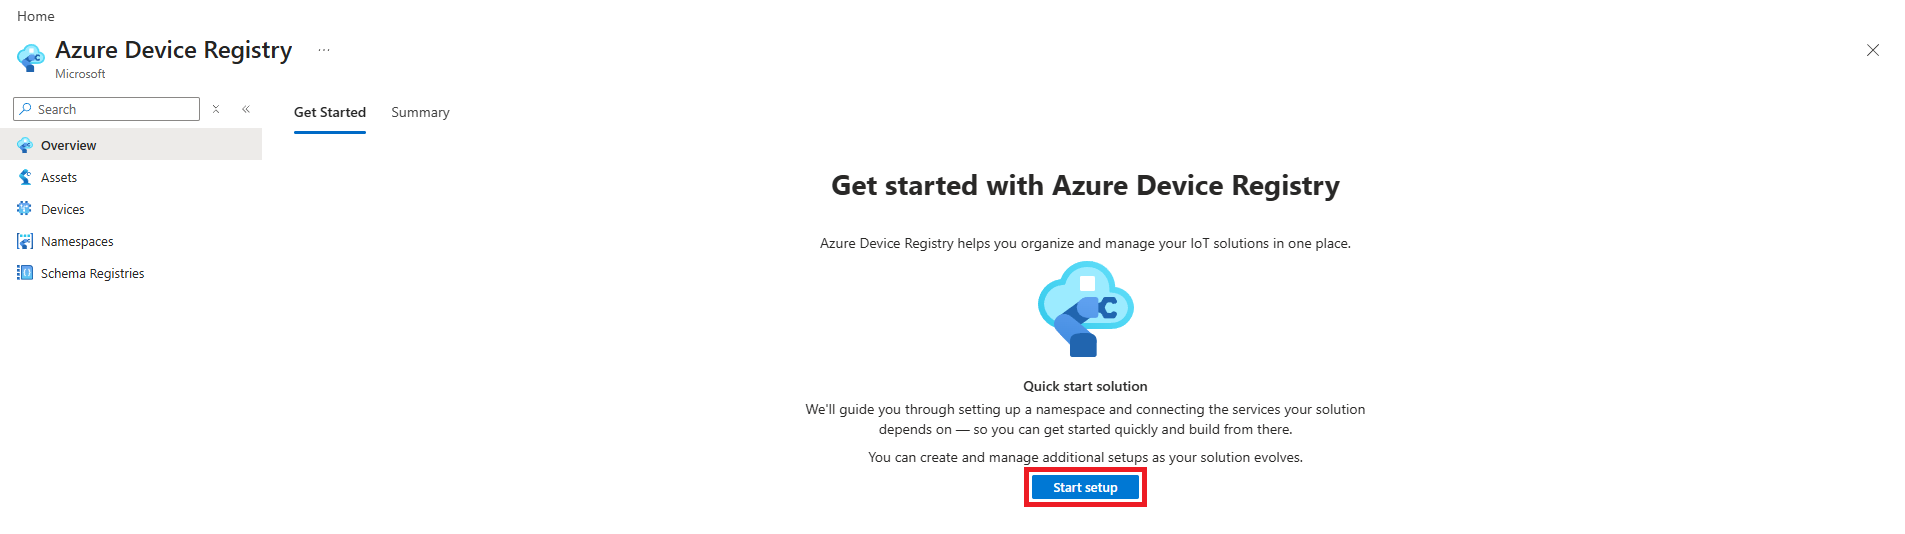
The guided setup walks you through four steps: ADR namespace, Connectivity, Capabilities, and Review + create.
1. ADR namespace
On the ADR namespace page:
- Select whether to Create a namespace or Use an existing namespace.
- Select the Azure subscription.
- Create a resource group or select an existing one.
- Enter a Namespace name that contains lowercase letters, numbers, and hyphens. The guided setup uses this value to suggest names for the resources it creates.
- Select a region. If you plan to connect existing DPS or IoT Hub resources, select the region that contains those resources.
If you started from an existing namespace, the subscription, resource group, and region are already set and can't be changed.
2. Connectivity
On the Connectivity page, choose how your devices connect. Based on your selection, Azure uses or creates a DPS instance and one or more IoT hubs.
Select Use existing resources or Create new resources.
If you select Create new resources, choose an IoT Hub preset:
| Preset | Devices | Connectivity | Telemetry | Resources created |
|---|---|---|---|---|
| Small scale or pilot deployment | Up to approximately 10,000 | Intermittent connections | Lower telemetry volume | One IoT Hub instance (S1) with one unit |
| Production deployment | 10,000-100,000 | Mixed connectivity | Moderate throughput | Two IoT Hub instances (S2) with five units, to separate and scale workloads |
| Large scale or high-throughput deployment | 1,000,000+ | Mostly always on | High telemetry volume | Four IoT Hub instances (S3) for high throughput and horizontal scaling |
Presets determine how many IoT Hub instances are created and connect them to a provisioning service. You can customize the configuration now and add more IoT Hub instances after onboarding.
If you select Use existing resources, choose whether to connect an Existing DPS linked to IoT Hub instances or Existing IoT Hub instances. Under Choose a linked setup, select a setup from the list. The list is filtered to the namespace's region, and only IoT Hub instances with public network access enabled appear.
Connecting an existing DPS instance or IoT hub to the namespace is permanent.
3. Capabilities
On the Capabilities page, choose which capabilities to enable. Azure sets up the required resources based on your selection.
- Certificate management is enabled by default and uses a Microsoft-issued root certificate authority. You can bring your own certificate authority or change it later.
- Software updates (preview) is optional. If you enable it, Azure creates a Device Update instance with a default configuration. Select Configure to change the instance name before you continue. The instance's region matches the namespace and can't be changed.
4. Review + create
On the Review + create page, review the impact summary, namespace details, connectivity setup, and enabled capabilities before you submit:
- An Impact summary lists the services that are added to the subscription and resource group.
- Existing resources and resources created for you are both labeled in the namespace and connectivity blocks. Select the pencil icon next to a resource to change settings such as name, SKU, or daily message limit before you submit.
- A warning states that connecting these services is an irreversible action that can cause downtime for existing management services.
Note
Estimated cost information isn't currently shown during setup.
Select Submit. After setup finishes, the guided setup opens the namespace, where you can view the connected services on the Connected Services tab.
Option 2: Connect services individually
If you want full control over each resource, connect services to a namespace one at a time instead of using the guided setup. Connect services in the following order: Device Provisioning Service, IoT Hub, and then software updates. This method produces the same connected result as the guided setup.
1. Create or open a namespace
Create an Azure Device Registry namespace, or open an existing namespace to add services to it. The namespace is the organizational and security boundary for the devices and resources in your solution.
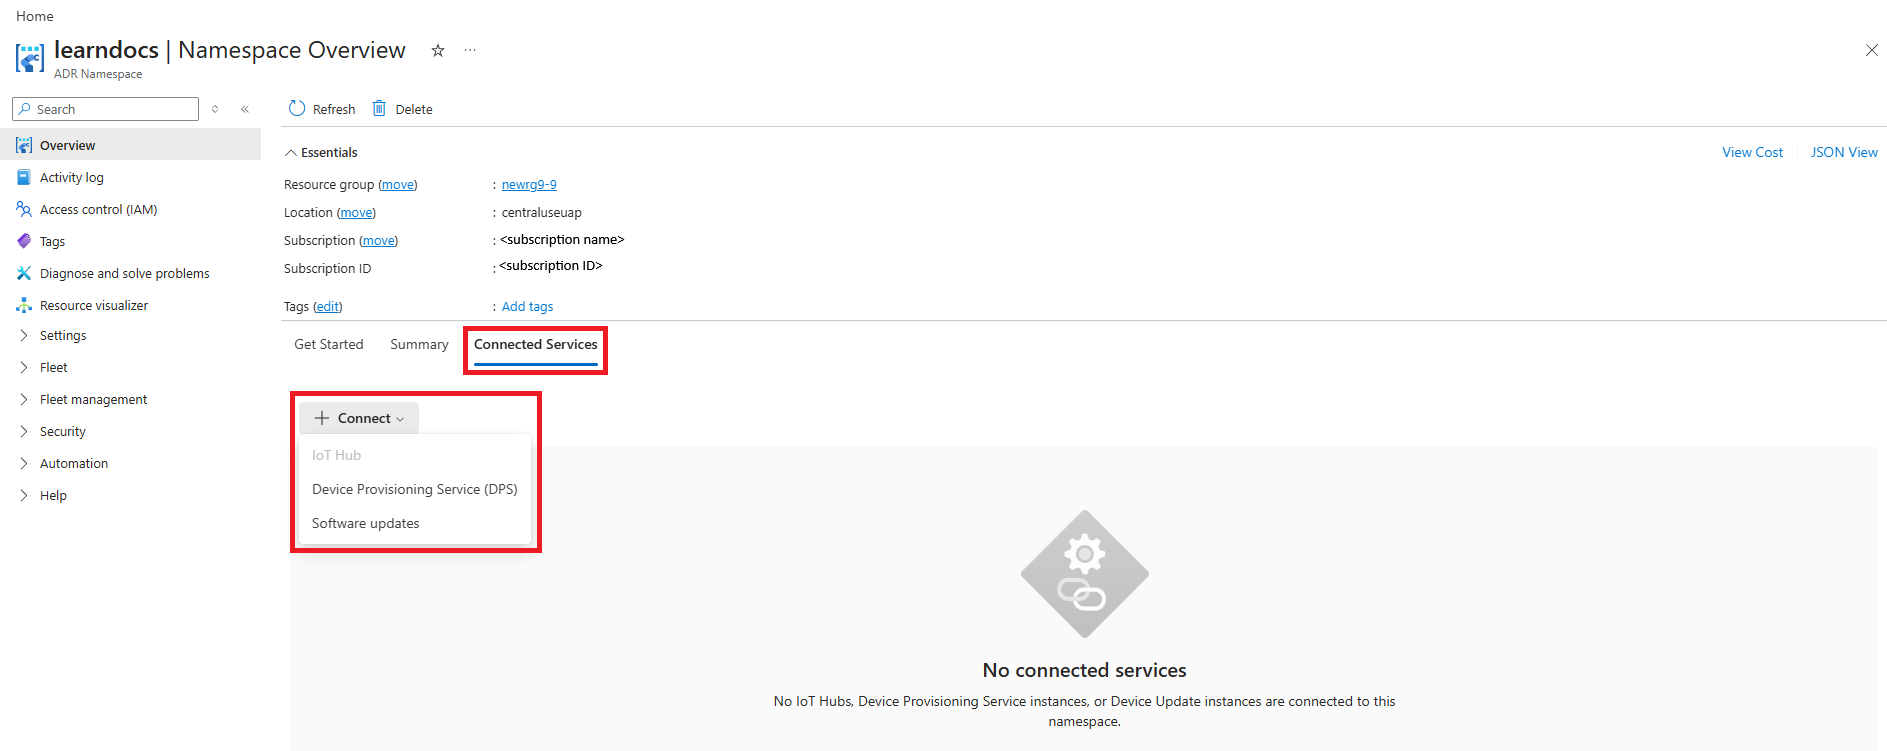
Open the namespace and select the Connected Services tab. Use the + Connect menu to add services one at a time.
2. Connect a Device Provisioning Service instance
Select + Connect > Device Provisioning Service (DPS), and then choose how to connect this service:
- Use existing: Select an unconnected DPS instance and its linked IoT hubs in the namespace's region.
- Create new: Select the subscription and resource group, and then enter a name for the new DPS instance. The region matches the namespace and can't be changed.
Select Save.
3. Connect an IoT hub
Select + Connect > IoT Hub, and then choose how to connect this service:
- Use existing: Connect an existing IoT hub.
- Create new: Select the subscription and resource group, and then enter a name, SKU, and daily message limit for the new IoT hub. The region matches the namespace and can't be changed.
When you connect an existing IoT hub, acknowledge that linking it to the namespace is permanent.
4. Connect software updates (optional)
Select + Connect > Software updates, and then enter a name for the new Device Update instance. The subscription, resource group, and region match the namespace and can't be changed.
5. Verify the connected resources
On the namespace's Connected Services tab, confirm that the resources you connected show a Health status of Available and a Configuration status of Succeeded. Your namespace is ready when all the services you need appear as connected.
For detailed Azure portal, Azure CLI, and PowerShell steps that create an IoT hub with Device Registry integration and certificate management, see Deploy Azure IoT Hub with Device Registry integration and certificate management.
Resource naming
The guided setup suggests resource names based on the namespace name. You can change the suggested names before you submit them.
For example, if the namespace name is contoso-devices, the guided setup suggests the following names:
| Resource | Suggested name pattern | Example |
|---|---|---|
| Azure Device Registry namespace | <namespace-name> |
contoso-devices |
| IoT Hub | <namespace-name>-hub-<number> |
contoso-devices-hub-1 |
| Device Provisioning Service | <namespace-name>-provisioning |
contoso-devices-provisioning |
| Device Update instance (software updates) | <namespace-name>-su |
contoso-devices-su |
Manage connected resources
Connecting services to a namespace doesn't replace their individual management experiences. To change IoT Hub settings, open the IoT hub in the Azure portal. To change DPS settings, open the DPS instance in the Azure portal.
Next steps
- Learn how to plan Azure Device Registry namespaces.
- Learn about certificate management in Azure Device Registry.
- Learn about Azure Device Registry integration with Azure IoT Hub.