Note
Access to this page requires authorization. You can try signing in or changing directories.
Access to this page requires authorization. You can try changing directories.
Important
Azure Lab Services will be retired on June 28, 2027. For more information, see the retirement guide. To simplify your migration, Microsoft has published automation scripts to help you clean up Lab Services resources, these are available in the Azure Lab Services Retirement Scripts GitHub repository.
When you create a lab from a Linux image, Azure Lab Services automatically enables Secure Shell (SSH). A lab creator can connect to the template virtual machine (VM) from the command line. After you publish the template VM, students can also connect to their VMs using SSH.
To connect to a Linux VM using a GUI, there are more steps to set up in the template VM. The steps vary based on the distribution, version, GUI desktop environment, and remote desktop technology that you choose to use with Azure Lab Services. This article shows how to set up common GUI desktops with Ubuntu 20.04/22.04 LTS using either Remote Desktop Protocol (RDP) or X2Go.
Note
Linux uses an open-source version of RDP called Xrdp. For simplicity, we use the term RDP throughout this article.
Performance
Performance over a remote desktop connection varies by distribution, version, GUI desktop, and the remote desktop technology used. For example, you might notice latency over a remote desktop connection when using a resource intensive GUI desktop like GNOME and RDP. A light-weight GUI desktop like XFCE or X2Go tends to have better performance. To optimize performance, you should consider using:
- A less resource intensive GUI desktop like XFCE.
- X2Go for remote desktop connection to supported GUI desktops.
Another option to consider is nested virtualization. Students can connect to a Windows lab host VM using RDP, and then use Linux on nested VMs. This approach might help improve performance.
Important
Some marketplace images already have a graphical desktop environment and remote desktop server installed. For example, the Data Science Virtual Machine for Linux (Ubuntu) already has XFCE and X2Go Server installed and configured to accept client connections.
Choose setup options
There are several distributions/versions and GUI desktops that can be used with Azure Lab Services. This section shows how to set up a lab's template VM with the following common configurations:
| Distribution/Version | GUI desktop | Remote desktop technology | Instructions |
|---|---|---|---|
| Ubuntu 20.04/22.04 LTS | XFCE | X2Go | Set up XFCE and X2Go |
| Ubuntu 20.04/22.04 LTS | Xubuntu | X2Go | Set up xUbuntu and X2Go |
| Ubuntu 20.04/22.04 LTS | MATE | X2Go | Set up MATE and X2Go |
| Ubuntu 20.04/22.04 LTS | GNOME | RDP | Set up GNOME and RDP |
Set up XFCE and X2Go
For optimal performance, we recommend using XFCE with X2Go for remote desktop connection. The lab creator must perform the following steps on the lab template VM:
- Install the XFCE GUI desktop
- Install the X2Go remote desktop server
X2Go uses the same port as SSH (22), which is enabled by default when you create a lab. The following steps show how to set up XFCE and X2Go.
Connect to a lab's template VM using SSH.
Use the following ReadMe and script to install the XFCE GUI desktop and the X2Go server on the template VM.
Set up xUbuntu and X2Go
xUbuntu is another light-weight GUI desktop that can be used with X2Go for remote desktop connection. However, to optimize performance, you need to disable windows compositing. The lab creator must perform the following steps on the lab template VM:
- Install the xUbuntu GUI desktop
- Install the X2Go remote desktop server
- Disable windows compositing
X2Go uses the same port as SSH (22), which is enabled by default when you create a lab. The following steps show how to set up xUbuntu and X2Go.
Connect to a lab's template VM using SSH.
Use the following ReadMe and script to install the xUbuntu GUI desktop and the X2Go server on the template VM.
Use the X2Go client to connect to the template VM. As shown in the above ReadMe, disable windows compositing and restart the template VM to optimize performance.
Set up MATE and X2Go
The MATE GUI desktop can also be used with X2Go for remote desktop connection. The lab creator must perform the following steps on the lab template VM:
- Install the MATE GUI desktop
- Install the X2Go remote desktop server
X2Go uses the same port as SSH (22), which is enabled by default when you create a lab. The following steps show how to set up MATE and X2Go.
Connect to a lab's template VM using SSH.
Use the following ReadMe and script to install the MATE GUI desktop and the X2Go server on the template VM.
Set up GNOME and RDP
GNOME is a more resource intensive desktop that requires RDP for remote desktop connection. The lab creator must perform the following steps:
Enable the Client connection (RDP) setting during lab creation.
On the template VM:
- Install the GNOME GUI desktop
- Install the RDP remote desktop server
- Update RDP performance related settings
RDP uses port 3389 for connecting to a VM. By default, Linux lab VMs only have the SSH port 22 enabled. The following steps show how to enable port 3389 and how to set up GNOME and RDP.
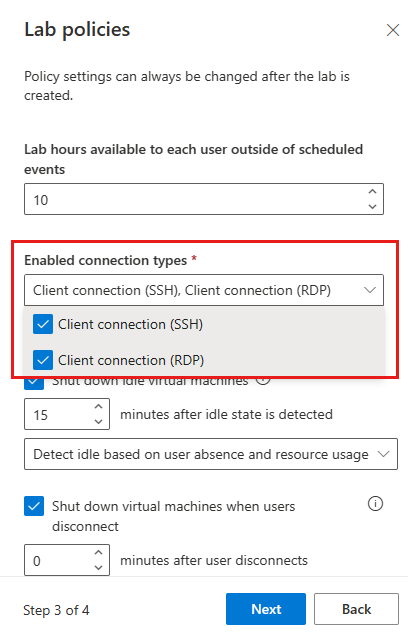
During lab creation, use the Enabled connection types settings to select the Client connection (RDP) setting. You must enable this option to open the port on the Linux VM that is needed for an RDP remote desktop session. If this option is left disabled, only the port for SSH is open. The enabled ports can't be changed after a lab is created.
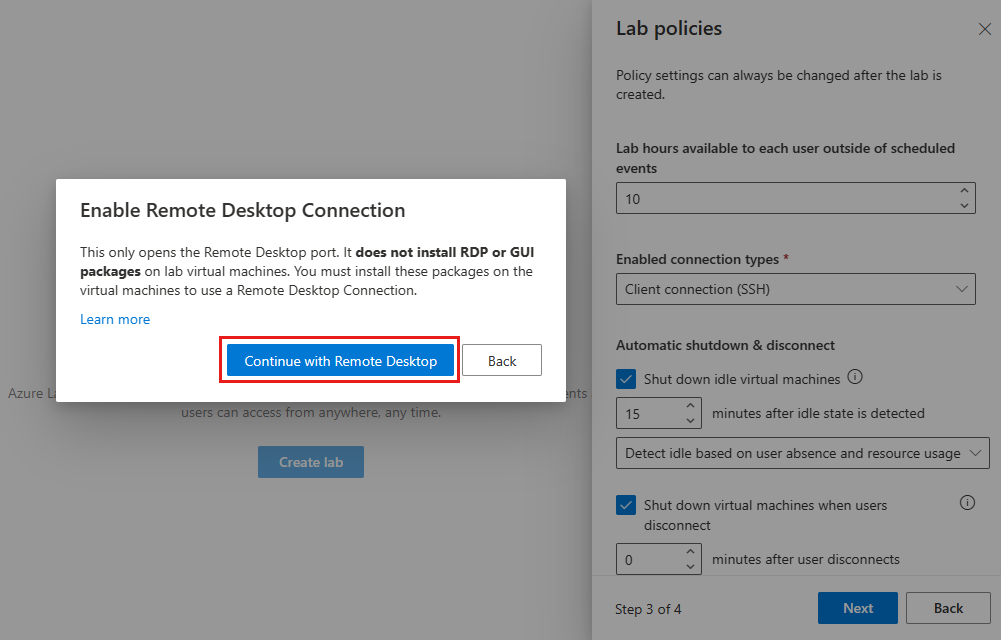
On the Enable Remote Desktop Connection message box, select Continue with Remote Desktop.
Connect to a lab's template VM using SSH.
On the template VM, use the following ReadMe and script to install the GNOME GUI desktop, install the RDP server, and make RDP performance optimizations:
Related content
You successfully configured RDP or X2Go for a Linux-based template VM.
- Learn how you can publish the template VM to create student lab VMs based on this template.

