Note
Access to this page requires authorization. You can try signing in or changing directories.
Access to this page requires authorization. You can try changing directories.
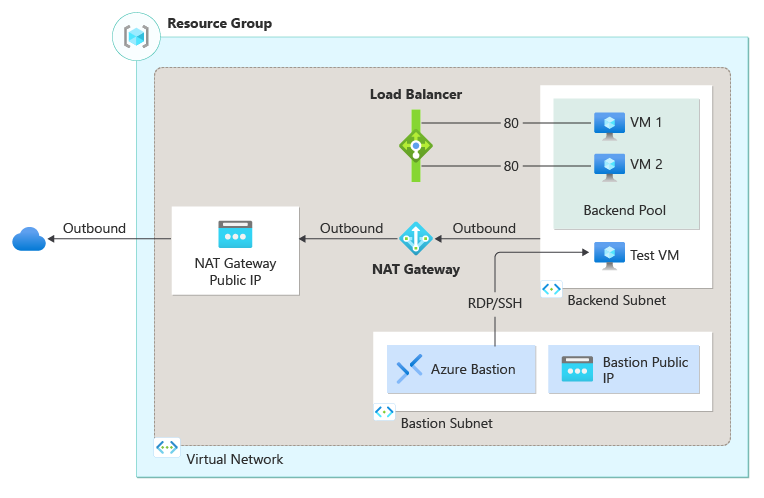
In this quickstart, you learn to use a Bicep file to create an internal Azure load balancer. The internal load balancer distributes traffic to virtual machines in a virtual network located in the load balancer's backend pool. Along with the internal load balancer, this template creates a virtual network, network interfaces, a NAT Gateway, and an Azure Bastion instance.
Bicep is a domain-specific language (DSL) that uses declarative syntax to deploy Azure resources. It provides concise syntax, reliable type safety, and support for code reuse. Bicep offers the best authoring experience for your infrastructure-as-code solutions in Azure.
Prerequisites
If you don't have an Azure subscription, create a free account before you begin.
Review the Bicep file
The Bicep file used in this quickstart is from the Azure Quickstart Templates.
@description('Admin username')
param adminUsername string

@description('Admin password')
@secure()
param adminPassword string

@description('Prefix to use for VM names')
param vmNamePrefix string = 'BackendVM'

@description('Location for all resources.')
param location string = resourceGroup().location

@description('Size of VM')
param vmSize string = 'Standard_D2s_v3'

@description('Virtual network address prefix')
param vNetAddressPrefix string = '10.0.0.0/16'

@description('Backend subnet address prefix')
param vNetSubnetAddressPrefix string = '10.0.0.0/24'

@description('Bastion subnet address prefix')
param vNetBastionSubnetAddressPrefix string = '10.0.2.0/24'

@description('Frontend IP address of load balancer')
param lbFrontendIPAddress string = '10.0.0.6'

var natGatewayName = 'lb-nat-gateway'
var natGatewayPublicIPAddressName = 'lb-nat-gateway-ip'
var vNetName = 'lb-vnet'
var vNetSubnetName = 'backend-subnet'
var storageAccountType = 'Standard_LRS'
var storageAccountName = uniqueString(resourceGroup().id)
var loadBalancerName = 'internal-lb'
var networkInterfaceName = 'lb-nic'
var numberOfInstances = 2
var lbSkuName = 'Standard'
var bastionName = 'lb-bastion'
var bastionSubnetName = 'AzureBastionSubnet'
var bastionPublicIPAddressName = 'lb-bastion-ip'

resource natGateway 'Microsoft.Network/natGateways@2023-09-01' = {
  name: natGatewayName
  location: location
  sku: {
    name: 'Standard'
  }
  properties: {
    idleTimeoutInMinutes: 4
    publicIpAddresses: [
      {
        id: natGatewayPublicIPAddress.id
      }
    ]
  }
}

resource natGatewayPublicIPAddress 'Microsoft.Network/publicIPAddresses@2023-09-01' = {
  name: natGatewayPublicIPAddressName
  location: location
  sku: {
    name: 'Standard'
  }
  properties: {
    publicIPAddressVersion: 'IPv4'
    publicIPAllocationMethod: 'Static'
    idleTimeoutInMinutes: 4
  }
}

resource vNet 'Microsoft.Network/virtualNetworks@2023-09-01' = {
  name: vNetName
  location: location
  properties: {
    addressSpace: {
      addressPrefixes: [
        vNetAddressPrefix
      ]
    }
  }
}

resource vNetName_bastionSubnet 'Microsoft.Network/virtualNetworks/subnets@2023-09-01' = {
  parent: vNet
  name: bastionSubnetName
  properties: {
    addressPrefix: vNetBastionSubnetAddressPrefix
  }
}

resource vNetName_vNetSubnetName 'Microsoft.Network/virtualNetworks/subnets@2023-09-01' = {
  parent: vNet
  name: vNetSubnetName
  properties: {
    addressPrefix: vNetSubnetAddressPrefix
    natGateway: {
      id: natGateway.id
    }
  }
}

resource bastion 'Microsoft.Network/bastionHosts@2023-09-01' = {
  name: bastionName
  location: location
  properties: {
    ipConfigurations: [
      {
        name: 'IpConf'
        properties: {
          privateIPAllocationMethod: 'Dynamic'
          publicIPAddress: {
            id: bastionPublicIPAddress.id
          }
          subnet: {
            id: vNetName_bastionSubnet.id
          }
        }
      }
    ]
  }
}

resource bastionPublicIPAddress 'Microsoft.Network/publicIPAddresses@2023-09-01' = {
  name: bastionPublicIPAddressName
  location: location
  sku: {
    name: lbSkuName
  }
  properties: {
    publicIPAddressVersion: 'IPv4'
    publicIPAllocationMethod: 'Static'
  }
}

resource networkInterface 'Microsoft.Network/networkInterfaces@2023-09-01' = [for i in range(0, numberOfInstances): {
  name: '${networkInterfaceName}${i}'
  location: location
  properties: {
    ipConfigurations: [
      {
        name: 'ipconfig1'
        properties: {
          privateIPAllocationMethod: 'Dynamic'
          subnet: {
            id: vNetName_vNetSubnetName.id
          }
          loadBalancerBackendAddressPools: [
            {
              id: resourceId('Microsoft.Network/loadBalancers/backendAddressPools', loadBalancerName, 'BackendPool1')
            }
          ]
        }
      }
    ]
  }
  dependsOn: [
    vNet
    loadBalancer
  ]
}]

resource loadBalancer 'Microsoft.Network/loadBalancers@2023-09-01' = {
  name: loadBalancerName
  location: location
  sku: {
    name: 'Standard'
  }
  properties: {
    frontendIPConfigurations: [
      {
        properties: {
          subnet: {
            id: vNetName_vNetSubnetName.id
          }
          privateIPAddress: lbFrontendIPAddress
          privateIPAllocationMethod: 'Static'
        }
        name: 'LoadBalancerFrontend'
      }
    ]
    backendAddressPools: [
      {
        name: 'BackendPool1'
      }
    ]
    loadBalancingRules: [
      {
        properties: {
          frontendIPConfiguration: {
            id: resourceId('Microsoft.Network/loadBalancers/frontendIpConfigurations', loadBalancerName, 'LoadBalancerFrontend')
          }
          backendAddressPool: {
            id: resourceId('Microsoft.Network/loadBalancers/backendAddressPools', loadBalancerName, 'BackendPool1')
          }
          probe: {
            id: resourceId('Microsoft.Network/loadBalancers/probes', loadBalancerName, 'lbprobe')
          }
          protocol: 'Tcp'
          frontendPort: 80
          backendPort: 80
          idleTimeoutInMinutes: 15
        }
        name: 'lbrule'
      }
    ]
    probes: [
      {
        properties: {
          protocol: 'Tcp'
          port: 80
          intervalInSeconds: 15
          numberOfProbes: 2
        }
        name: 'lbprobe'
      }
    ]
  }
}

resource storageAccount 'Microsoft.Storage/storageAccounts@2023-01-01' = {
  name: storageAccountName
  location: location
  sku: {
    name: storageAccountType
  }
  kind: 'StorageV2'
}

resource vm 'Microsoft.Compute/virtualMachines@2023-09-01' = [for i in range(0, numberOfInstances): {
  name: '${vmNamePrefix}${i}'
  location: location
  properties: {
    hardwareProfile: {
      vmSize: vmSize
    }
    osProfile: {
      computerName: '${vmNamePrefix}${i}'
      adminUsername: adminUsername
      adminPassword: adminPassword
    }
    storageProfile: {
      imageReference: {
        publisher: 'MicrosoftWindowsServer'
        offer: 'WindowsServer'
        sku: '2019-Datacenter'
        version: 'latest'
      }
      osDisk: {
        createOption: 'FromImage'
      }
    }
    networkProfile: {
      networkInterfaces: [
        {
          id: networkInterface[i].id
        }
      ]
    }
    diagnosticsProfile: {
      bootDiagnostics: {
        enabled: true
        storageUri: storageAccount.properties.primaryEndpoints.blob
      }
    }
  }
}]

output location string = location
output name string = loadBalancer.name
output resourceGroupName string = resourceGroup().name
output resourceId string = loadBalancer.id
Multiple Azure resources have been defined in the Bicep file:
- Microsoft.Network/virtualNetworks: Virtual network for load balancer and virtual machines.
- Microsoft.Network/networkInterfaces: Network interfaces for virtual machines.
- Microsoft.Network/loadBalancers: Internal load balancer.
- Microsoft.Network/natGateways
- Microsoft.Network/publicIPAddresses: Public IP addresses for the NAT Gateway and Azure Bastion.
- Microsoft.Compute/virtualMachines: Virtual machines in the backend pool.
- Microsoft.Network/bastionHosts: Azure Bastion instance.
- Microsoft.Network/virtualNetworks/subnets: Subnets for the virtual network.
- Microsoft.Storage/storageAccounts: Storage account for the virtual machines.
Deploy the Bicep file
Save the Bicep file as main.bicep to your local computer.
Deploy the Bicep file using either Azure CLI or Azure PowerShell.
az group create --name CreateIntLBQS-rg --location eastus az deployment group create --resource-group CreateIntLBQS-rg --template-file main.bicep --parameters adminUsername=AzureAdminNote
Replace <admin-user> with the admin username. You'll also be prompted to enter adminPassword.
When the deployment finishes, you should see a message indicating the deployment succeeded.
Review deployed resources
Use the Azure portal, Azure CLI, or Azure PowerShell to list the deployed resources in the resource group.
az resource list --resource-group CreateIntLBQS-rg
Clean up resources
When no longer needed, use the Azure portal, Azure CLI, or Azure PowerShell to delete the resource group and its resources.
az group delete --name CreateIntLBQS-rg
Next steps
For a step-by-step tutorial that guides you through the process of creating a Bicep file, see:
