Note
Access to this page requires authorization. You can try signing in or changing directories.
Access to this page requires authorization. You can try changing directories.
Applies to: Azure Logic Apps (Standard)
Note
This capability is in preview and is subject to the Supplemental Terms of Use for Microsoft Azure Previews.
Suppose you want to automate the way that your enterprise or organization answers questions from various groups of people, such as employees, customers, investors, or the media. You can add chat interactions that respond to questions by using the Azure OpenAI Service action named Get chat completions using Prompt Template and data from your enterprise or organization.
When you use your own data with the models in Azure OpenAI Service, you create an AI-powered conversation platform that provides faster communication and draws context from specific domain knowledge. To build a process that handles each question, accesses your data source, and returns a response, create a Standard workflow in Azure Logic Apps to automate the necessary steps - all without writing code.
This guide shows how to add chat interactions to a Standard workflow by using a prompt template as the starting point. This template is a prebuilt reusable text-based structure that guides the interactions between the AI model and the questioners.
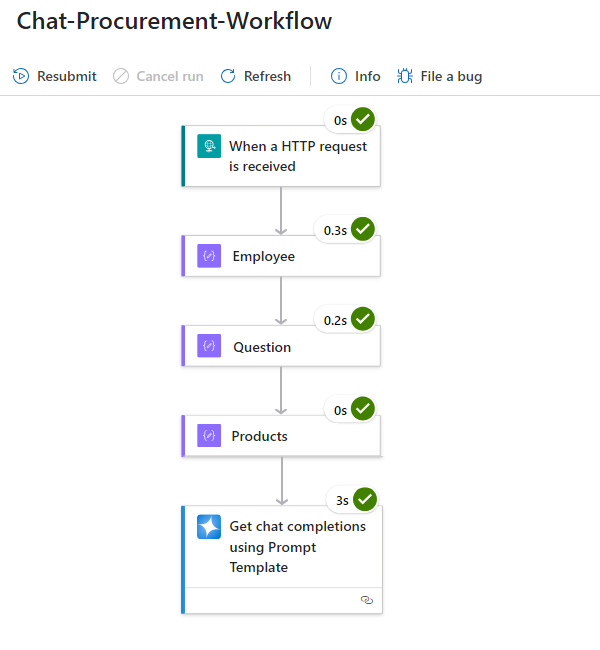
The following diagram shows the example workflow that this guide creates:

For more information about the operations in this workflow, see Review the example scenario.
Templates provide the following benefits for creating effective, useful, and clear prompts that align with specific use cases:
| Benefit | Description |
|---|---|
| Consistency | Centralize prompt logic, rather than embed prompt text in each action. |
| Reusability | Apply the same prompt across multiple workflows. |
| Maintainability | Tweak prompt logic in a single place without editing the entire flow. |
| Dynamic control | Workflow inputs directly pass into the template, for example, values from a form, database, or API. |
All these benefits help you create adaptable AI-driven flows that are suitable for scalable enterprise automation - without duplicating effort.
For more information, see the following documentation:
Review the example scenario
This guide uses an example scenario that creates a chat assistant for an IT team. Among other responsibilities, the team procures hardware such as laptops for the company's employees. The requirements for this assistant include the following tasks:
- Accept a question that uses natural language and understands context.
- Read and search structured data such as past orders and catalog details.
- Pass the results into a prompt template by using Jinja2 syntax to dynamically inject data at runtime.
- Generate a polished and professional response.
The example workflow uses the following operations:
| Operation | Description |
|---|---|
| Built-in trigger named When an HTTP request is available | Waits for an HTTPS request to arrive from external caller. This request causes the trigger to fire, start the workflow, and pass in a serialized token string with inputs for the workflow actions to use. |
| Three Compose built-in actions | These actions store the following test data: - Employee: Employee profile and past procurement orders. - Question: The question asked. - Products: Internal product catalog entries. |
| Built-in action named Get chat completions using Prompt Template | Gets chat completions for the specified prompt template. For more information, see Get chat completions using prompt template. |
Tip
When you have the choice, always choose the built-in ("in app") operation over the managed ("shared") version. The built-in version runs inside the Azure Logic Apps runtime to reduce latency and provides better performance and control over authentication.
This example creates and uses a prompt template that lets your workflow complete the following tasks:
- Define a prompt with placeholders such as
{{ Employee.orders }}. - Automatically populate the template with outputs from earlier actions in the workflow.
- Generate consistent and structured prompts with minimal effort.
To follow the example, download the sample prompt template and inputs from the Azure Logic Apps GitHub repo. The example assumes that you're simulating procurement data with test inputs.
Prerequisites
An Azure account and subscription. If you don't have an Azure subscription, sign up for a free Azure account.
A Standard logic app resource with a blank stateful workflow, which stores run history and the values for variables, inputs, and outputs that you can use for testing.
To create this resource and workflow, see Create an example Standard logic app workflow using the Azure portal.
An Azure OpenAI Service resource with a deployed model such as GPT-3.5 or GPT-4.
The example in this how-to guide provides test data that you can use to try out the workflow. To chat with your own data by using the Azure OpenAI Service models, you have to create an Azure AI Foundry project and add your own data source. For more information, see the following documentation:
When you add the Azure OpenAI action to your workflow, you can create a connection to your Azure OpenAI Service resource. You need the endpoint URL from your Azure OpenAI Service resource and the following information, based on the selected authentication type:
Authentication type Required values to find URL and key-based authentication 1. Go to your Azure OpenAI Service resource.
2. On the resource menu, under Resource Management, select Keys and Endpoint.
3. Copy the Endpoint URL and either Key value. Store these values somewhere safe.Active Directory OAuth 1. Set up your logic app resource for OAuth 2.0 with Microsoft Entra ID authentication.
2. Go to your Azure OpenAI Service resource.
3. On the resource menu, under Resource Management, select Keys and Endpoint.
4. Copy the Endpoint URL. Store this value somewhere safe.Managed identity
(Recommended)1. Follow the general steps to set up the managed identity with Microsoft Entra ID for your logic app.
2. Go to your Azure OpenAI Service resource.
3. On the resource menu, under Resource Management, select Keys and Endpoint.
4. Copy the Endpoint URL. Store this value somewhere safe.Warning
Always secure and protect sensitive and personal data, such as credentials, secrets, access keys, connection strings, certificates, thumbprints, and similar information with the highest available or supported level of security.
For authentication and authorization, set up or use Microsoft Entra ID with a managed identity. This solution provides optimal and superior security without you having to manually provide and manage credentials, secrets, access keys, and so on because Azure handles the managed identity for you. To set up a managed identity for Azure Logic Apps, see Authenticate access and connections to Azure resources with managed identities in Azure Logic Apps.
If you can't use a managed identity, choose the next highest level security solution available. For example, if you must use a connection string, which includes information required to access a resource, service, or system, remember that this string includes an access key that is similar to a root password.
Make sure that you securely store such information by using Microsoft Entra ID and Azure Key Vault. Don't hardcode this information, share with other users, or save in plain text anywhere that others can access. Set up a plan to rotate or revoke secrets in the case they become compromised. For more information, see the following resources:
Install or use a tool that can send HTTP requests to test your solution, for example:
- Visual Studio Code with an extension from Visual Studio Marketplace
- PowerShell Invoke-RestMethod
- Microsoft Edge - Network Console tool
- Bruno
- curl
Caution
For scenarios where you have sensitive data, such as credentials, secrets, access tokens, API keys, and other similar information, make sure to use a tool that protects your data with the necessary security features. The tool should work offline or locally, and not require sign in to an online account or sync data to the cloud. When you use a tool with these characteristics, you reduce the risk of exposing sensitive data to the public.
Add a trigger
Your workflow requires a trigger to control when to start running. You can use any trigger that fits your scenario. For more information, see Triggers.
Add the trigger by following these steps:
In the Azure portal, open your Standard logic app resource and blank workflow in the designer.
Follow the general steps to add the trigger that you want.
This example uses the Request trigger named When an HTTP request is available. For more information about this trigger, see Receive and respond to inbound HTTPS calls.
Save the workflow. On the designer toolbar, select Save.
After you save the workflow, a URL appears in the HTTP URL parameter for the Request trigger. This URL belongs to an endpoint that is created for the Request trigger. To fire the trigger and start the workflow, callers outside the workflow can send HTTPS requests to the URL and include inputs for the trigger to pass along into the workflow.
Warning
The endpoint URL includes a Shared Access Signature (SAS) key that gives anyone with the URL the capability to trigger the workflow and pass along any data they want. For information about protecting and securing the workflow, see Secure access and data in workflows.
When you're done, your workflow looks like the following example:

Add the Compose actions
To add operations that store the trigger outputs for subsequent actions to use as inputs, follow these steps:
Under the trigger, follow the general steps to add the data operation named Compose action.
The example adds three Compose actions and uses the following test data as inputs:
Rename the first Compose action as Employee, and enter the following data in the Inputs box:
{
    "firstName": "Alex",
    "lastName": "Taylor",
    "department": "IT",
    "employeeId": "E12345",
    "orders": [
        {
            "name": "Adatum Streamline 5540 Laptop",
            "description": "Ordered 15 units for Q1 IT onboarding",
            "date": "2024/02/20"
        },
        {
            "name": "Docking Station",
            "description": "Bulk purchase of 20 Adatum AB99Z docking stations",
            "date": "2024/01/10"
        }
    ]
}
Rename the next Compose action as Question, and enter the following data in the Inputs box:
[
    {
        "role": "user",
        "content": "When did we last order laptops for new hires in IT?"
    }
]
Rename the next Compose action as Products, and enter the following data in the Inputs box:
[
    {
        "id": "1",
        "title": "Adatum Streamline 5540 Laptop",
        "content": "i7, 16GB RAM, 512GB SSD, standard issue for IT new hire onboarding"
    },
    {
        "id": "2",
        "title": "Docking Station",
        "content": "Adatum AB99Z docking stations for dual monitor setup"
    }
]
When you're done, your workflow looks like the following example:

Now, add the Azure OpenAI action to the workflow.
Add the Azure OpenAI action
Under the last Compose action, follow the general steps to add the Azure OpenAI action named Get chat completions using Prompt Template.
After the action appears on the designer surface, the connection pane opens so that you can provide the following information:
Parameter Required Value Description Connection Name Yes <connection-name> The name for the connection to your Azure OpenAI resource. Authentication Type Yes See the following sections:
- Prerequisites
- Azure OpenAI built-in connector authenticationThe authentication type to use with the connection. Azure OpenAI Endpoint URL Yes <endpoint-URL-Azure-OpenAI-resource> The endpoint URL for your Azure OpenAI resource. For more information, see Prerequisites. Authentication Key Required only for URL and key-based authentication <access-key> See the following sections:
- Prerequisites
- Azure OpenAI built-in connector authenticationWhen you're done, select Create new.
After the action pane opens, on the Parameters tab, provide the following information to use for the prompt template:
Parameter Value Description Deployment Identifier - gpt-4o
- gpt-35The name for the Azure OpenAI deployed model, which should match the one that you used for your Azure OpenAI resource. Prompt Template <template-text> The prompt template. For more information, see Get chat completions using Prompt Template. For this example, replace the example template text with the following sample text:
system:
You are an AI assistant for Contoso's internal procurement team. You help employees get quick answers about previous orders and product catalog details. Be brief, professional, and use markdown formatting when appropriate. Include the employee’s name in your response for a personal touch.

# Employee info
Name: {{Employee.firstName}} {{Employee.lastName}}
Department: {{Employee.department}}
Employee ID: {{Employee.employeeId}}

# Question
The employee asked the following:

{% for item in question %}
{{item.role}}:
{{item.content}}
{% endfor %}

# Product catalog
Use this documentation to guide your response. Include specific item names and any relevant descriptions.

{% for item in Products %}
Catalog item ID: {{item.id}}
Name: {{item.title}}
Description: {{item.content}}
{% endfor %}

# Order history
Here is the employee's procurement history to use as context when answering their question.

{% for item in Employee.orders %}
Order Item: {{item.name}}
Details: {{item.description}} — Ordered on {{item.date}}
{% endfor %}

Based on the product documentation and order history above, provide a concise and helpful answer to their question. Don't fabricate information beyond the provided inputs.
The following table describes how the example template works:
Template element Task {{ Employee.firstName }} {{ Employee.lastName }}Displays the employee name. {{ Employee.department }}Adds department context. {{ Question[0].content }}Injects the employee's question from the Compose action named Question. {% for doc in Products %}Loops through catalog data from the Compose action named Products. {% for order in Employee.orders %}Loops through the employee's order history from the Compose action named Employee. Each element value is dynamically pulled from the workflow's Compose actions - all without any code or external services needed. You can apply the same approach to reference data output from other operations, for example, a SharePoint list, SQL Server row, email body, or even AI Search results. You only have to map the outputs into the prompt template and let your workflow do the rest.
From the Advanced parameters list, select Prompt Template Variable, which now appears on the Parameters tab.
In the key-value table that appears on the Parameters tab, enter the following template variable names and outputs selected from the preceding Compose actions in the workflow, for example:
On the first row, in the first column, enter Employee as the variable name.
On the same row, in the next column, select inside the edit box, and then select the lightning icon to open the dynamic content list.
From the dynamic content list, under Employee, select Outputs.
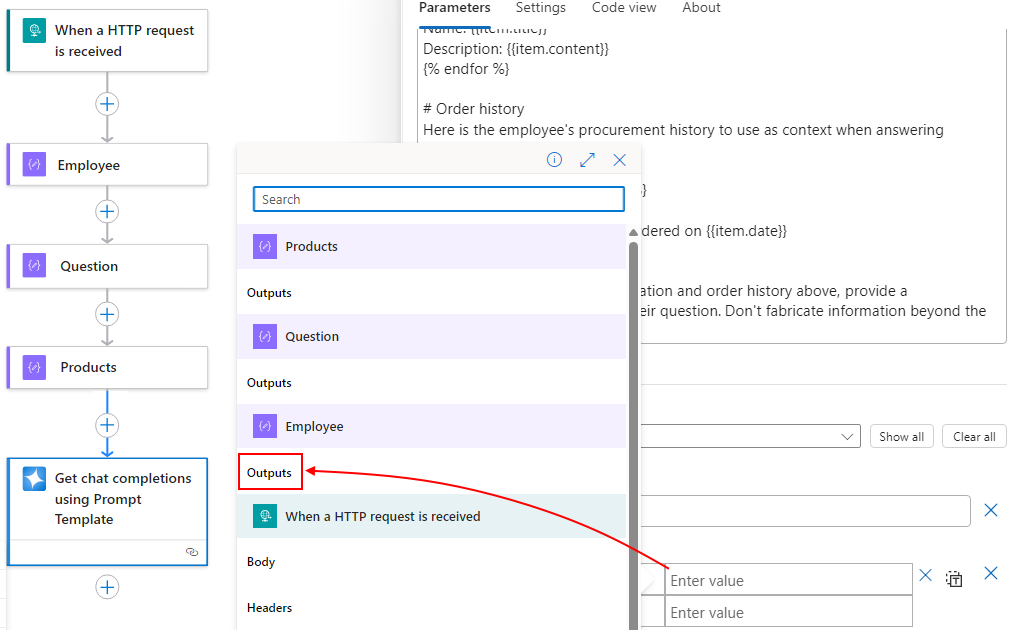
Repeat the same steps on the next row and following row for Question and Products.
When you're done, the table looks like the following example:

For other parameters, see Get chat completions using Prompt Template.


When you're done, your workflow looks like the following example:

Test your workflow
To trigger your workflow, send an HTTPS request to the callback URL for the Request trigger, including the method that the Request trigger expects, by using your HTTP request tool, based on the instructions.
For more information about the trigger's underlying JSON definition and how to call this trigger, see the following documentation:
After workflow execution completes, the run history page opens to show the status for each action.
To find the run history page for a specific workflow run at a later time, follow these steps:
On the workflow menu, under Tools, select Run history.
On the Run history tab, select the workflow run to inspect.
To find the chat response, on the run history page, select the Azure OpenAI action.
A pane opens to show the inputs and outputs for the selected action.
On the opened pane, scroll to the Outputs section.
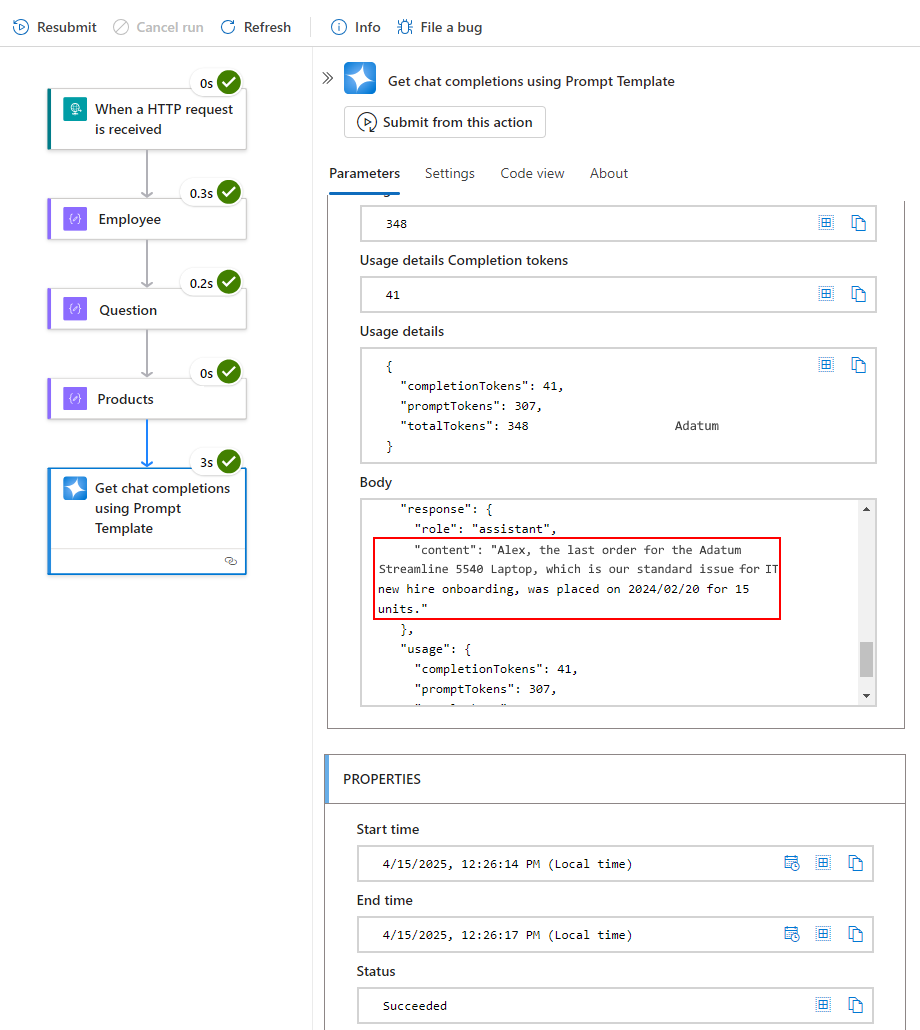
The response is entirely based on the structured context that is passed into your workflow—no extra fine-tuning needed.


Clean up resources
If you don't need the resources that you created for this guide, make sure to delete the resources so that you don't continue to get charged. You can either follow these steps to delete the resource group that contains these resources, or you can delete each resource individually.
In the Azure search box, enter resource groups, and select Resource groups.
Find and select the resource groups that contain the resources for this example.
On the Overview page, select Delete resource group.
When the confirmation pane appears, enter the resource group name, and select Delete.