Note
Access to this page requires authorization. You can try signing in or changing directories.
Access to this page requires authorization. You can try changing directories.
Applies to: Azure Logic Apps (Standard)
This how-to guide shows how to create an example automated workflow that waits for an inbound web request and then sends a message to an email account. More specifically, you create a Standard logic app resource, which can include multiple stateful and stateless workflows that run in single-tenant Azure Logic Apps.
- The Request trigger, which creates a callable endpoint that can handle inbound requests from any caller.
- The Office 365 Outlook connector, which provides an action to send email.
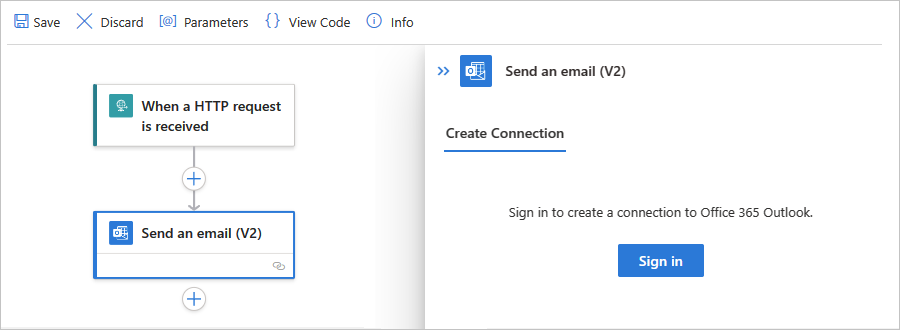
When you finish, your workflow looks like the following high level example:

You can have multiple workflows in a Standard logic app. Workflows in the same logic app and the tenant run in the same process as the Azure Logic Apps runtime, so they share the same resources and provide better performance.
Tip
To learn more, you can ask Azure Copilot these questions:
- What's Azure Logic Apps?
- What's a Standard logic app workflow?
- What's the Request trigger?
- What's the Office 365 Outlook connector?
To find Azure Copilot, on the Azure portal toolbar, select Copilot.
The operations in this example are from two connectors among 1000+ connectors that you can use in a workflow. While this example is cloud-based, you can create workflows that integrate a vast range of apps, data, services, and systems across cloud, on-premises, and hybrid environments.
As you progress, you complete these high-level tasks:
To create a Standard logic app workflow from a prebuilt template that follows a commonly used pattern, see Create a Standard logic app workflow from a prebuilt template.
To create and manage a Standard logic app workflow using other tools, see Create Standard workflows with Visual Studio Code. With Visual Studio Code, you can develop, test, and run workflows in your local development environment.
For more information, see the following documentation:
Prerequisites
An Azure account and subscription. If you don't have a subscription, sign up for a free Azure account.
An Azure Storage account. If you don't have one, you can either create a storage account in advance or during logic app creation.
Note
The Standard logic app resource type is powered by Azure Functions and has storage requirements similar to function apps. Stateful workflows perform storage transactions, such as using queues for scheduling and storing workflow states in tables and blobs. These transactions incur storage charges. For more information about how stateful workflows store data in external storage, see Stateful and stateless workflows.
An email account from an email provider supported by Azure Logic Apps, such as Office 365 Outlook, Outlook.com, or Gmail. For other supported email providers, see Connectors for Azure Logic Apps.
This example uses Office 365 Outlook with a work or school account. If you use a different email account, the general steps stay the same, but the user experience might slightly differ. If you use Outlook.com, use your personal Microsoft account instead to sign in.
Note
If you want to use the Gmail connector, only G-Suite business accounts can use this connector without restriction in logic app workflows. If you have a Gmail consumer account, you can use this connector with only specific Google-approved services, or you can create a Google client app to use for authentication with your Gmail connector. For more information, see Data security and privacy policies for Google connectors in Azure Logic Apps.
Install or use a tool that can send HTTP requests to test your solution, for example:
- Visual Studio Code with an extension from Visual Studio Marketplace
- PowerShell Invoke-RestMethod
- Microsoft Edge - Network Console tool
- Bruno
- curl
Caution
For scenarios where you have sensitive data, such as credentials, secrets, access tokens, API keys, and other similar information, make sure to use a tool that protects your data with the necessary security features. The tool should work offline or locally, and not require sign in to an online account or sync data to the cloud. When you use a tool with these characteristics, you reduce the risk of exposing sensitive data to the public.
To deploy your Standard logic app resource to an App Service Environment v3 (ASEv3) - Windows plan only, you have to create this environment resource first. You can then select this environment as the deployment location when you create your logic app. For more information, see Resources types and environments and Create an App Service Environment.
To enable communication from your Standard logic app workflows to a private endpoint on a Premium integration account, you must have an existing Azure virtual network. Both your logic app, virtual network, and integration account must use the same Azure region. Both your logic app and integration account must exist inside the same virtual network. For more information, see Create a virtual network.
If you enable Application Insights on your logic app, you can optionally enable diagnostics logging and tracing. You can do so either when you create your logic app or after deployment. You need to have an Application Insights instance, but you can create this resource in advance, when you create your logic app, or after deployment.
Best practices and recommendations
For optimal designer responsiveness and performance, review and follow these guidelines:
Use no more than 50 actions per workflow. Exceeding this number of actions raises the possibility for slower designer performance.
Consider splitting business logic into multiple workflows where necessary.
When you add more workflows to your logic app resource, you increase cold start times and the risk for longer load times, which negatively affect performance. To reduce these risks or if you have mission-critical logic apps that require zero downtime deployments, set up deployment slots.
Create a Standard logic app resource
In the Azure portal, sign in with your Azure account.
In the Azure portal search box, enter logic app, and select Logic apps.

On the Logic apps page toolbar, select Create.
The Create Logic App page appears and shows the following options:
Plan Description Consumption Creates a logic app resource that supports only one workflow that runs in multitenant Azure Logic Apps and uses the Consumption model for billing. Standard Creates a logic app resource that supports multiple workflows. You have the following options:
- Workflow Service Plan: Workflows run in single-tenant Azure Logic Apps and use the Standard model for billing.
- App Service Environment V3: Workflows run in single-tenant Azure Logic Apps and use an App Service Environment plan for billing.
- Hybrid: Workflows run on-premises and in multiple clouds using Kubernetes Event-driven Autoscaling (KEDA). For more information, see Create Standard workflows for hybrid deployment.On the Create Logic App page, select Standard (Workflow Service Plan).
Plan type Description Standard This logic app type is the default selection. Workflows run in single-tenant Azure Logic Apps and use the Standard pricing model. Consumption This logic app type and workflow runs in global, multitenant Azure Logic Apps and uses the Consumption pricing model. On the Create Logic App page, on the Basics tab, provide the following basic information about your logic app:
Property Required Value Description Subscription Yes <Azure-subscription-name> Your Azure subscription name.
This example uses Pay-As-You-Go.Resource Group Yes <Azure-resource-group-name> The Azure resource group where you create your logic app and related resources. This name must be unique across regions and can contain only letters, numbers, hyphens (-), underscores (_), parentheses (()), and periods (.).
This example creates a resource group named Fabrikam-Workflows-RG.Logic App name Yes <logic-app-name> Your logic app resource name, which must be unique across regions and can contain only letters, numbers, hyphens (-), underscores (_), parentheses (()), and periods (.).
Note: Your logic app's name automatically gets the suffix, .azurewebsites.net, because the Standard logic app resource is powered by the single-tenant Azure Logic Apps runtime, which uses the Azure Functions extensibility model and is hosted as an extension on the Azure Functions runtime. Azure Functions uses the same app naming convention.
This example creates a logic app resource named Fabrikam-Workflows.Region Yes <Azure-region> The Azure datacenter region for your logic app.
This example uses West US.Windows Plan Yes <plan-name> The plan name to use. Either select an existing plan name or provide a name for a new plan.
This example uses the name My-App-Service-Plan.
Note: Don't use a Linux-based App Service plan. Only the Windows-based App Service plan is supported.Pricing plan Yes <pricing-tier> The pricing tier to use for your logic app and workflows. Your selection affects the pricing, compute, memory, and storage that your logic app and workflows use.
For more information, review Hosting plans and pricing tiers.Note
If you select an Azure region that supports availability zone redundancy, the Zone redundancy section is enabled. This section offers the choice to enable availability zone redundancy for your logic app. However, currently supported Azure regions don't include West US, so you can ignore this section for this example. For more information, see Protect logic apps from region failures with zone redundancy and availability zones.
When you finish, your settings look similar to the following example:

Note
The FUNCTIONS_WORKER_RUNTIME app setting is required for your Standard logic app, and the value was previously set to node. However, the required value is now dotnet for all new and existing deployed Standard logic apps. This change in value shouldn't affect your workflow's runtime, so everything should work the same way as before. For more information, see the FUNCTIONS_WORKER_RUNTIME app setting.
The APP_KIND app setting value is required for your Standard logic app, and the value must be workflowApp. However, in some scenarios, this app setting might be missing, for example, due to automation using Azure Resource Manager templates or other scenarios where the setting isn't included. If certain actions don't work, such as the Execute JavaScript Code action, or if the workflow stops working, check that the APP_KIND app setting exists and is set to workflowApp. For more information, see the APP_KIND app setting.
When you finish, select Next: Storage.
On the Storage tab, provide the following information about the storage solution and hosting plan to use for your logic app.
Property Required Value Description Storage type Yes - Azure Storage
- SQL and Azure StorageThe storage type that you want to use for workflow-related artifacts and data.
- To deploy only to Azure, select Azure Storage.
- To use SQL as primary storage and Azure Storage as secondary storage, select SQL and Azure Storage, and review Set up SQL database storage for Standard logic apps in single-tenant Azure Logic Apps.
Note: If you're deploying to an Azure region, you still need an Azure storage account, which is used to complete the one-time hosting of the logic app's configuration on the Azure Logic Apps platform. The workflow's state, run history, and other runtime artifacts are stored in your SQL database.
For deployments to a custom location that is hosted on an Azure Arc cluster, you only need SQL as your storage provider.Storage account Yes <Azure-storage-account-name> The Azure Storage account to use for storage transactions.
This resource name must be unique across regions and have 3-24 characters with only numbers and lowercase letters. Either select an existing account or create a new account.
This example creates a storage account named mystorageacct.
Note: Make sure that Maximum Compatibility is the default security setting for the storage account file share. Otherwise, your logic app and workflows might fail to start, and you get the following error: The user name or password is incorrect: 'C:\home\data\Functions\secrets\Sentinels'.On the Networking tab, you can leave the default options to follow the example. However, for specific, real-world scenarios, make sure to review and select the following appropriate options. You can also change this configuration after you deploy your logic app resource. For more information, see Secure traffic between Standard logic apps and Azure virtual networks using private endpoints.
The following Enable public access setting applies to endpoints on your logic app and doesn't affect whether your logic app can communicate with Azure resources in the same virtual network, for example, a Premium integration account with a private endpoint. To access such Azure resources, your logic app must exist in the same virtual network as these resources.
Enable public access Behavior On Your logic app has a public endpoint with an inbound address that's open to the internet. For clients that are outside an Azure virtual network, they can use this endpoint to access your logic app, but not the virtual network. Off Your logic app has no public endpoint, but has a private endpoint instead for communication within an Azure virtual network, and is isolated within that virtual network. The private endpoint can communicate with endpoints in the virtual network, but only from clients within that network. This configuration also means that logic app traffic can be governed by network security groups or affected by virtual network routes. The following settings control Standard logic app access to endpoints in a virtual network:
Enable network injection Behavior On Your logic app workflows can privately and securely communicate with endpoints in the virtual network.
To enable communication between your logic app and a private endpoint on a Premium integration account, select this option, which also makes the Virtual Network section available. For Virtual Network, select the Azure virtual network to use. This choice makes the Inbound access and Outbound access sections available.Off Your logic app workflows can't communicate with endpoints in the virtual network. The following sections appear after you select a virtual network when Enable network injection is set to On.
Inbound access
- Enable private endpoints: Applies to private endpoints on your Standard logic app and is available only when Enable public access is set to Off.
Outbound access
- Enable VNet integration: To enable communication between a Standard logic app and a private endpoint on a Premium integration account, select On and the subnet to use.
If your creation and deployment settings support using Application Insights, you can optionally enable diagnostics logging and tracing for your logic app workflows by following these steps:
On the Monitoring tab, under Application Insights, set Enable Application Insights to Yes.
For the Application Insights setting, either select an existing Application Insights instance, or if you want to create a new instance, select Create new and provide the name that you want to use.
On the Authentication tab, under Authentication type, select the authentication to use for connecting to the host storage account resource (Host storage (AzureWebJobsStorage)).
Important
If you select Managed identity for authentication, you must specify the managed identity to use. Choose one of the following options:
If you select Create new managed identity, the portal creates this identity and automatically assigns the correct role-based access permissions to the identity on the host storage account for your logic app. After you create your logic app, you might have to wait a few minutes for the permissions to propagate onto your new managed identity. You can then restart your logic app. If no option exists to create a managed identity, you need the lowest level of permissions that permits you to complete this task.
If you select an existing managed identity, you must manually assign the roles in the Minimum roles required column to the managed identity on the host storage account resource. Consider completing this assignment before you deploy your logic app. Otherwise, you get errors when you open your new logic app resource. For more information, see Assign Azure roles using the Azure portal.
After Azure validates your logic app settings, on the Review + create tab, select Create, for example:

Note
If you get a validation error during this step, open and review the error details. For example, if your selected region reaches a quota for resources that you're trying to create, you might have to try a different region.
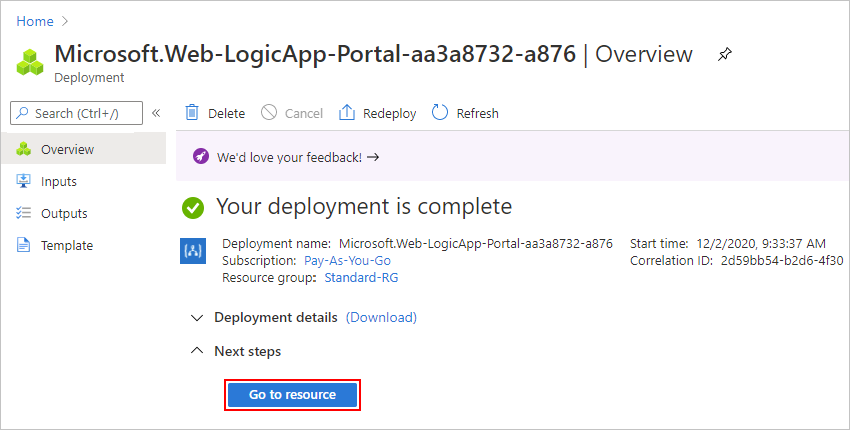
After Azure finishes deployment, your logic app resource is automatically live but doesn't do anything yet because the resource is empty, and you haven't added any workflows yet.
On the deployment completion page, select Go to resource so that you can add a blank workflow.


Add a blank workflow
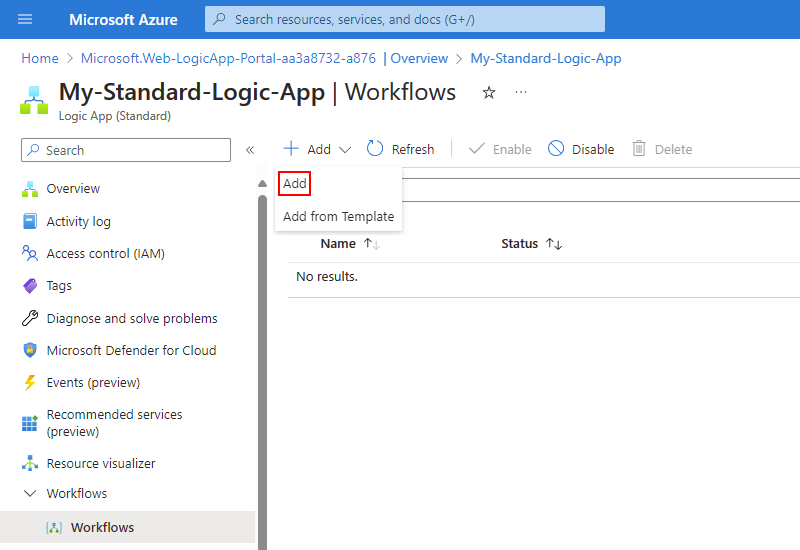
After you create your empty logic app resource, you have to add your first workflow.
After Azure opens the resource, on your logic app menu, under Workflows, select Workflows. On the Workflows toolbar, open the Add menu, and select Add.
After the New workflow pane opens, provide a name for your workflow, and select the State type, which is either Stateful or Stateless. When you finish, select Create.
This example adds a blank stateful workflow named Stateful-Workflow. By default, the workflow is enabled but doesn't do anything until you add a trigger and actions.
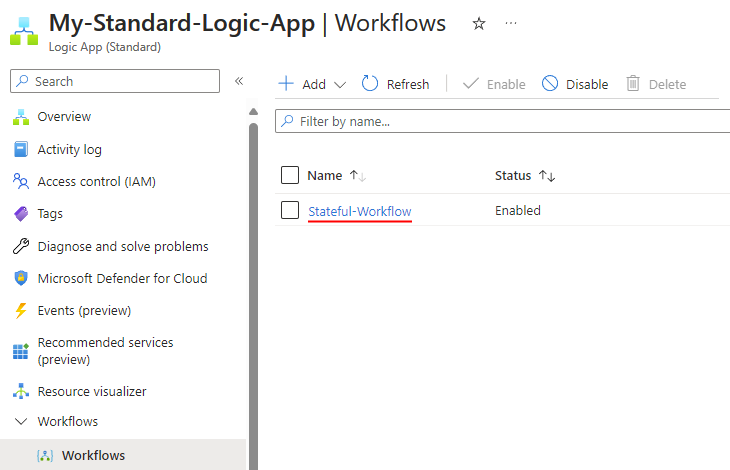
From the workflow list, select the blank stateful workflow.
On the workflow menu, under Tools, select Designer.
The designer opens, and the surface shows the prompt named Add trigger.
On the designer surface, select Add trigger to open the connectors gallery so that you can select a trigger operation.

Now, add a trigger that starts your workflow.
Add a trigger
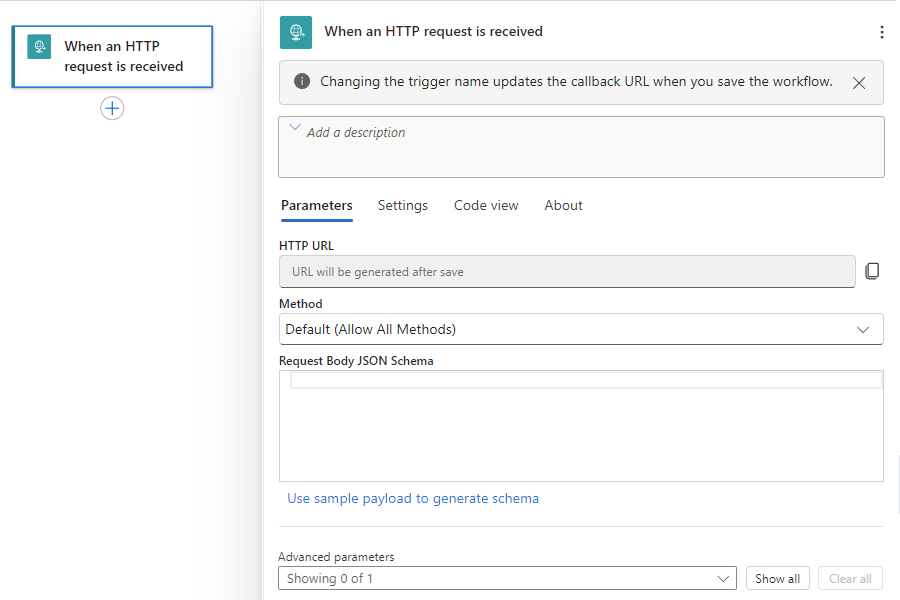
This example workflow starts with the built-in Request trigger named When a HTTP request is received. This trigger creates an endpoint that other services or logic app workflows can call and waits for those inbound calls or requests to arrive. Built-in operations run natively and directly within the Azure Logic Apps runtime.
In the workflow designer, make sure that your blank workflow is open and that the Add a trigger prompt is selected on the designer surface.
By using request as the search term, follow these steps to add the built-in Request trigger named When a HTTP request is received to your workflow.
When the trigger appears on the designer, the trigger's information pane opens to show the trigger's properties, settings, and other actions.
Save your workflow. On the designer toolbar, select Save.
When you save a workflow for the first time, and that workflow starts with a Request trigger, Azure Logic Apps automatically generates a URL for an endpoint that's created by the Request trigger. Later, when you test your workflow, you send a request to this URL, which fires the trigger and starts the workflow run.
Add an action
This example workflow continues with the Office 365 Outlook managed connector action named Send an email. Managed connector operations run in Azure versus natively and directly on the Azure Logic Apps runtime.
On the designer surface, under the trigger that you added, select the plus sign (+) > Add an action.
The Add an action pane opens so that you can select an action.
By using office 365 outlook send email as the search term, follow these steps to add the Office 365 Outlook action that's named Send an email (V2) to your workflow.
In the action's information pane, under Create a new connection, select Sign in so that you can create a connection to your email account.
When you're prompted for access to your email account, sign in with your account credentials.
Note
If you get the error message, "Failed with error: 'The browser is closed.'. Please sign in again", check whether your browser blocks external cookies. If these cookies are blocked, try adding https://portal.azure.com to the list of sites that can use cookies. If you're using incognito mode, make sure that external cookies aren't blocked while working in that mode.
If necessary, reload the page, open your workflow, add the email action again, and try creating the connection.
After Azure creates the connection, the Send an email action appears on the designer and is selected by default. If the action isn't selected, select the action so that its information pane is also open.
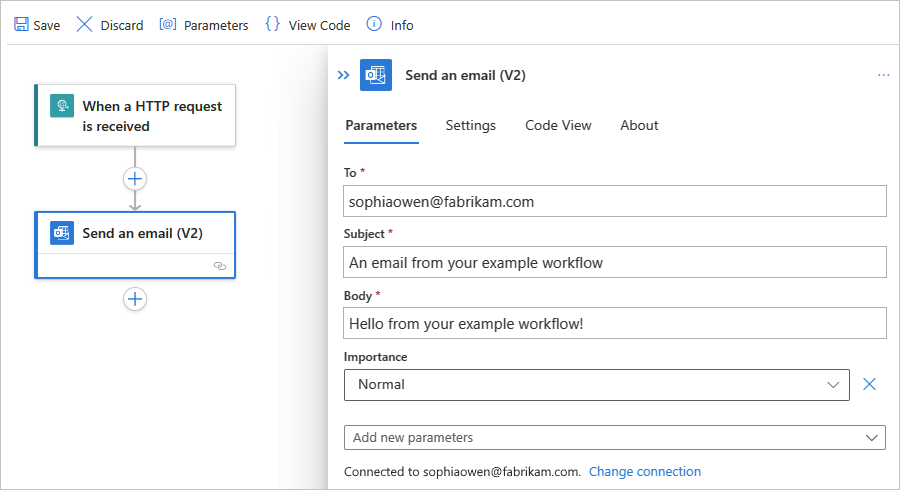
In the action information pane, on the Parameters tab, provide the required information for the action, for example:
Property Required Value Description To Yes <your-email-address> The email recipient, which can be your email address for test purposes. This example uses the fictitious email, sophiaowen@fabrikam.com. Subject Yes An email from your example workflow The email subject Body Yes Hello from your example workflow! The email body content When you're done, your version looks similar to the following example:
Save your workflow. On the designer toolbar, select Save.
If your environment has strict network requirements or firewalls that limit traffic, you have to set up permissions for any trigger or action connections that exist in your workflow. To find the fully qualified domain names, review Find domain names for firewall access.
Otherwise, to test your workflow, manually trigger a run.
Delete items from the designer
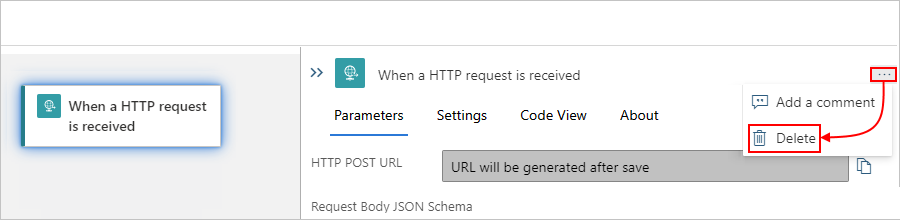
To delete an item in your workflow from the designer, follow any of these steps:
Select the item, open the item's shortcut menu (Shift+F10), and select Delete. To confirm, select OK.
Select the item, and press the delete key. To confirm, select OK.
Select the item so that information pane opens for that item. In the pane's upper right corner, open the ellipses (...) menu, and select Delete. To confirm, select OK.
Tip
If the ellipses menu isn't visible, expand your browser window wide enough so that the information pane shows the ellipses (...) button in the upper right corner.
Find domain names for firewall access
Before you deploy your logic app and run your workflow in the Azure portal, if your environment has strict network requirements or firewalls that limit traffic, you have to set up network or firewall permissions for any trigger or action connections in the workflows that exist in your logic app.
To find the inbound and outbound IP addresses used by your logic app and workflows, follow these steps:
On your logic app menu, under Settings, select Networking.
On the networking page, find and review the Inbound Traffic and Outbound Traffic sections.
To find the fully qualified domain names (FQDNs) for connections, follow these steps:
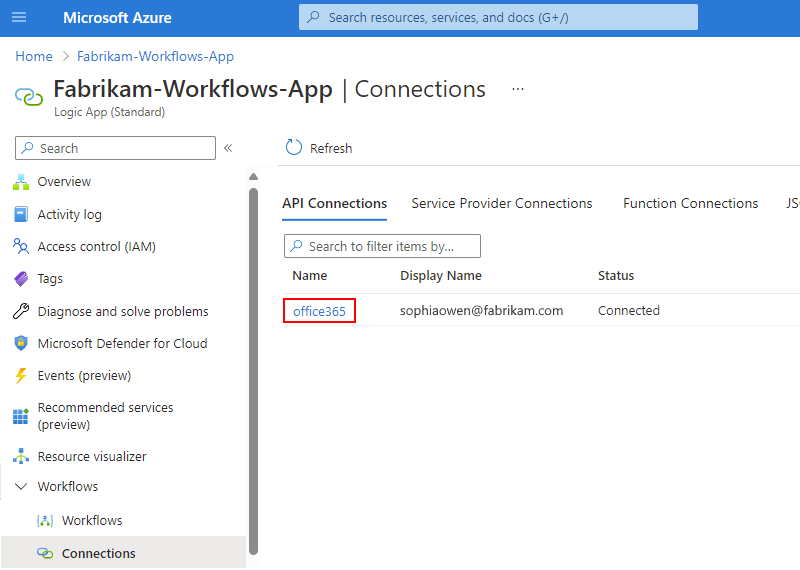
On your logic app menu, under Workflows, select Workflows, Connections.
On the API Connections tab, select the connection's resource name, for example:
Expand your browser wide enough so that JSON View appears visible in the browser's upper right corner, and then select JSON View.
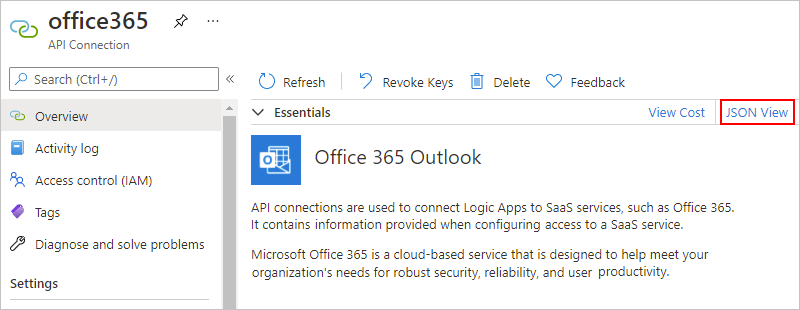
Copy and save the connectionRuntimeUrl property value somewhere safe so that you can set up your firewall with this information.
For each connection, repeat the relevant steps.
Trigger the workflow
In this example, the workflow runs when the Request trigger receives an inbound request, which is sent to the URL for the endpoint that's created by the trigger. When you saved the workflow for the first time, Azure Logic Apps automatically generated this URL. So, before you can send this request to trigger the workflow, you need to find this URL.
On the workflow designer, select the Request trigger that's named When a HTTP request is received.
After the information pane opens, on the Parameters tab, find the HTTP URL property.
To copy the generated URL, select the Copy URL (copy file icon), and save the URL somewhere else for now. The URL follows this format:
https://<*logic-app-name*>.azurewebsites.net:443/api/<*workflow-name*>/triggers/manual/invoke?api-version=2020-05-01&sp=%2Ftriggers%2Fmanual%2Frun&sv=1.0&sig=<*shared-access-signature*>
For this example, the URL looks like the following sample:
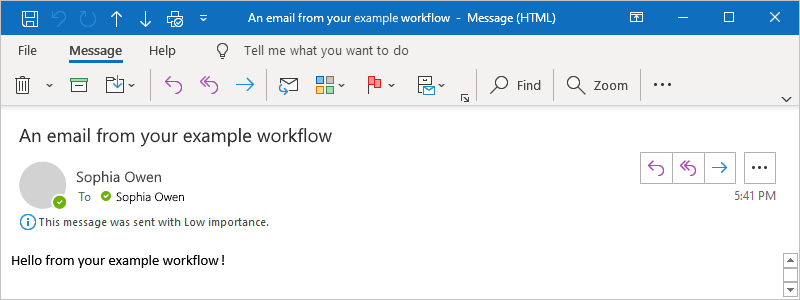
https://fabrikam-workflows.azurewebsites.net:443/api/Fabrikam-Stateful-Workflow/triggers/manual/invoke?api-version=2020-05-01&sp=%2Ftriggers%2Fmanual%2Frun&sv=1.0&sig=xxxxxXXXXxxxxxXXXXxxxXXXXxxxxXXXXTo test the endpoint URL and trigger the workflow, send an HTTP request to the URL, including the method that the Request trigger expects, by using your HTTP request tool and its instructions.
This example uses the GET method with the copied URL, which looks like the following sample:
GET https://fabrikam-workflows.azurewebsites.net:443/api/Fabrikam-Stateful-Workflow/triggers/manual/invoke?api-version=2020-05-01&sp=%2Ftriggers%2Fmanual%2Frun&sv=1.0&sig=xxxxxXXXXxxxxxXXXXxxxXXXXxxxxXXXXWhen the trigger fires, the example workflow runs and sends an email that appears similar to this example:
Review workflow run history
After a stateful workflow finishes running, you can view the workflow's run history, which includes the status for the overall run as well as for the trigger and for each action along with their inputs and outputs. In the Azure portal, workflow run history and trigger history appear at the workflow level, not at the logic app resource level. For more information, see Review workflow run history.
Review trigger history
For a stateful workflow, you can review the trigger history for each run, including the trigger status along with inputs and outputs, separately from the workflow run history. In the Azure portal, trigger history and run history appear at the workflow level, not the logic app level. For more information, see Review trigger history.
Resubmit workflow run with same inputs
For a stateful workflow run, you can rerun the entire workflow with the same inputs that were previously used for that run. For more information, see Rerun a workflow with same inputs.
Set up managed identity access to your storage account
By default, your Standard logic app authenticates access to your Azure Storage account by using a connection string. However, you can set up a user-assigned managed identity to authenticate access instead.
Note
Currently, you can't disable storage account key access for Standard logic apps that use the Workflow Service Plan hosting option. However, if your logic app uses the App Service Environment v3 hosting option, you can disable storage account key access after you finish the steps to set up managed identity authentication.
In the Azure portal, follow these steps to create a user-assigned managed identity.
From your user-assigned identity, get the resource ID:
On the user-assigned managed identity menu, under Settings, select Properties.
From the Id property, copy and save the resource ID.
From your storage account, get the URIs for the Blob, Queue, and Table services:
On the storage account menu, under Settings, select Endpoints.
Copy and save the URIs for Blob service, Queue service, and Table service.
On your storage account, add the necessary role assignments for your user-assigned identity:
On the storage account menu, select Access control (IAM).
On the Access control (IAM) page toolbar, from the Add menu, select Add role assignment.
On the Job function roles tab, add each of the following roles to the user-assigned identity:
- Storage Account Contributor
- Storage Blob Data Owner
- Storage Queue Data Contributor
- Storage Table Data Contributor
For more information, see Assign Azure roles using the Azure portal and Understand role assignments.
Follow these steps to add the user-assigned managed identity to your Standard logic app resource.
If your Standard logic app uses the hosting option named Workflow Service Plan, enable runtime scale monitoring:
Note
If your logic app uses the App Service Environment (ASE) v3 hosting option, skip the steps for runtime scale monitoring because ASE doesn't support this capability.
On the logic app menu, under Settings, select Configuration.
On the Workflow runtime settings tab, for Runtime Scale Monitoring, select On.
On the Configuration toolbar, select Save.
On your Standard logic app, set up the resource ID and service URIs:
On the logic app menu, select Overview.
On the Overview page toolbar, select Stop.
On the logic app menu, under Settings, select Environment variables.
On the App settings tab, select Add to add each of the following app settings and values and select Apply when you finish with each setting.
App setting Value AzureWebJobsStorage__managedIdentityResourceId The resource ID for your user-assigned managed identity AzureWebJobsStorage__blobServiceUri The Blob service URI for your storage account AzureWebJobsStorage__queueServiceUri The Queue service URI for your storage account AzureWebJobsStorage__tableServiceUri The Table service URI for your storage account AzureWebJobsStorage__credential managedIdentity On the App settings tab, delete the app setting named AzureWebJobsStorage, which is set to the connection string associated with your storage account.
When you finish, select Apply, which saves your changes and restarts your logic app.
Your changes might take several moments to take effect. If necessary, on your logic app menu, select Overview, and on the toolbar, select Refresh.
The following message might appear, but it isn't an error and doesn't affect your logic app:
"AzureWebjobsStorage" app setting is not present.
Enable run history for stateless workflows
To debug a stateless workflow more easily, you can enable the run history for that workflow, and then disable the run history when you're done. Follow these steps for the Azure portal, or if you're working in Visual Studio Code, see Create stateful and stateless workflows in Visual Studio Code.
In the Azure portal, open your Standard logic app resource.
On the logic app menu, under Settings, select Environment variables.
On the App settings tab, select Add.
On the Add/Edit application setting pane, in the Name box, enter the following app setting name:
Workflows.{your-workflow-name}.OperationOptions
In the Value box, enter the following value: WithStatelessRunHistory
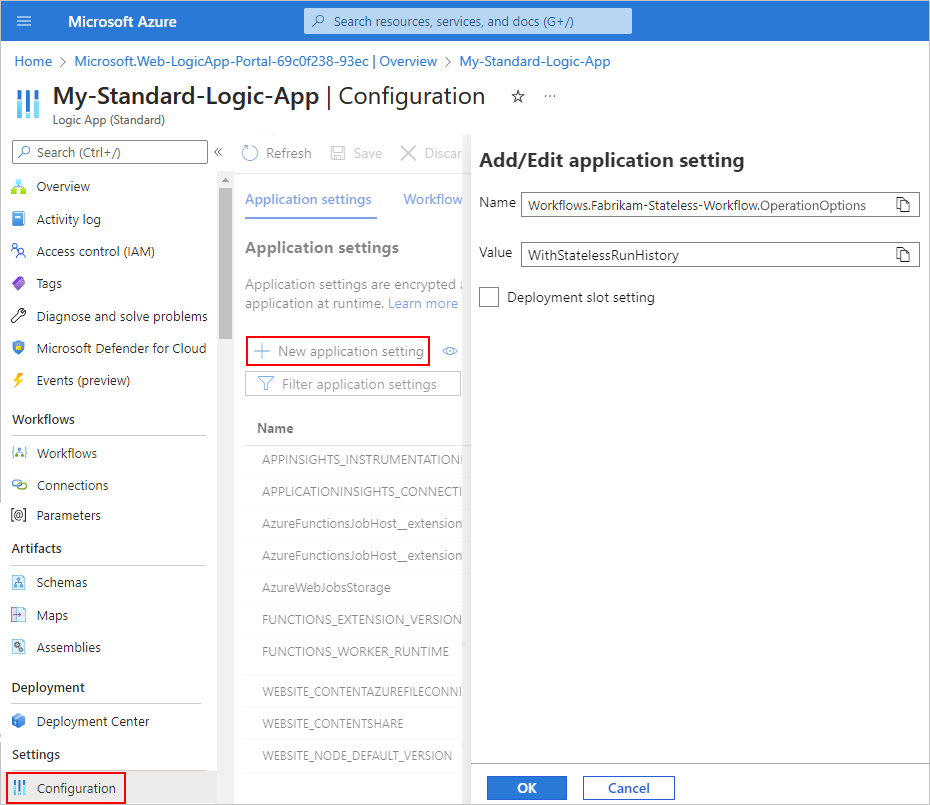
To finish this task, select Apply.
To disable the run history when you're done, either set the property named Workflows.{your-workflow-name}.OperationOptions to None, or delete the property and its value.
Enable or open Application Insights after deployment
During workflow run, your logic app emits telemetry along with other events. You can use this telemetry to get better visibility into how well your workflow runs and how the Logic Apps runtime works in various ways. You can monitor your workflow by using Application Insights, which provides near real-time telemetry (live metrics). This capability can help you investigate failures and performance problems more easily when you use this data to diagnose issues, set up alerts, and build charts.
If your logic app's creation and deployment settings support using Application Insights, you can optionally enable diagnostics logging and tracing for your logic app workflow. You can do so either when you create your logic app resource in the Azure portal or after deployment. You need to have an Application Insights instance, but you can create this resource either in advance, when you create your logic app, or after deployment. You can also optionally enable enhanced telemetry in Application Insights for Standard workflows.
Enable Application Insights on a deployed logic app
In the Azure portal, find your deployed logic app.
On the logic app menu, under Settings, select Application Insights.
On the Application Insights pane, select Turn on Application Insights.
After the pane updates, at the bottom, select Apply > Yes.
On the Application Insights pane, select View Application Insights data.
After the Application Insights dashboard opens, you can review metrics or logs for your logic app workflow. For example, to chart or query for data, on the Application Insights resource menu, under Monitoring, select Metrics or Logs.
Open Application Insights
In the Azure portal, find your deployed logic app.
On the logic app menu, under Settings, select Application Insights.
On the Application Insights pane, select View Application Insights data.
After the Application Insights dashboard opens, you can review metrics or logs for your logic app workflow. For example, to chart or query for data, on the Application Insights resource menu, under Monitoring, select Metrics or Logs.
View connections
When you create connections in a workflow using connectors managed by Microsoft, these connections are separate Azure resources with their own resource definitions and are hosted in global, multitenant Azure. Standard logic app workflows can also use built-in service provider connectors that natively run and are powered by the single-tenant Azure Logic Apps runtime. To view and manage these connections, see View connections.
Stop or start logic app resources
Follow the steps in Disable or enable logic apps.
Troubleshoot problems and errors
New triggers and actions are missing from the designer picker for previously created workflows
Single-tenant Azure Logic Apps supports built-in actions for Azure Function Operations, Liquid Operations, and XML Operations, such as XML Validation and Transform XML. However, for previously created logic apps, these actions might not appear in the designer for you to select if your logic app uses an outdated version of the extension bundle, Microsoft.Azure.Functions.ExtensionBundle.Workflows.
To fix this problem, follow these steps to delete the outdated version so that the extension bundle can automatically update to the latest version.
Note
This specific solution applies only to Standard logic app resources that you create using the Azure portal, not the logic apps that you create and deploy using Visual Studio Code and the Azure Logic Apps (Standard) extension. See Supported triggers and actions are missing from the designer in Visual Studio Code.
In the Azure portal, stop your logic app.
On your logic app menu, select Overview.
On the Overview pane's toolbar, select Stop.
On your logic app menu, under Development Tools, select Advanced Tools.
On the Advanced Tools pane, select Go, which opens the Kudu environment for your logic app.
On the Kudu toolbar, open the Debug console menu, and select CMD.
A console window opens so that you can browse to the bundle folder using the command prompt. Or, you can browse the directory structure that appears above the console window.
Browse to the following folder, which contains versioned folders for the existing bundle:
...\home\data\Functions\ExtensionBundles\Microsoft.Azure.Functions.ExtensionBundle.Workflows
Delete the version folder for the existing bundle. In the console window, you can run this command where you replace {bundle-version} with the existing version:
rm -rf {bundle-version}For example:
rm -rf 1.1.3Tip
If you get an error such as "permission denied" or "file in use", refresh the page in your browser, and try the previous steps again until the folder is deleted.
In the Azure portal, return to your logic app and its Overview page, and select Restart.
The portal automatically gets and uses the latest bundle.