Note
Access to this page requires authorization. You can try signing in or changing directories.
Access to this page requires authorization. You can try changing directories.
Applies to: Azure Logic Apps (Standard)
This guide primarily shows how to set up deployment for a Standard logic app project in Visual Studio Code to your infrastructure using DevOps tools and processes. If your Standard logic app exists in the Azure portal instead, you can download your logic app's artifact files for use with DevOps deployment. Based on whether you want to use GitHub or Azure DevOps, you then choose the path and tools that work best for your deployment scenario.
If you don't have a Standard logic app, you can still follow this guide using the linked sample Standard logic app projects plus examples for deployment to Azure through GitHub or Azure DevOps. For more information, review DevOps deployment overview for single-tenant Azure Logic Apps.
Prerequisites
An Azure account with an active subscription. If you don't have an Azure subscription, create a free account.
The Standard logic app to use with your DevOps tools and processes.
You can either download the artifact files for your Standard logic app resource from the Azure portal, or you can use a Standard logic app project created with Visual Studio Code and the Azure Logic Apps (Standard) extension for Visual Studio Code.
Portal: The downloaded zip file contains Standard logic app artifact files, such as workflow.json, connections.json, host.json, and local.settings.json. See Download Standard logic app artifact files from portal.
Visual Studio Code: You need an empty Standard logic app resource in the Azure portal for your deployment destination. To quickly create an empty Standard logic app resource, review Create single-tenant based logic app workflows - Portal.
If you don't have an existing logic app or infrastructure, you can use the linked sample Standard logic app projects to deploy an example logic app and infrastructure, based whether you want to use GitHub or Azure DevOps. For more information about the included sample projects and resources to run the example logic app, review Deploy infrastructure resources.
Deploy infrastructure resources
To try the DevOps deployment experience without prior Standard logic app or infrastructure setup, use the following sample projects so you can set up deployment for an example Standard logic app and infrastructure, based whether you want to use GitHub or Azure DevOps:
GitHub sample for single-tenant Azure Logic Apps
This sample includes an example Standard logic app project plus examples for Azure deployment and GitHub Actions.
Azure DevOps sample for single-tenant Azure Logic Apps
This sample includes an example Standard logic app project plus examples for Azure deployment and Azure Pipelines.
Both samples include the following resources that a Standard logic app uses to run:
| Resource name | Required | Description |
|---|---|---|
| Standard logic app | Yes | This Azure resource contains the workflows that run in single-tenant Azure Logic Apps. Important: In your logic app project, each workflow has a workflow.json file that contains the workflow definition, which includes the trigger and action definitions. |
| API connections | Yes, if API connections exist | These Azure resources define any managed API connections that your workflows use to run managed connector operations, such as Office 365, SharePoint, and so on. Important: In your logic app project, the connections.json file contains metadata, endpoints, and keys for any managed API connections and Azure functions that your workflows use. To use different connections and functions in each environment, make sure that you parameterize the connections.json file and update the endpoints. For more information, review API connection resources and access policies. |
| Functions Premium or App Service hosting plan | Yes | This Azure resource specifies the hosting resources to use for running your logic app, such as compute, processing, storage, networking, and so on. Important: In the current experience, the Standard logic app resource requires the Workflow Standard hosting plan, which is based on the Azure Functions Premium hosting plan. |
| Azure storage account | Yes, for both stateful and stateless workflows | This Azure resource stores the metadata, keys for access control, state, inputs, outputs, run history, and other information about your workflows. |
| Application Insights | Optional | This Azure resource provides monitoring capabilities for your workflows. |
| Azure Resource Manager (ARM) template | Optional | This Azure resource defines a baseline infrastructure deployment that you can reuse or export. |
API connection resources and access policies
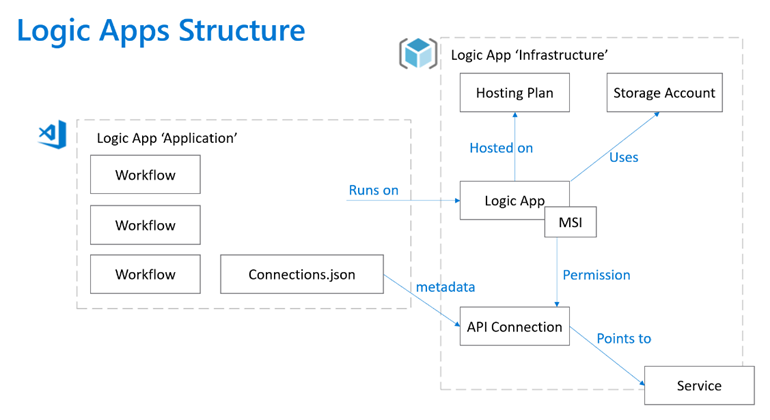
In single-tenant Azure Logic Apps, every managed API connection resource in your workflow requires an associated access policy. This policy needs your logic app's identity to provide the correct permissions for accessing the managed connector infrastructure. The included sample projects include an ARM template that includes all the necessary infrastructure resources, including these access policies.
For example, the following diagram shows the dependencies between a Standard logic app project and infrastructure resources:
Download Standard logic app artifacts from portal
If your Standard logic app is in the Azure portal, you can download a zip file that contains your logic app's artifact files, including workflow.json, connections.json, host.json, and local.settings.json.
In the Azure portal, find and open your Standard logic app resource.
On the logic app menu, select Overview.
On the Overview toolbar, select Download app content. In the confirmation box that appears, select Download.
When the prompt appears, select Save as, browse to the local folder that you want, and select Save to save the zip file.
Extract the zip file.
In Visual Studio Code, open the folder that contains the unzipped files.
When you open the folder, Visual Studio Code automatically creates a workspace.
Edit the folder's contents to include only the folders and files required for deployment using DevOps.
When you finish, save your changes.
Build and deploy logic app (zip deploy)
You can set up build and release pipelines either inside or outside Azure that deploy Standard logic apps to your infrastructure.
Build your project
Push your Standard logic app project and artifact files to your source repository, for example, either GitHub or Azure DevOps.
Set up a build pipeline based on your logic app project type by completing the following corresponding actions:
Project type Description and steps Nuget-based The NuGet-based project structure is based on the .NET Framework. To build these projects, make sure to follow the build steps for .NET Standard. For more information, review the documentation for Create a NuGet package using MSBuild. Bundle-based The extension bundle-based project isn't language-specific and doesn't require any language-specific build steps. Zip your project files using any method that you want.
Important
Make sure that your zip file contains your project's actual build artifacts at the root level, including all workflow folders, configuration files such as host.json, connections.json, local.settings.json, and any other related files. Don't add any extra folders nor put any artifacts into folders that don't already exist in your project structure.
For example, the following list shows an example MyBuildArtifacts.zip file structure:
MyStatefulWorkflow1-Folder
MyStatefulWorkflow2-Folder
connections.json
host.json
local.settings.json
Before you release to Azure
The managed API connections inside your logic app project's connections.json file are created specifically for local use in Visual Studio Code. Before you can release your project artifacts from Visual Studio Code to Azure, you have to update these artifacts. To use the managed API connections in Azure, you have to update their authentication methods so that they're in the correct format to use in Azure.
Update authentication type
For each managed API connection that uses authentication, you have to update the authentication object from the local format in Visual Studio Code to the Azure portal format, as shown by the first and second code examples, respectively:
Visual Studio Code format
{
   "managedApiConnections": {
      "sql": {
         "api": {
            "id": "/subscriptions/aaaa0a0a-bb1b-cc2c-dd3d-eeeeee4e4e4e/providers/Microsoft.Web/locations/westus/managedApis/sql"
         },
         "connection": {
            "id": "/subscriptions/aaaa0a0a-bb1b-cc2c-dd3d-eeeeee4e4e4e/resourceGroups/ase/providers/Microsoft.Web/connections/sql-2"
         },
         "connectionRuntimeUrl": "https://xxxxxxxxxxxxxx.01.common.logic-westus.azure-apihub.net/apim/sql/xxxxxxxxxxxxxxxxxxxxxxxxx/",
         "authentication": {
            "type": "Raw",
            "scheme": "Key",
            "parameter": "@appsetting('sql-connectionKey')"
         }
      }
   }
}
Azure portal format
{
   "managedApiConnections": {
      "sql": {
         "api": {
            "id": "/subscriptions/aaaa0a0a-bb1b-cc2c-dd3d-eeeeee4e4e4e/providers/Microsoft.Web/locations/westus/managedApis/sql"
         },
         "connection": {
            "id": "/subscriptions/aaaa0a0a-bb1b-cc2c-dd3d-eeeeee4e4e4e/resourceGroups/ase/providers/Microsoft.Web/connections/sql-2"
         },
         "connectionRuntimeUrl": "https://xxxxxxxxxxxxxx.01.common.logic-westus.azure-apihub.net/apim/sql/xxxxxxxxxxxxxxxxxxxxxxxxx/",
         "authentication": {
            "type": "ManagedServiceIdentity"
         }
      }
   }
}
Create API connections as needed
If you're deploying your Standard logic app to an Azure region or subscription different from your local development environment, you must also make sure to create these managed API connections before deployment. Azure Resource Manager template (ARM template) deployment is the easiest way to create managed API connections.
The following example shows a SQL managed API connection resource definition in an ARM template:
{
   "type": "Microsoft.Web/connections",
   "apiVersion": "2016–06–01",
   "location": "[parameters('location')]",
   "name": "[parameters('connectionName')]",
   "properties": {
      "displayName": "sqltestconnector",
      "api": {
         "id": "/subscriptions/aaaa0a0a-bb1b-cc2c-dd3d-eeeeee4e4e4e/providers/Microsoft.Web/locations/{Azure-region-location}/managedApis/sql"
      },
      "parameterValues": {
         "authType": "windows",
         "database": "TestDB",
         "password": "TestPassword",
         "server": "TestServer",
         "username": "TestUserName"
      }
   }
}
To find the required values for the properties object so that you can complete the connection resource definition, use the following API for a specific connector:
GET https://management.azure.com/subscriptions/{Azure-subscription-ID}/providers/Microsoft.Web/locations/{Azure-region-location}/managedApis/{connector-name}?api-version=2016-06-01
In the response, find the connectionParameters object, which contains the necessary information to complete the resource definition for that specific connector. The following example shows an example resource definition for a SQL managed connection:
{
   "type": "Microsoft.Web/connections",
   "apiVersion": "2016–06–01",
   "location": "[parameters('location')]",
   "name": "[parameters('connectionName')]",
   "properties": {
      "displayName": "sqltestconnector",
      "api": {
         "id": "/subscriptions/{Azure-subscription-ID}/providers/Microsoft.Web/locations/{Azure-region-location}/managedApis/sql"
      },
      "parameterValues": {
         "authType": "windows",
         "database": "TestDB",
         "password": "TestPassword",
         "server": "TestServer",
         "username": "TestUserName"
      }
   }
}
As an alternative, you can capture and review the network trace for when you create a connection using the workflow designer in Azure Logic Apps. Find the PUT call that is sent to the managed connector's API as previously described, and review the request body for all the necessary information.
On-premises data gateway resource definition
If your connection uses an on-premises data gateway resource, this resource definition exists separately from the connector resource definition. To view the data gateway's resource definition, see Automate deployment for Azure Logic Apps by using Azure Resource Manager templates and Microsoft.Web connectionGateways.
Release to Azure
To set up a release pipeline that deploys to Azure, follow the associated steps for GitHub, Azure DevOps, or Azure CLI.
For GitHub deployments, you can deploy your logic app by using GitHub Actions, for example, the GitHub Actions in Azure Functions. This action requires that you pass through the following information:
- The logic app name to use for deployment
- The zip file that contains your actual build artifacts, including all workflow folders, configuration files such as host.json, connections.json, local.settings.json, and any other related files.
- Your publish profile, which is used for authentication
- name: 'Run Azure Functions Action'
  uses: Azure/functions-action@v1
  id: fa
  with:
   app-name: 'MyLogicAppName'
   package: 'MyBuildArtifact.zip'
   publish-profile: 'MyLogicAppPublishProfile'
For more information, review Continuous delivery by using GitHub Action.
After deployment to Azure
Each API connection has access policies. After the zip deployment completes, you must open your Standard logic app resource in the Azure portal, and create access policies for each API connection to set up permissions for the deployed logic app. The zip deployment doesn't create app settings for you. After deployment, you must create these app settings based on the local.settings.json file in your logic app project.
Related content
We'd like to hear about your experiences with the single-tenant Azure Logic Apps!
- For bugs or problems, create your issues in GitHub.
- For questions, requests, comments, and other feedback, use this feedback form.