Note
Access to this page requires authorization. You can try signing in or changing directories.
Access to this page requires authorization. You can try changing directories.
APPLIES TO:  Python SDK azure-ai-ml v2 (current)
A machine learning project typically starts with exploratory data analysis (EDA) and data preprocessing (cleaning, feature engineering). It also includes building machine learning model prototypes to validate hypotheses. This prototyping project phase is highly interactive, and it lends itself to development in a Jupyter notebook or in an IDE with a Python interactive console. In this article, you learn how to:
- Access data from an Azure Machine Learning datastores URI as if it were a file system.
- Materialize Azure Machine Learning data assets into Pandas by using the
mltablePython library. - Materialize data via an explicit download by using the
azcopyutility.
Prerequisites
- An Azure Machine Learning workspace. For more information, see Manage Azure Machine Learning workspaces in the portal or with the Python SDK (v2).
- An Azure Machine Learning datastore. For more information, see Create datastores.
Tip
The guidance in this article describes data access during interactive development. It applies to any host that can run a Python session. This host can be your local machine, a cloud VM, a GitHub Codespace, or another host. Use an Azure Machine Learning compute instance - a fully managed and preconfigured cloud workstation. For more information, see Create an Azure Machine Learning compute instance.
Important
Ensure you have the latest azure-fsspec, mltable, and azure-ai-ml Python libraries installed in your Python environment:
pip install -U azureml-fsspec==1.3.1 mltable azure-ai-ml
The latest azure-fsspec package version can change over time. For more information about the azure-fsspec package, see azureml-fsspec 1.3.1.
Access data from a datastore URI as you would from a filesystem
An Azure Machine Learning datastore is a reference to an existing Azure storage account. The benefits of creating and using datastores include:
- A common, easy-to-use API to interact with different storage types (blob, file, Azure Data Lake Storage).
- Easy discovery of useful datastores in team operations.
- Support for both credential-based (for example, SAS token) and identity-based (Microsoft Entra ID or managed identity) access to data.
- For credential-based access, the connection information is secured to avoid key exposure in scripts.
- You can browse data and copy and paste datastore URIs in the Azure Machine Learning studio UI.
A Datastore URI is a Uniform Resource Identifier, which is a reference to a storage location (path) in your Azure storage account. A datastore URI has this format:
# Azure Machine Learning workspace details:
subscription = '<subscription_ID>'
resource_group = '<resource_group>'
workspace = '<workspace>'
datastore_name = '<datastore>'
path_on_datastore = '<path>'

# Long-form datastore URI format:
uri = f'azureml://subscriptions/{subscription}/resourcegroups/{resource_group}/workspaces/{workspace}/datastores/{datastore_name}/paths/{path_on_datastore}'.
These datastore URIs are a known implementation of the Filesystem spec (fsspec): a unified Pythonic interface to local, remote, and embedded file systems and byte storage. First, use pip to install the azureml-fsspec package and its dependency azureml-dataprep package. You can then use the Azure Machine Learning datastore fsspec implementation.
The Azure Machine Learning datastore fsspec implementation automatically handles the credential/identity passthrough that the Azure Machine Learning datastore uses. You can avoid both account key exposure in your scripts and extra sign-in procedures on a compute instance.
For example, you can directly use datastore URIs in Pandas. This example shows how to read a CSV file:
import pandas as pd

df = pd.read_csv("azureml://subscriptions/<subscription_ID>/resourcegroups/<resource_group_name>/workspaces/<workspace_name>/datastores/<datastore_name>/paths/<folder>/<filename>.csv")
df.head()
Tip
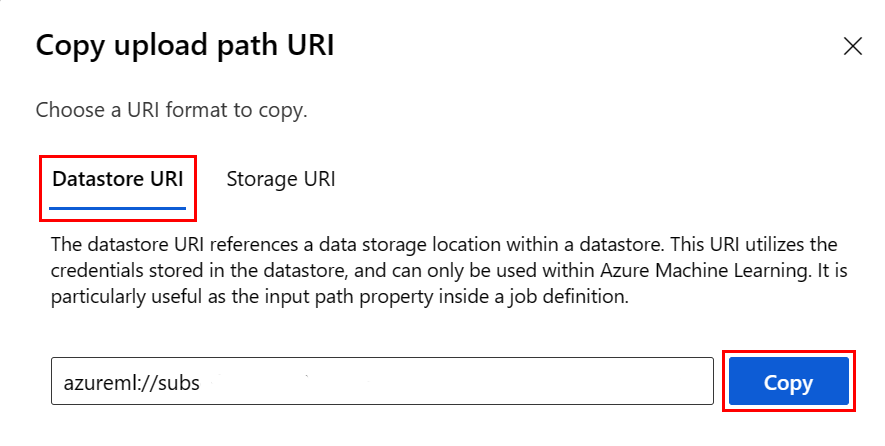
To avoid needing to remember the datastore URI format, you can copy and paste the datastore URI in the studio UI by taking these steps:
- Select Data in the left menu, and then select the Datastores tab.
- Select your datastore name, and then select Browse.
- Find the file or folder you want to read into Pandas, select the ellipsis (...) next to it, and then select Copy URI. You can then select the datastore URI to copy into your notebook or script.
You can also instantiate an Azure Machine Learning filesystem to handle filesystem-like commands, like ls, glob, exists, and open.
- The
ls()method lists files in a specific directory. You can usels(),ls(.), andls (<folder_level_1>/<folder_level_2>)to list files. Both.and..are supported in relative paths. - The
glob()method supports*and**globbing. - The
exists()method returns a Boolean value that indicates whether a specified file exists in the current root directory. - The
open()method returns a file-like object that can be passed to any other library that expects to work with Python files. Your code can also use this object as if it were a normal Python file object. These file-like objects respect the use ofwithcontexts, as shown in this example:
from azureml.fsspec import AzureMachineLearningFileSystem

# Instantiate the filesystem by using the following URI.
fs = AzureMachineLearningFileSystem('azureml://subscriptions/<subscriptionID>/resourcegroups/<resource_group_name>/workspaces/<workspace_name>/datastores/<datastore_name>')

fs.ls() # List folders and files in datastore datastorename.

# Output example:
# folder1
# folder2
# file3.csv

# Use an open context.
with fs.open('./folder1/file1.csv') as f:
    # Do some process.
    process_file(f)
Upload files by using AzureMachineLearningFileSystem
from azureml.fsspec import AzureMachineLearningFileSystem
# Instantiate the filesystem by using the following URI.
fs = AzureMachineLearningFileSystem('azureml://subscriptions/<subscriptionID>/resourcegroups/<resource_group_name>/workspaces/<workspace_name>/datastores/<datastore_name>/paths/')

# You can set recursive to False to upload a file.
fs.upload(lpath='data/upload_files/crime-spring.csv', rpath='data/fsspec', recursive=False, **{'overwrite': 'MERGE_WITH_OVERWRITE'})

# You need to set recursive to True to upload a folder.
fs.upload(lpath='data/upload_folder/', rpath='data/fsspec_folder', recursive=True, **{'overwrite': 'MERGE_WITH_OVERWRITE'})
lpath is the local path, and rpath is the remote path.
If the folders you specify in rpath don't exist, the method creates the folders for you.
The method supports three overwrite modes:
- APPEND. If a file with the same name exists in the destination path, APPEND keeps the original file.
- FAIL_ON_FILE_CONFLICT. If a file with the same name exists in the destination path, FAIL_ON_FILE_CONFLICT throws an error.
- MERGE_WITH_OVERWRITE. If a file with the same name exists in the destination path, MERGE_WITH_OVERWRITE overwrites that existing file with the new file.
Download files by using AzureMachineLearningFileSystem
# You can set recursive to False to download a file.
# The downloading overwrite option is determined by the local system. It's MERGE_WITH_OVERWRITE.
fs.download(rpath='data/fsspec/crime-spring.csv', lpath='data/download_files/', recursive=False)

# You need to set recursive to True to download a folder.
fs.download(rpath='data/fsspec_folder', lpath='data/download_folder/', recursive=True)
Examples
These examples show how to use the filesystem spec in common scenarios.
Read a single CSV file into Pandas
You can read a single CSV file into Pandas by using this code:
import pandas as pd

df = pd.read_csv("azureml://subscriptions/<subscription_ID>/resourcegroups/<resource_group_name>/workspaces/<workspace_name>/datastores/<datastore_name>/paths/<folder>/<file_name>.csv")
Read a folder of CSV files into Pandas
The Pandas read_csv() method doesn't support reading a folder of CSV files. To handle this limitation, use glob to get the CSV paths, and concatenate them to a data frame with the Pandas concat() method. The next code sample shows how to achieve this concatenation by using the Azure Machine Learning filesystem:
import pandas as pd
from azureml.fsspec import AzureMachineLearningFileSystem

# Define the URI. Update <> placeholders.
uri = 'azureml://subscriptions/<subscription_ID>/resourcegroups/<resource_group_name>/workspaces/<workspace_name>/datastores/<datastore_name>'

# Create the filesystem.
fs = AzureMachineLearningFileSystem(uri)

# Append .csv files in the folder to a list.
dflist = []
for path in fs.glob('/<folder>/*.csv'):
    with fs.open(path) as f:
        dflist.append(pd.read_csv(f))

# Concatenate data frames.
df = pd.concat(dflist)
df.head()
Reading CSV files into Dask
This example shows how to read a CSV file into a Dask data frame:
import dask.dd as dd

df = dd.read_csv("azureml://subscriptions/<subscription_ID>/resourcegroups/<resource_group_name>/workspaces/<workspace_name>/datastores/<datastore_name>/paths/<folder>/<file_name>.csv")
df.head()
Read a folder of parquet files into Pandas
During an ETL process, Parquet files are typically written to a folder. The process can then emit files relevant to the ETL, such as progress, commits, and other metadata. This example shows files created from an ETL process (files beginning with _) which then produce a Parquet file of data.
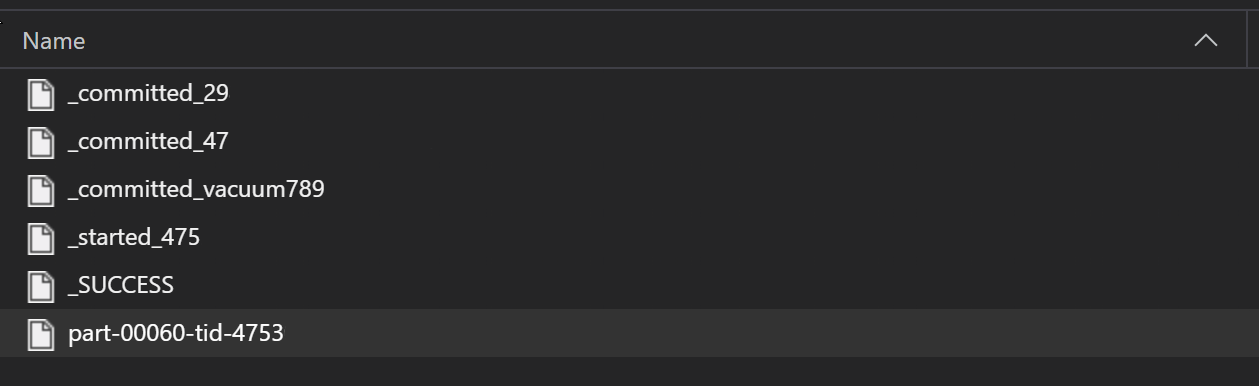
In these scenarios, you only read the Parquet files in the folder. You ignore the ETL process files. This code sample shows how glob patterns can read only Parquet files in a folder:
import pandas as pd
from azureml.fsspec import AzureMachineLearningFileSystem

# Define the URI. Update <> placeholders.
uri = 'azureml://subscriptions/<subscription_ID>/resourcegroups/<resource_group_name>/workspaces/<workspace_name>/datastores/<datastore_name>'

# Create the filesystem.
fs = AzureMachineLearningFileSystem(uri)

# Append Parquet files in folder to a list.
dflist = []
for path in fs.glob('/<folder>/*.parquet'):
    with fs.open(path) as f:
        dflist.append(pd.read_parquet(f))

# Concatenate data frames.
df = pd.concat(dflist)
df.head()
Accessing data from your Azure Databricks filesystem
The Filesystem spec (fsspec) has a range of known implementations, including the Databricks Filesystem (dbfs).
To access data from the dbfs resource, you need:
- The instance name, in the form of
adb-<number>.<number>.azuredatabricks.net. You can find this value in the URL of your Azure Databricks workspace. - A personal access token. For more information about personal access token creation, see Authenticate with Azure Databricks personal access tokens (legacy).
With these values, create an environment variable for the PAT token on your compute instance:
export ADB_PAT=<personal_access_token>
You can then access data in Pandas, as shown in this example:
import os
import pandas as pd

pat = os.getenv(ADB_PAT)
path_on_dbfs = '<absolute_path_on_dbfs>' # e.g. /folder/subfolder/file.csv

storage_options = {
    'instance':'adb-<number>.<number>.azuredatabricks.net',
    'token': pat
}

df = pd.read_csv(f'dbfs://{path_on_dbfs}', storage_options=storage_options)
Reading images with pillow
from PIL import Image
from azureml.fsspec import AzureMachineLearningFileSystem

# Define the URI. Update <> placeholders.
uri = 'azureml://subscriptions/<subscription_ID>/resourcegroups/<resource_group_name>/workspaces/<workspace_name>/datastores/<datastore_name>'

# Create the filesystem.
fs = AzureMachineLearningFileSystem(uri)

with fs.open('/<folder>/<image.jpeg>') as f:
    img = Image.open(f)
    img.show()
PyTorch custom dataset example
In this example, you create a PyTorch custom dataset for processing images. In this scenario, an annotations file (in CSV format) exists, with this overall structure:
image_path, label
0/image0.png, label0
0/image1.png, label0
1/image2.png, label1
1/image3.png, label1
2/image4.png, label2
2/image5.png, label2
Subfolders store these images, according to their labels:
/
└── 📁images
    ├── 📁0
    │   ├── 📷image0.png
    │   └── 📷image1.png
    ├── 📁1
    │   ├── 📷image2.png
    │   └── 📷image3.png
    └── 📁2
        ├── 📷image4.png
        └── 📷image5.png
A custom PyTorch Dataset class must implement three functions: __init__, __len__, and __getitem__, as shown here:
import os
import pandas as pd
from PIL import Image
from torch.utils.data import Dataset

class CustomImageDataset(Dataset):
    def __init__(self, filesystem, annotations_file, img_dir, transform=None, target_transform=None):
        self.fs = filesystem
        f = filesystem.open(annotations_file)
        self.img_labels = pd.read_csv(f)
        f.close()
        self.img_dir = img_dir
        self.transform = transform
        self.target_transform = target_transform

    def __len__(self):
        return len(self.img_labels)

    def __getitem__(self, idx):
        img_path = os.path.join(self.img_dir, self.img_labels.iloc[idx, 0])
        f = self.fs.open(img_path)
        image = Image.open(f)
        f.close()
        label = self.img_labels.iloc[idx, 1]
        if self.transform:
            image = self.transform(image)
        if self.target_transform:
            label = self.target_transform(label)
        return image, label
You can then instantiate the dataset, as shown here:
from azureml.fsspec import AzureMachineLearningFileSystem
from torch.utils.data import DataLoader

# Define the URI. Update <> placeholders.
uri = 'azureml://subscriptions/<subscription_ID>/resourcegroups/<resource_group_name>/workspaces/<workspace_name>/datastores/<datastore_name>'

# Create the filesystem.
fs = AzureMachineLearningFileSystem(uri)

# Create the dataset.
training_data = CustomImageDataset(
    filesystem=fs,
    annotations_file='/annotations.csv',
    img_dir='/<path_to_images>/'
)

# Prepare your data for training with DataLoaders.
train_dataloader = DataLoader(training_data, batch_size=64, shuffle=True)
Materialize data into Pandas by using mltable library
The mltable library can also help you access data in cloud storage. To read data into Pandas by using mltable, use the following general format:
import mltable

# Define a path, folder, or pattern.
path = {
    'file': '<supported_path>'
    # alternatives
    # 'folder': '<supported_path>'
    # 'pattern': '<supported_path>'
}

# Create an mltable from paths.
tbl = mltable.from_delimited_files(paths=[path])
# alternatives
# tbl = mltable.from_parquet_files(paths=[path])
# tbl = mltable.from_json_lines_files(paths=[path])
# tbl = mltable.from_delta_lake(paths=[path])

# Materialize to Pandas.
df = tbl.to_pandas_dataframe()
df.head()
Supported paths
The mltable library supports reading tabular data from different path types:
| Location | Examples |
|---|---|
| A path on your local computer | ./home/username/data/my_data |
| A path on a public HTTP(S) server | https://raw.githubusercontent.com/pandas-dev/pandas/main/doc/data/titanic.csv |
| A path on Azure Storage | wasbs://<container_name>@<account_name>.blob.core.windows.net/<path> abfss://<file_system>@<account_name>.dfs.core.windows.net/<path> |
| A long-form Azure Machine Learning datastore | azureml://subscriptions/<subscription_ID>/resourcegroups/<resource_group_name>/workspaces/<workspace_name>/datastores/<name>/paths/<path> |
Note
For paths on Azure Storage and Azure Machine Learning datastores, mltable uses credential passthrough. If you don't have permission to access the data on the underlying storage, you can't access the data.
Files, folders, and globs
mltable supports reading from:
- Files. For example,
abfss://<file_system>@<account_name>.dfs.core.windows.net/my-csv.csv. - Folders. For example,
abfss://<file_system>@<account_name>.dfs.core.windows.net/my-folder/. - glob patterns. For example,
abfss://<file_system>@<account_name>.dfs.core.windows.net/my-folder/*.csv. - A combination of files, folders, and/or glob patterns.
mltable enables data materialization into a single dataframe from a combination of local and cloud storage resources, and from combinations of files, folders, and globs. For example:
path1 = {
    'file': 'abfss://filesystem@account1.dfs.core.windows.net/my-csv.csv'
}

path2 = {
    'folder': './home/username/data/my_data'
}

path3 = {
    'pattern': 'abfss://filesystem@account2.dfs.core.windows.net/folder/*.csv'
}

tbl = mltable.from_delimited_files(paths=[path1, path2, path3])
Supported file formats
mltable supports the following file formats.
- Delimited text (for example, CSV files):
mltable.from_delimited_files(paths=[path]) - Parquet:
mltable.from_parquet_files(paths=[path]) - Delta:
mltable.from_delta_lake(paths=[path]) - JSON Lines format:
mltable.from_json_lines_files(paths=[path])
Examples
Read a CSV file
Replace the placeholders (<>) in this code snippet with your values:
import mltable

path = {
    'file': 'abfss://<filesystem>@<account>.dfs.core.windows.net/<folder>/<file_name>.csv'
}

tbl = mltable.from_delimited_files(paths=[path])
df = tbl.to_pandas_dataframe()
df.head()
Read Parquet files in a folder
This example shows how mltable can use glob patterns, like wildcards, to ensure that only Parquet files are read.
Replace the placeholders (<>) in this code snippet with your values:
import mltable

path = {
    'pattern': 'abfss://<filesystem>@<account>.dfs.core.windows.net/<folder>/*.parquet'
}

tbl = mltable.from_parquet_files(paths=[path])
df = tbl.to_pandas_dataframe()
df.head()
Reading data assets
This section shows how to access your Azure Machine Learning data assets in Pandas.
Table asset
If you previously created a table asset in Azure Machine Learning (an mltable or a V1 TabularDataset), you can load that table asset into Pandas by using this code:
import mltable
from azure.ai.ml import MLClient
from azure.identity import DefaultAzureCredential

ml_client = MLClient.from_config(credential=DefaultAzureCredential())
data_asset = ml_client.data.get(name="<name_of_asset>", version="<version>")

tbl = mltable.load(f'azureml:/{data_asset.id}')
df = tbl.to_pandas_dataframe()
df.head()
File asset
If you have registered a file asset (a CSV file, for example), you can read that asset into a Pandas data frame by using this code:
import mltable
from azure.ai.ml import MLClient
from azure.identity import DefaultAzureCredential

ml_client = MLClient.from_config(credential=DefaultAzureCredential())
data_asset = ml_client.data.get(name="<name_of_asset>", version="<version>")

path = {
    'file': data_asset.path
}

tbl = mltable.from_delimited_files(paths=[path])
df = tbl.to_pandas_dataframe()
df.head()
Folder asset
If you have registered a folder asset (uri_folder or a V1 FileDataset), for example, a folder containing a CSV file, you can read that asset into a Pandas data frame by using this code:
import mltable
from azure.ai.ml import MLClient
from azure.identity import DefaultAzureCredential

ml_client = MLClient.from_config(credential=DefaultAzureCredential())
data_asset = ml_client.data.get(name="<name_of_asset>", version="<version>")

path = {
    'folder': data_asset.path
}

tbl = mltable.from_delimited_files(paths=[path])
df = tbl.to_pandas_dataframe()
df.head()
Reading and processing large data volumes by using Pandas
Tip
Pandas isn't designed to handle large datasets. Pandas can only process data that fits into the memory of the compute instance.
For large datasets, use Azure Machine Learning managed Spark. This service provides the PySpark Pandas API.
You might want to iterate quickly on a smaller subset of a large dataset before scaling up to a remote asynchronous job. mltable provides functionality to get samples of large data via the take_random_sample method:
import mltable

path = {
    'file': 'https://raw.githubusercontent.com/pandas-dev/pandas/main/doc/data/titanic.csv'
}

tbl = mltable.from_delimited_files(paths=[path])
# Take a random 30% sample of the data.
tbl = tbl.take_random_sample(probability=.3)
df = tbl.to_pandas_dataframe()
df.head()
You can also take subsets of large data by using these operations:
Downloading data by using the azcopy utility
Use the azcopy utility to download data into the local file system of the SSD of your host (local machine, cloud VM, Azure Machine Learning compute instance, and so on). The azcopy utility, which is preinstalled on an Azure Machine Learning compute instance, handles the data download. If you don't use an Azure Machine Learning compute instance or a Data Science Virtual Machine (DSVM), you might need to install azcopy. For more information, see azcopy.
Caution
Don't download data into the /home/azureuser/cloudfiles/code location on a compute instance. This location is designed to store notebook and code artifacts, not data. Reading data from this location incurs significant performance overhead during training. Instead, store data in the home/azureuser location, which is the local SSD of the compute node.
Open a terminal and create a new directory, for example:
mkdir /home/azureuser/data
Sign-in to azcopy:
azcopy login
You can now copy data by using a storage URI:
SOURCE=https://<account_name>.blob.core.windows.net/<container>/<path>
DEST=/home/azureuser/data
azcopy cp $SOURCE $DEST