Add users to your data labeling project
This article shows how to add users to your data labeling project so that they can label data, but can't see the rest of your workspace. These steps can add anyone to your project, whether or not they are from a data labeling vendor company.
Prerequisites
- An Azure subscription. If you don't have an Azure subscription, create a free account before you begin.
- An Azure Machine Learning workspace. See Create workspace resources.
You need certain permission levels to follow the steps in this article. If you can't follow one of the steps because of a permissions issue, contact your administrator to request the appropriate permissions.
- To add a guest user, your organization's external collaboration settings needs the correct configuration to allow you to invite guests.
- To add a custom role, you must have
Microsoft.Authorization/roleAssignments/writepermissions for your subscription - for example, User Access Administrator or Owner. - To add users to your workspace, you must be an Owner of the workspace.
Add custom role
When you add a user to your project, you assign them a role to define their level of access. Before you add users, define the roles you want to use.
There is a built-in role for data labeling, scoped only to labeling data. If you want to use the built-in role for all your labelers, skip this section and proceed to add guest user.
The following custom roles give other levels of access for a data labeling project. Define all the roles you want to use before moving on to add the users.
To add a custom role, you must have Microsoft.Authorization/roleAssignments/write permissions for your subscription - for example, User Access Administrator.
Access the resource group for your workspace in the Azure portal.
- Open your workspace in Azure Machine Learning studio.
- Open the menu on the top right, and select View all properties in Azure Portal. You use the Azure portal for the remaining steps in this section.
- Select the Resource group link in the middle of the page.
Add a custom role
- On the left, select Access control (IAM).
- At the top, select + Add > Add custom role.
- For the Custom role name, type the name you want to use. For example, Labeling team lead.
- In the Description box, add a description. For example, Team leader for labeling projects.
- Select Start from JSON.
- Ignore the Select a file entry, even though it is starred. You'll create the JSON in a future step.
- At the bottom of the page, select Next.
Skip tabs.
- Don't do anything for the Permissions tab. You add permissions in a later step. Select Next.
- The Assignable scopes tab shows your subscription information. Select Next.
Edit the JSON definition.
In the JSON tab, above the edit box, select Edit.
Select lines starting with "actions:" and "notActions:".
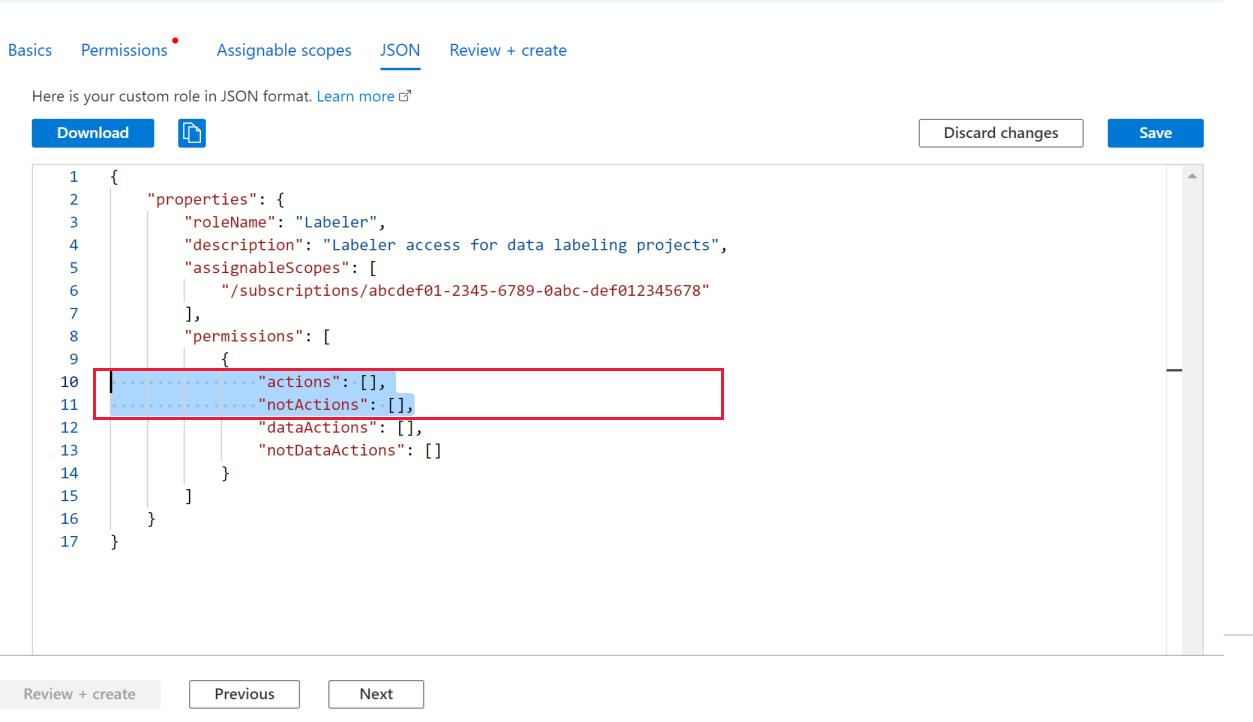
Replace these two lines with the
ActionsandNotActionsfrom the appropriate role in the following tabs. Make sure to copy fromActionsthrough the closing bracket,],.The labeling team lead allows you to review and reject the labeled dataset and view labeling insights. In addition to it, this role also allows you to perform the role of a labeler.
labeling_team_lead_custom_role.json :
{ "Name": "Labeling Team Lead", "IsCustom": true, "Description": "Team lead for Labeling Projects", "Actions": [ "Microsoft.MachineLearningServices/workspaces/read", "Microsoft.MachineLearningServices/workspaces/labeling/labels/read", "Microsoft.MachineLearningServices/workspaces/labeling/labels/write", "Microsoft.MachineLearningServices/workspaces/labeling/labels/reject/action", "Microsoft.MachineLearningServices/workspaces/labeling/labels/update/action", "Microsoft.MachineLearningServices/workspaces/labeling/projects/read", "Microsoft.MachineLearningServices/workspaces/labeling/projects/summary/read" ], "NotActions": [ "Microsoft.MachineLearningServices/workspaces/labeling/projects/write", "Microsoft.MachineLearningServices/workspaces/labeling/projects/delete", "Microsoft.MachineLearningServices/workspaces/labeling/export/action" ], "AssignableScopes": [ "/subscriptions/<subscriptionId>" ] }Select Save at the top of the edit box to save your changes.
Important
Don't select Next until you've saved your edits.
After you save your edits, select Next.
Select Create to create the custom role.
Select OK.
Add guest user
If your labelers are outside of your organization, add them, so they can access your workspace. If labelers are already inside your organization, skip this step and proceed to add users to your workspace.
To add a guest user, your organization's external collaboration settings need the correct configuration to allow you to invite guests.
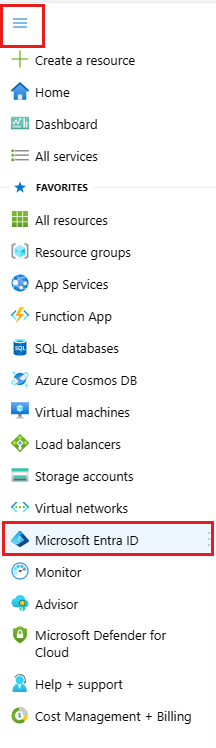
In Azure portal, in the top-left corner, expand the menu and select Microsoft Entra ID.
On the left, select Users.
At the top, select New user.
Select Invite external user.
Fill in the name and email address for the user.
Add a message for the new user.
At the bottom of the page, select Invite.

Repeat these steps for each of the guest users. Or use the link at the bottom of the Invite user box to invite multiple users in bulk.
Tip
Inform your labelers that they will receive an email. They must accept the invitation in order to gain access to your project.
Add users to your workspace
Once you have the appropriate users in your system and the role(s) defined, add the users to your workspace so that they can access your data labeling project.
To add users to your workspace, you must be an owner of the workspace.
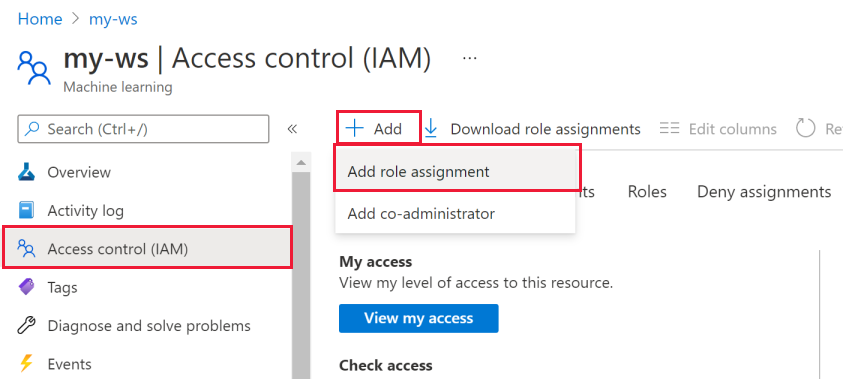
Access your workspace in the Azure portal.
- Open your workspace in Azure Machine Learning studio.
- Open the menu on the top right, and select View all properties in Azure Portal. You use the Azure portal for the remaining steps in this section.
On the left, select Access control (IAM).
At the top, select + Add > Add role assignment.
Select the role you want to use from the list. Use Search if necessary to find it.
Select Next.
In the middle of the page, next to Members, select the + Select members link.
Select each of the users you want to add. Use Search if necessary to find them.
At the bottom of the page, select the Select button.
Select Next.
Verify that the Role is correct, and that your users appear in the Members list.
Select Review + assign.
For your labelers
Once labelers have been added as users in the workspace, they can begin labeling in your project. However, they still need information from you to access the project.
Be sure to create your labeling project before you contact your labelers.
Send the following information to your labelers, after you fill in your workspace and project names:
- Accept the invite from Microsoft Invitations (invites@microsoft.com).
- Follow the steps on the web page after you accept. Don't worry if, at the end, you find yourself on a page that says you don't have any apps.
- Open Azure Machine Learning studio.
- Use the dropdown to select the workspace <workspace-name>.
- Select the Label data tool for <project-name>.

- For more information about how to label data, see Labeling images and text documents.
Related content
Feedback
Coming soon: Throughout 2024 we will be phasing out GitHub Issues as the feedback mechanism for content and replacing it with a new feedback system. For more information see: https://aka.ms/ContentUserFeedback.
Submit and view feedback for