Note
Access to this page requires authorization. You can try signing in or changing directories.
Access to this page requires authorization. You can try changing directories.
APPLIES TO:
 Azure CLI ml extension v2 (current)
Python SDK azure-ai-ml v2 (current)
Azure CLI ml extension v2 (current)
Python SDK azure-ai-ml v2 (current)
In this article, you learn how to train computer vision models on image data with automated ML. You can train models using the Azure Machine Learning CLI extension v2 or the Azure Machine Learning Python SDK v2.
Automated ML supports model training for computer vision tasks like image classification, object detection, and instance segmentation. Authoring AutoML models for computer vision tasks is currently supported via the Azure Machine Learning Python SDK. The resulting experimentation trials, models, and outputs are accessible from the Azure Machine Learning studio UI. Learn more about automated ml for computer vision tasks on image data.
Prerequisites
APPLIES TO:
Azure CLI ml extension v2 (current)
- An Azure Machine Learning workspace. To create the workspace, see Create workspace resources.
- Install and set up CLI (v2) and make sure you install the
mlextension.
Select your task type
Automated ML for images supports the following task types:
| Task type | AutoML Job syntax |
|---|---|
| image classification | CLI v2: image_classification SDK v2: image_classification() |
| image classification multi-label | CLI v2: image_classification_multilabel SDK v2: image_classification_multilabel() |
| image object detection | CLI v2: image_object_detection SDK v2: image_object_detection() |
| image instance segmentation | CLI v2: image_instance_segmentation SDK v2: image_instance_segmentation() |
APPLIES TO:
Azure CLI ml extension v2 (current)
This task type is a required parameter and can be set using the task key.
For example:
task: image_object_detection
Training and validation data
In order to generate computer vision models, you need to bring labeled image data as input for model training in the form of an MLTable. You can create an MLTable from training data in JSONL format.
If your training data is in a different format (like, pascal VOC or COCO), you can apply the helper scripts included with the sample notebooks to convert the data to JSONL. Learn more about how to prepare data for computer vision tasks with automated ML.
Note
The training data needs to have at least 10 images in order to be able to submit an AutoML job.
Warning
Creation of MLTable from data in JSONL format is supported using the SDK and CLI only, for this capability. Creating the MLTable via UI is not supported at this time.
JSONL schema samples
The structure of the TabularDataset depends upon the task at hand. For computer vision task types, it consists of the following fields:
| Field | Description |
|---|---|
image_url |
Contains filepath as a StreamInfo object |
image_details |
Image metadata information consists of height, width, and format. This field is optional and hence may or may not exist. |
label |
A json representation of the image label, based on the task type. |
The following code is a sample JSONL file for image classification:
{
      "image_url": "azureml://subscriptions/<my-subscription-id>/resourcegroups/<my-resource-group>/workspaces/<my-workspace>/datastores/<my-datastore>/paths/image_data/Image_01.png",
      "image_details":
      {
          "format": "png",
          "width": "2230px",
          "height": "4356px"
      },
      "label": "cat"
  }
  {
      "image_url": "azureml://subscriptions/<my-subscription-id>/resourcegroups/<my-resource-group>/workspaces/<my-workspace>/datastores/<my-datastore>/paths/image_data/Image_02.jpeg",
      "image_details":
      {
          "format": "jpeg",
          "width": "3456px",
          "height": "3467px"
      },
      "label": "dog"
  }
The following code is a sample JSONL file for object detection:
{
    "image_url": "azureml://subscriptions/<my-subscription-id>/resourcegroups/<my-resource-group>/workspaces/<my-workspace>/datastores/<my-datastore>/paths/image_data/Image_01.png",
    "image_details":
    {
        "format": "png",
        "width": "2230px",
        "height": "4356px"
    },
    "label":
    {
        "label": "cat",
        "topX": "1",
        "topY": "0",
        "bottomX": "0",
        "bottomY": "1",
        "isCrowd": "true",
    }
}
{
    "image_url": "azureml://subscriptions/<my-subscription-id>/resourcegroups/<my-resource-group>/workspaces/<my-workspace>/datastores/<my-datastore>/paths/image_data/Image_02.png",
    "image_details":
    {
        "format": "jpeg",
        "width": "1230px",
        "height": "2356px"
    },
    "label":
    {
        "label": "dog",
        "topX": "0",
        "topY": "1",
        "bottomX": "0",
        "bottomY": "1",
        "isCrowd": "false",
    }
}
Consume data
Once your data is in JSONL format, you can create training and validation MLTable as shown below.
paths:
  - file: ./train_annotations.jsonl
transformations:
  - read_json_lines:
        encoding: utf8
        invalid_lines: error
        include_path_column: false
  - convert_column_types:
      - columns: image_url
        column_type: stream_info
Automated ML doesn't impose any constraints on training or validation data size for computer vision tasks. Maximum dataset size is only limited by the storage layer behind the dataset (Example: blob store). There's no minimum number of images or labels. However, we recommend starting with a minimum of 10-15 samples per label to ensure the output model is sufficiently trained. The higher the total number of labels/classes, the more samples you need per label.
APPLIES TO:
Azure CLI ml extension v2 (current)
Training data is a required parameter and is passed in using the training_data key. You can optionally specify another MLtable as a validation data with the validation_data key. If no validation data is specified, 20% of your training data is used for validation by default, unless you pass validation_data_size argument with a different value.
Target column name is a required parameter and used as target for supervised ML task. It's passed in using the target_column_name key. For example,
target_column_name: label
training_data:
  path: data/training-mltable-folder
  type: mltable
validation_data:
  path: data/validation-mltable-folder
  type: mltable
Compute to run experiment
Provide a compute target for automated ML to conduct model training. Automated ML models for computer vision tasks require GPU SKUs and support NC and ND families. We recommend the NCsv3-series (with v100 GPUs) for faster training. A compute target with a multi-GPU VM SKU uses multiple GPUs to also speed up training. Additionally, when you set up a compute target with multiple nodes you can conduct faster model training through parallelism when tuning hyperparameters for your model.
Note
If you are using a compute instance as your compute target, please make sure that multiple AutoML jobs are not run at the same time. Also, please make sure that max_concurrent_trials is set to 1 in your job limits.
The compute target is passed in using the compute parameter. For example:
APPLIES TO:
Azure CLI ml extension v2 (current)
compute: azureml:gpu-cluster
Configure experiments
For computer vision tasks, you can launch either individual trials, manual sweeps or automatic sweeps. We recommend starting with an automatic sweep to get a first baseline model. Then, you can try out individual trials with certain models and hyperparameter configurations. Finally, with manual sweeps you can explore multiple hyperparameter values near the more promising models and hyperparameter configurations. This three step workflow (automatic sweep, individual trials, manual sweeps) avoids searching the entirety of the hyperparameter space, which grows exponentially in the number of hyperparameters.
Automatic sweeps can yield competitive results for many datasets. Additionally, they don't require advanced knowledge of model architectures, they take into account hyperparameter correlations and they work seamlessly across different hardware setups. All these reasons make them a strong option for the early stage of your experimentation process.
Primary metric
An AutoML training job uses a primary metric for model optimization and hyperparameter tuning. The primary metric depends on the task type as shown below; other primary metric values are currently not supported.
- Accuracy for image classification
- Intersection over union for image classification multilabel
- Mean average precision for image object detection
- Mean average precision for image instance segmentation
Job limits
You can control the resources spent on your AutoML Image training job by specifying the timeout_minutes, max_trials and the max_concurrent_trials for the job in limit settings as described in the below example.
| Parameter | Detail |
|---|---|
max_trials |
Parameter for maximum number of trials to sweep. Must be an integer between 1 and 1000. When exploring just the default hyperparameters for a given model architecture, set this parameter to 1. The default value is 1. |
max_concurrent_trials |
Maximum number of trials that can run concurrently. If specified, must be an integer between 1 and 100. The default value is 1. NOTE: max_concurrent_trials is capped at max_trials internally. For example, if user sets max_concurrent_trials=4, max_trials=2, values would be internally updated as max_concurrent_trials=2, max_trials=2. |
timeout_minutes |
The amount of time in minutes before the experiment terminates. If none specified, default experiment timeout_minutes is seven days (maximum 60 days) |
APPLIES TO:
Azure CLI ml extension v2 (current)
limits:
  timeout_minutes: 60
  max_trials: 10
  max_concurrent_trials: 2
Automatically sweeping model hyperparameters (AutoMode)
Important
This feature is currently in public preview. This preview version is provided without a service-level agreement. Certain features might not be supported or might have constrained capabilities. For more information, see Supplemental Terms of Use for Microsoft Azure Previews.
It's hard to predict the best model architecture and hyperparameters for a dataset. Also, in some cases the human time allocated to tuning hyperparameters may be limited. For computer vision tasks, you can specify any number of trials and the system automatically determines the region of the hyperparameter space to sweep. You don't have to define a hyperparameter search space, a sampling method or an early termination policy.
Triggering AutoMode
You can run automatic sweeps by setting max_trials to a value greater than 1 in limits and by not specifying the search space, sampling method and termination policy. We call this functionality AutoMode; please see the following example.
APPLIES TO:
Azure CLI ml extension v2 (current)
limits:
  max_trials: 10
  max_concurrent_trials: 2
A number of trials between 10 and 20 likely works well on many datasets. The time budget for the AutoML job can still be set, but we recommend doing this only if each trial may take a long time.
Warning
Launching automatic sweeps via the UI is not supported at this time.
Individual trials
In individual trials, you directly control the model architecture and hyperparameters. The model architecture is passed via the model_name parameter.
Supported model architectures
The following table summarizes the supported legacy models for each computer vision task. Using only these legacy models will trigger runs using the legacy runtime (where each individual run or trial is submitted as a command job). Please see below for HuggingFace and MMDetection support.
| Task | model architectures | String literal syntaxdefault_model* denoted with * |
|---|---|---|
| Image classification (multi-class and multi-label) |
MobileNet: Light-weighted models for mobile applications ResNet: Residual networks ResNeSt: Split attention networks SE-ResNeXt50: Squeeze-and-Excitation networks ViT: Vision transformer networks |
mobilenetv2 resnet18 resnet34 resnet50 resnet101 resnet152 resnest50 resnest101 seresnext vits16r224 (small) vitb16r224* (base) vitl16r224 (large) |
| Object detection | YOLOv5: One stage object detection model Faster RCNN ResNet FPN: Two stage object detection models RetinaNet ResNet FPN: address class imbalance with Focal Loss Note: Refer to model_size hyperparameter for YOLOv5 model sizes. |
yolov5* fasterrcnn_resnet18_fpn fasterrcnn_resnet34_fpn fasterrcnn_resnet50_fpn fasterrcnn_resnet101_fpn fasterrcnn_resnet152_fpn retinanet_resnet50_fpn |
| Instance segmentation | MaskRCNN ResNet FPN | maskrcnn_resnet18_fpn maskrcnn_resnet34_fpn maskrcnn_resnet50_fpn* maskrcnn_resnet101_fpn maskrcnn_resnet152_fpn |
Supported model architectures - HuggingFace and MMDetection
With the new backend that runs on Azure Machine Learning pipelines, you can additionally use any image classification model from the HuggingFace Hub which is part of the transformers library (such as microsoft/beit-base-patch16-224), as well as any object detection or instance segmentation model from the MMDetection Version 3.1.0 Model Zoo (such as atss_r50_fpn_1x_coco).
In addition to supporting any model from HuggingFace Transfomers and MMDetection 3.1.0, we also offer a list of curated models from these libraries in the azureml registry. These curated models have been tested thoroughly and use default hyperparameters selected from extensive benchmarking to ensure effective training. The table below summarizes these curated models.
| Task | model architectures | String literal syntax |
|---|---|---|
| Image classification (multi-class and multi-label) |
BEiT ViT DeiT SwinV2 |
microsoft/beit-base-patch16-224-pt22k-ft22kgoogle/vit-base-patch16-224facebook/deit-base-patch16-224microsoft/swinv2-base-patch4-window12-192-22k |
| Object Detection | Sparse R-CNN Deformable DETR VFNet YOLOF |
mmd-3x-sparse-rcnn_r50_fpn_300-proposals_crop-ms-480-800-3x_cocommd-3x-sparse-rcnn_r101_fpn_300-proposals_crop-ms-480-800-3x_coco mmd-3x-deformable-detr_refine_twostage_r50_16xb2-50e_coco mmd-3x-vfnet_r50-mdconv-c3-c5_fpn_ms-2x_coco mmd-3x-vfnet_x101-64x4d-mdconv-c3-c5_fpn_ms-2x_coco mmd-3x-yolof_r50_c5_8x8_1x_coco |
| Instance Segmentation | Mask R-CNN | mmd-3x-mask-rcnn_swin-t-p4-w7_fpn_1x_coco |
We constantly update the list of curated models. You can get the most up-to-date list of the curated models for a given task using the Python SDK:
credential = DefaultAzureCredential()
ml_client = MLClient(credential, registry_name="azureml")

models = ml_client.models.list()
classification_models = []
for model in models:
    model = ml_client.models.get(model.name, label="latest")
    if model.tags['task'] == 'image-classification': # choose an image task
        classification_models.append(model.name)

classification_models
Output:
['google-vit-base-patch16-224',
 'microsoft-swinv2-base-patch4-window12-192-22k',
 'facebook-deit-base-patch16-224',
 'microsoft-beit-base-patch16-224-pt22k-ft22k']
Using any HuggingFace or MMDetection model will trigger runs using pipeline components. If both legacy and HuggingFace/MMdetection models are used, all runs/trials will be triggered using components.
In addition to controlling the model architecture, you can also tune hyperparameters used for model training. While many of the hyperparameters exposed are model-agnostic, there are instances where hyperparameters are task-specific or model-specific. Learn more about the available hyperparameters for these instances.
APPLIES TO:
Azure CLI ml extension v2 (current)
If you wish to use the default hyperparameter values for a given architecture (say yolov5), you can specify it using the model_name key in the training_parameters section. For example,
training_parameters:
    model_name: yolov5
Manually sweeping model hyperparameters
When training computer vision models, model performance depends heavily on the hyperparameter values selected. Often, you might want to tune the hyperparameters to get optimal performance. For computer vision tasks, you can sweep hyperparameters to find the optimal settings for your model. This feature applies the hyperparameter tuning capabilities in Azure Machine Learning. Learn how to tune hyperparameters.
APPLIES TO:
Azure CLI ml extension v2 (current)
search_space:
  - model_name:
      type: choice
      values: [yolov5]
    learning_rate:
      type: uniform
      min_value: 0.0001
      max_value: 0.01
    model_size:
      type: choice
      values: [small, medium]

  - model_name:
      type: choice
      values: [fasterrcnn_resnet50_fpn]
    learning_rate:
      type: uniform
      min_value: 0.0001
      max_value: 0.001
    optimizer:
      type: choice
      values: [sgd, adam, adamw]
    min_size:
      type: choice
      values: [600, 800]
Define the parameter search space
You can define the model architectures and hyperparameters to sweep in the parameter space. You can either specify a single model architecture or multiple ones.
- See Individual trials for the list of supported model architectures for each task type.
- See Hyperparameters for computer vision tasks hyperparameters for each computer vision task type.
- See details on supported distributions for discrete and continuous hyperparameters.
Sampling methods for the sweep
When sweeping hyperparameters, you need to specify the sampling method to use for sweeping over the defined parameter space. Currently, the following sampling methods are supported with the sampling_algorithm parameter:
| Sampling type | AutoML Job syntax |
|---|---|
| Random Sampling | random |
| Grid Sampling | grid |
| Bayesian Sampling | bayesian |
Note
Currently only random and grid sampling support conditional hyperparameter spaces.
Early termination policies
You can automatically end poorly performing trials with an early termination policy. Early termination improves computational efficiency, saving compute resources that would have been otherwise spent on less promising trials. Automated ML for images supports the following early termination policies using the early_termination parameter. If no termination policy is specified, all trials are run to completion.
| Early termination policy | AutoML Job syntax |
|---|---|
| Bandit policy | CLI v2: bandit SDK v2: BanditPolicy() |
| Median stopping policy | CLI v2: median_stopping SDK v2: MedianStoppingPolicy() |
| Truncation selection policy | CLI v2: truncation_selection SDK v2: TruncationSelectionPolicy() |
Learn more about how to configure the early termination policy for your hyperparameter sweep.
Note
For a complete sweep configuration sample, please refer to this tutorial.
You can configure all the sweep related parameters as shown in the following example.
APPLIES TO:
Azure CLI ml extension v2 (current)
sweep:
  sampling_algorithm: random
  early_termination:
    type: bandit
    evaluation_interval: 2
    slack_factor: 0.2
    delay_evaluation: 6
Fixed settings
You can pass fixed settings or parameters that don't change during the parameter space sweep as shown in the following example.
APPLIES TO:
Azure CLI ml extension v2 (current)
training_parameters:
  early_stopping: True
  evaluation_frequency: 1
Data augmentation
In general, deep learning model performance can often improve with more data. Data augmentation is a practical technique to amplify the data size and variability of a dataset, which helps to prevent overfitting and improve the model's generalization ability on unseen data. Automated ML applies different data augmentation techniques based on the computer vision task, before feeding input images to the model. Currently, there's no exposed hyperparameter to control data augmentations.
| Task | Impacted dataset | Data augmentation technique(s) applied |
|---|---|---|
| Image classification (multi-class and multi-label) | Training Validation & Test |
Random resize and crop, horizontal flip, color jitter (brightness, contrast, saturation, and hue), normalization using channel-wise ImageNet's mean and standard deviation Resize, center crop, normalization |
| Object detection, instance segmentation | Training Validation & Test |
Random crop around bounding boxes, expand, horizontal flip, normalization, resize Normalization, resize |
| Object detection using yolov5 | Training Validation & Test |
Mosaic, random affine (rotation, translation, scale, shear), horizontal flip Letterbox resizing |
Currently the augmentations defined above are applied by default for an Automated ML for image job. To provide control over augmentations, Automated ML for images exposes below two flags to turn-off certain augmentations. Currently, these flags are only supported for object detection and instance segmentation tasks.
- apply_mosaic_for_yolo: This flag is only specific to Yolo model. Setting it to False turns off the mosaic data augmentation, which is applied at the training time.
- apply_automl_train_augmentations: Setting this flag to false turns off the augmentation applied during training time for the object detection and instance segmentation models. For augmentations, see the details in the table above.
- For non-yolo object detection model and instance segmentation models, this flag turns off only the first three augmentations. For example: Random crop around bounding boxes, expand, horizontal flip. The normalization and resize augmentations are still applied regardless of this flag.
- For Yolo model, this flag turns off the random affine and horizontal flip augmentations.
These two flags are supported via advanced_settings under training_parameters and can be controlled in the following way.
APPLIES TO:
Azure CLI ml extension v2 (current)
training_parameters:
  advanced_settings: >
    {"apply_mosaic_for_yolo": false}
training_parameters:
  advanced_settings: >
    {"apply_automl_train_augmentations": false}
Note that these two flags are independent of each other and can also be used in combination using the following settings.
training_parameters:
 advanced_settings: >
   {"apply_automl_train_augmentations": false, "apply_mosaic_for_yolo": false}
In our experiments, we found that these augmentations help the model to generalize better. Therefore, when these augmentations are switched off, we recommend the users to combine them with other offline augmentations to get better results.
Incremental training (optional)
Once the training job is done, you can choose to further train the model by loading the trained model checkpoint. You can either use the same dataset or a different one for incremental training. If you are satisfied with the model, you can choose to stop training and use the current model.
Pass the checkpoint via job ID
You can pass the job ID that you want to load the checkpoint from.
APPLIES TO:
Azure CLI ml extension v2 (current)
training_parameters:
  checkpoint_run_id : "target_checkpoint_run_id"
Submit the AutoML job
APPLIES TO:
Azure CLI ml extension v2 (current)
To submit your AutoML job, you run the following CLI v2 command with the path to your .yml file, workspace name, resource group and subscription ID.
az ml job create --file ./hello-automl-job-basic.yml --workspace-name [YOUR_AZURE_WORKSPACE] --resource-group [YOUR_AZURE_RESOURCE_GROUP] --subscription [YOUR_AZURE_SUBSCRIPTION]
Outputs and evaluation metrics
The automated ML training jobs generates output model files, evaluation metrics, logs and deployment artifacts like the scoring file and the environment file. These files and metrics can be viewed from the outputs and logs and metrics tab of the child jobs.
Tip
Check how to navigate to the job results from the View job results section.
For definitions and examples of the performance charts and metrics provided for each job, see Evaluate automated machine learning experiment results.
Register and deploy model
Once the job completes, you can register the model that was created from the best trial (configuration that resulted in the best primary metric). You can either register the model after downloading or by specifying the azureml path with corresponding jobid. Note: When you want to change the inference settings that are described below you need to download the model and change settings.json and register using the updated model folder.
Get the best trial
APPLIES TO:
Azure CLI ml extension v2 (current)
CLI example not available, please use Python SDK.
register the model
Register the model either using the azureml path or your locally downloaded path.
APPLIES TO:
Azure CLI ml extension v2 (current)
az ml model create --name od-fridge-items-mlflow-model --version 1 --path azureml://jobs/$best_run/outputs/artifacts/outputs/mlflow-model/ --type mlflow_model --workspace-name [YOUR_AZURE_WORKSPACE] --resource-group [YOUR_AZURE_RESOURCE_GROUP] --subscription [YOUR_AZURE_SUBSCRIPTION]
After you register the model you want to use, you can deploy it using the managed online endpoint deploy-managed-online-endpoint
Configure online endpoint
APPLIES TO:
Azure CLI ml extension v2 (current)
$schema: https://azuremlschemas.azureedge.net/latest/managedOnlineEndpoint.schema.json
name: od-fridge-items-endpoint
auth_mode: key
Create the endpoint
Using the MLClient created earlier, we create the Endpoint in the workspace. This command starts the endpoint creation and returns a confirmation response while the endpoint creation continues.
APPLIES TO:
Azure CLI ml extension v2 (current)
az ml online-endpoint create --file .\create_endpoint.yml --workspace-name [YOUR_AZURE_WORKSPACE] --resource-group [YOUR_AZURE_RESOURCE_GROUP] --subscription [YOUR_AZURE_SUBSCRIPTION]
Configure online deployment
A deployment is a set of resources required for hosting the model that does the actual inferencing. We'll create a deployment for our endpoint using the ManagedOnlineDeployment class. You can use either GPU or CPU VM SKUs for your deployment cluster.
APPLIES TO:
Azure CLI ml extension v2 (current)
name: od-fridge-items-mlflow-deploy
endpoint_name: od-fridge-items-endpoint
model: azureml:od-fridge-items-mlflow-model@latest
instance_type: Standard_DS3_v2
instance_count: 1
liveness_probe:
    failure_threshold: 30
    success_threshold: 1
    timeout: 2
    period: 10
    initial_delay: 2000
readiness_probe:
    failure_threshold: 10
    success_threshold: 1
    timeout: 10
    period: 10
    initial_delay: 2000
Create the deployment
Using the MLClient created earlier, we'll now create the deployment in the workspace. This command will start the deployment creation and return a confirmation response while the deployment creation continues.
APPLIES TO:
Azure CLI ml extension v2 (current)
az ml online-deployment create --file .\create_deployment.yml --workspace-name [YOUR_AZURE_WORKSPACE] --resource-group [YOUR_AZURE_RESOURCE_GROUP] --subscription [YOUR_AZURE_SUBSCRIPTION]
update traffic:
By default the current deployment is set to receive 0% traffic. you can set the traffic percentage current deployment should receive. Sum of traffic percentages of all the deployments with one end point shouldn't exceed 100%.
APPLIES TO:
Azure CLI ml extension v2 (current)
az ml online-endpoint update --name 'od-fridge-items-endpoint' --traffic 'od-fridge-items-mlflow-deploy=100' --workspace-name [YOUR_AZURE_WORKSPACE] --resource-group [YOUR_AZURE_RESOURCE_GROUP] --subscription [YOUR_AZURE_SUBSCRIPTION]
Alternatively You can deploy the model from the Azure Machine Learning studio UI. Navigate to the model you wish to deploy in the Models tab of the automated ML job and select on Deploy and select Deploy to real-time endpoint .
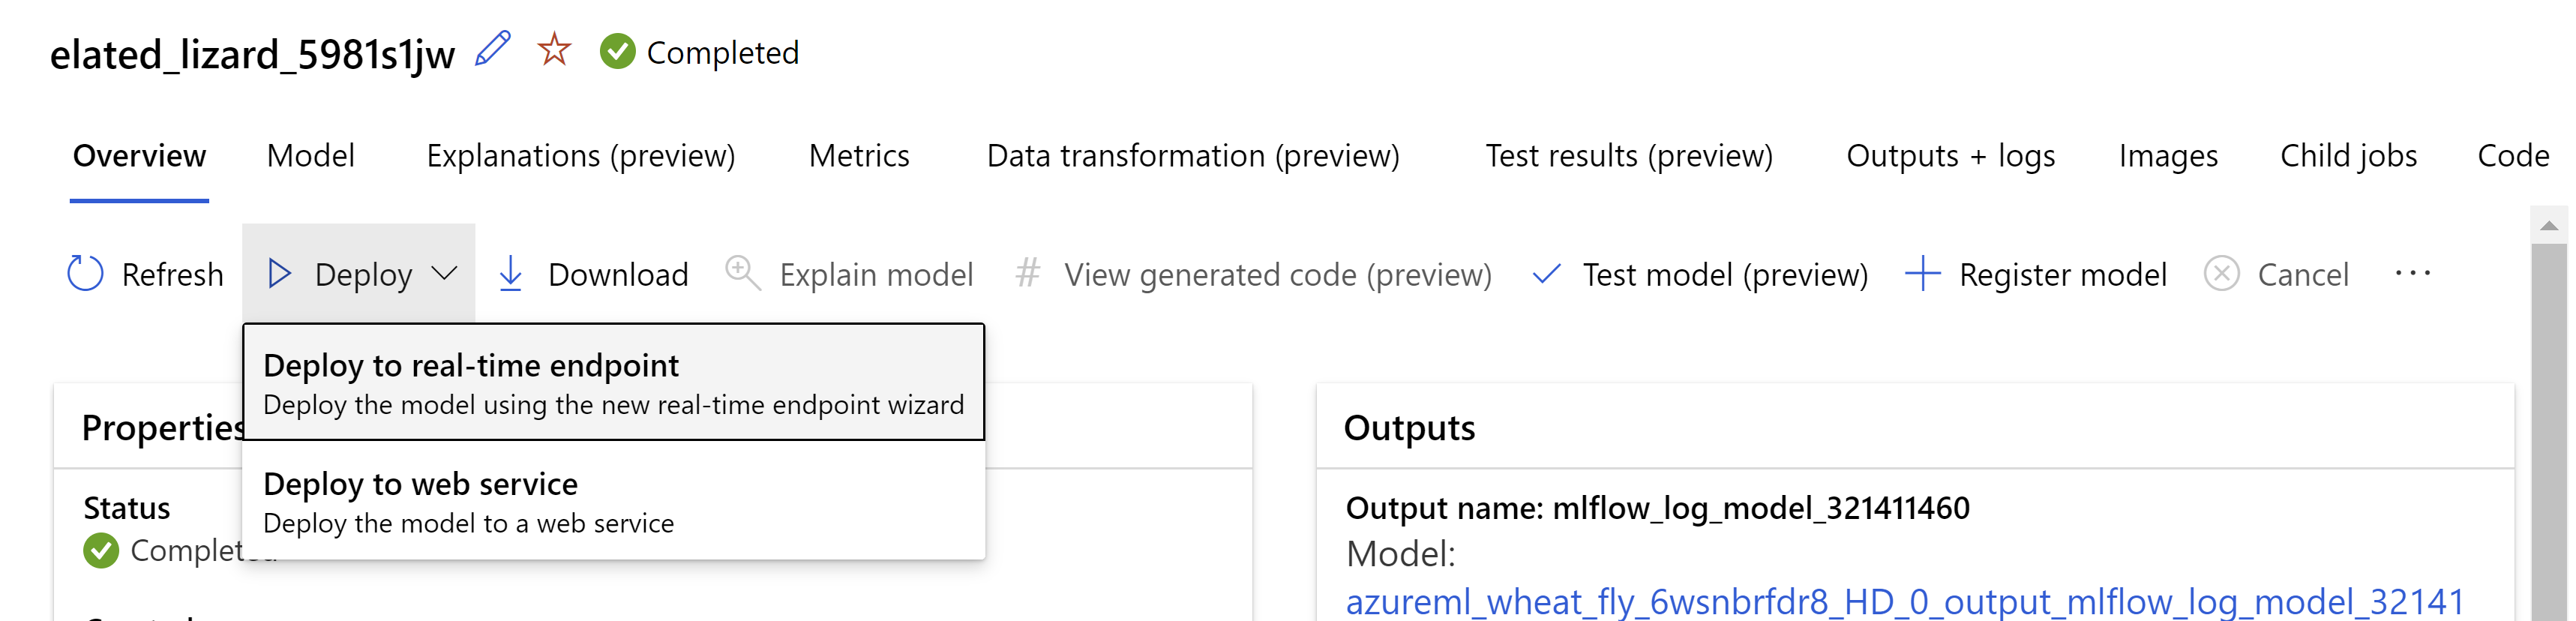 .
.
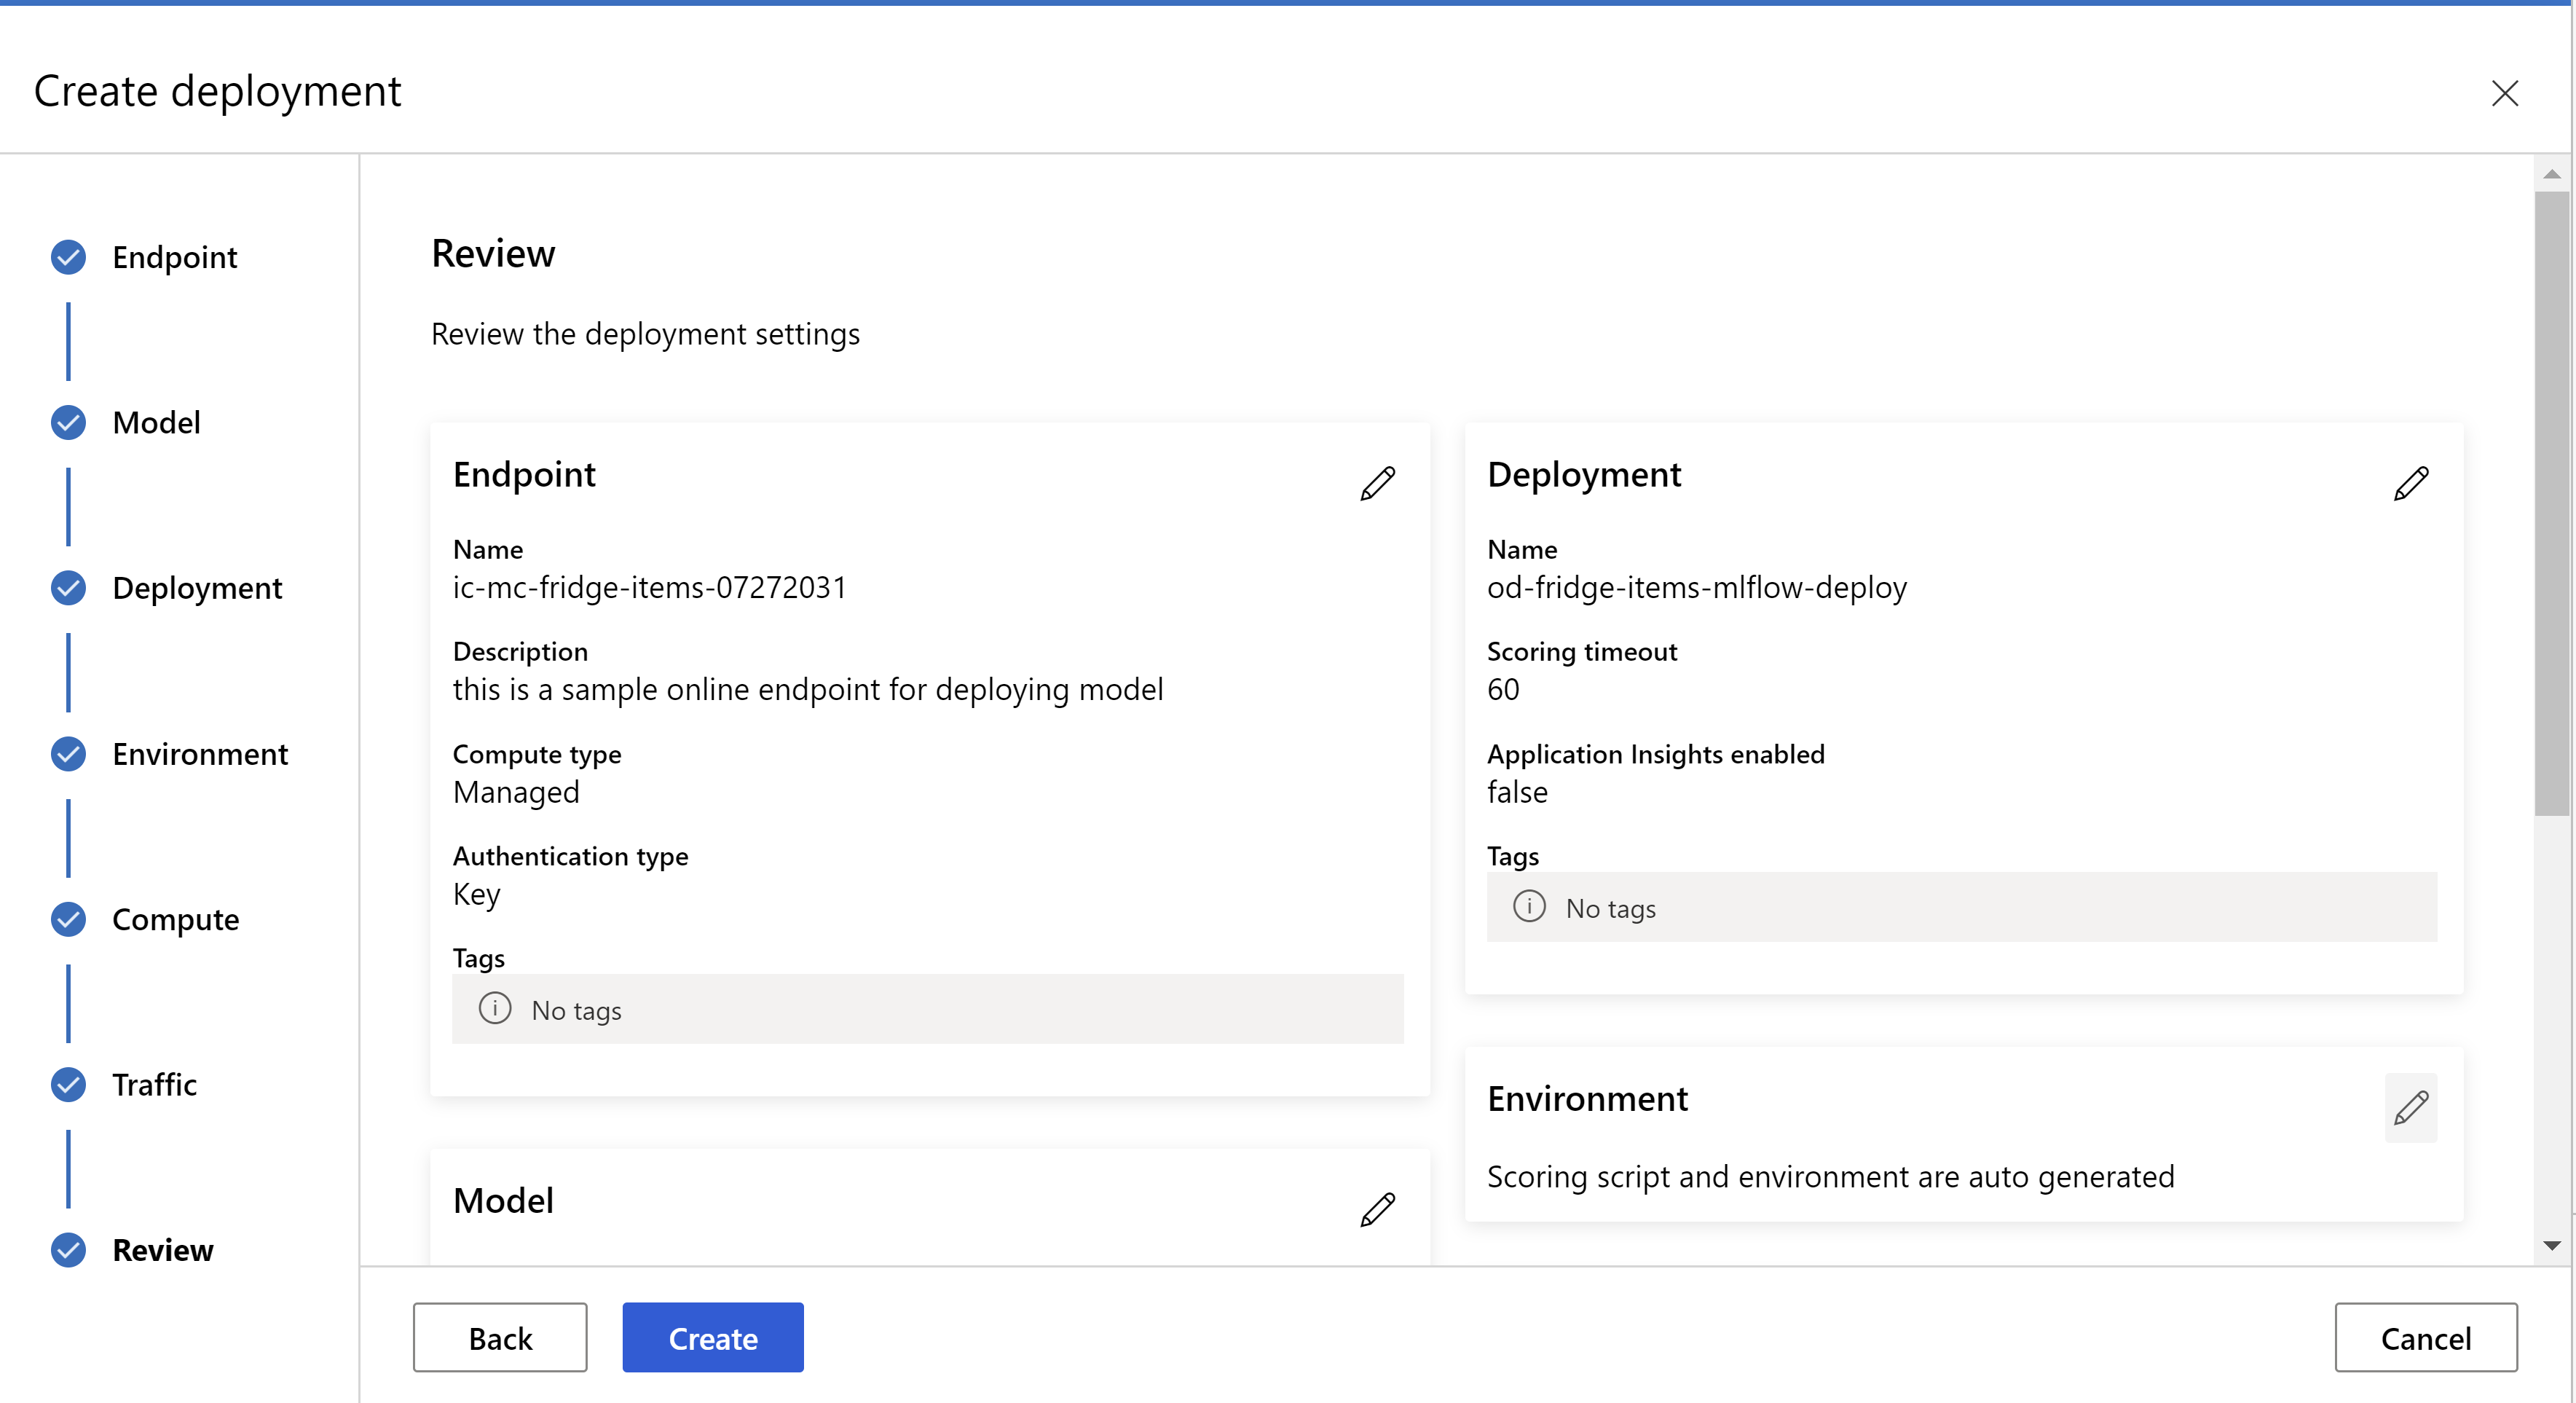
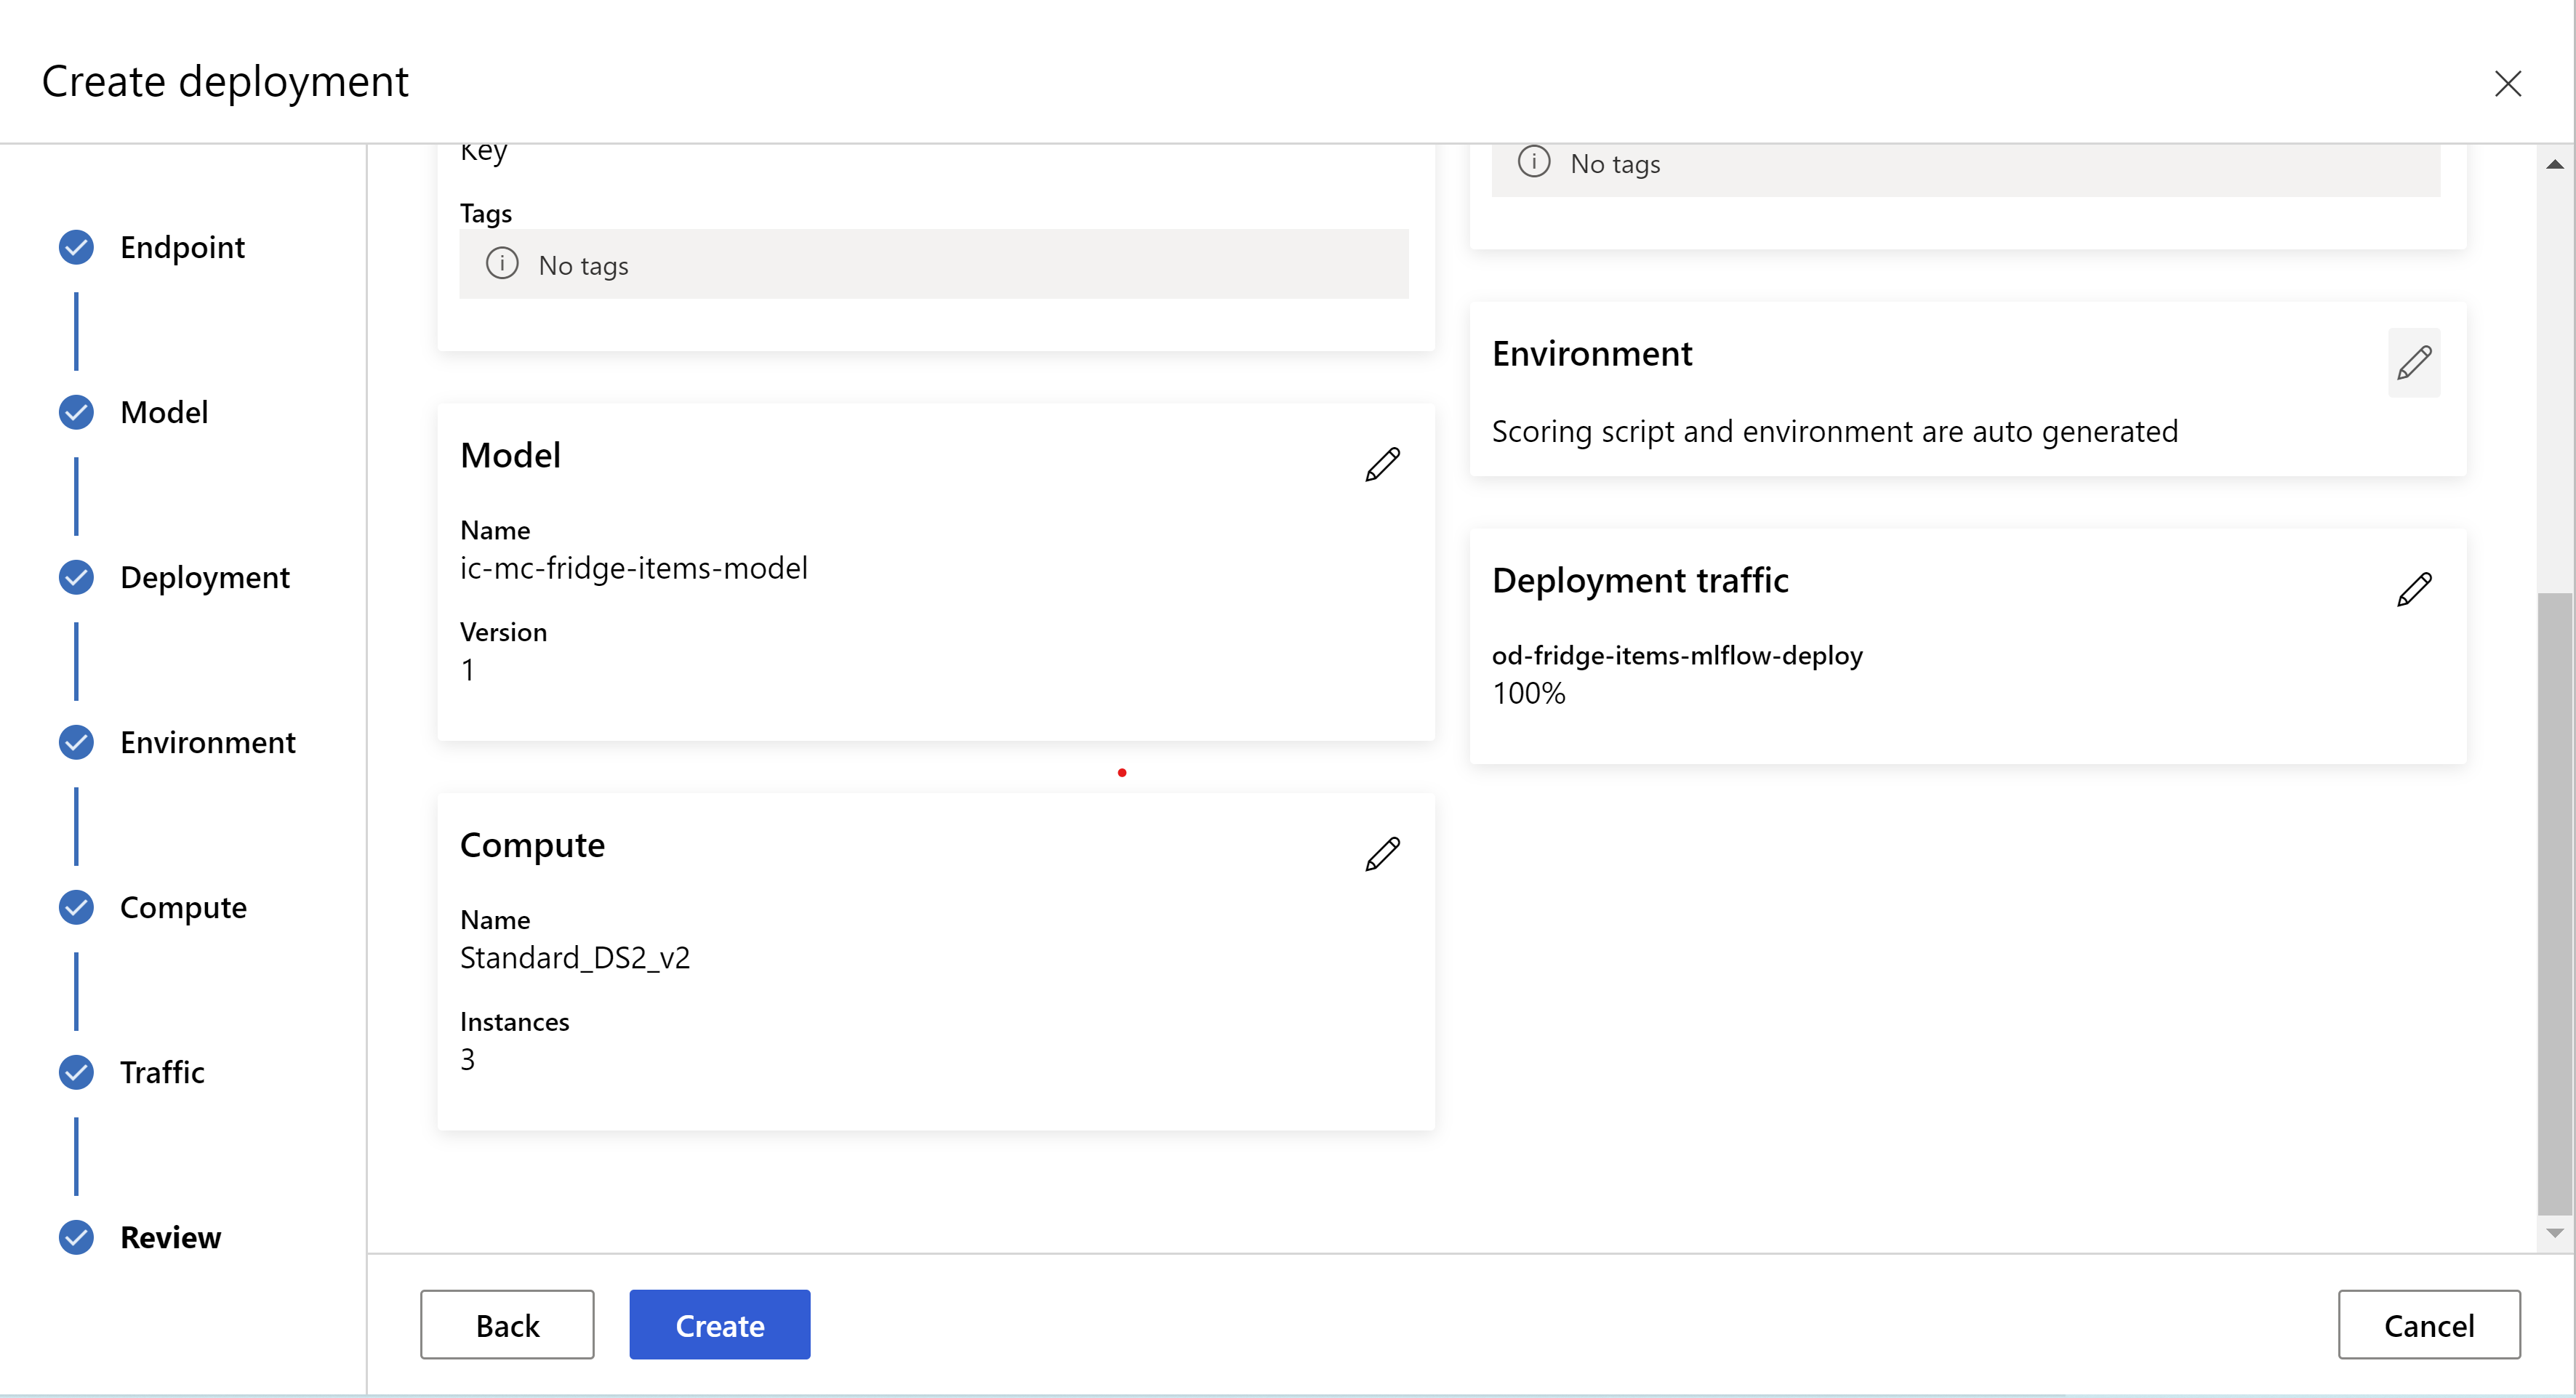
this is how your review page looks like. we can select instance type, instance count and set traffic percentage for the current deployment.
 .
.
 .
.
Update inference settings
In the previous step, we downloaded a file mlflow-model/artifacts/settings.json from the best model. which can be used to update the inference settings before registering the model. Although it's recommended to use the same parameters as training for best performance.
Each of the tasks (and some models) has a set of parameters. By default, we use the same values for the parameters that were used during the training and validation. Depending on the behavior that we need when using the model for inference, we can change these parameters. Below you can find a list of parameters for each task type and model.
| Task | Parameter name | Default |
|---|---|---|
| Image classification (multi-class and multi-label) | valid_resize_sizevalid_crop_size |
256 224 |
| Object detection | min_sizemax_sizebox_score_threshnms_iou_threshbox_detections_per_img |
600 1333 0.3 0.5 100 |
Object detection using yolov5 |
img_sizemodel_sizebox_score_threshnms_iou_thresh |
640 medium 0.1 0.5 |
| Instance segmentation | min_sizemax_sizebox_score_threshnms_iou_threshbox_detections_per_imgmask_pixel_score_thresholdmax_number_of_polygon_pointsexport_as_imageimage_type |
600 1333 0.3 0.5 100 0.5 100 False JPG |
For a detailed description on task specific hyperparameters, refer to Hyperparameters for computer vision tasks in automated machine learning.
If you want to use tiling, and want to control tiling behavior, the following parameters are available: tile_grid_size, tile_overlap_ratio and tile_predictions_nms_thresh. For more details on these parameters check Train a small object detection model using AutoML.
Test the deployment
Check this Test the deployment section to test the deployment and visualize the detections from the model.
Generate explanations for predictions
Important
These settings are currently in public preview. They are provided without a service-level agreement. Certain features might not be supported or might have constrained capabilities. For more information, see Supplemental Terms of Use for Microsoft Azure Previews.
Warning
Model Explainability is supported only for multi-class classification and multi-label classification.
Some of the advantages of using Explainable AI (XAI) with AutoML for images:
- Improves the transparency in the complex vision model predictions
- Helps the users to understand the important features/pixels in the input image that are contributing to the model predictions
- Helps in troubleshooting the models
- Helps in discovering the bias
Explanations
Explanations are feature attributions or weights given to each pixel in the input image based on its contribution to model's prediction. Each weight can be negative (negatively correlated with the prediction) or positive (positively correlated with the prediction). These attributions are calculated against the predicted class. For multi-class classification, exactly one attribution matrix of size [3, valid_crop_size, valid_crop_size] is generated per sample, whereas for multi-label classification, attribution matrix of size [3, valid_crop_size, valid_crop_size] is generated for each predicted label/class for each sample.
Using Explainable AI in AutoML for Images on the deployed endpoint, users can get visualizations of explanations (attributions overlaid on an input image) and/or attributions (multi-dimensional array of size [3, valid_crop_size, valid_crop_size]) for each image. Apart from visualizations, users can also get attribution matrices to gain more control over the explanations (like generating custom visualizations using attributions or scrutinizing segments of attributions). All the explanation algorithms use cropped square images with size valid_crop_size for generating attributions.
Explanations can be generated either from online endpoint or batch endpoint. Once the deployment is done, this endpoint can be utilized to generate the explanations for predictions. In online deployments, make sure to pass request_settings = OnlineRequestSettings(request_timeout_ms=90000) parameter to ManagedOnlineDeployment and set request_timeout_ms to its maximum value to avoid timeout issues while generating explanations (refer to register and deploy model section). Some of the explainability (XAI) methods like xrai consume more time (specially for multi-label classification as we need to generate attributions and/or visualizations against each predicted label). So, we recommend any GPU instance for faster explanations. For more information on input and output schema for generating explanations, see the schema docs.
We support following state-of-the-art explainability algorithms in AutoML for images:
- XRAI (xrai)
- Integrated Gradients (integrated_gradients)
- Guided GradCAM (guided_gradcam)
- Guided BackPropagation (guided_backprop)
Following table describes the explainability algorithm specific tuning parameters for XRAI and Integrated Gradients. Guided backpropagation and guided gradcam don't require any tuning parameters.
| XAI algorithm | Algorithm specific parameters | Default Values |
|---|---|---|
xrai |
1. n_steps: The number of steps used by the approximation method. Larger number of steps lead to better approximations of attributions (explanations). Range of n_steps is [2, inf), but the performance of attributions starts to converge after 50 steps. Optional, Int 2. xrai_fast: Whether to use faster version of XRAI. if True, then computation time for explanations is faster but leads to less accurate explanations (attributions) Optional, Bool |
n_steps = 50 xrai_fast = True |
integrated_gradients |
1. n_steps: The number of steps used by the approximation method. Larger number of steps lead to better attributions (explanations). Range of n_steps is [2, inf), but the performance of attributions starts to converge after 50 steps.Optional, Int 2. approximation_method: Method for approximating the integral. Available approximation methods are riemann_middle and gausslegendre.Optional, String |
n_steps = 50 approximation_method = riemann_middle |
Internally XRAI algorithm uses integrated gradients. So, n_steps parameter is required by both integrated gradients and XRAI algorithms. Larger number of steps consume more time for approximating the explanations and it may result in timeout issues on the online endpoint.
We recommend using XRAI > Guided GradCAM > Integrated Gradients > Guided BackPropagation algorithms for better explanations, whereas Guided BackPropagation > Guided GradCAM > Integrated Gradients > XRAI are recommended for faster explanations in the specified order.
A sample request to the online endpoint looks like the following. This request generates explanations when model_explainability is set to True. Following request generates visualizations and attributions using faster version of XRAI algorithm with 50 steps.
import base64
import json

def read_image(image_path):
    with open(image_path, "rb") as f:
        return f.read()

sample_image = "./test_image.jpg"

# Define explainability (XAI) parameters
model_explainability = True
xai_parameters = {"xai_algorithm": "xrai",
                  "n_steps": 50,
                  "xrai_fast": True,
                  "visualizations": True,
                  "attributions": True}

# Create request json
request_json = {"input_data": {"columns":  ["image"],
                               "data": [json.dumps({"image_base64": base64.encodebytes(read_image(sample_image)).decode("utf-8"),
                                                    "model_explainability": model_explainability,
                                                    "xai_parameters": xai_parameters})],
                               }
                }

request_file_name = "sample_request_data.json"

with open(request_file_name, "w") as request_file:
    json.dump(request_json, request_file)

resp = ml_client.online_endpoints.invoke(
    endpoint_name=online_endpoint_name,
    deployment_name=deployment.name,
    request_file=request_file_name,
)
predictions = json.loads(resp)
For more information on generating explanations, see GitHub notebook repository for automated machine learning samples.
Interpreting Visualizations
Deployed endpoint returns base64 encoded image string if both model_explainability and visualizations are set to True. Decode the base64 string as described in notebooks or use the following code to decode and visualize the base64 image strings in the prediction.
import base64
from io import BytesIO
from PIL import Image

def base64_to_img(base64_img_str):
    base64_img = base64_img_str.encode("utf-8")
    decoded_img = base64.b64decode(base64_img)
    return BytesIO(decoded_img).getvalue()

# For Multi-class classification:
# Decode and visualize base64 image string for explanations for first input image
# img_bytes = base64_to_img(predictions[0]["visualizations"])

# For  Multi-label classification:
# Decode and visualize base64 image string for explanations for first input image against one of the classes
img_bytes = base64_to_img(predictions[0]["visualizations"][0])
image = Image.open(BytesIO(img_bytes))
Following picture describes the Visualization of explanations for a sample input image.

Decoded base64 figure has four image sections within a 2 x 2 grid.
- Image at Top-left corner (0, 0) is the cropped input image
- Image at top-right corner (0, 1) is the heatmap of attributions on a color scale bgyw (blue green yellow white) where the contribution of white pixels on the predicted class is the highest and blue pixels is the lowest.
- Image at bottom left corner (1, 0) is blended heatmap of attributions on cropped input image
- Image at bottom right corner (1, 1) is the cropped input image with top 30 percent of the pixels based on attribution scores.
Interpreting Attributions
Deployed endpoint returns attributions if both model_explainability and attributions are set to True. Fore more details, refer to multi-class classification and multi-label classification notebooks.
These attributions give more control to the users to generate custom visualizations or to scrutinize pixel level attribution scores. Following code snippet describes a way to generate custom visualizations using attribution matrix. For more information on the schema of attributions for multi-class classification and multi-label classification, see the schema docs.
Use the exact valid_resize_size and valid_crop_size values of the selected model to generate the explanations (default values are 256 and 224 respectively). Following code uses Captum visualization functionality to generate custom visualizations. Users can utilize any other library to generate visualizations. For more details, please refer to the captum visualization utilities.
import colorcet as cc
import numpy as np
from captum.attr import visualization as viz
from PIL import Image
from torchvision import transforms

def get_common_valid_transforms(resize_to=256, crop_size=224):

    return transforms.Compose([
        transforms.Resize(resize_to),
        transforms.CenterCrop(crop_size)
    ])

# Load the image
valid_resize_size = 256
valid_crop_size = 224
sample_image = "./test_image.jpg"
image = Image.open(sample_image)
# Perform common validation transforms to get the image used to generate attributions
common_transforms = get_common_valid_transforms(resize_to=valid_resize_size,
                                                crop_size=valid_crop_size)
input_tensor = common_transforms(image)

# Convert output attributions to numpy array

# For Multi-class classification:
# Selecting attribution matrix for first input image
# attributions = np.array(predictions[0]["attributions"])

# For  Multi-label classification:
# Selecting first attribution matrix against one of the classes for first input image
attributions = np.array(predictions[0]["attributions"][0])

# visualize results
viz.visualize_image_attr_multiple(np.transpose(attributions, (1, 2, 0)),
                                  np.array(input_tensor),
                                  ["original_image", "blended_heat_map"],
                                  ["all", "absolute_value"],
                                  show_colorbar=True,
                                  cmap=cc.cm.bgyw,
                                  titles=["original_image", "heatmap"],
                                  fig_size=(12, 12))
Large datasets
If you're using AutoML to train on large datasets, there are some experimental settings that may be useful.
Important
These settings are currently in public preview. They are provided without a service-level agreement. Certain features might not be supported or might have constrained capabilities. For more information, see Supplemental Terms of Use for Microsoft Azure Previews.
Multi-GPU and multi-node training
By default, each model trains on a single VM. If training a model is taking too much time, using VMs that contain multiple GPUs may help. The time to train a model on large datasets should decrease in roughly linear proportion to the number of GPUs used. (For instance, a model should train roughly twice as fast on a VM with two GPUs as on a VM with one GPU.) If the time to train a model is still high on a VM with multiple GPUs, you can increase the number of VMs used to train each model. Similar to multi-GPU training, the time to train a model on large datasets should also decrease in roughly linear proportion to the number of VMs used. When training a model across multiple VMs, be sure to use a compute SKU that supports InfiniBand for best results. You can configure the number of VMs used to train a single model by setting the node_count_per_trial property of the AutoML job.
APPLIES TO:
Azure CLI ml extension v2 (current)
properties:
  node_count_per_trial: "2"
Streaming image files from storage
By default, all image files are downloaded to disk prior to model training. If the size of the image files is greater than available disk space, the job fails. Instead of downloading all images to disk, you can select to stream image files from Azure storage as they're needed during training. Image files are streamed from Azure storage directly to system memory, bypassing disk. At the same time, as many files as possible from storage are cached on disk to minimize the number of requests to storage.
Note
If streaming is enabled, ensure the Azure storage account is located in the same region as compute to minimize cost and latency.
APPLIES TO:
Azure CLI ml extension v2 (current)
training_parameters:
  advanced_settings: >
    {"stream_image_files": true}
Example notebooks
Review detailed code examples and use cases in the GitHub notebook repository for automated machine learning samples. Check the folders with 'automl-image-' prefix for samples specific to building computer vision models.
Code examples
Review detailed code examples and use cases in the azureml-examples repository for automated machine learning samples.