Note
Access to this page requires authorization. You can try signing in or changing directories.
Access to this page requires authorization. You can try changing directories.
APPLIES TO:
 Azure CLI ml extension v2 (current)
Python SDK azure-ai-ml v2 (current)
Azure CLI ml extension v2 (current)
Python SDK azure-ai-ml v2 (current)
This article describes how to deploy MLflow models to Azure Machine Learning for batch inference by using batch endpoints. When you deploy MLflow models to batch endpoints, Azure Machine Learning completes the following tasks:
- Provides an MLflow base image or curated environment that contains the required dependencies to run a Machine Learning batch job.
- Creates a batch job pipeline with a scoring script for you that can process data by using parallelization.
For more information about the supported input file types and details about how MLflow model works, see Considerations for deploying to batch inference.
Prerequisites
An Azure subscription. If you don't have an Azure subscription, create a free account.
An Azure Machine Learning workspace. To create a workspace, see Manage Azure Machine Learning workspaces.
The following permissions in the Azure Machine Learning workspace:
- For creating or managing batch endpoints and deployments: Use an Owner, Contributor, or custom role that has the
Microsoft.MachineLearningServices/workspaces/batchEndpoints/*permissions. - For creating Azure Resource Manager deployments in the workspace resource group: Use an Owner, Contributor, or custom role that has the
Microsoft.Resources/deployments/writepermission in the resource group where the workspace is deployed.
- For creating or managing batch endpoints and deployments: Use an Owner, Contributor, or custom role that has the
The Azure Machine Learning CLI or the Azure Machine Learning SDK for Python:
Run the following command to install the Azure CLI and the
mlextension for Azure Machine Learning:az extension add -n mlPipeline component deployments for batch endpoints require version 2.7 or later of the
mlextension for the Azure CLI (current version: 2.37.0). Use theaz extension update --name mlcommand to get the latest version.
Connect to your workspace
The workspace is the top-level resource for Azure Machine Learning. It provides a centralized place to work with all artifacts you create when you use Azure Machine Learning. In this section, you connect to the workspace where you perform your deployment tasks.
In the following command, enter your subscription ID, workspace name, resource group name, and location:
az account set --subscription <subscription>
az configure --defaults workspace=<workspace> group=<resource-group> location=<location>
Explore the example
The example in this article shows how to deploy an MLflow model to a batch endpoint to perform batch predictions. The MLflow model is based on the UCI Heart Disease Data Set. The database contains 76 attributes, but the example uses only a subset of 14. The model tries to predict the presence of heart disease in a patient with an integer value from 0 (no presence) to 1 (presence).
The model is trained by using an XGBBoost classifier. All required preprocessing is packaged as a scikit-learn pipeline, which makes the model an end-to-end pipeline that goes from raw data to predictions.
The example in this article is based on code samples contained in the azureml-examples repository. To run the commands locally without having to copy or paste YAML and other files, use the following commands to clone the repository and go to the folder for your coding language:
git clone https://github.com/Azure/azureml-examples --depth 1
cd azureml-examples/cli
The files for this example are located in the following folder:
cd endpoints/batch/deploy-models/heart-classifier-mlflow
Follow along in Jupyter Notebooks
You can follow along with this sample by using a public Jupyter Notebook. In the cloned repository, open the mlflow-for-batch-tabular.ipynb notebook.
Deploy the MLflow model
In this section, you deploy an MLflow model to a batch endpoint so you can run batch inference over new data. Before you move forward with the deployment, make sure your model is registered and there's an available compute cluster in the workspace.
Register the model
Batch endpoints can only deploy registered models. In this article, you use a local copy of the model in the repository. As a result, you only need to publish the model to the registry in the workspace.
Note
If the model you're deploying is already registered, you can continue to the Create compute cluster section.
Register the model by running the following command:
MODEL_NAME='heart-classifier-mlflow'
az ml model create --name $MODEL_NAME --type "mlflow_model" --path "model"
Create compute cluster
You need to ensure the batch deployments run on some available infrastructure (compute). Batch deployments can run on any Machine Learning compute that already exists in the workspace. Multiple batch deployments can share the same compute infrastructure.
In this article, you work on a Machine Learning compute cluster named cpu-cluster. The following example verifies a compute exists on the workspace or creates a new compute.
Create a compute cluster:
az ml compute create -n batch-cluster --type amlcompute --min-instances 0 --max-instances 5
Create batch endpoint
To create an endpoint, you need a name and description. The endpoint name appears in the URI associated with your endpoint, so it needs to be unique within an Azure region. For example, there can be only one batch endpoint with the name mybatchendpoint in the WestUS2 region.
Place the name of the endpoint in a variable for easy reference later:
Create the endpoint:
To create a new endpoint, create a
YAMLconfiguration like the following code:endpoint.yml
$schema: https://azuremlschemas.azureedge.net/latest/batchEndpoint.schema.json
name: heart-classifier-batch
description: A heart condition classifier for batch inference
auth_mode: aad_token
Create the endpoint with the following command:
az ml batch-endpoint create -n $ENDPOINT_NAME -f endpoint.yml
Create batch deployment
MLflow models don't require you to specify an environment or scoring script when you create the deployment. The environment or scoring script is created for you automatically. However, you can specify the environment or scoring script if you want to customize how the deployment does inference.
To create a new deployment under the created endpoint, create a
YAMLconfiguration as shown in the following code. You can check the full batch endpoint YAML schema for extra properties.deployment-simple/deployment.yml
$schema: https://azuremlschemas.azureedge.net/latest/modelBatchDeployment.schema.json
endpoint_name: heart-classifier-batch
name: classifier-xgboost-mlflow
description: A heart condition classifier based on XGBoost
type: model
model: azureml:heart-classifier-mlflow@latest
compute: azureml:batch-cluster
resources:
  instance_count: 2
settings:
  max_concurrency_per_instance: 2
  mini_batch_size: 2
  output_action: append_row
  output_file_name: predictions.csv
  retry_settings:
    max_retries: 3
    timeout: 300
  error_threshold: -1
  logging_level: info
Create the deployment with the following command:
az ml batch-deployment create --file deployment-simple/deployment.yml --endpoint-name $ENDPOINT_NAME --set-default
Important
Configure the timeout value in your deployment based on how long it takes for your model to run inference on a single batch. The larger the batch size, the longer the timeout value. Keep in mind that the mini_batch_size value indicates the number of files in a batch and not the number of samples. When you work with tabular data, each file can contain multiple rows, which increases the time it takes for the batch endpoint to process each file. In such cases, use higher timeout values to avoid timeout errors.
Invoke the endpoint
Although you can invoke a specific deployment inside an endpoint, it's common to invoke the endpoint itself and let the endpoint decide which deployment to use. This type of deployment is named the "default" deployment. This approach lets you change the default deployment, which enables you to change the model serving the deployment without changing the contract with the user invoking the endpoint.
Use the following instruction to update the default deployment:
DEPLOYMENT_NAME="classifier-xgboost-mlflow"
az ml batch-endpoint update --name $ENDPOINT_NAME --set defaults.deployment_name=$DEPLOYMENT_NAME
The batch endpoint is now ready for use.
Test the deployment
To test your endpoint, use a sample of unlabeled data located in this repository that works with the model. Batch endpoints can only process data located in the cloud and accessible from the Machine Learning workspace. In this example, you upload the sample to a Machine Learning data store. You create a data asset that you use to invoke the endpoint for scoring. Keep in mind that batch endpoints accept data that you can place in various locations.
First, create the data asset. The data asset consists of a folder with multiple CSV files that you want to process in parallel by using batch endpoints. You can skip this step if your data is already registered as a data asset or you want to use a different input type.
Create a data asset definition in YAML:
heart-dataset-unlabeled.yml
$schema: https://azuremlschemas.azureedge.net/latest/data.schema.json
name: heart-dataset-unlabeled
description: An unlabeled dataset for heart classification.
type: uri_folder
path: data
Create the data asset:
az ml data create -f heart-dataset-unlabeled.yml
After you upload the data, invoke the endpoint.
Tip
In the following commands, notice that the deployment name isn't indicated in the
invokeoperation. The endpoint automatically routes the job to the default deployment because the endpoint has one deployment only. You can target a specific deployment by indicating the argument/parameterdeployment_name.Run the following command:
JOB_NAME = $(az ml batch-endpoint invoke --name $ENDPOINT_NAME --input azureml:heart-dataset-unlabeled@latest --query name -o tsv)Note
The utility
jqmight not be installed on every installation. For installation instructions, see Download jq.A batch job starts as soon as the command returns. You can monitor the status of the job until it finishes:
Analyze outputs
The deployment configuration specifies that the job generates output predictions in the predictions.csv file. The job creates an output named score and places this file there. Each batch job generates only one file.
The file has the following structure:
One row for each data point sent to the model. For tabular data, the predictions.csv file contains one row for every row present in each processed file. For other data types (images, audio, text), there's one row for each processed file.
The file includes the following columns in the specified order:
row(optional): The corresponding row index in the input data file. This column applies only if the input data is tabular. Predictions are returned in the same order they appear in the input file. You can rely on the row number to match the corresponding prediction.prediction: The prediction associated with the input data. The model returns this value "as-is," through itspredict()function.file_name: The name of the file where the data is read. In tabular data, use this field to determine which prediction belongs to each input data.
You can download the results of the job by using the job name.
To download the predictions, use the following command:
az ml job download --name $JOB_NAME --output-name score --download-path ./
After you download the file, you can open the file with your preferred editing tool. The following example loads the predictions by using a pandas DataFrame.
import pandas as pd

score = pd.read_csv(
    "named-outputs/score/predictions.csv", names=["row", "prediction", "file"]
)
The output displays a table:
| Row | Prediction | File |
|---|---|---|
| 0 | 0 | heart-unlabeled-0.csv |
| 1 | 1 | heart-unlabeled-0.csv |
| 2 | 0 | heart-unlabeled-0.csv |
| ... | ... | ... |
| 307 | 0 | heart-unlabeled-3.csv |
Tip
Notice that in this example, the input data contains tabular data in CSV format. There are four different input files: heart-unlabeled-0.csv, heart-unlabeled-1.csv, heart-unlabeled-2.csv, and heart-unlabeled-3.csv.
Review considerations for batch inference
Azure Machine Learning supports deployment of MLflow models to batch endpoints without indicating a scoring script. This approach is a convenient way to deploy models that require processing large amounts of data similar to batch processing. Azure Machine Learning uses information in the MLflow model specification to orchestrate the inference process.
Explore distribution of work on workers
Batch endpoints distribute work at the file level, for both structured and unstructured data. As a consequence, only URI file and URI folders are supported for this feature. Each worker processes batches of Mini batch size files at a time. For tabular data, batch endpoints don't take into account the number of rows inside of each file when distributing the work.
Warning
Nested folder structures aren't explored during inference. If you partition your data by using folders, be sure to flatten the structure before you proceed.
Batch deployments call the predict function of the MLflow model once per file. For CSV files with multiple rows, this action can impose memory pressure in the underlying compute. This behavior increases the time it takes for the model to score a single file, especially for expensive models like large language models. If you encounter several out-of-memory exceptions or time-out entries in logs, consider splitting the data into smaller files with fewer rows, or implement batching at the row level inside of the model scoring script.
Review support for file types
The following data types are supported for batch inference when deploying MLflow models without an environment or scoring script. To process a different file type, or execute inference differently, you can create the deployment by customizing MLflow model deployment with a scoring script.
| File extension | Type returned as model input | Signature requirement |
|---|---|---|
.csv, .parquet, .pqt |
pd.DataFrame |
ColSpec. If not provided, columns typing isn't enforced. |
.png, .jpg, .jpeg, .tiff, .bmp, .gif |
np.ndarray |
TensorSpec. Input is reshaped to match tensors shape, if available. If no signature is available, tensors of type np.uint8 are inferred. For more information, see Considerations for MLflow models processing images. |
Warning
Any unsupported file that might be present in the input data causes the job to fail. In such cases, you see an error similar to ERROR:azureml:Error processing input file: '/mnt/batch/tasks/.../a-given-file.avro'. File type 'avro' isn't supported.
Understand signature enforcement for MLflow models
Batch deployment jobs enforce the input data types while reading the data by using the available MLflow model signature. As a result, your data input must comply with the types indicated in the model signature. If the data can't be parsed as expected, the job fails with an error similar to ERROR:azureml:Error processing input file: '/mnt/batch/tasks/.../a-given-file.csv'. Exception: invalid literal for int() with base 10: 'value'.
Tip
Signatures in MLflow models are optional, but they're highly encouraged. They provide a convenient way for early detection of data compatibility issues. For more information about how to log models with signatures, see Log models that use a custom signature, environment, or samples.
You can inspect the model signature of your model by opening the MLmodel file associated with your MLflow model. For more information about how signatures work in MLflow, see Signatures in MLflow.
Examine flavor support
Batch deployments support deploying MLflow models with a pyfunc flavor only. To deploy a different flavor, see Customize model deployment with scoring script.
Customize model deployment with scoring script
You can deploy MLflow models to batch endpoints without indicating a scoring script in the deployment definition. However, you can opt in to indicate this file (commonly referred to as the batch driver) to customize inference execution.
Typically, select this workflow for the following scenarios:
- Process file types that batch deployments of MLflow deployments don't support.
- Customize how the model runs, such as by using a specific flavor to load it with the
mlflow.<flavor>.load()function. - Complete pre- or post- processing in your scoring routine, when the model itself doesn't complete it.
- Adjust presentation of model that doesn't present well with tabular data, such as a tensor graph that represents an image.
- Allow model to read data in chunks because it can't process each file at once due to memory constraints.
Important
To indicate a scoring script for an MLflow model deployment, you need to specify the environment where the deployment runs.
Use the scoring script
Use the following steps to deploy an MLflow model with a custom scoring script:
Identify the folder where your MLflow model is placed.
In Azure Machine Learning studio, browse to Models.
Select the model to deploy, and then select the Artifacts tab.
Take note of the displayed folder. You indicated this folder when you registered the model.
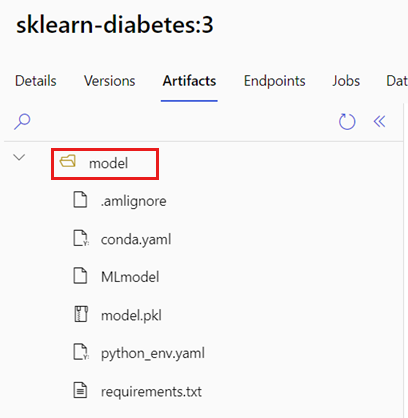
Create a scoring script. Notice how the previous folder name
modelis included in theinit()function.deployment-custom/code/batch_driver.py
# Copyright (c) Microsoft. All rights reserved.
# Licensed under the MIT license.

import os
import glob
import mlflow
import pandas as pd
import logging


def init():
    global model
    global model_input_types
    global model_output_names

    # AZUREML_MODEL_DIR is an environment variable created during deployment
    # It is the path to the model folder
    # Please provide your model's folder name if there's one
    model_path = glob.glob(os.environ["AZUREML_MODEL_DIR"] + "/*/")[0]

    # Load the model, it's input types and output names
    model = mlflow.pyfunc.load(model_path)
    if model.metadata and model.metadata.signature:
        if model.metadata.signature.inputs:
            model_input_types = dict(
                zip(
                    model.metadata.signature.inputs.input_names(),
                    model.metadata.signature.inputs.pandas_types(),
                )
            )
        if model.metadata.signature.outputs:
            if model.metadata.signature.outputs.has_input_names():
                model_output_names = model.metadata.signature.outputs.input_names()
            elif len(model.metadata.signature.outputs.input_names()) == 1:
                model_output_names = ["prediction"]
    else:
        logging.warning(
            "Model doesn't contain a signature. Input data types won't be enforced."
        )


def run(mini_batch):
    print(f"run method start: {__file__}, run({len(mini_batch)} files)")

    data = pd.concat(
        map(
            lambda fp: pd.read_csv(fp).assign(filename=os.path.basename(fp)), mini_batch
        )
    )

    if model_input_types:
        data = data.astype(model_input_types)

    # Predict over the input data, minus the column filename which is not part of the model.
    pred = model.predict(data.drop("filename", axis=1))

    if pred is not pd.DataFrame:
        if not model_output_names:
            model_output_names = ["pred_col" + str(i) for i in range(pred.shape[1])]
        pred = pd.DataFrame(pred, columns=model_output_names)

    return pd.concat([data, pred], axis=1)
Create an environment where the scoring script can be executed. Because the model in this example is MLflow, the conda requirements are also specified in the model package. For more information about MLflow models and the included files, see The MLmodel format.
In this step, you build the environment by using the conda dependencies from the file. You also need to include the
azureml-corepackage, which is required for batch deployments.Note
The
azureml-corepackage is part of the Azure Machine Learning SDK v1, which is deprecated as of March 31, 2025, with end of support on June 30, 2026. It remains required as a runtime dependency for batch deployment scoring scripts.Tip
If you already registered your model in the model registry, you can download and copy the
conda.ymlfile associated with your model. You can find this file in Azure Machine Learning studio under Models > Select your model from the list > Artifacts. In the root folder, select theconda.ymlfile, and then select Download or copy its content.Important
This example uses a conda environment specified at
/heart-classifier-mlflow/environment/conda.yaml. This file was created by combining the original MLflow conda dependencies file and adding theazureml-corepackage. You can't use theconda.ymlfile directly from the model.The deployment definition itself includes the environment definition as an anonymous environment. You see the following lines in the deployment:
environment: name: batch-mlflow-xgboost image: mcr.microsoft.com/azureml/openmpi4.1.0-ubuntu20.04:latest conda_file: environment/conda.yamlConfigure the deployment:
To create a new deployment under the created endpoint, create a
YAMLconfiguration as shown in the following code snippet. For extra properties, see the full batch endpoint YAML schema.deployment-custom/deployment.yml
$schema: https://azuremlschemas.azureedge.net/latest/modelBatchDeployment.schema.json endpoint_name: heart-classifier-batch name: classifier-xgboost-custom description: A heart condition classifier based on XGBoost type: model model: azureml:heart-classifier-mlflow@latest environment: name: batch-mlflow-xgboost image: mcr.microsoft.com/azureml/openmpi4.1.0-ubuntu20.04:latest conda_file: environment/conda.yaml code_configuration: code: code scoring_script: batch_driver.py compute: azureml:batch-cluster resources: instance_count: 2 settings: max_concurrency_per_instance: 2 mini_batch_size: 2 output_action: append_row output_file_name: predictions.csv retry_settings: max_retries: 3 timeout: 300 error_threshold: -1 logging_level: infoCreate the deployment:
The batch endpoint is now ready for use.
Clean up resources
After you complete the exercise, delete resources that you no longer need.
Run the following code to delete the batch endpoint and all underlying deployments:
az ml batch-endpoint delete --name $ENDPOINT_NAME --yes
This command doesn't delete batch scoring jobs.