Note
Access to this page requires authorization. You can try signing in or changing directories.
Access to this page requires authorization. You can try changing directories.
Azure Machine Learning registry enables you to collaborate across workspaces within your organization. Using registries, you can share models, components, and environments.
There are two scenarios where you'd want to use the same set of models, components and environments in multiple workspaces:
- Cross-workspace MLOps: You're training a model in a
devworkspace and need to deploy it totestandprodworkspaces. In this case you, want to have end-to-end lineage between endpoints to which the model is deployed intestorprodworkspaces and the training job, metrics, code, data, and environment that was used to train the model in thedevworkspace. - Share and reuse models and pipelines across different teams: Sharing and reuse improve collaboration and productivity. In this scenario, you might want to publish a trained model and the associated components and environments used to train it to a central catalog. From there, colleagues from other teams can search and reuse the assets you shared in their own experiments.
In this article, you learn how to:
- Create an environment and component in the registry.
- Use the component from registry to submit a model training job in a workspace.
- Register the trained model in the registry.
- Deploy the model from the registry to an online-endpoint in the workspace, then submit an inference request.
Prerequisites
Before following the steps in this article, make sure you have the following prerequisites:
- An Azure subscription. If you don't have an Azure subscription, create a free account before you begin. Try the free or paid version of Azure Machine Learning.
An Azure Machine Learning registry to share models, components, and environments. To create a registry, see Learn how to create a registry.
An Azure Machine Learning workspace. To create one if you don't have one, use the steps in the Quickstart: Create workspace resources article.
Important
The Azure region (location) where you create your workspace must be in the list of supported regions for Azure Machine Learning registry
The Azure CLI and the
mlextension or the Azure Machine Learning Python SDK v2:To install the Azure CLI and extension, see Install, set up, and use the CLI (v2).
Important
The CLI examples in this article assume that you're using the Bash (or compatible) shell. For example, from a Linux system or Windows Subsystem for Linux.
The examples also assume that you configured defaults for the Azure CLI so that you don't have to specify the parameters for your subscription, workspace, resource group, or location. To set default settings, use the following commands. Replace the following parameters with the values for your configuration:
- Replace
<subscription>with your Azure subscription ID. - Replace
<workspace>with your Azure Machine Learning workspace name. - Replace
<resource-group>with the Azure resource group that contains your workspace. - Replace
<location>with the Azure region that contains your workspace.
az account set --subscription <subscription>
az configure --defaults workspace=<workspace> group=<resource-group> location=<location>
You can see what your current defaults are by using the
az configure -lcommand.- Replace
Clone examples repository
The code examples in this article are based on the nyc_taxi_data_regression sample in the examples repository. To use these files on your development environment, use the following commands to clone the repository and change directories to the example:
git clone https://github.com/Azure/azureml-examples
cd azureml-examples
For the CLI example, change directories to cli/jobs/pipelines-with-components/nyc_taxi_data_regression in your local clone of the examples repository.
cd cli/jobs/pipelines-with-components/nyc_taxi_data_regression
Create SDK connection
Tip
This step is only needed when using the Python SDK.
Create a client connection to both the Azure Machine Learning workspace and registry:
ml_client_workspace = MLClient( credential=credential,
    subscription_id = "<workspace-subscription>",
    resource_group_name = "<workspace-resource-group",
    workspace_name = "<workspace-name>")
print(ml_client_workspace)

ml_client_registry = MLClient(credential=credential,
                        registry_name="<REGISTRY_NAME>",
                        registry_location="<REGISTRY_REGION>")
print(ml_client_registry)
Create environment in registry
Environments define the docker container and Python dependencies required to run training jobs or deploy models. For more information on environments, see the following articles:
Tip
The same CLI command az ml environment create can be used to create environments in a workspace or registry. Running the command with --workspace-name command creates the environment in a workspace whereas running the command with --registry-name creates the environment in the registry.
We create an environment that uses the python:3.8 docker image and installs Python packages required to run a training job using the SciKit Learn framework. If you cloned the examples repo and are in the folder cli/jobs/pipelines-with-components/nyc_taxi_data_regression, you should be able to see environment definition file env_train.yml that references the docker file env_train/Dockerfile. The contents of env_train.yml is as follows:
$schema: https://azuremlschemas.azureedge.net/latest/environment.schema.json
name: SKLearnEnv
version: 1
build:
  path: ./env_train
Create the environment using the az ml environment create as follows
az ml environment create --file env_train.yml --registry-name <registry-name>
If you get an error that an environment with this name and version already exists in the registry, you can either edit the version field in env_train.yml or specify a different version on the CLI that overrides the version value in env_train.yml.
# use shell epoch time as the version
version=$(date +%s)
az ml environment create --file env_train.yml --registry-name <registry-name> --set version=$version
Tip
version=$(date +%s) works only in Linux. Replace $version with a random number if this doesn't work.
Note down the name and version of the environment from the output of the az ml environment create command and use them with az ml environment show commands as follows. You'll need the name and version in the next section when you create a component in the registry.
az ml environment show --name SKLearnEnv --version 1 --registry-name <registry-name>
Tip
If you used a different environment name or version, replace the --name and --version parameters accordingly.
You can also use az ml environment list --registry-name <registry-name> to list all environments in the registry.
You can browse all environments in the Azure Machine Learning studio. Make sure you navigate to the global UI and look for the Registries entry.

Create a component in registry
Components are reusable building blocks of Machine Learning pipelines in Azure Machine Learning. You can package the code, command, environment, input interface, and output interface of an individual pipeline step into a component. Then you can reuse the component across multiple pipelines without having to worry about porting dependencies and code each time you write a different pipeline.
Creating a component in a workspace allows you to use the component in any pipeline job within that workspace. Creating a component in a registry allows you to use the component in any pipeline in any workspace within your organization. Creating components in a registry is a great way to build modular reusable utilities or shared training tasks that can be used for experimentation by different teams within your organization.
For more information on components, see the following articles:
How to use components in pipelines (SDK)
Important
Registry only supports named assets (data/model/component/environment). To reference an asset in a registry, you need to create it in the registry first. Especially for pipeline component case, if you want reference component or environment in pipeline component, you need first create the component or environment in the registry.
Make sure you are in the folder cli/jobs/pipelines-with-components/nyc_taxi_data_regression. You find the component definition file train.yml that packages a Scikit Learn training script train_src/train.py and the curated environment AzureML-sklearn-0.24-ubuntu18.04-py37-cpu. We use the Scikit Learn environment created in pervious step instead of the curated environment. You can edit environment field in the train.yml to refer to your Scikit Learn environment. The resulting component definition file train.yml is similar to the following example:
# <component>
$schema: https://azuremlschemas.azureedge.net/latest/commandComponent.schema.json
name: train_linear_regression_model
display_name: TrainLinearRegressionModel
version: 1
type: command
inputs:
  training_data:
    type: uri_folder
  test_split_ratio:
    type: number
    min: 0
    max: 1
    default: 0.2
outputs:
  model_output:
    type: mlflow_model
  test_data:
    type: uri_folder
code: ./train_src
environment: azureml://registries/<registry-name>/environments/SKLearnEnv/versions/1`
command: >-
  python train.py
  --training_data ${{inputs.training_data}}
  --test_data ${{outputs.test_data}}
  --model_output ${{outputs.model_output}}
  --test_split_ratio ${{inputs.test_split_ratio}}
If you used different name or version, the more generic representation looks like this: environment: azureml://registries/<registry-name>/environments/<sklearn-environment-name>/versions/<sklearn-environment-version>, so make sure you replace the <registry-name>, <sklearn-environment-name> and <sklearn-environment-version> accordingly. You then run the az ml component create command to create the component as follows.
az ml component create --file train.yml --registry-name <registry-name>
Tip
The same CLI command az ml component create can be used to create components in a workspace or registry. Running the command with --workspace-name command creates the component in a workspace whereas running the command with --registry-name creates the component in the registry.
If you prefer to not edit the train.yml, you can override the environment name on the CLI as follows:
az ml component create --file train.yml --registry-name <registry-name>` --set environment=azureml://registries/<registry-name>/environments/SKLearnEnv/versions/1
# or if you used a different name or version, replace `<sklearn-environment-name>` and `<sklearn-environment-version>` accordingly
az ml component create --file train.yml --registry-name <registry-name>` --set environment=azureml://registries/<registry-name>/environments/<sklearn-environment-name>/versions/<sklearn-environment-version>
Tip
If you get an error that the name of the component already exists in the registry, you can either edit the version in train.yml or override the version on the CLI with a random version.
Note down the name and version of the component from the output of the az ml component create command and use them with az ml component show commands as follows. You'll need the name and version in the next section when you create submit a training job in the workspace.
az ml component show --name <component_name> --version <component_version> --registry-name <registry-name>
You can also use az ml component list --registry-name <registry-name> to list all components in the registry.
You can browse all components in the Azure Machine Learning studio. Make sure you navigate to the global UI and look for the Registries entry.

Run a pipeline job in a workspace using component from registry
When running a pipeline job that uses a component from a registry, the compute resources and training data are local to the workspace. For more information on running jobs, see the following articles:
- Running jobs (CLI)
- Running jobs (SDK)
- Pipeline jobs with components (CLI)
- Pipeline jobs with components (SDK)
We run a pipeline job with the Scikit Learn training component created in the previous section to train a model. Check that you are in the folder cli/jobs/pipelines-with-components/nyc_taxi_data_regression. The training dataset is located in the data_transformed folder. Edit the component section in under the train_job section of the single-job-pipeline.yml file to refer to the training component created in the previous section. The resulting single-job-pipeline.yml is as follows:
$schema: https://azuremlschemas.azureedge.net/latest/pipelineJob.schema.json
type: pipeline
display_name: nyc_taxi_data_regression_single_job
description: Single job pipeline to train regression model based on nyc taxi dataset

jobs:
  train_job:
    type: command
    component: azureml://registries/<registry-name>/component/train_linear_regression_model/versions/1
    compute: azureml:cpu-cluster
    inputs:
      training_data:
        type: uri_folder
        path: ./data_transformed
    outputs:
      model_output:
        type: mlflow_model
      test_data:
The key aspect is that this pipeline is going to run in a workspace using a component that isn't in the specific workspace. The component is in a registry that can be used with any workspace in your organization. You can run this training job in any workspace you have access to without having worry about making the training code and environment available in that workspace.
Warning
- Before running the pipeline job, confirm that the workspace in which you run the job is in an Azure region that is supported by the registry in which you created the component.
- Confirm that the workspace has a compute cluster with the name
cpu-clusteror edit thecomputefield underjobs.train_job.computewith the name of your compute.
Run the pipeline job with the az ml job create command.
az ml job create --file single-job-pipeline.yml
Tip
If you didn't configure the default workspace and resource group as explained in the prerequisites section, you need to specify the --workspace-name and --resource-group parameters for the az ml job create to work.
Alternatively, ou can skip editing single-job-pipeline.yml and override the component name used by train_job in the CLI.
az ml job create --file single-job-pipeline.yml --set jobs.train_job.component=azureml://registries/<registry-name>/component/train_linear_regression_model/versions/1
Since the component used in the training job is shared through a registry, you can submit the job to any workspace that you have access to in your organization, even across different subscriptions. For example, if you have dev-workspace, test-workspace and prod-workspace, running the training job in these three workspaces is as easy as running three az ml job create commands.
az ml job create --file single-job-pipeline.yml --workspace-name dev-workspace --resource-group <resource-group-of-dev-workspace>
az ml job create --file single-job-pipeline.yml --workspace-name test-workspace --resource-group <resource-group-of-test-workspace>
az ml job create --file single-job-pipeline.yml --workspace-name prod-workspace --resource-group <resource-group-of-prod-workspace>
In Azure Machine Learning studio, select the endpoint link in the job output to view the job. Here you can analyze training metrics, verify that the job is using the component and environment from registry, and review the trained model. Note down the name of the job from the output or find the same information from the job overview in Azure Machine Learning studio. You'll need this information to download the trained model in the next section on creating models in registry.

Create a model in registry
You learn how to create models in a registry in this section. Review manage models to learn more about model management in Azure Machine Learning. We look at two different ways to create a model in a registry. First is from local files. Second, is to copy a model registered in the workspace to a registry.
In both the options, you create model with the MLflow format, which helps you to deploy this model for inference without writing any inference code.
Create a model in registry from local files
Download the model, which is available as output of the train_job by replacing <job-name> with the name from the job from the previous section. The model along with MLflow metadata files should be available in the ./artifacts/model/.
# fetch the name of the train_job by listing all child jobs of the pipeline job
train_job_name=$(az ml job list --parent-job-name <job-name> --query [0].name | sed 's/\"//g')
# download the default outputs of the train_job
az ml job download --name $train_job_name
# review the model files
ls -l ./artifacts/model/
Tip
If you didn't configure the default workspace and resource group as explained in the prerequisites section, you need to specify the --workspace-name and --resource-group parameters for the az ml model create to work.
Warning
The output of az ml job list is passed to sed. This works only on Linux shells. If you are on Windows, run az ml job list --parent-job-name <job-name> --query [0].name and strip any quotes you see in the train job name.
If you're unable to download the model, you can find sample MLflow model trained by the training job in the previous section in cli/jobs/pipelines-with-components/nyc_taxi_data_regression/artifacts/model/ folder.
Create the model in the registry:
# create model in registry
az ml model create --name nyc-taxi-model --version 1 --type mlflow_model --path ./artifacts/model/ --registry-name <registry-name>
Tip
- Use a random number for the
versionparameter if you get an error that model name and version already exist. - The same CLI command
az ml model createcan be used to create models in a workspace or registry. Running the command with--workspace-namecommand creates the model in a workspace whereas running the command with--registry-namecreates the model in the registry.
Share a model from workspace to registry
In this workflow, you first create the model in the workspace and then share it to the registry. This workflow is useful when you want to test the model in the workspace before sharing it. For example, deploy it to endpoints and try out inference with some test data and then copy the model to a registry if everything looks good. This workflow might also be useful when you're developing a series of models using different techniques, frameworks, or parameters and want to promote just one of them to the registry as a production candidate.
Make sure you have the name of the pipeline job from the previous section and replace that in the command to fetch the training job name. You then register the model from the output of the training job into the workspace. Note how the --path parameter refers to the output train_job output with the azureml://jobs/$train_job_name/outputs/artifacts/paths/model syntax.
# fetch the name of the train_job by listing all child jobs of the pipeline job
train_job_name=$(az ml job list --parent-job-name <job-name> --workspace-name <workspace-name> --resource-group <workspace-resource-group> --query [0].name | sed 's/\"//g')
# create model in workspace
az ml model create --name nyc-taxi-model --version 1 --type mlflow_model --path azureml://jobs/$train_job_name/outputs/artifacts/paths/model
Tip
- Use a random number for the
versionparameter if you get an error that the model name and version already exists. - If you haven't configured the default workspace and resource group as explained in the prerequisites section, you need to specify the
--workspace-nameand--resource-groupparameters for theaz ml model createto work.
Note down the model name and version. You can validate if the model is registered in the workspace by browsing it in the Studio UI or using az ml model show --name nyc-taxi-model --version $model_version command.
Next, you share the model from the workspace to the registry.
# share model registered in workspace to registry
az ml model share --name nyc-taxi-model --version 1 --registry-name <registry-name> --share-with-name <new-name> --share-with-version <new-version>
Tip
- Make sure to use the right model name and version if you changed it in the
az ml model createcommand. - The above command has two optional parameters "--share-with-name" and "--share-with-version". If these are not provided the new model will have the same name and version as the model that is being shared.
Note down the
nameandversionof the model from the output of theaz ml model createcommand and use them withaz ml model showcommands as follows. You'll need thenameandversionin the next section when you deploy the model to an online endpoint for inference.
az ml model show --name <model_name> --version <model_version> --registry-name <registry-name>
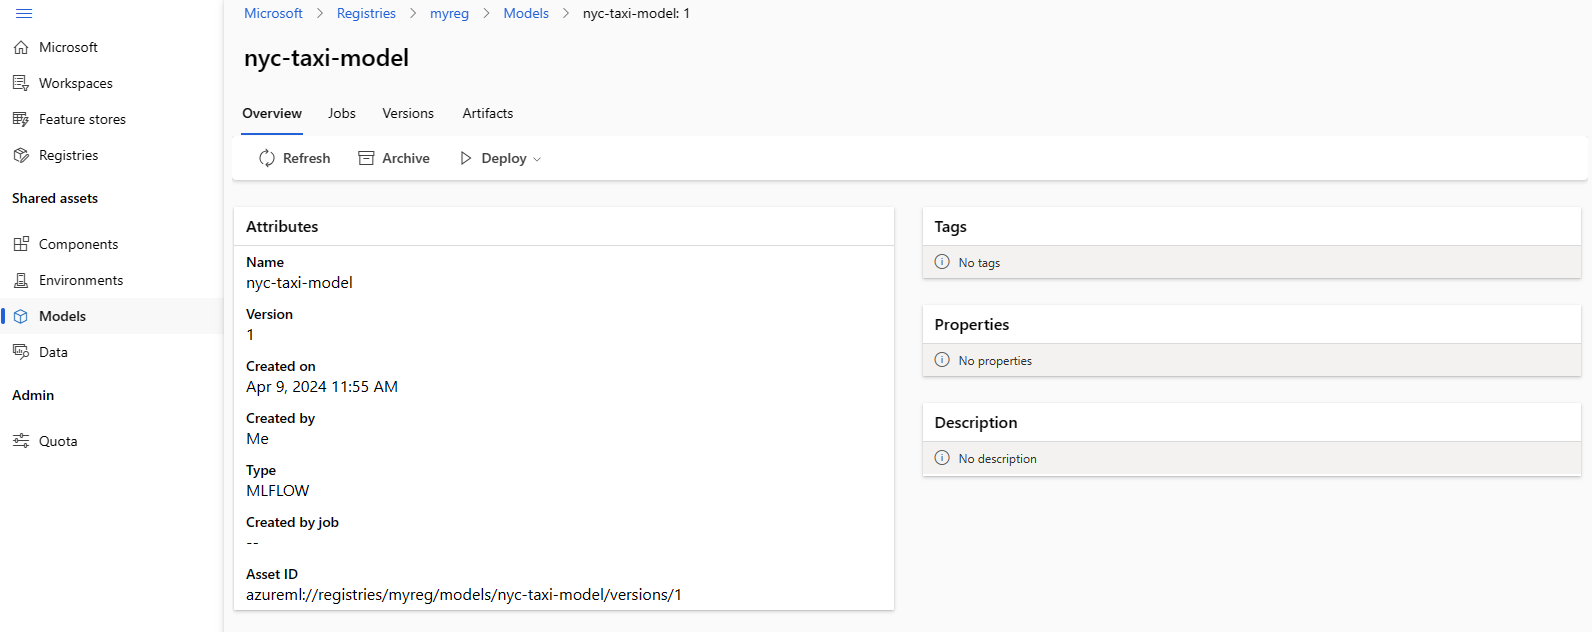
You can also use az ml model list --registry-name <registry-name> to list all models in the registry or browse all components in the Azure Machine Learning studio UI. Make sure you navigate to the global UI and look for the Registries hub.
The following screenshot shows a model in a registry in Azure Machine Learning studio. If you created a model from the job output and then copied the model from the workspace to registry, you'll see that the model has a link to the job that trained the model. You can use that link to navigate to the training job to review the code, environment and data used to train the model.
Deploy model from registry to online endpoint in workspace
In the last section, you'll deploy a model from registry to an online endpoint in a workspace. You can choose to deploy any workspace you have access to in your organization, provided the location of the workspace is one of the locations supported by the registry. This capability is helpful if you trained a model in a dev workspace and now need to deploy the model to test or prod workspace, while preserving the lineage information around the code, environment and data used to train the model.
Online endpoints let you deploy models and submit inference requests through the REST APIs. For more information, see How to deploy and score a machine learning model by using an online endpoint.
Create an online endpoint.
az ml online-endpoint create --name reg-ep-1234
Update the model: line deploy.yml available in the cli/jobs/pipelines-with-components/nyc_taxi_data_regression folder to refer the model name and version from the pervious step. Create an online deployment to the online endpoint. The deploy.yml is shown below for reference.
$schema: https://azuremlschemas.azureedge.net/latest/managedOnlineDeployment.schema.json
name: demo
endpoint_name: reg-ep-1234
model: azureml://registries/<registry-name>/models/nyc-taxi-model/versions/1
instance_type: Standard_DS2_v2
instance_count: 1
Create the online deployment. The deployment takes several minutes to complete.
az ml online-deployment create --file deploy.yml --all-traffic
Fetch the scoring URI and submit a sample scoring request. Sample data for the scoring request is available in the scoring-data.json in the cli/jobs/pipelines-with-components/nyc_taxi_data_regression folder.
ENDPOINT_KEY=$(az ml online-endpoint get-credentials -n reg-ep-1234 -o tsv --query primaryKey)
SCORING_URI=$(az ml online-endpoint show -n reg-ep-1234 -o tsv --query scoring_uri)
curl --request POST "$SCORING_URI" --header "Authorization: Bearer $ENDPOINT_KEY" --header 'Content-Type: application/json' --data @./scoring-data.json
Tip
curlcommand works only on Linux.- If you have not configured the default workspace and resource group as explained in the prerequisites section, you will need to specify the
--workspace-nameand--resource-groupparameters for theaz ml online-endpointandaz ml online-deploymentcommands to work.
Clean up resources
If you aren't going use the deployment, you should delete it to reduce costs. The following example deletes the endpoint and all the underlying deployments:
az ml online-endpoint delete --name reg-ep-1234 --yes --no-wait