Note
Access to this page requires authorization. You can try signing in or changing directories.
Access to this page requires authorization. You can try changing directories.
APPLIES TO:
 Azure CLI ml extension v2 (current)
Python SDK azure-ai-ml v2 (current)
Azure CLI ml extension v2 (current)
Python SDK azure-ai-ml v2 (current)
Batch endpoints let you deploy models that run inference over large volumes of data. These endpoints simplify hosting models for batch scoring, so you can focus on machine learning instead of infrastructure.
Use batch endpoints to deploy models when:
- You use expensive models that take longer to run inference.
- You perform inference over large amounts of data distributed in multiple files.
- You don't need low latency.
- You take advantage of parallelization.
This article shows how to use a batch endpoint to deploy a machine learning model that solves the classic MNIST (Modified National Institute of Standards and Technology) digit recognition problem. The deployed model performs batch inferencing over large amounts of data, such as image files. The process begins with creating a batch deployment of a model built using Torch. This deployment becomes the default in the endpoint. Later, create a second deployment of a model built with TensorFlow (Keras), test the second deployment, and set it as the endpoint's default deployment.
Prerequisites
Before you follow the steps in this article, make sure you have the following prerequisites:
An Azure subscription. If you don't have an Azure subscription, create a free account before you begin. Try the free or paid version of Azure Machine Learning.
An Azure Machine Learning workspace. If you don't have one, use the steps in the How to manage workspaces article to create one.
To perform the following tasks, ensure that you have these permissions in the workspace:
To create/manage batch endpoints and deployments: Use owner role, contributor role, or a custom role allowing
Microsoft.MachineLearningServices/workspaces/batchEndpoints/*.To create ARM deployments in the workspace resource group: Use owner role, contributor role, or a custom role allowing
Microsoft.Resources/deployments/writein the resource group where the workspace is deployed.
You need to install the following software to work with Azure Machine Learning:
APPLIES TO:
Azure CLI ml extension v2 (current)The Azure CLI and the
mlextension for Azure Machine Learning.az extension add -n ml
Clone the examples repository
The example in this article is based on code samples contained in the azureml-examples repository. To run the commands locally without having to copy/paste YAML and other files, first clone the repo and then change directories to the folder:
git clone https://github.com/Azure/azureml-examples --depth 1
cd azureml-examples/cli/endpoints/batch/deploy-models/mnist-classifier
Prepare your system
Connect to your workspace
First, connect to the Azure Machine Learning workspace where you work.
If you haven't already set the defaults for the Azure CLI, save your default settings. To avoid entering the values for your subscription, workspace, resource group, and location multiple times, run this code:
az account set --subscription <subscription>
az configure --defaults workspace=<workspace> group=<resource-group> location=<location>
Create compute
Batch endpoints run on compute clusters and support both Azure Machine Learning compute clusters (AmlCompute) and Kubernetes clusters. Clusters are a shared resource, therefore, one cluster can host one or many batch deployments (along with other workloads, if desired).
Create a compute named batch-cluster, as shown in the following code. Adjust as needed and reference your compute using azureml:<your-compute-name>.
az ml compute create -n batch-cluster --type amlcompute --min-instances 0 --max-instances 5
Note
You're not charged for the compute at this point because the cluster remains at 0 nodes until a batch endpoint is invoked and a batch scoring job is submitted. For more information about compute costs, see Manage and optimize cost for AmlCompute.
Create a batch endpoint
A batch endpoint is an HTTPS endpoint that clients call to trigger a batch scoring job. A batch scoring job scores multiple inputs. A batch deployment is a set of compute resources hosting the model that performs batch scoring (or batch inferencing). One batch endpoint can have multiple batch deployments. For more information about batch endpoints, see What are batch endpoints?.
Tip
One of the batch deployments serves as the default deployment for the endpoint. When the endpoint is invoked, the default deployment performs batch scoring. For more information about batch endpoints and deployments, see batch endpoints and batch deployment.
Name the endpoint. The endpoint's name must be unique within an Azure region because the name is included in the endpoint's URI. For example, there can be only one batch endpoint with the name
mybatchendpointinwestus2.Configure the batch endpoint
The following YAML file defines a batch endpoint. Use this file with the CLI command for batch endpoint creation.
endpoint.yml
$schema: https://azuremlschemas.azureedge.net/latest/batchEndpoint.schema.json
name: mnist-batch
description: A batch endpoint for scoring images from the MNIST dataset.
tags:
  type: deep-learning
The following table describes the key properties of the endpoint. For the complete batch endpoint YAML schema, see CLI (v2) batch endpoint YAML schema.
Key Description nameThe name of the batch endpoint. Needs to be unique at the Azure region level. descriptionThe description of the batch endpoint. This property is optional. tagsThe tags to include in the endpoint. This property is optional. Create the endpoint:
Create a batch deployment
A model deployment is a set of resources required for hosting the model that does the actual inferencing. To create a batch model deployment, you need the following items:
- A registered model in the workspace
- The code to score the model
- An environment with the model's dependencies installed
- The precreated compute and resource settings
Begin by registering the model to be deployed—a Torch model for the popular digit recognition problem (MNIST). Batch Deployments can only deploy models that are registered in the workspace. You can skip this step if the model you want to deploy is already registered.
Tip
Models are associated with the deployment, rather than with the endpoint. This means that a single endpoint can serve different models (or model versions) under the same endpoint as long as the different models (or model versions) are deployed in different deployments.
Now it's time to create a scoring script. Batch deployments require a scoring script that indicates how a given model should be executed and how input data must be processed. Batch endpoints support scripts created in Python. In this case, you deploy a model that reads image files representing digits and outputs the corresponding digit. The scoring script is as follows:
Note
For MLflow models, Azure Machine Learning automatically generates the scoring script, so you're not required to provide one. If your model is an MLflow model, you can skip this step. For more information about how batch endpoints work with MLflow models, see the article Using MLflow models in batch deployments.
Warning
If you're deploying an Automated machine learning (AutoML) model under a batch endpoint, note that the scoring script that AutoML provides only works for online endpoints and isn't designed for batch execution. For information on how to create a scoring script for your batch deployment, see Author scoring scripts for batch deployments.
deployment-torch/code/batch_driver.py
import os
import pandas as pd
import torch
import torchvision
import glob
from os.path import basename
from mnist_classifier import MnistClassifier
from typing import List


def init():
    global model
    global device

    # AZUREML_MODEL_DIR is an environment variable created during deployment
    # It is the path to the model folder
    model_path = os.environ["AZUREML_MODEL_DIR"]
    model_file = glob.glob(f"{model_path}/*/*.pt")[-1]

    model = MnistClassifier()
    model.load_state_dict(torch.load(model_file))
    model.eval()

    device = torch.device("cuda:0" if torch.cuda.is_available() else "cpu")


def run(mini_batch: List[str]) -> pd.DataFrame:
    print(f"Executing run method over batch of {len(mini_batch)} files.")

    results = []
    with torch.no_grad():
        for image_path in mini_batch:
            image_data = torchvision.io.read_image(image_path).float()
            batch_data = image_data.expand(1, -1, -1, -1)
            input = batch_data.to(device)

            # perform inference
            predict_logits = model(input)

            # Compute probabilities, classes and labels
            predictions = torch.nn.Softmax(dim=-1)(predict_logits)
            predicted_prob, predicted_class = torch.max(predictions, axis=-1)

            results.append(
                {
                    "file": basename(image_path),
                    "class": predicted_class.numpy()[0],
                    "probability": predicted_prob.numpy()[0],
                }
            )

    return pd.DataFrame(results)
Create an environment where your batch deployment runs. The environment should include the packages
azureml-coreandazureml-dataset-runtime[fuse], which are required by batch endpoints, plus any dependency your code requires for running. In this case, the dependencies have been captured in aconda.yamlfile:deployment-torch/environment/conda.yaml
name: mnist-env
channels:
  - conda-forge
dependencies:
  - python=3.8.5
  - pip<22.0
  - pip:
    - torch==1.13.0
    - torchvision==0.14.0
    - pytorch-lightning
    - pandas
    - azureml-core
    - azureml-dataset-runtime[fuse]
Important
The packages
azureml-coreandazureml-dataset-runtime[fuse]are required by batch deployments and should be included in the environment dependencies.Specify the environment as follows:
The environment definition is included in the deployment definition itself as an anonymous environment. You see in the following lines in the deployment:
environment: name: batch-torch-py38 image: mcr.microsoft.com/azureml/openmpi4.1.0-ubuntu22.04:latest conda_file: environment/conda.yamlGo to the Environments tab in the side menu.
Select Custom environments > Create.
Enter the name of the environment, in this case
torch-batch-env.For Select environment source, select Use existing docker image with optional conda file.
For Container registry image path, enter
mcr.microsoft.com/azureml/openmpi4.1.0-ubuntu20.04.Select Next to go to the "Customize" section.
Copy the content of the file deployment-torch/environment/conda.yaml from the GitHub repo into the portal.
Select Next until you reach the "Review page."
Select Create and wait for the environment to be ready.
Warning
Curated environments aren't supported in batch deployments. You need to specify your own environment. You can always use the base image of a curated environment as yours to simplify the process.
Create a deployment definition
deployment-torch/deployment.yml
$schema: https://azuremlschemas.azureedge.net/latest/modelBatchDeployment.schema.json
name: mnist-torch-dpl
description: A deployment using Torch to solve the MNIST classification dataset.
endpoint_name: mnist-batch
type: model
model:
  name: mnist-classifier-torch
  path: model
code_configuration:
  code: code
  scoring_script: batch_driver.py
environment:
  name: batch-torch-py38
  image: mcr.microsoft.com/azureml/openmpi4.1.0-ubuntu22.04:latest
  conda_file: environment/conda.yaml
compute: azureml:batch-cluster
resources:
  instance_count: 1
settings:
  max_concurrency_per_instance: 2
  mini_batch_size: 10
  output_action: append_row
  output_file_name: predictions.csv
  retry_settings:
    max_retries: 3
    timeout: 30
  error_threshold: -1
  logging_level: info
The following table describes the key properties of the batch deployment. For the full batch deployment YAML schema, see CLI (v2) batch deployment YAML schema.
Key Description nameThe name of the deployment. endpoint_nameThe name of the endpoint to create the deployment under. modelThe model to be used for batch scoring. The example defines a model inline using path. This definition allows model files to be automatically uploaded and registered with an autogenerated name and version. See the Model schema for more options. As a best practice for production scenarios, you should create the model separately and reference it here. To reference an existing model, use theazureml:<model-name>:<model-version>syntax.code_configuration.codeThe local directory that contains all the Python source code to score the model. code_configuration.scoring_scriptThe Python file in the code_configuration.codedirectory. This file must have aninit()function and arun()function. Use theinit()function for any costly or common preparation (for example, to load the model in memory).init()is called only once at the start of the process. Userun(mini_batch)to score each entry; the value ofmini_batchis a list of file paths. Therun()function should return a pandas DataFrame or an array. Each returned element indicates one successful run of input element in themini_batch. For more information on how to author a scoring script, see Understanding the scoring script.environmentThe environment to score the model. The example defines an environment inline using conda_fileandimage. Theconda_filedependencies are installed on top of theimage. The environment is automatically registered with an autogenerated name and version. See the Environment schema for more options. As a best practice for production scenarios, you should create the environment separately and reference it here. To reference an existing environment, use theazureml:<environment-name>:<environment-version>syntax.computeThe compute to run batch scoring. The example uses the batch-clustercreated at the beginning and references it using theazureml:<compute-name>syntax.resources.instance_countThe number of instances to be used for each batch scoring job. settings.max_concurrency_per_instanceThe maximum number of parallel scoring_scriptruns per instance.settings.mini_batch_sizeThe number of files the scoring_scriptcan process in onerun()call.settings.output_actionHow the output should be organized in the output file. append_rowmerges allrun()returned output results into one single file namedoutput_file_name.summary_onlywon't merge the output results and will only calculateerror_threshold.settings.output_file_nameThe name of the batch scoring output file for append_rowoutput_action.settings.retry_settings.max_retriesThe number of max tries for a failed scoring_scriptrun().settings.retry_settings.timeoutThe timeout in seconds for a scoring_scriptrun()for scoring a mini batch.settings.error_thresholdThe number of input file scoring failures that should be ignored. If the error count for the entire input goes above this value, the batch scoring job is terminated. The example uses -1, which indicates that any number of failures is allowed without terminating the batch scoring job.settings.logging_levelLog verbosity. Values in increasing verbosity are: WARNING, INFO, and DEBUG. settings.environment_variablesDictionary of environment variable name-value pairs to set for each batch scoring job. Go to the Endpoints tab in the side menu.
Select the tab Batch endpoints > Create.
Give the endpoint a name, in this case
mnist-batch. You can configure the rest of the fields or leave them blank.Select Next to go to the "Model" section.
Select the model mnist-classifier-torch.
Select Next to go to the "Deployment" page.
Give the deployment a name.
For Output action, make sure Append row is selected.
For Output file name, ensure the batch scoring output file is the one you need. Default is
predictions.csv.For Mini batch size, adjust the size of the files that will be included on each mini-batch. This size controls the amount of data your scoring script receives per batch.
For Scoring timeout (seconds), ensure you're giving enough time for your deployment to score a given batch of files. If you increase the number of files, you usually have to increase the timeout value too. More expensive models (like those based on deep learning) might require high values in this field.
For Max concurrency per instance, configure the number of executors you want to have for each compute instance you get in the deployment. A higher number here guarantees a higher degree of parallelization but it also increases the memory pressure on the compute instance. Tune this value altogether with Mini batch size.
Once done, select Next to go to the "Code + environment" page.
For "Select a scoring script for inferencing", browse to find and select the scoring script file deployment-torch/code/batch_driver.py.
In the "Select environment" section, select the environment you created previously torch-batch-env.
Select Next to go to the "Compute" page.
Select the compute cluster you created in a previous step.
Warning
Azure Kubernetes clusters are supported in batch deployments, but only when created using the Azure Machine Learning CLI or Python SDK.
For Instance count, enter the number of compute instances you want for the deployment. In this case, use 2.
Select Next.
Create the deployment:
Run the following code to create a batch deployment under the batch endpoint, and set it as the default deployment.
az ml batch-deployment create --file deployment-torch/deployment.yml --endpoint-name $ENDPOINT_NAME --set-defaultTip
The
--set-defaultparameter sets the newly created deployment as the default deployment of the endpoint. It's a convenient way to create a new default deployment of the endpoint, especially for the first deployment creation. As a best practice for production scenarios, you might want to create a new deployment without setting it as default. Verify that the deployment works as you expect, and then update the default deployment later. For more information on implementing this process, see the Deploy a new model section.Check batch endpoint and deployment details.
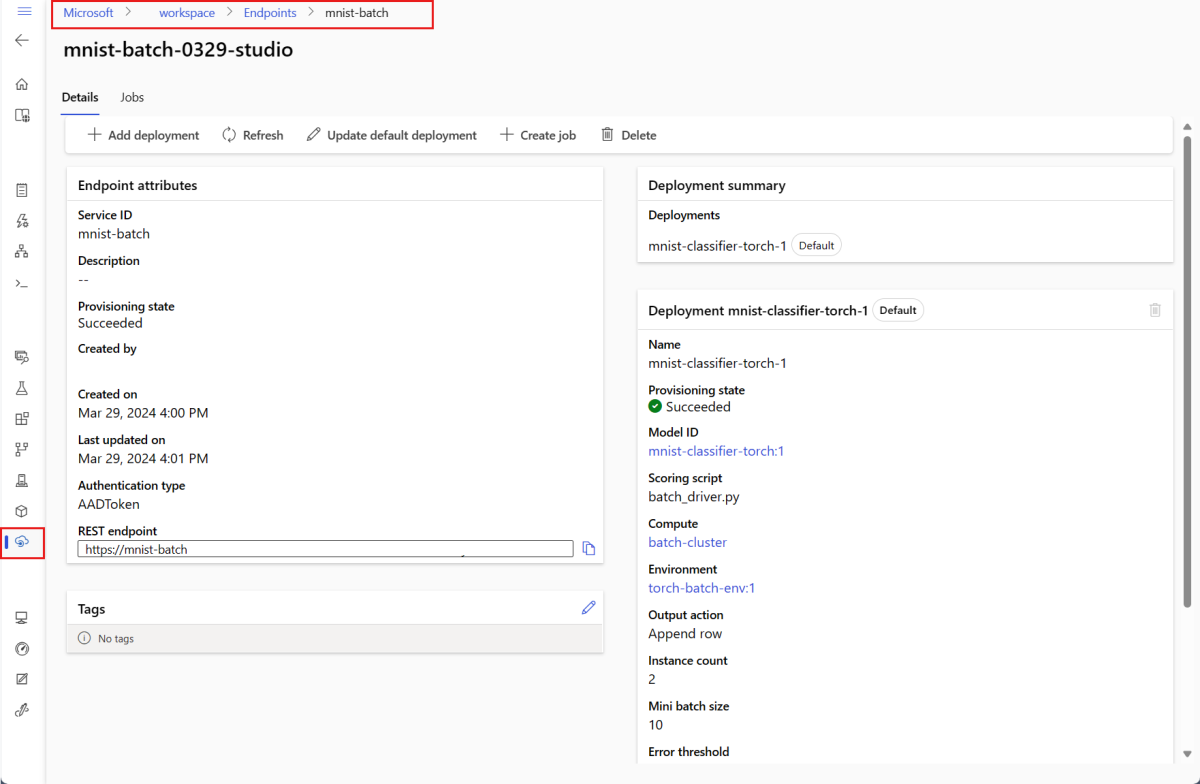
Select the Batch endpoints tab.
Select the batch endpoint you want to view.
The endpoint's Details page shows the details of the endpoint along with all the deployments available in the endpoint.

Run batch endpoints and access results
Understanding the data flow
Before running your batch endpoint, understand how data flows through the system:
Inputs: Data to process (score). This includes:
- Files stored in Azure Storage (blob storage, data lake)
- Folders with multiple files
- Registered datasets in Azure Machine Learning
Processing: The deployed model processes the input data in batches (mini-batches) and generates predictions.
Outputs: Results from the model, stored as files in Azure Storage. By default, outputs are saved to the workspace's default blob storage, but you can specify a different location.
Invoke a batch endpoint
Invoking a batch endpoint triggers a batch scoring job. The job name is returned in the invoke response and tracks the batch scoring progress. Specify the input data path so the endpoints can locate the data to score. The following example shows how to start a new job over a sample data of the MNIST dataset stored in an Azure Storage Account.
You can run and invoke a batch endpoint using Azure CLI, Azure Machine Learning SDK, or REST endpoints. For more information about these options, see Create jobs and input data for batch endpoints.
Note
How does parallelization work?
Batch deployments distribute work at the file level. For example, a folder with 100 files and mini-batches of 10 files generates 10 batches of 10 files each. This happens regardless of file size. If files are too large for processing in mini-batches, split them into smaller files to increase parallelism or reduce the number of files per mini-batch. Batch deployments currently don't account for skews in file size distribution.
JOB_NAME=$(az ml batch-endpoint invoke --name $ENDPOINT_NAME --input $SAMPLE_INPUT_URI --input-type uri_folder --query name -o tsv)


Batch endpoints support reading files or folders that are located in different locations. To learn more about the supported types and how to specify them, see Accessing data from batch endpoints jobs.
Monitor batch job execution progress
Batch scoring jobs take time to process all inputs.
The following code checks the job status and outputs a link to the Azure Machine Learning studio for further details.
az ml job show -n $JOB_NAME --web

Check batch scoring results
The job outputs are stored in cloud storage, either in the workspace's default blob storage, or the storage you specified. To learn how to change the defaults, see Configure the output location. The following steps allow you to view the scoring results in Azure Storage Explorer when the job is completed:
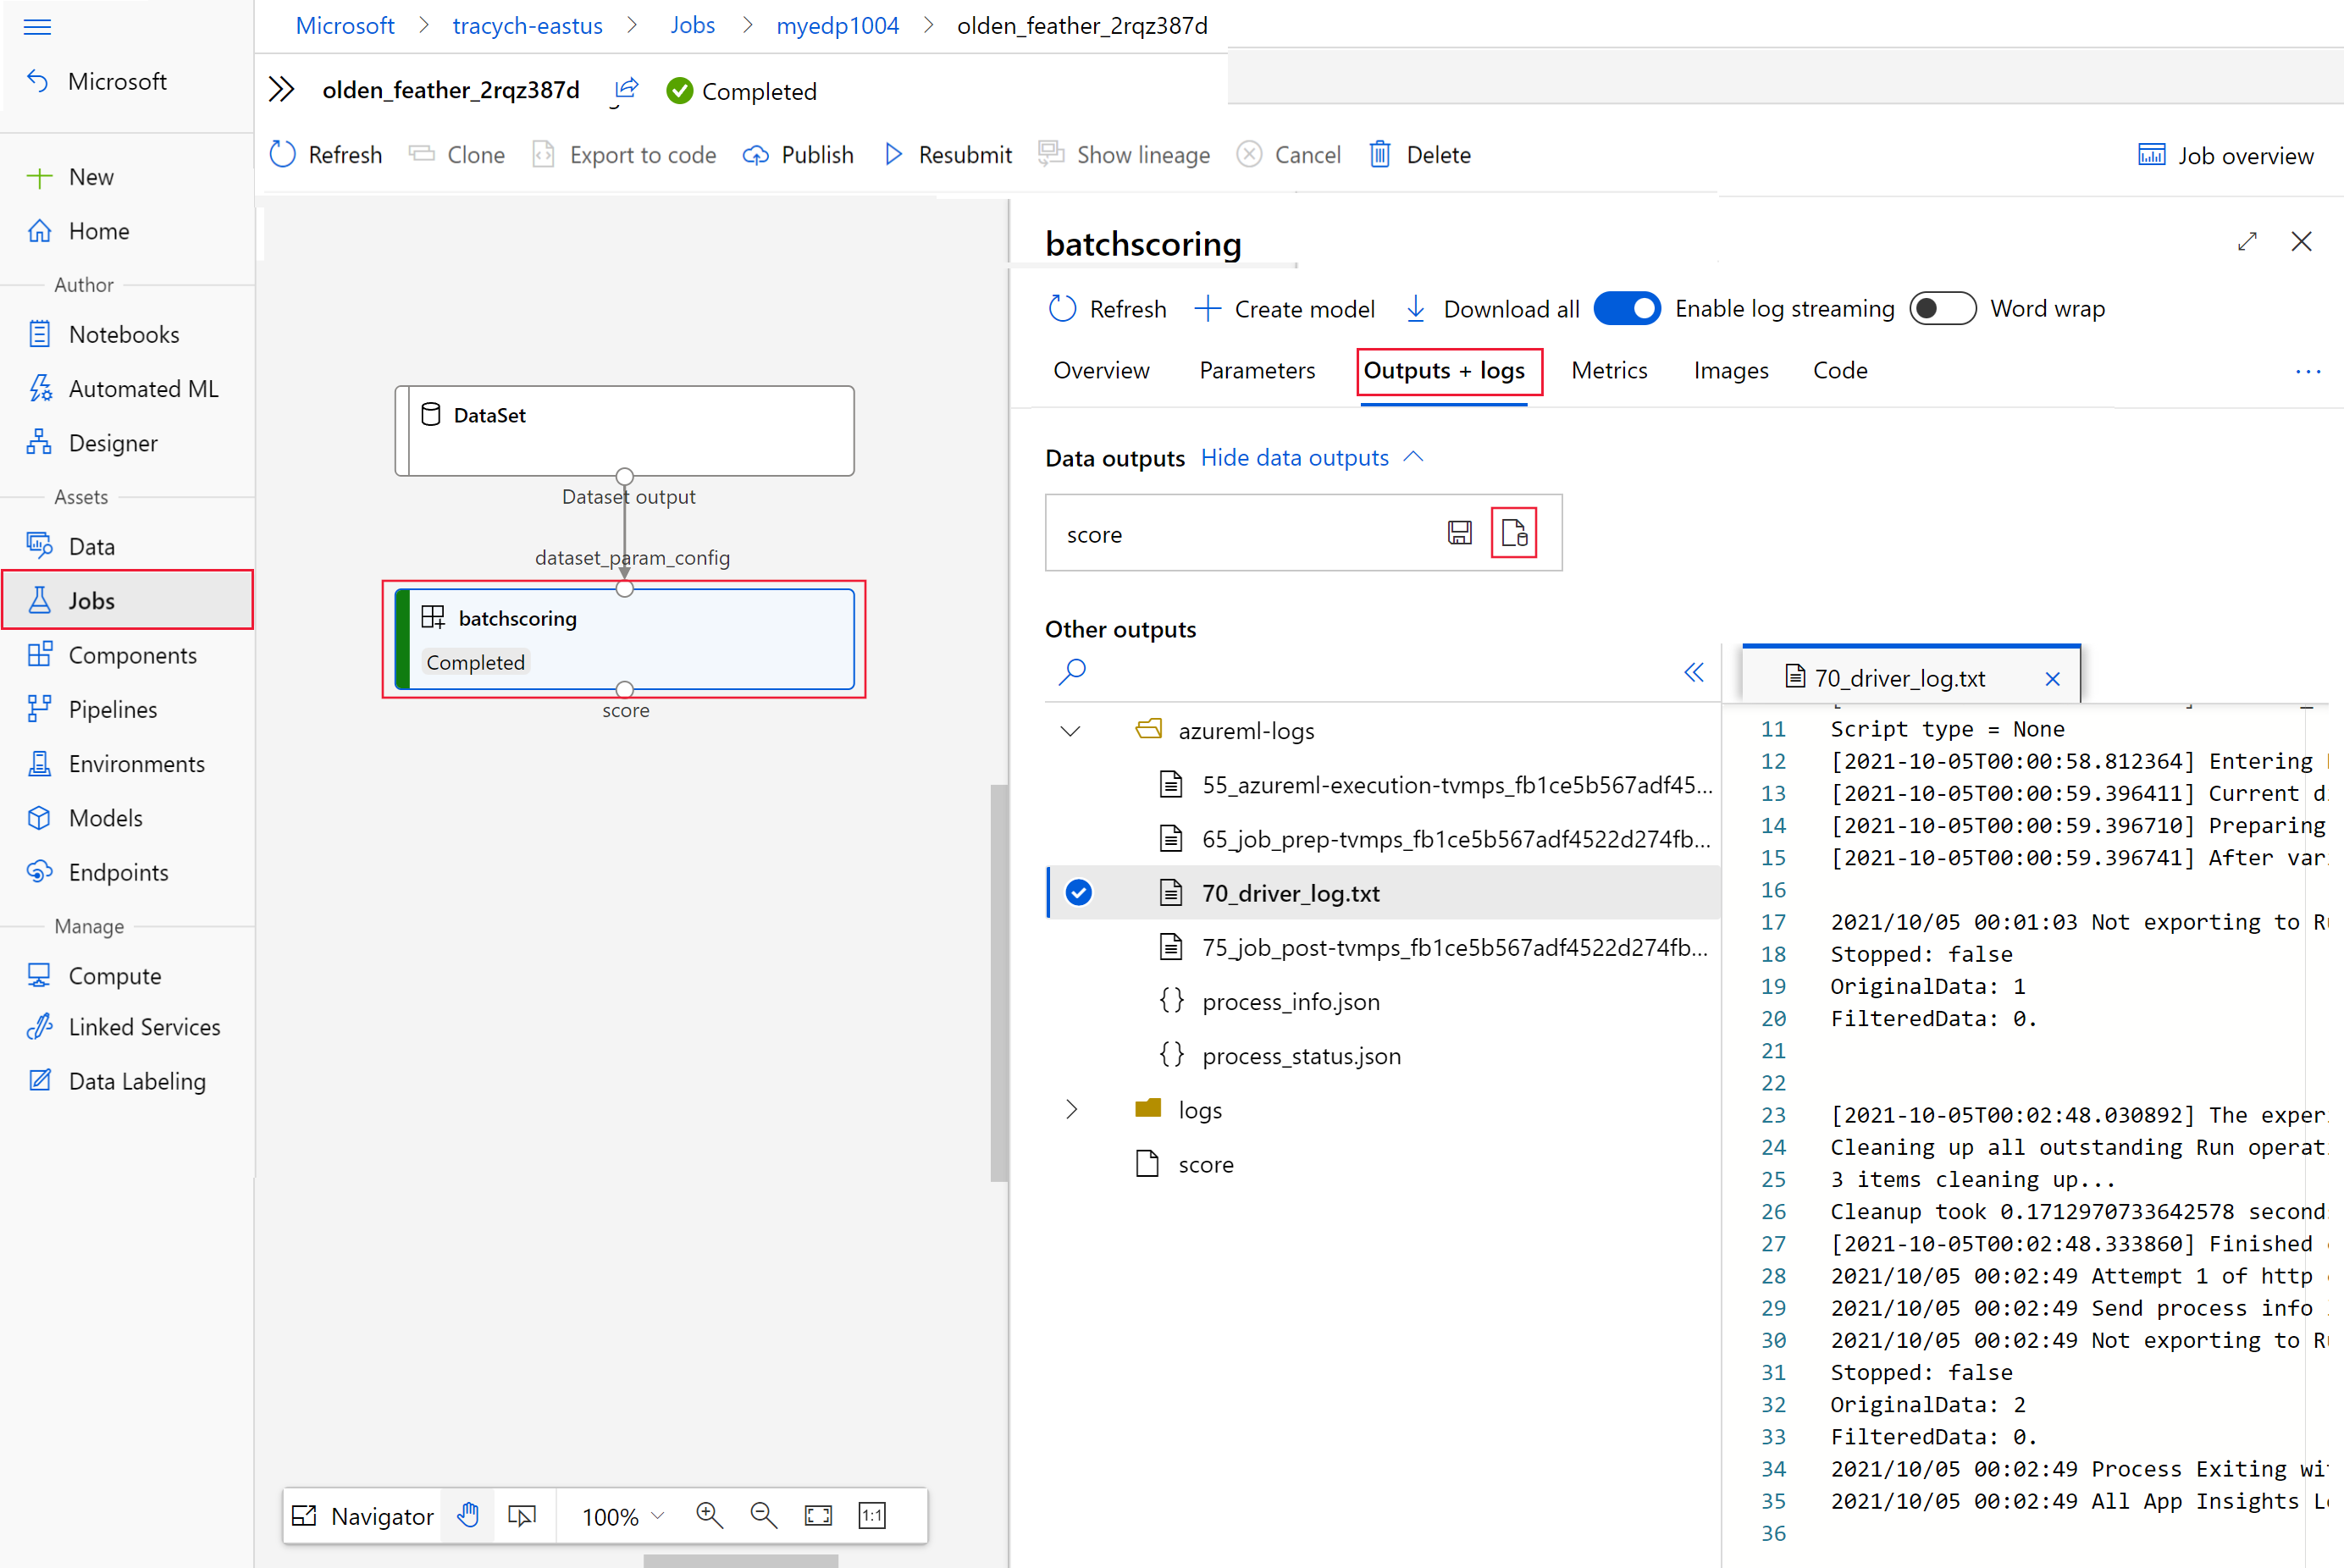
Run the following code to open the batch scoring job in Azure Machine Learning studio. The job studio link is also included in the response of
invoke, as the value ofinteractionEndpoints.Studio.endpoint.az ml job show -n $JOB_NAME --webIn the graph of the job, select the
batchscoringstep.Select the Outputs + logs tab and then select Show data outputs.
From Data outputs, select the icon to open Storage Explorer.
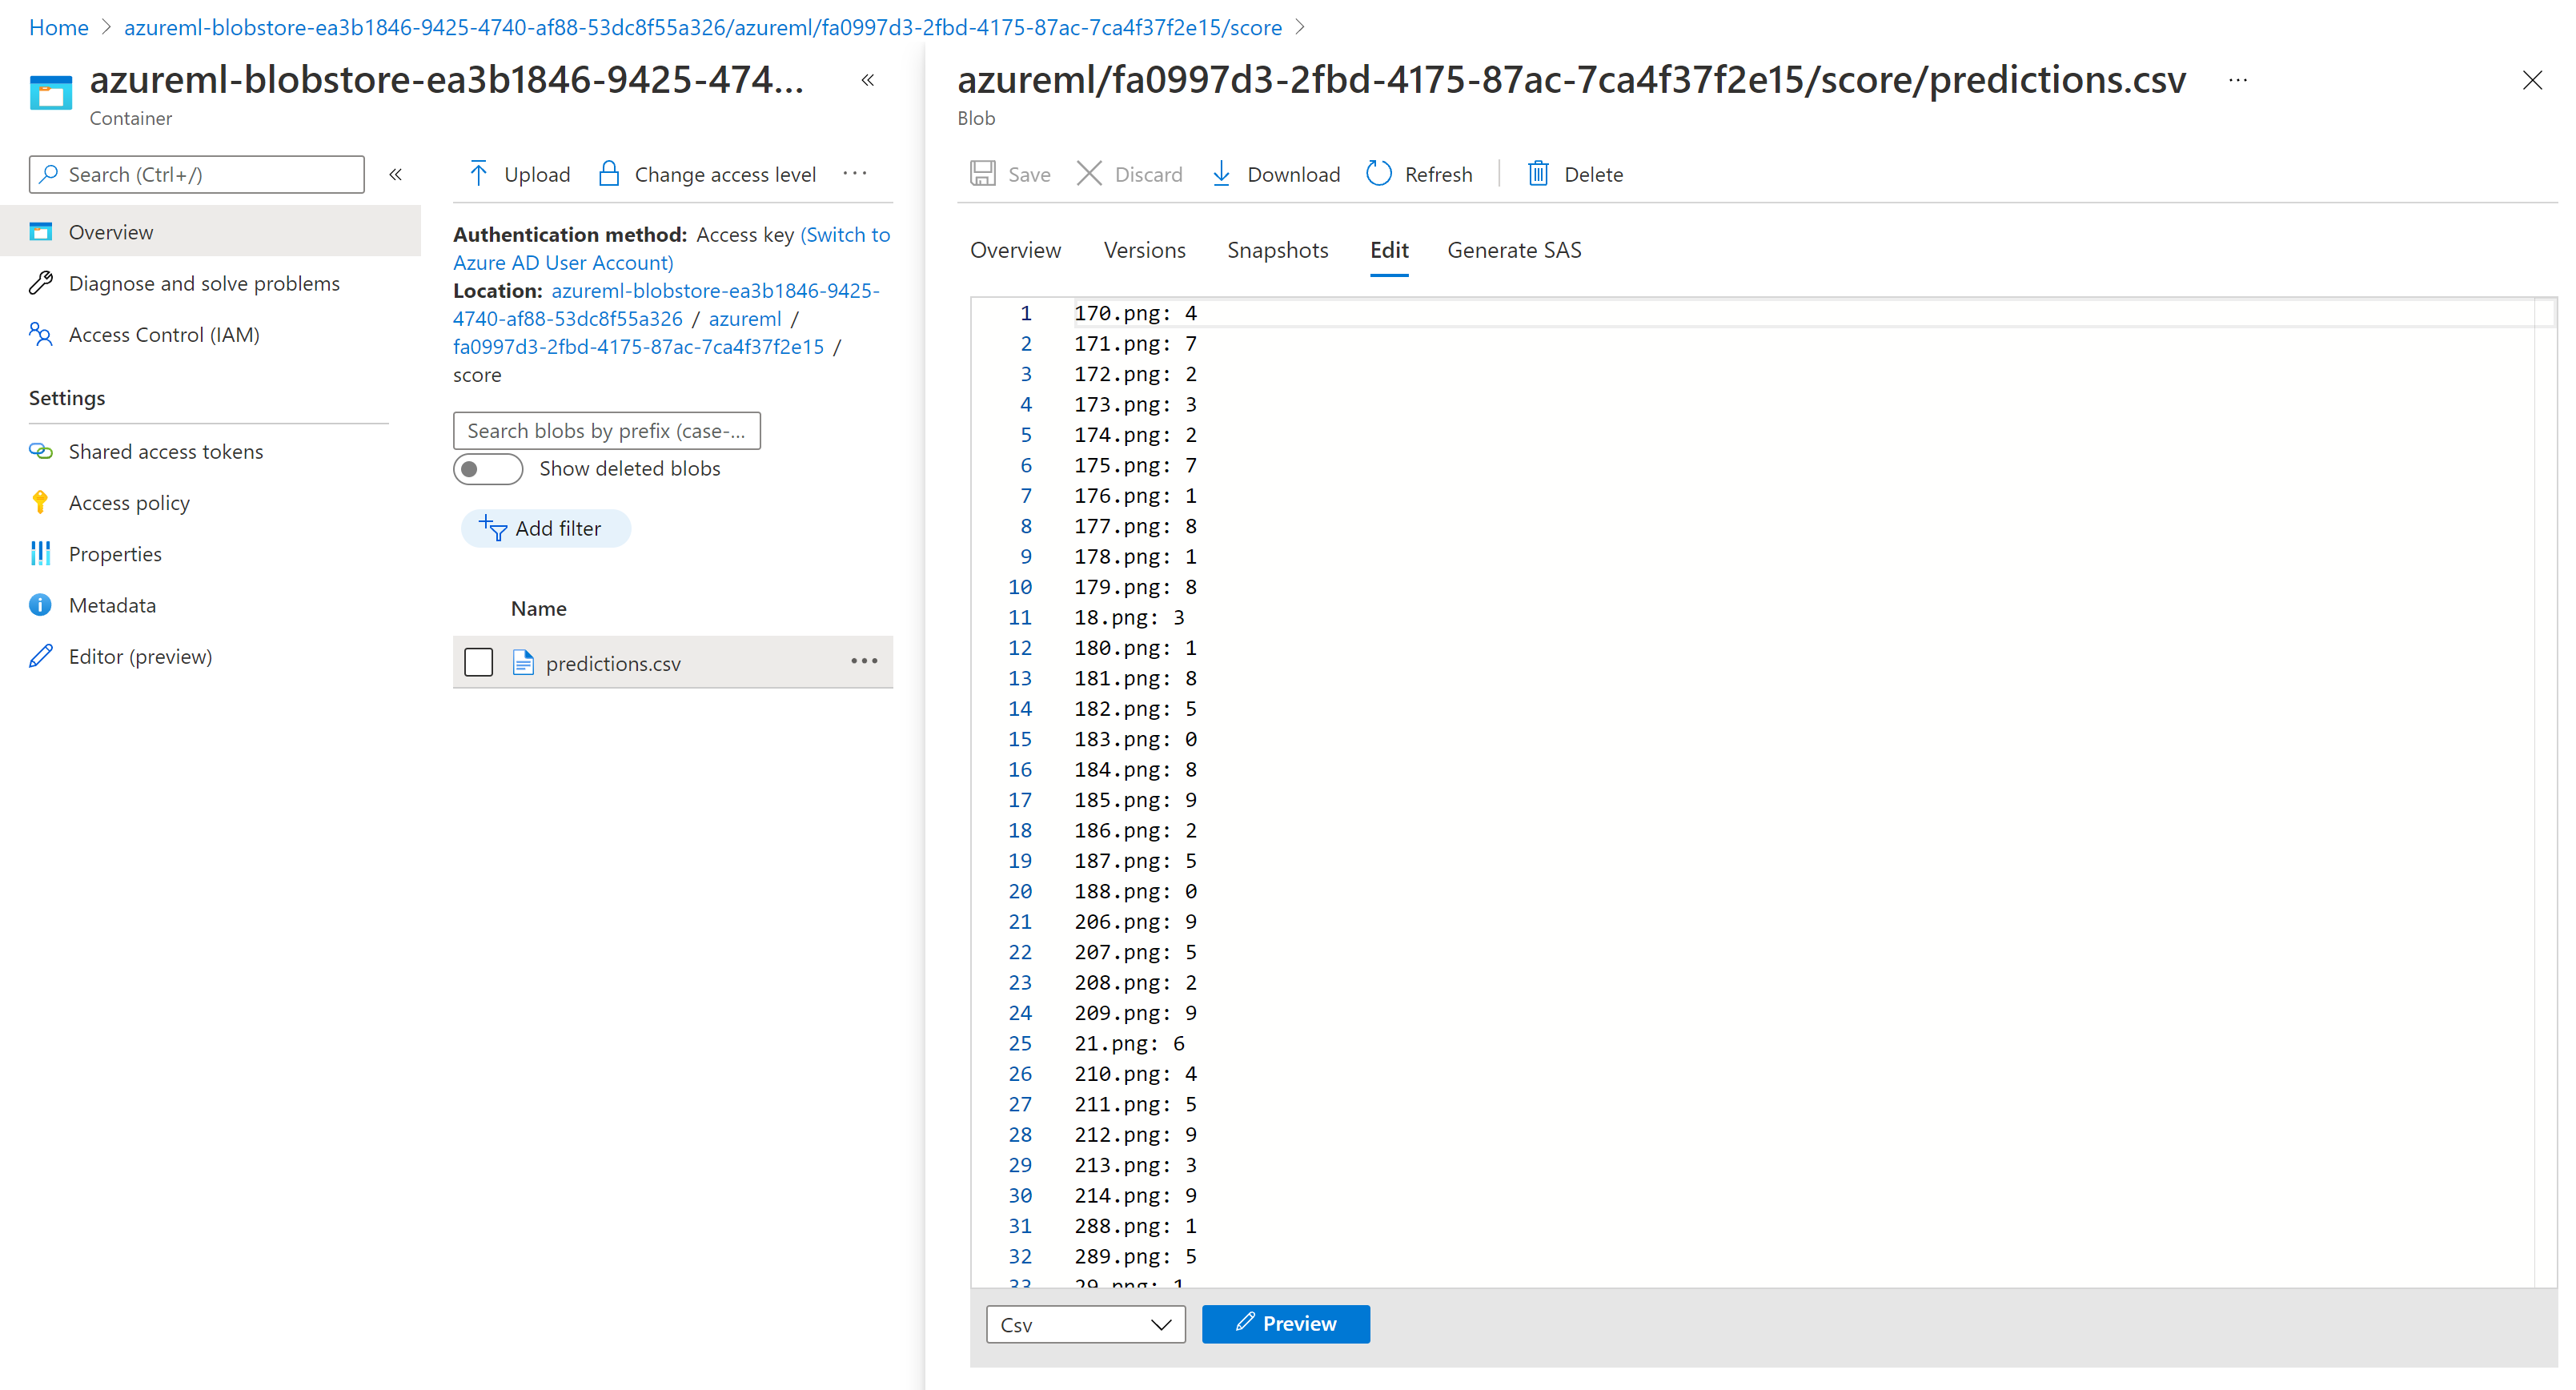
The scoring results in Storage Explorer are similar to the following sample page:


Configure the output location
By default, batch scoring results are stored in the workspace's default blob store in a folder named after the job (a system-generated GUID). Configure the output location when invoking the batch endpoint.
Use output-path to configure any folder in an Azure Machine Learning registered datastore. The syntax for the --output-path is the same as --input when you're specifying a folder, that is, azureml://datastores/<datastore-name>/paths/<path-on-datastore>/. Use --set output_file_name=<your-file-name> to configure a new output file name.
OUTPUT_FILE_NAME=predictions_`echo $RANDOM`.csv
OUTPUT_PATH="azureml://datastores/workspaceblobstore/paths/$ENDPOINT_NAME"

JOB_NAME=$(az ml batch-endpoint invoke --name $ENDPOINT_NAME --input $SAMPLE_INPUT_URI --output-path $OUTPUT_PATH --set output_file_name=$OUTPUT_FILE_NAME --query name -o tsv)

Warning
You must use a unique output location. If the output file exists, the batch scoring job fails.
Important
Unlike inputs, outputs can be stored only in Azure Machine Learning data stores that run on blob storage accounts.
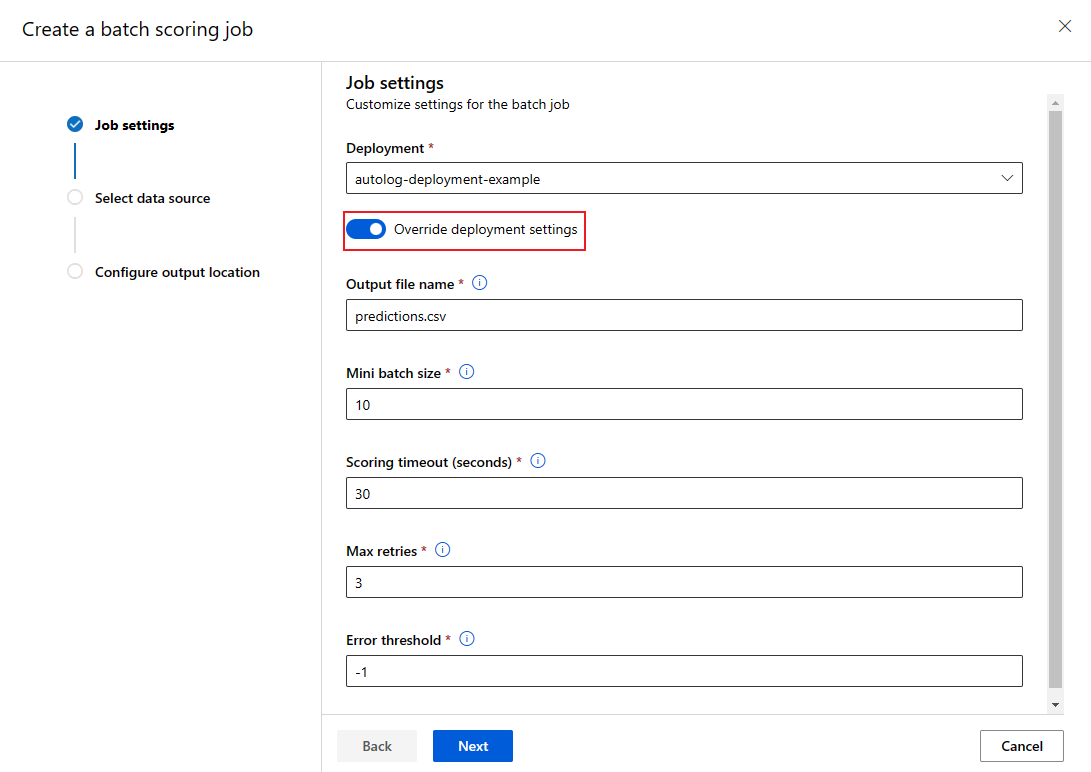
Overwrite deployment configuration for each job
When you invoke a batch endpoint, you can overwrite some settings to make the best use of compute resources and improve performance. This feature is useful when you need different settings for different jobs without permanently modifying the deployment.
Which settings can be overridden?
You can configure the following settings on a per-job basis:
| Setting | When to use | Example scenario |
|---|---|---|
| Instance count | When you have varying data volumes | Use more instances for larger datasets (10 instances for 1 million files vs. 2 instances for 100,000 files). |
| Mini-batch size | When you need to balance throughput and memory usage | Use smaller batches (10–50 files) for large images and larger batches (100–500 files) for small text files. |
| Max retries | When data quality varies | Higher retries (5-10) for noisy data; lower retries (1-3) for clean data |
| Timeout | When processing time varies by data type | Longer timeout (300s) for complex models; shorter timeout (30s) for simple models |
| Error threshold | When you need different failure tolerance levels | Strict threshold (-1) for critical jobs; lenient threshold (10%) for experimental jobs |
How to override settings
JOB_NAME=$(az ml batch-endpoint invoke --name $ENDPOINT_NAME --input https://azuremlexampledata.blob.core.windows.net/data/mnist/sample --mini-batch-size 20 --instance-count 5 --query name -o tsv)
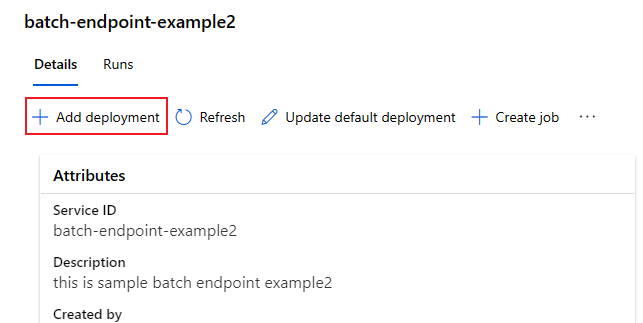
Add deployments to an endpoint
Once you have a batch endpoint with a deployment, you can continue to refine your model and add new deployments. Batch endpoints will continue serving the default deployment while you develop and deploy new models under the same endpoint. Deployments don't affect one another.
In this example, you add a second deployment that uses a model built with Keras and TensorFlow to solve the same MNIST problem.
Add a second deployment
Create an environment for your batch deployment. Include any dependencies your code needs to run. Add the library
azureml-core, as it's required for batch deployments. The following environment definition includes the required libraries to run a model with TensorFlow.Copy the content of the file deployment-keras/environment/conda.yaml from the GitHub repo into the portal.
Select Next until you get to the "Review page".
Select Create and wait until the environment is ready for use.
The conda file used looks as follows:
deployment-keras/environment/conda.yaml
name: tensorflow-env
channels:
  - conda-forge
dependencies:
  - python=3.8.5
  - pip
  - pip:
    - pandas
    - tensorflow
    - pillow
    - azureml-core
    - azureml-dataset-runtime[fuse]
Create a scoring script for the model:
deployment-keras/code/batch_driver.py
import os
import numpy as np
import pandas as pd
import tensorflow as tf
from typing import List
from os.path import basename
from PIL import Image
from tensorflow.keras.models import load_model


def init():
    global model

    # AZUREML_MODEL_DIR is an environment variable created during deployment
    model_path = os.path.join(os.environ["AZUREML_MODEL_DIR"], "model")

    # load the model
    model = load_model(model_path)


def run(mini_batch: List[str]) -> pd.DataFrame:
    print(f"Executing run method over batch of {len(mini_batch)} files.")

    results = []
    for image_path in mini_batch:
        data = Image.open(image_path)
        data = np.array(data)
        data_batch = tf.expand_dims(data, axis=0)

        # perform inference
        pred = model.predict(data_batch)

        # Compute probabilities, classes and labels
        pred_prob = tf.math.reduce_max(tf.math.softmax(pred, axis=-1)).numpy()
        pred_class = tf.math.argmax(pred, axis=-1).numpy()

        results.append(
            {
                "file": basename(image_path),
                "class": pred_class[0],
                "probability": pred_prob,
            }
        )

    return pd.DataFrame(results)
Create a deployment definition
deployment-keras/deployment.yml
$schema: https://azuremlschemas.azureedge.net/latest/modelBatchDeployment.schema.json name: mnist-keras-dpl description: A deployment using Keras with TensorFlow to solve the MNIST classification dataset. endpoint_name: mnist-batch type: model model: name: mnist-classifier-keras path: model code_configuration: code: code scoring_script: batch_driver.py environment: name: batch-tensorflow-py38 image: mcr.microsoft.com/azureml/openmpi4.1.0-ubuntu22.04:latest conda_file: environment/conda.yaml compute: azureml:batch-cluster resources: instance_count: 1 settings: max_concurrency_per_instance: 2 mini_batch_size: 10 output_action: append_row output_file_name: predictions.csvSelect Next to proceed to the "Code + environment" page.
For Select a scoring script for inferencing, browse to select the scoring script file deployment-keras/code/batch_driver.py.
For Select environment, select the environment you created in a previous step.
Select Next.
On the Compute page, select the compute cluster you created in a previous step.
For Instance count, enter the number of compute instances you want for the deployment. In this case, use 2.
Select Next.
Create the deployment:
Run the following code to create a batch deployment under the batch endpoint and set it as the default deployment.
az ml batch-deployment create --file deployment-keras/deployment.yml --endpoint-name $ENDPOINT_NAMETip
The
--set-defaultparameter is missing in this case. As a best practice for production scenarios, create a new deployment without setting it as default. Then verify it, and update the default deployment later.
Test a non-default batch deployment
To test the new non-default deployment, you need to know the name of the deployment you want to run.
DEPLOYMENT_NAME="mnist-keras-dpl"
JOB_NAME=$(az ml batch-endpoint invoke --name $ENDPOINT_NAME --deployment-name $DEPLOYMENT_NAME --input $SAMPLE_INPUT_URI --input-type uri_folder --query name -o tsv)
Notice --deployment-name is used to specify the deployment to execute. This parameter allows you to invoke a non-default deployment without updating the default deployment of the batch endpoint.
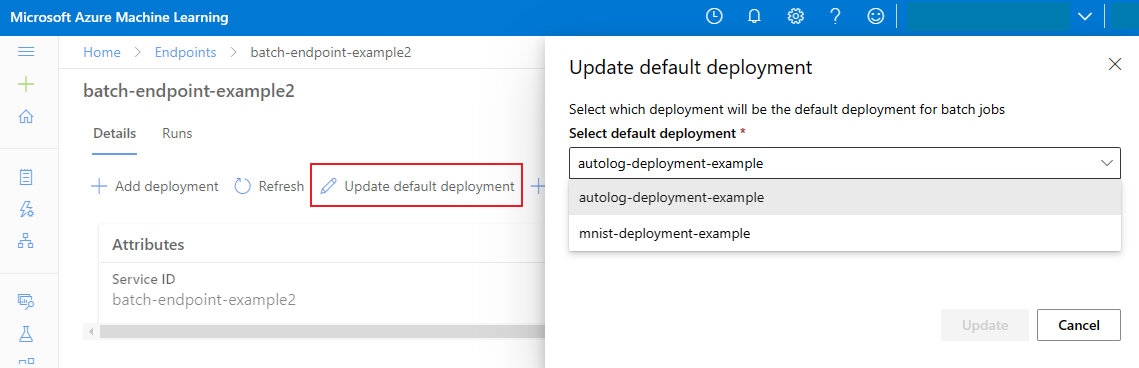
Update the default batch deployment
Although you can invoke a specific deployment inside an endpoint, you'll typically want to invoke the endpoint itself and let the endpoint decide which deployment to use—the default deployment. You can change the default deployment (and consequently, change the model serving the deployment) without changing your contract with the user invoking the endpoint. Use the following code to update the default deployment:
az ml batch-endpoint update --name $ENDPOINT_NAME --set defaults.deployment_name=$DEPLOYMENT_NAME
Delete the batch endpoint and deployment
If you don't need the old batch deployment, delete it by running the following code. The --yes flag confirms the deletion.
az ml batch-deployment delete --name mnist-torch-dpl --endpoint-name $ENDPOINT_NAME --yes
Run the following code to delete the batch endpoint and its underlying deployments. Batch scoring jobs aren't deleted.
az ml batch-endpoint delete --name $ENDPOINT_NAME --yes