Note
Access to this page requires authorization. You can try signing in or changing directories.
Access to this page requires authorization. You can try changing directories.
Azure Machine Learning is a cloud service for accelerating and managing the machine learning (ML) project lifecycle. ML professionals, data scientists, and engineers can use it in their day-to-day workflows to train and deploy models and manage machine learning operations (MLOps).
You can create a model in Machine Learning or use a model built from an open-source platform, such as PyTorch, TensorFlow, or scikit-learn. MLOps tools help you monitor, retrain, and redeploy models.
Tip
Free trial! If you don't have an Azure subscription, create a free account before you begin. Try the free or paid version of Azure Machine Learning. You get credits to spend on Azure services. After they're used up, you can keep the account and use free Azure services. Your credit card is never charged unless you explicitly change your settings and ask to be charged.
Who is Azure Machine Learning for?
Machine Learning is for individuals and teams implementing MLOps within their organization to bring ML models into production in a secure and auditable production environment.
Data scientists and ML engineers can use tools to accelerate and automate their day-to-day workflows. Application developers can use tools for integrating models into applications or services. Platform developers can use a robust set of tools, backed by durable Azure Resource Manager APIs, for building advanced ML tooling.
Enterprises working in the Microsoft Azure cloud can use familiar security and role-based access control for infrastructure. You can set up a project to deny access to protected data and select operations.
Productivity for everyone on the team
ML projects often require a team with a varied skill set to build and maintain. Machine Learning has tools that help enable you to:
Collaborate with your team via shared notebooks, compute resources, serverless compute, data, and environments
Develop models for fairness and explainability, tracking and auditability to fulfill lineage and audit compliance requirements
Deploy ML models quickly and easily at scale, and manage and govern them efficiently with MLOps
Run machine learning workloads anywhere with built-in governance, security, and compliance
Cross-compatible platform tools that meet your needs
Anyone on an ML team can use their preferred tools to get the job done. Whether you're running rapid experiments, hyperparameter-tuning, building pipelines, or managing inferences, you can use familiar interfaces including:
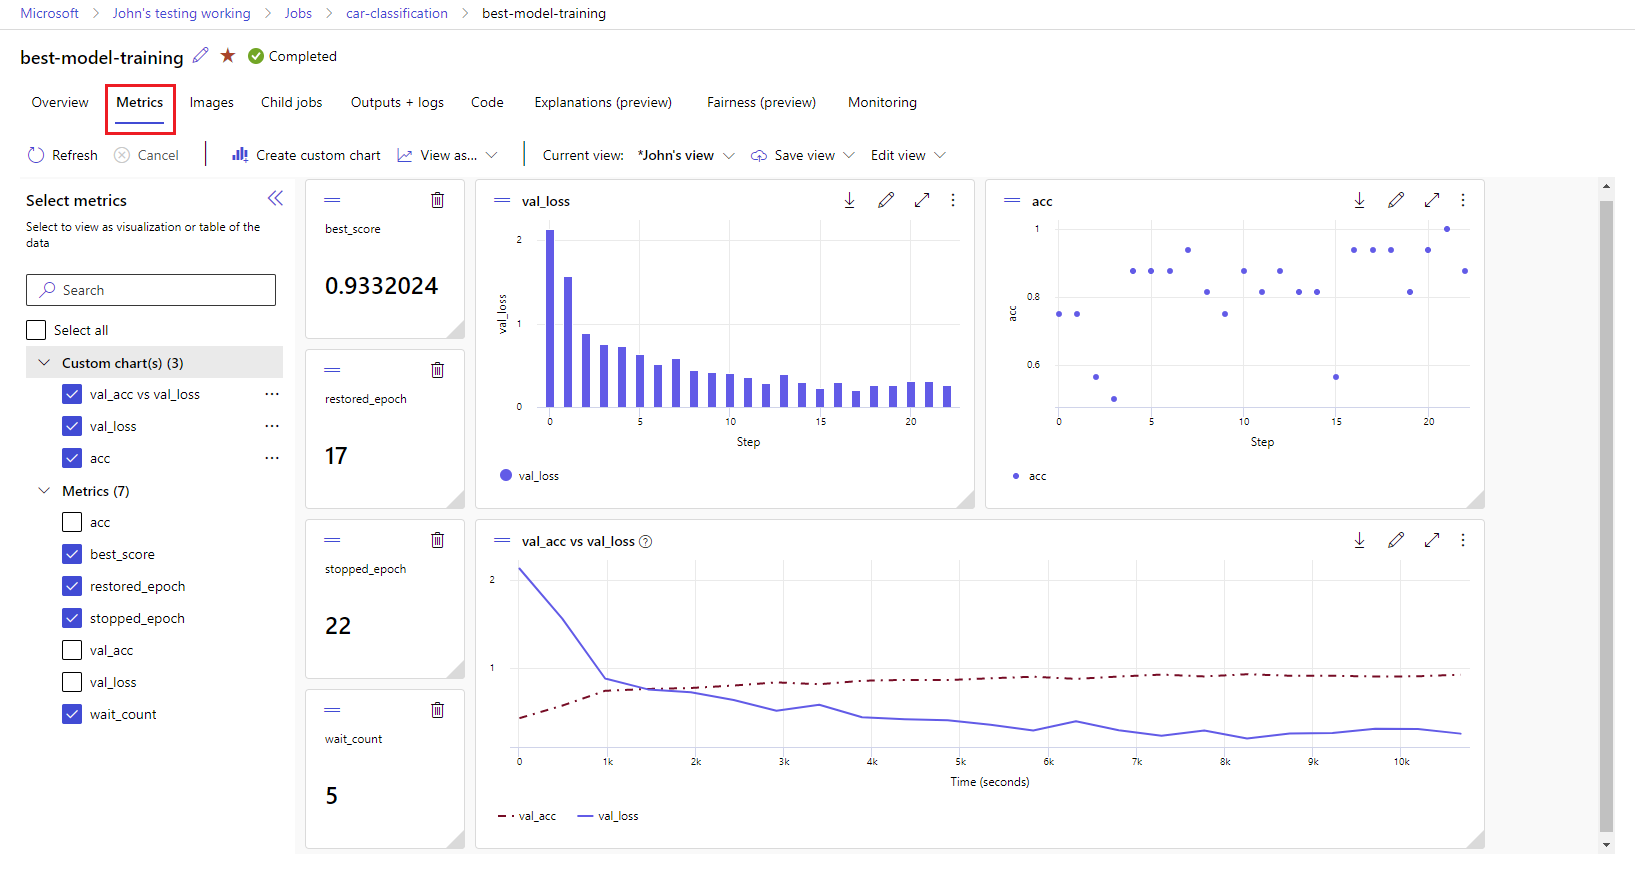
As you're refining the model and collaborating with others throughout the rest of the Machine Learning development cycle, you can share and find assets, resources, and metrics for your projects on the Machine Learning studio UI.
Studio
Machine Learning studio offers multiple authoring experiences depending on the type of project and the level of your past ML experience, without having to install anything.
Notebooks: Write and run your own code in managed Jupyter Notebook servers that are directly integrated in the studio. Or, open the notebooks in VS Code, on the web or on your desktop.
Visualize run metrics: Analyze and optimize your experiments with visualization.
Azure Machine Learning designer: Use the designer to train and deploy ML models without writing any code. Drag and drop datasets and components to create ML pipelines.
Automated machine learning UI: Learn how to create automated ML experiments with an easy-to-use interface.
Data labeling: Use Machine Learning data labeling to efficiently coordinate image labeling or text labeling projects.
Work with LLMs and Generative AI
Azure Machine Learning includes tools to help you build Generative AI applications powered by Large Language Models (LLMs). The solution includes a model catalog, prompt flow, and a suite of tools to streamline the development cycle of AI applications.
Both Azure Machine Learning studio and Azure AI Foundry allow you to work with LLMs. Use this guide to determine which studio you should use.
Model catalog
The model catalog in Azure Machine Learning studio is the hub to discover and use a wide range of models that enable you to build Generative AI applications. The model catalog features hundreds of models from model providers such as Azure OpenAI service, Mistral, Meta, Cohere, NVIDIA, Hugging Face, including models trained by Microsoft. Models from providers other than Microsoft are Non-Microsoft Products, as defined in Microsoft's Product Terms, and subject to the terms provided with the model.
Prompt flow
Azure Machine Learning prompt flow is a development tool designed to streamline the entire development cycle of AI applications powered by Large Language Models (LLMs). Prompt flow provides a comprehensive solution that simplifies the process of prototyping, experimenting, iterating, and deploying your AI applications.
Enterprise-readiness and security
Machine Learning integrates with the Azure cloud platform to add security to ML projects.
Security integrations include:
- Azure Virtual Networks with network security groups.
- Azure Key Vault, where you can save security secrets, such as access information for storage accounts.
- Azure Container Registry set up behind a virtual network.
For more information, see Tutorial: Set up a secure workspace.
Azure integrations for complete solutions
Other integrations with Azure services support an ML project from end to end. They include:
- Azure Synapse Analytics, which is used to process and stream data with Spark.
- Azure Arc, where you can run Azure services in a Kubernetes environment.
- Storage and database options, such as Azure SQL Database and Azure Blob Storage.
- Azure App Service, which you can use to deploy and manage ML-powered apps.
- Microsoft Purview, which allows you to discover and catalog data assets across your organization.
Important
Azure Machine Learning doesn't store or process your data outside of the region where you deploy.
Machine learning project workflow
Typically, models are developed as part of a project with an objective and goals. Projects often involve more than one person. When you experiment with data, algorithms, and models, development is iterative.
Project lifecycle
The project lifecycle can vary by project, but it often looks like this diagram.
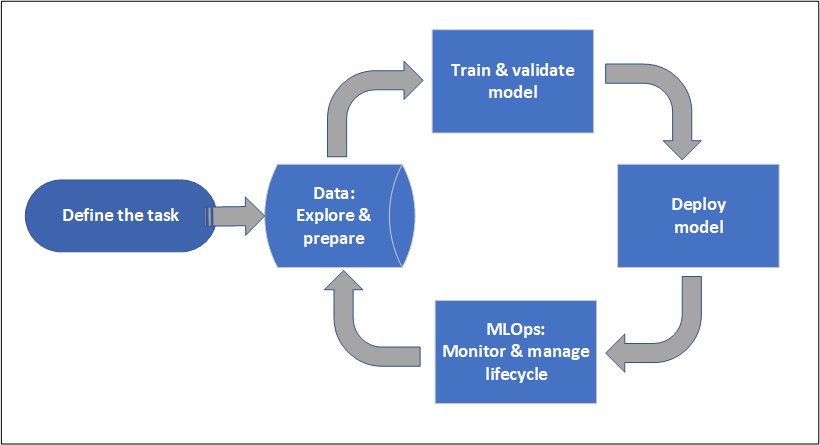
A workspace organizes a project and allows for collaboration for many users all working toward a common objective. Users in a workspace can easily share the results of their runs from experimentation in the studio user interface. Or they can use versioned assets for jobs like environments and storage references.
For more information, see Manage Azure Machine Learning workspaces.
When a project is ready for operationalization, users' work can be automated in an ML pipeline and triggered on a schedule or HTTPS request.
You can deploy models to the managed inferencing solution, for both real-time and batch deployments, abstracting away the infrastructure management typically required for deploying models.
Train models
In Azure Machine Learning, you can run your training script in the cloud or build a model from scratch. Customers often bring models they've built and trained in open-source frameworks so that they can operationalize them in the cloud.
Open and interoperable
Data scientists can use models in Azure Machine Learning that they've created in common Python frameworks, such as:
- PyTorch
- TensorFlow
- scikit-learn
- XGBoost
- LightGBM
Other languages and frameworks are also supported:
- R
- .NET
For more information, see Open-source integration with Azure Machine Learning.
Automated featurization and algorithm selection
In a repetitive, time-consuming process, in classical ML, data scientists use prior experience and intuition to select the right data featurization and algorithm for training. Automated ML (AutoML) speeds this process. You can use it through the Machine Learning studio UI or the Python SDK.
For more information, see What is automated machine learning?.
Hyperparameter optimization
Hyperparameter optimization, or hyperparameter tuning, can be a tedious task. Machine Learning can automate this task for arbitrary parameterized commands with little modification to your job definition. Results are visualized in the studio.
For more information, see Tune hyperparameters.
Multinode distributed training
Efficiency of training for deep learning and sometimes classical machine learning training jobs can be drastically improved via multinode distributed training. Azure Machine Learning compute clusters and serverless compute offer the latest GPU options.
Supported via Azure Machine Learning Kubernetes, Azure Machine Learning compute clusters, and serverless compute:
- PyTorch
- TensorFlow
- MPI
You can use MPI distribution for Horovod or custom multinode logic. Apache Spark is supported via serverless Spark compute and attached Synapse Spark pool that use Azure Synapse Analytics Spark clusters.
For more information, see Distributed training with Azure Machine Learning.
Embarrassingly parallel training
Scaling an ML project might require scaling embarrassingly parallel model training. This pattern is common for scenarios like forecasting demand, where a model might be trained for many stores.
Deploy models
To bring a model into production, you deploy the model. The Azure Machine Learning managed endpoints abstract the required infrastructure for both batch or real-time (online) model scoring (inferencing).
Real-time and batch scoring (inferencing)
Batch scoring, or batch inferencing, involves invoking an endpoint with a reference to data. The batch endpoint runs jobs asynchronously to process data in parallel on compute clusters and store the data for further analysis.
Real-time scoring, or online inferencing, involves invoking an endpoint with one or more model deployments and receiving a response in near real time via HTTPS. Traffic can be split across multiple deployments, allowing for testing new model versions by diverting some amount of traffic initially and increasing after confidence in the new model is established.
For more information, see:
MLOps: DevOps for machine learning
DevOps for ML models, often called MLOps, is a process for developing models for production. A model's lifecycle from training to deployment must be auditable if not reproducible.
ML model lifecycle
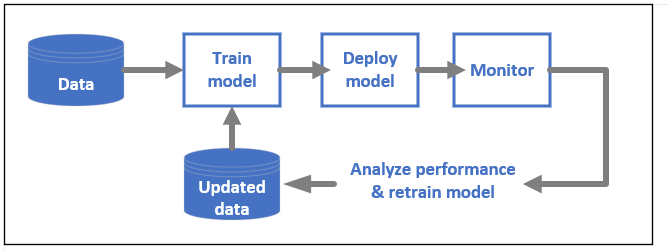
Learn more about MLOps in Azure Machine Learning.
Integrations enabling MLOPs
Machine Learning is built with the model lifecycle in mind. You can audit the model lifecycle down to a specific commit and environment.
Some key features enabling MLOps include:
gitintegration.- MLflow integration.
- Machine learning pipeline scheduling.
- Azure Event Grid integration for custom triggers.
- Ease of use with CI/CD tools like GitHub Actions or Azure DevOps.
Machine Learning also includes features for monitoring and auditing:
- Job artifacts, such as code snapshots, logs, and other outputs.
- Lineage between jobs and assets, such as containers, data, and compute resources.
If you use Apache Airflow, the airflow-provider-azure-machinelearning package is a provider that enables you to submit workflows to Azure Machine Learning from Apache AirFlow.
Related content
Start using Azure Machine Learning: