Note
Access to this page requires authorization. You can try signing in or changing directories.
Access to this page requires authorization. You can try changing directories.
Azure Machine Learning prompt flow is a developer-friendly and easy-to-use code-first method to develop and iterate flows for large language model (LLM)-based application development. Prompt flow provides an SDK and CLI, a Visual Studio Code extension, and a flow authoring UI. These tools facilitate local flow development, local flow run and evaluation run triggering, and transitioning flows between local and cloud workspace environments.
You can combine the prompt flow experience and code capabilities with developer operations (DevOps) to enhance your LLM-based application development workflows. This article focuses on integrating prompt flow and DevOps for Azure Machine Learning LLM-based applications.
The following diagram shows the interaction of local and cloud-based prompt flow development with DevOps.

Prerequisites
An Azure Machine Learning workspace. To create one, see Create resources to get started.
A local Python environment with the Azure Machine Learning Python SDK v2 installed, created by following the instructions at Getting started.
Note
This environment is separate from the environment the compute session uses to run the flow, which you define as part of the flow. For more information, see Manage prompt flow compute session in Azure Machine Learning studio.
Visual Studio Code with the Python and Prompt flow extensions installed.

Use a code-first experience in prompt flow
Developing LLM-based applications usually follows a standardized application engineering process that includes source code repositories and continuous integration/continuous deployment (CI/CD) pipelines. This process promotes streamlined development, version control, and collaboration among team members.
Integrating DevOps with the prompt flow code experience offers code developers a more efficient GenAIOps or LLMOps iteration process, with the following key features and benefits:
Flow versioning in the code repository. You can define flow files in YAML format, and they stay aligned with referenced source files in the same folder structure.
Flow run integration with CI/CD pipelines. You can seamlessly integrate prompt flow into your CI/CD pipelines and delivery process by using the prompt flow CLI or SDK to automatically trigger flow runs.
Smooth transition between local and cloud. You can easily export your flow folder to your local or upstream code repository for version control, local development, and sharing. You can also effortlessly import the flow folder back into Azure Machine Learning for further authoring, testing, and deployment using cloud resources.
Access prompt flow code
Each prompt flow has a flow folder structure containing essential code files that define the flow. The folder structure organizes your flow, facilitating smoother transitions between local and cloud.
Azure Machine Learning provides a shared file system for all workspace users. Upon flow creation, a corresponding flow folder is automatically generated and stored in the Users/<username>/promptflow directory.

Work with flow code files
Once you create a flow in Azure Machine Learning studio, you can view, edit, and manage the flow files in the Files section of the flow authoring page. Any modifications you make to the files reflect directly in the file share storage.

The flow folder for an LLM-based flow contains the following key files.
flow.dag.yaml is the primary flow definition file in YAML format. This file is integral to authoring and defining the prompt flow. The file includes information about inputs, outputs, nodes, tools, and variants the flow uses.
User-managed source code files in Python (.py) or Jinja 2 (.jinja2) format configure the tools and nodes in the flow. The Python tool uses Python files to define custom Python logic. The prompt tool and LLM tool use Jinja 2 files to define prompt context.
Nonsource files like utility and data files can be included in the flow folder along with the source files.
To view and edit the raw code of the flow.dag.yaml and source files in the file editor, turn on Raw file mode.

Alternatively, you can access and edit all your flow folders and files from the Azure Machine Learning studio Notebooks page.

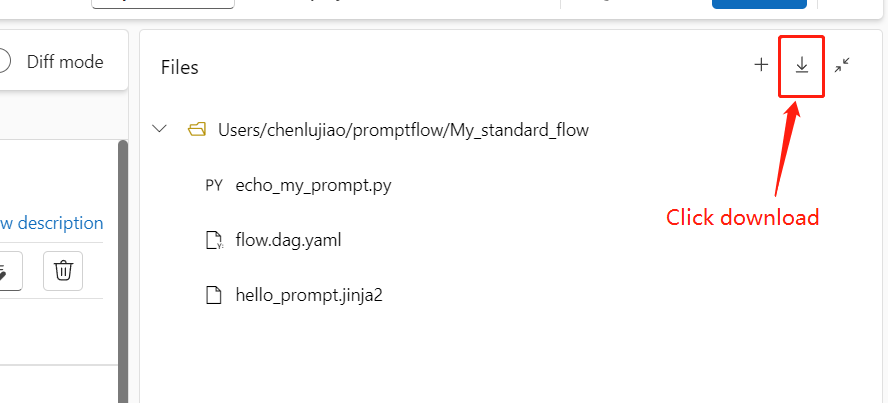
Download and check in prompt flow code
To check your flow into your code repository, export the flow folder from Azure Machine Learning studio to your local machine. Select the download icon in the Files section of the flow authoring page to download a ZIP package containing all the flow files. You can then check that file into your code repository or unzip it to work with the files locally.
For more information about DevOps integration with Azure Machine Learning, see Git integration for Azure Machine Learning.
Develop and test locally
As you refine and fine-tune your flow or prompts during iterative development, you can carry out multiple iterations locally within your code repository. The VS Code community version, VS Code Prompt flow extension, and prompt flow local SDK and CLI facilitate pure local development and testing without Azure binding.
Working locally allows you to make and test changes quickly, without needing to update the main code repository each time. For more details and guidance on using local versions, consult the Prompt flow GitHub community.
Use the VS Code Prompt flow extension
By using the Prompt flow VS Code extension, you can easily author your flow locally in the VS Code editor with a similar UI experience as in the cloud.
To edit files locally in VS Code with the Prompt flow extension:
In VS Code with the Prompt flow extension enabled, open a prompt flow folder.
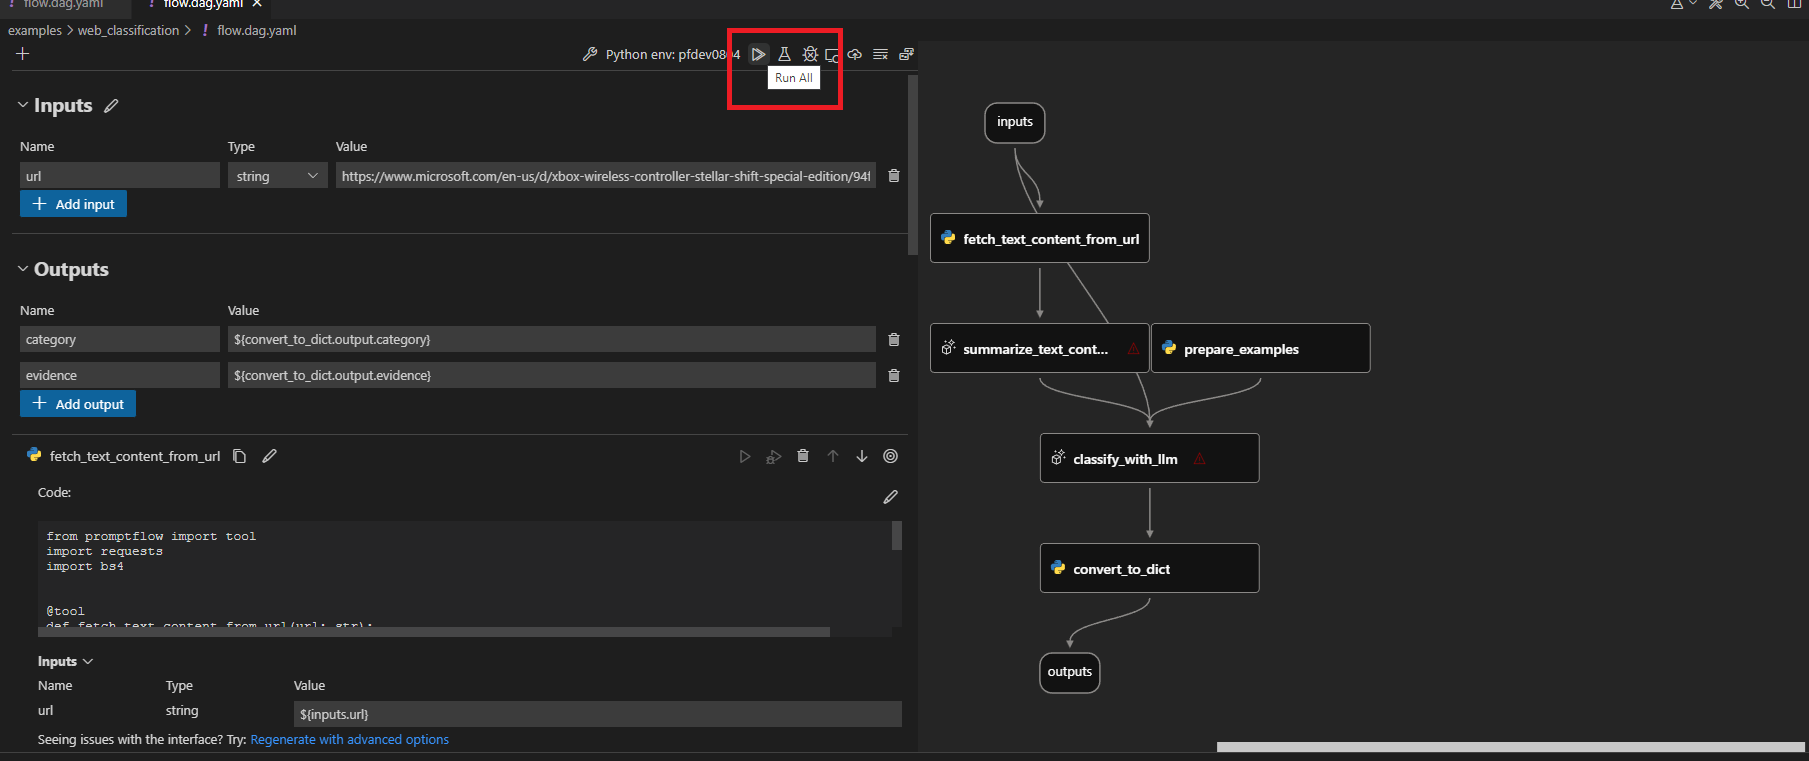
Open the flow.dag.yaml file and select the Visual editor link at the top of the file.
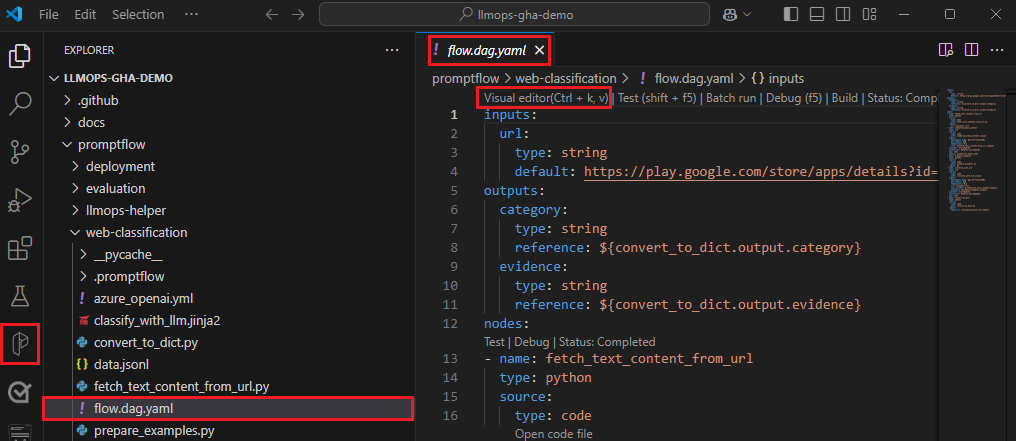
Use the prompt flow visual editor to make changes to your flow, such as tuning the prompts in variants or adding more nodes.
To test your flow, select the Run icon at the top of the visual editor, or to test any node, select the Run icon at the top of the node.


Use the prompt flow SDK and CLI
If you prefer to work directly in code, or use Jupyter, PyCharm, Visual Studio, or another integrated development environment (IDE), you can directly modify the YAML code in the flow.dag.yaml file.

You can then trigger a single flow run for testing by using the prompt flow CLI or SDK in the terminal as follows.
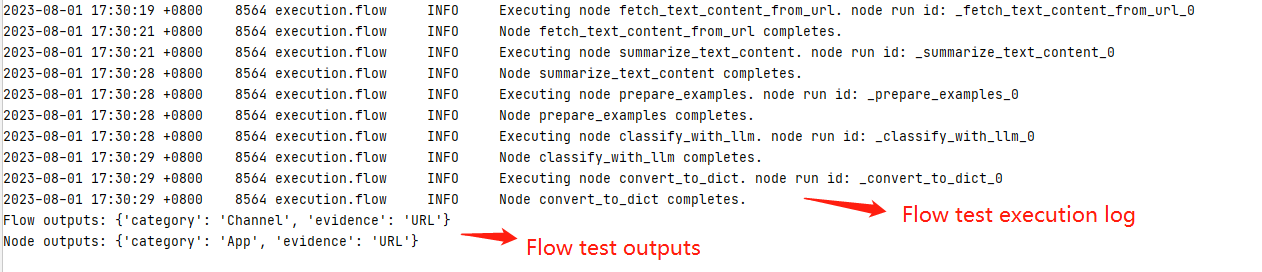
To trigger a run from the working directory, run the following code:
pf flow test --flow <directory-name>
The return values are the test logs and outputs.

Submit runs to the cloud from a local repository
Once you're satisfied with the results of your local testing, you can use the prompt flow CLI or SDK to submit runs to the cloud from the local repository. The following procedure and code are based on the Web Classification demo project in GitHub. You can clone the project repo or download the prompt flow code to your local machine.
Install the prompt flow SDK
Install the Azure prompt flow SDK/CLI by running pip install promptflow[azure] promptflow-tools.
If you're using the demo project, get the SDK and other necessary packages by installing requirements.txt withpip install -r <path>/requirements.txt.
Connect to your Azure Machine Learning workspace
az login
Upload the flow and create a run
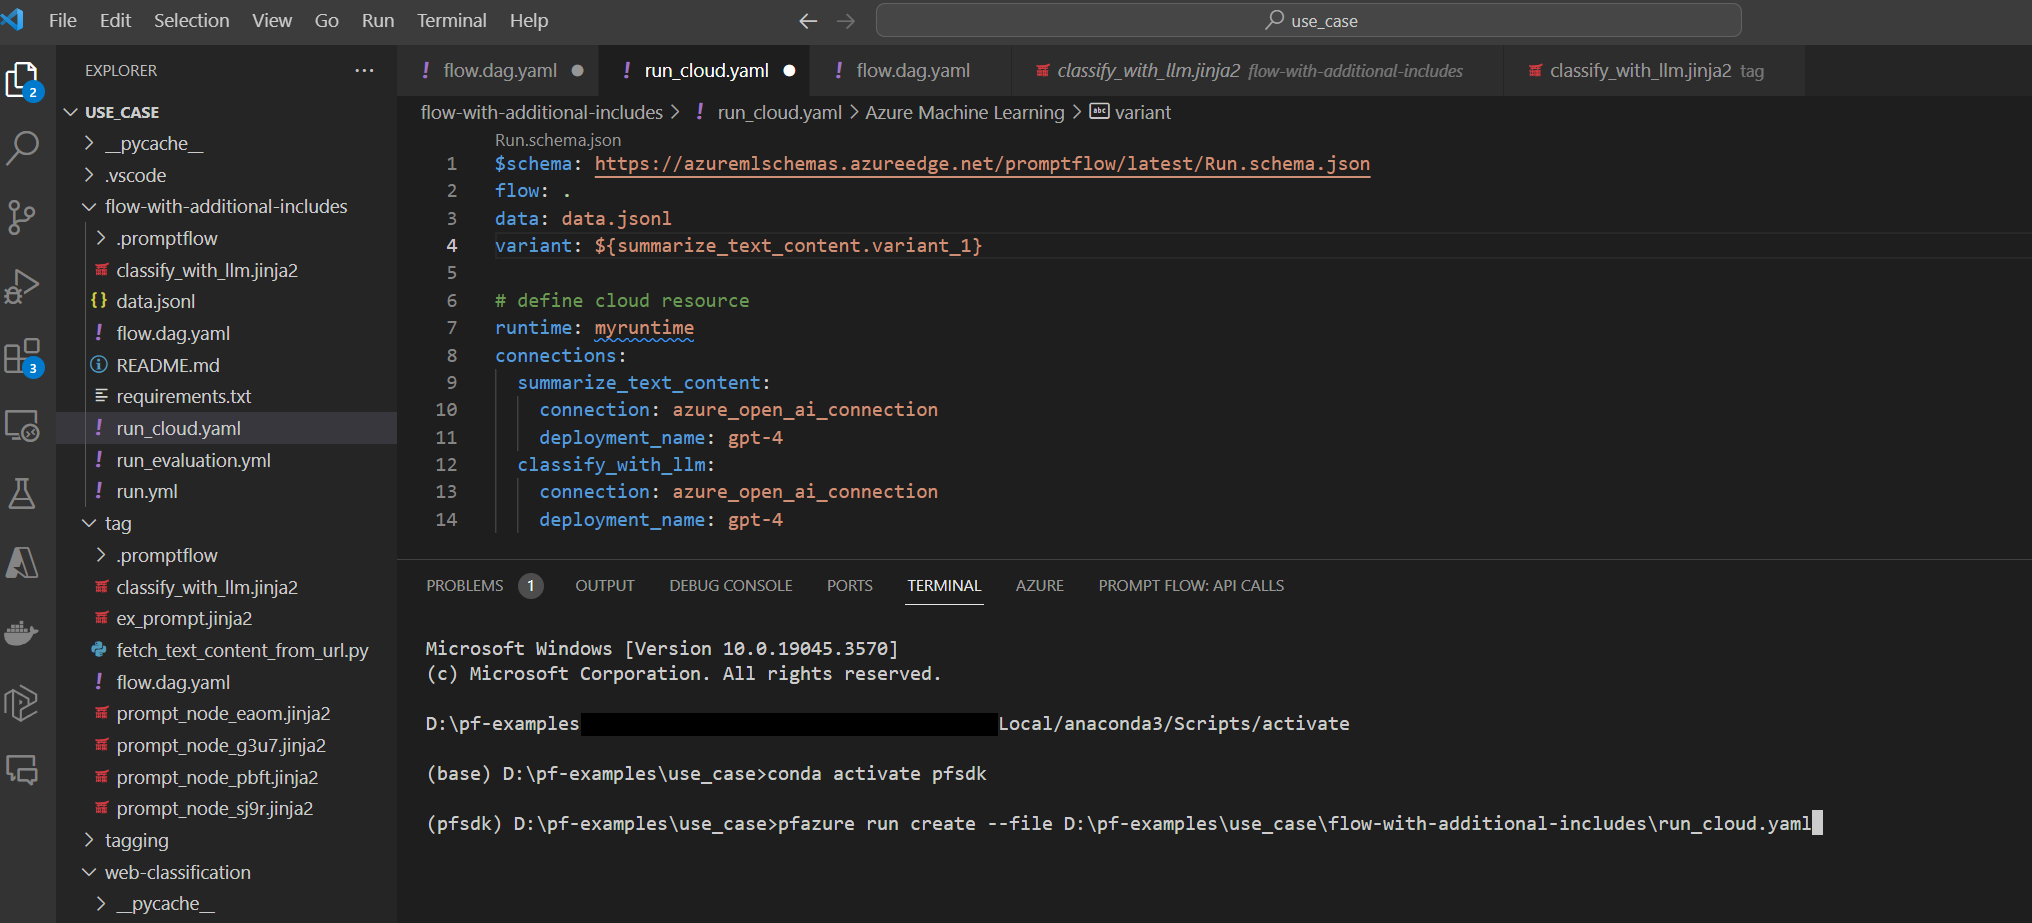
Prepare the run.yml file to define the configuration for this flow run in the cloud.
$schema: https://azuremlschemas.azureedge.net/promptflow/latest/Run.schema.json
flow: <path-to-flow>
data: <path-to-flow>/<data-file>.jsonl

column_mapping:
  url: ${data.url}

# Define cloud compute resource

resources:
  instance_type: <compute-type>

# If using compute instance compute type, also specify instance name
#  compute: <compute-instance-name>

# Specify connections

  <node-name>:
    connection: <connection-name>
    deployment_name: <deployment-name>
You can specify the connection and deployment name for each tool in the flow that requires a connection. If you don't specify the connection and deployment name, the tool uses the connection and deployment in the flow.dag.yaml file. Use the following code to format connections:
...
connections:
  <node-name>:
    connection: <connection-name>
      deployment_name: <deployment-name>
...
Create the run.
pfazure run create --file run.yml
Create an evaluation flow run
Prepare the run_evaluation.yml file to define the configuration for this evaluation flow run in the cloud.
$schema: https://azuremlschemas.azureedge.net/promptflow/latest/Run.schema.json
flow: <path-to-flow>
data: <path-to-flow>/<data-file>.jsonl
run: <id-of-base-flow-run>
column_mapping:
  <input-name>: ${data.<column-from-test-dataset>}
  <input-name>: ${run.outputs.<column-from-run-output>}

resources:
  instance_type: <compute-type>
  compute: <compute_instance_name>

connections:
  <node-name>:
    connection: <connection-name>
    deployment_name: <deployment-name>
  <node-name>:
    connection: <connection-name>
    deployment_name: <deployment-name>
Create the evaluation run.
pfazure run create --file run_evaluation.yml
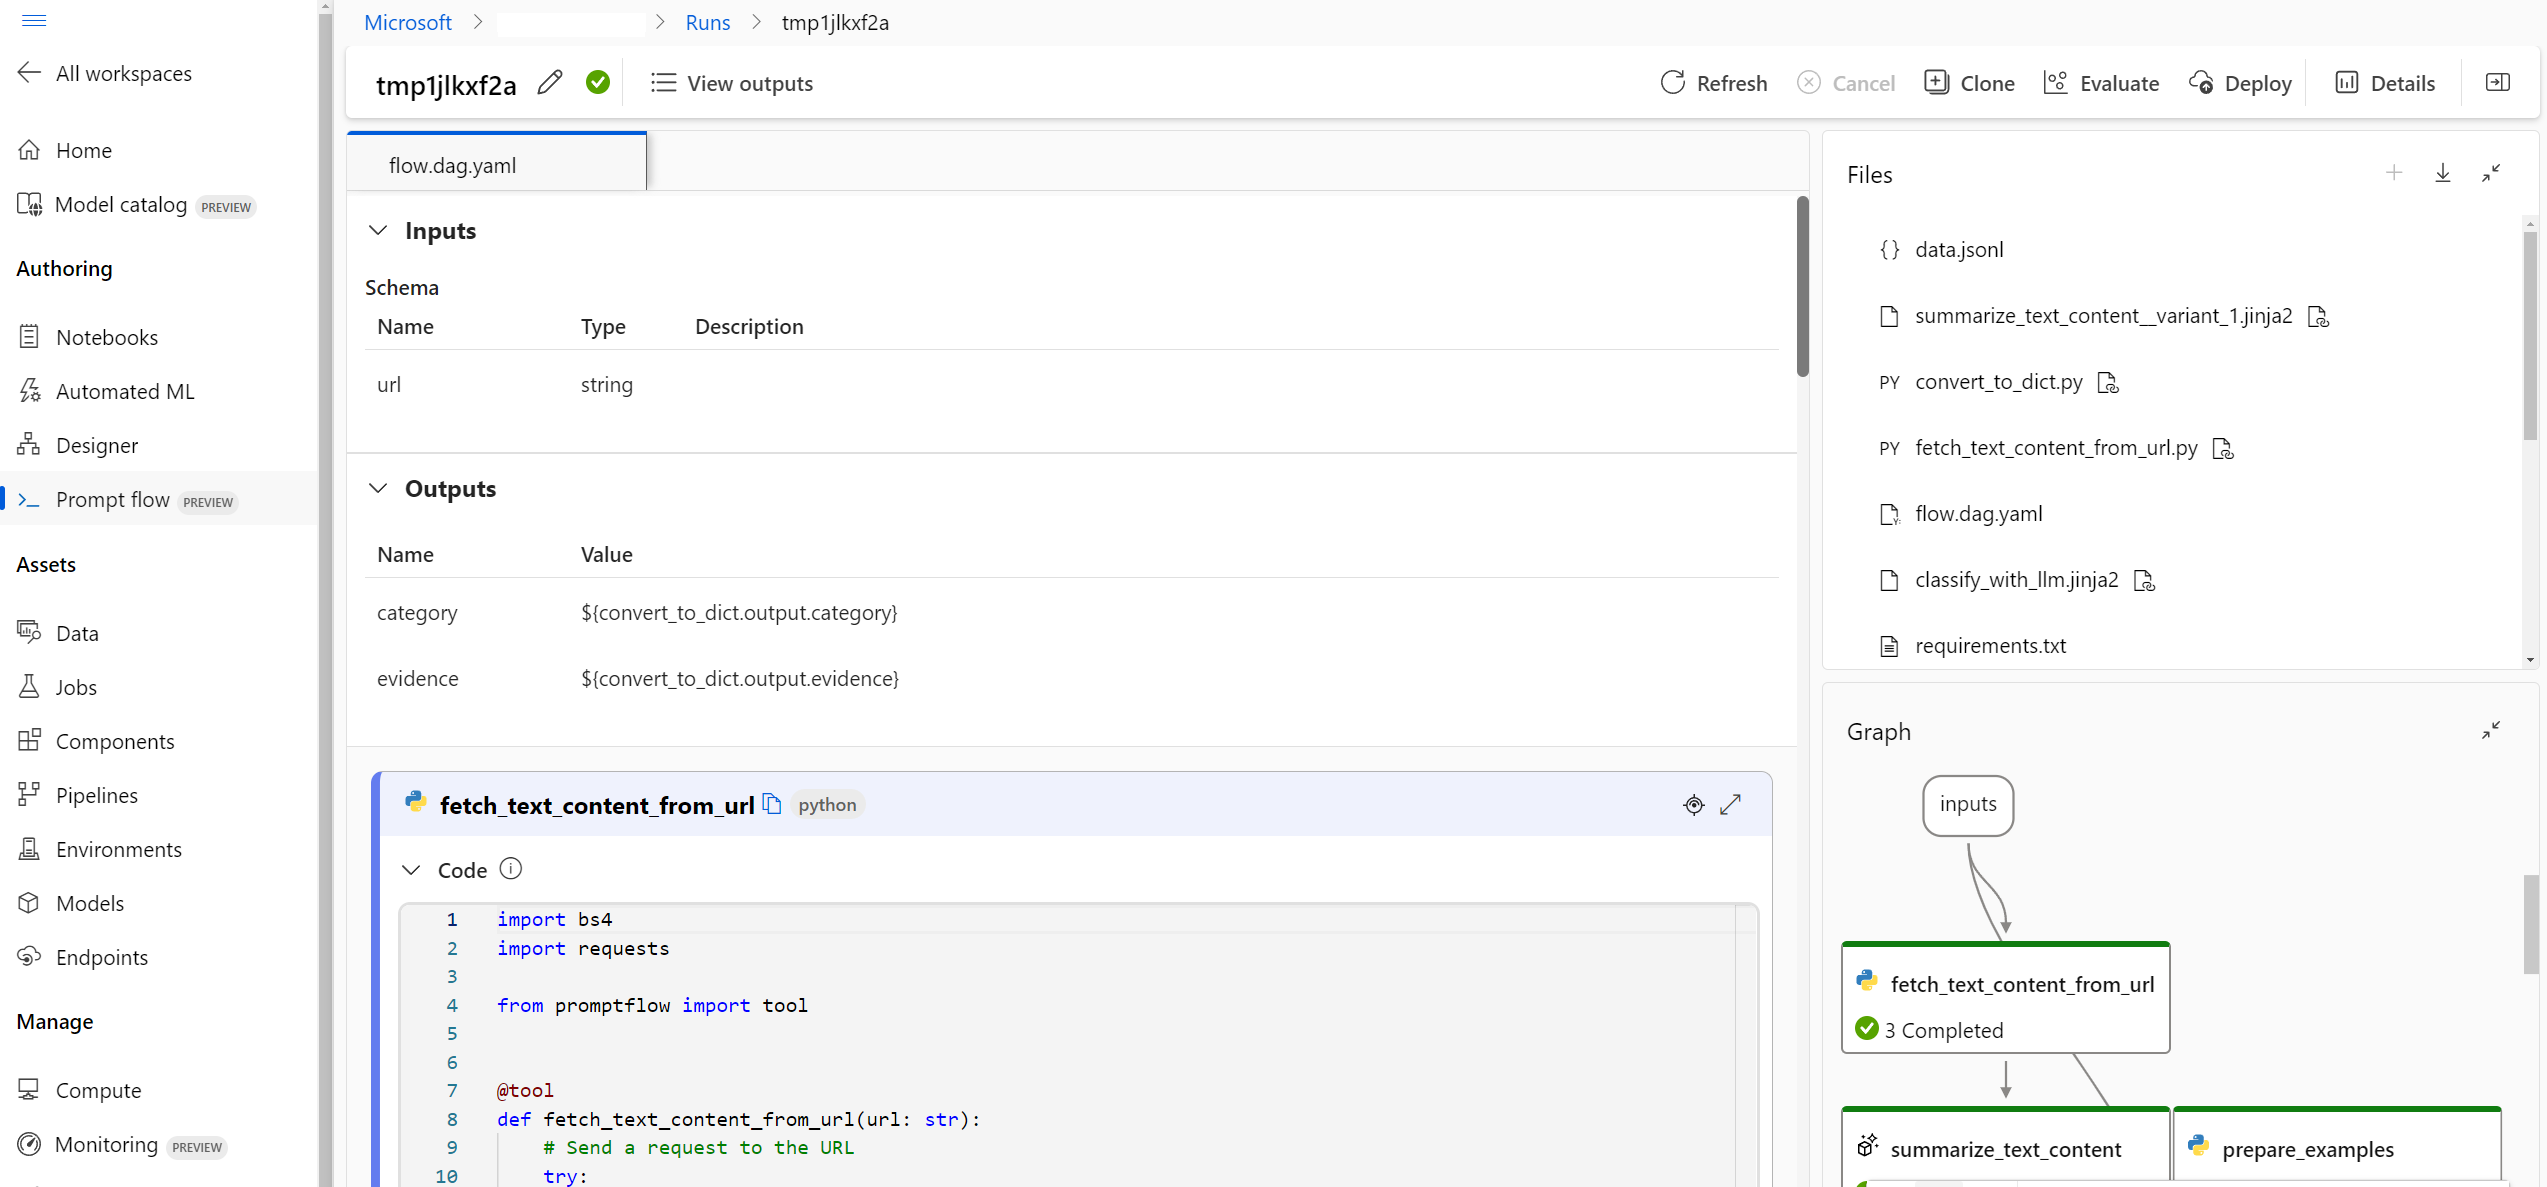
View run results
Submitting the flow run to the cloud returns the cloud URL of the run. You can open the URL to view the run results in Azure Machine Learning studio. You can also run the following CLI or SDK commands to view run results.
Stream the logs
pfazure run stream --name <run-name>
View run outputs
pfazure run show-details --name <run-name>
View evaluation run metrics
pfazure run show-metrics --name <evaluation-run-name>
Integrate with DevOps
A combination of a local development environment and a version control system such as Git is typically most effective for iterative development. You can make modifications and test your code locally, then commit the changes to Git. This process creates an ongoing record of your changes and offers the ability to revert to earlier versions if necessary.
When you need to share flows across different environments, you can push them to a cloud-based code repository like GitHub or Azure Repos. This strategy lets you access the most recent code version from any location and provides tools for collaboration and code management.
By following these practices, teams can create a seamless, efficient, and productive collaborative environment for prompt flow development.
For example end-to-end LLMOps pipelines that execute web classification flows, see Set up end to end GenAIOps with prompt Flow and GitHub and the GitHub Web Classification demo project.
Trigger flow runs in CI pipelines
Once you successfully develop and test your flow and check it in as the initial version, you're ready for tuning and testing iterations. At this stage, you can trigger flow runs, including batch testing and evaluation runs, by using the prompt flow CLI to automate steps in your CI pipeline.
Throughout the lifecycle of your flow iterations, you can use the CLI to automate the following operations:
- Running the prompt flow after a pull request
- Running prompt flow evaluation to ensure results are high quality
- Registering prompt flow models
- Deploying prompt flow models
Use the studio UI for continuous development
At any point in flow development, you can go back to the Azure Machine Learning studio UI and use cloud resources and experiences to make changes to your flow.
To continue developing and working with the most up-to-date versions of the flow files, you can access a terminal on the Notebook page and pull the latest flow files from your repository. Or, you can directly import a local flow folder as a new draft flow to seamlessly transition between local and cloud development.

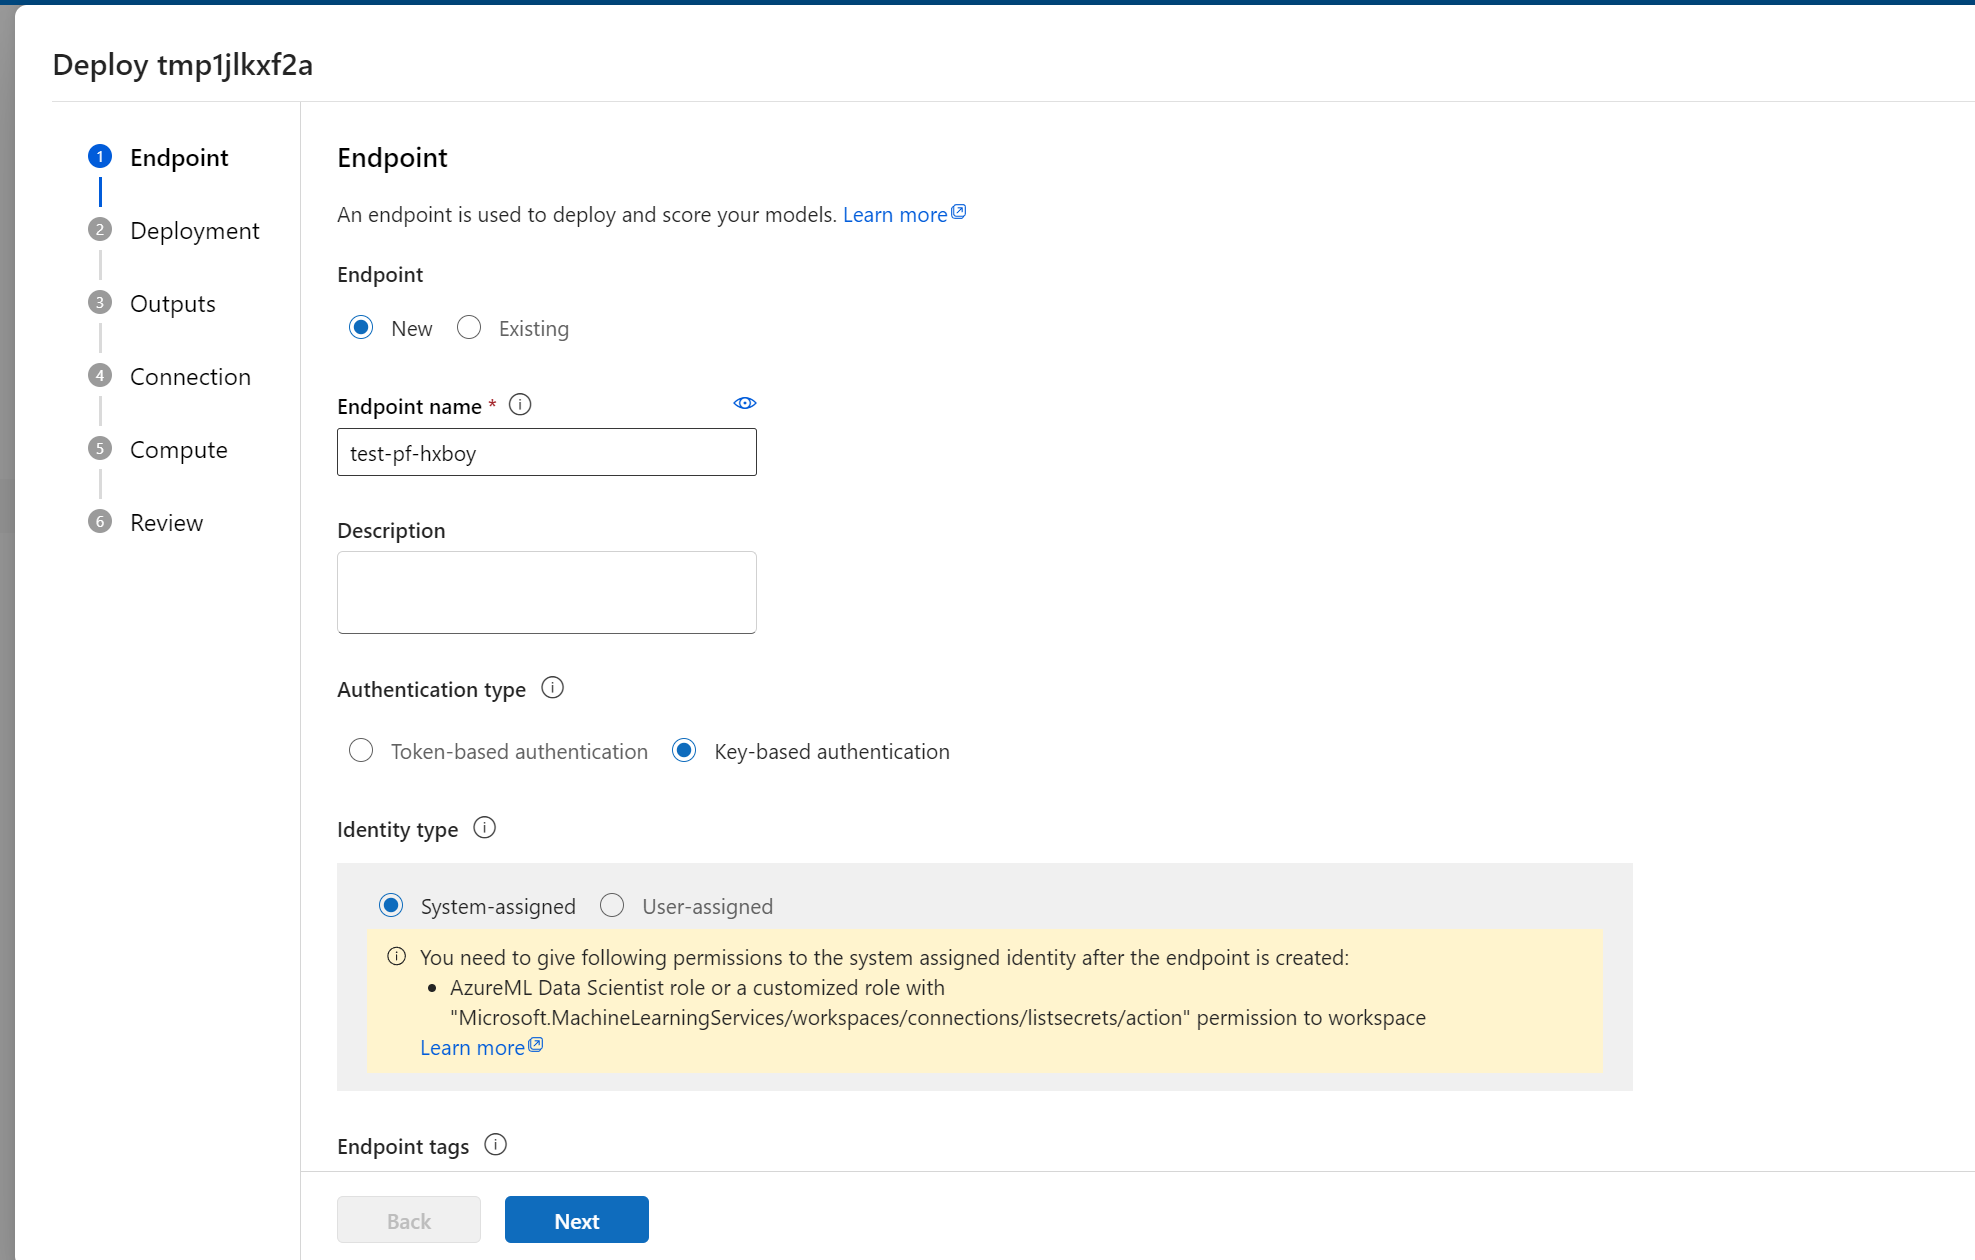
Deploy the flow as an online endpoint
The last step in going to production is to deploy your flow as an online endpoint in Azure Machine Learning. This process allows you to integrate your flow into your application and makes it available to use. For more information on how to deploy your flow, see Deploy flows to Azure Machine Learning managed online endpoint for real-time inference.
Collaborate on flow development
Collaboration among team members can be essential when developing a LLM-based application with prompt flow. Team members might be authoring and testing the same flow, working on different facets of the flow, or making iterative changes and enhancements concurrently. This collaboration requires an efficient and streamlined approach to sharing code, tracking modifications, managing versions, and integrating changes into the final project.
The prompt flow SDK/CLI and the VS Code Prompt flow extension facilitate easy collaboration on code-based flow development within a source code repository. You can use a cloud-based source control system like GitHub or Azure Repos for tracking changes, managing versions, and integrating these modifications into the final project.
Follow collaborative development best practices
Set up a centralized code repository.
The first step of the collaborative process involves setting up a code repository as the base for project code, including prompt flow code. This centralized repository enables efficient organization, change tracking, and collaboration among team members.
Author and single test your flow locally in VS Code with the Prompt flow extension.
Once the repository is set up, team members can use VS Code with the Prompt flow extension for local authoring and single input testing of the flow. The standardized integrated development environment promotes collaboration among multiple members working on different aspects of the flow.

Use the
pfazureCLI or SDK to submit batch runs and evaluation runs from local flows to the cloud.After local development and testing, team members can use the prompt flow CLI/SDK to submit and evaluate batch and evaluation runs to the cloud. This process enables cloud compute usage, persistent results storage, endpoint creation for deployments, and efficient management in the studio UI.
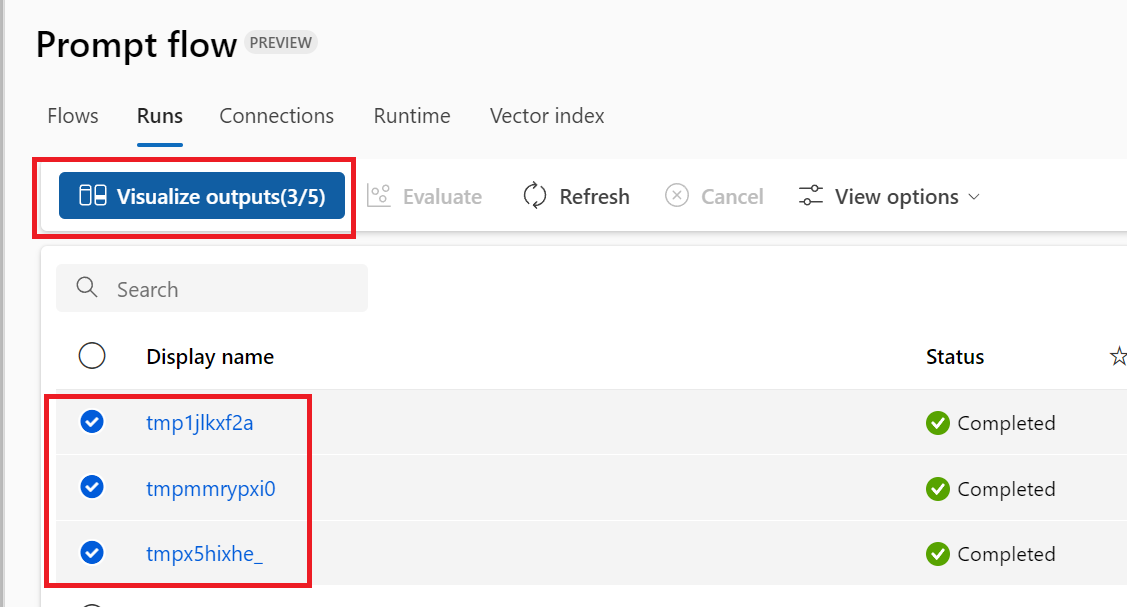
View and manage run results in the Azure Machine Learning studio workspace UI.
After they submit runs to the cloud, team members can access the studio UI to view the results and manage experiments efficiently. The cloud workspace provides a centralized location for gathering and managing run history, logs, snapshots, comprehensive results, and instance level inputs and outputs.
Use the Runs list that records all run history to easily compare the results of different runs, aiding in quality analysis and necessary adjustments.
Continue to use local iterative development.
After analyzing the results of experiments, team members can return to the local environment and code repository for more development and fine-tuning, and iteratively submit subsequent runs to the cloud. This iterative approach ensures consistent enhancement until the team is satisfied with the quality for production.
Use one-step deployment to production in the studio.
Once the team is fully confident in the quality of the flow, they can seamlessly deploy it as an online endpoint in a robust cloud environment. Deployment as an online endpoint can be based on a run snapshot, allowing stable and secure serving, further resource allocation and usage tracking, and log monitoring in the cloud.
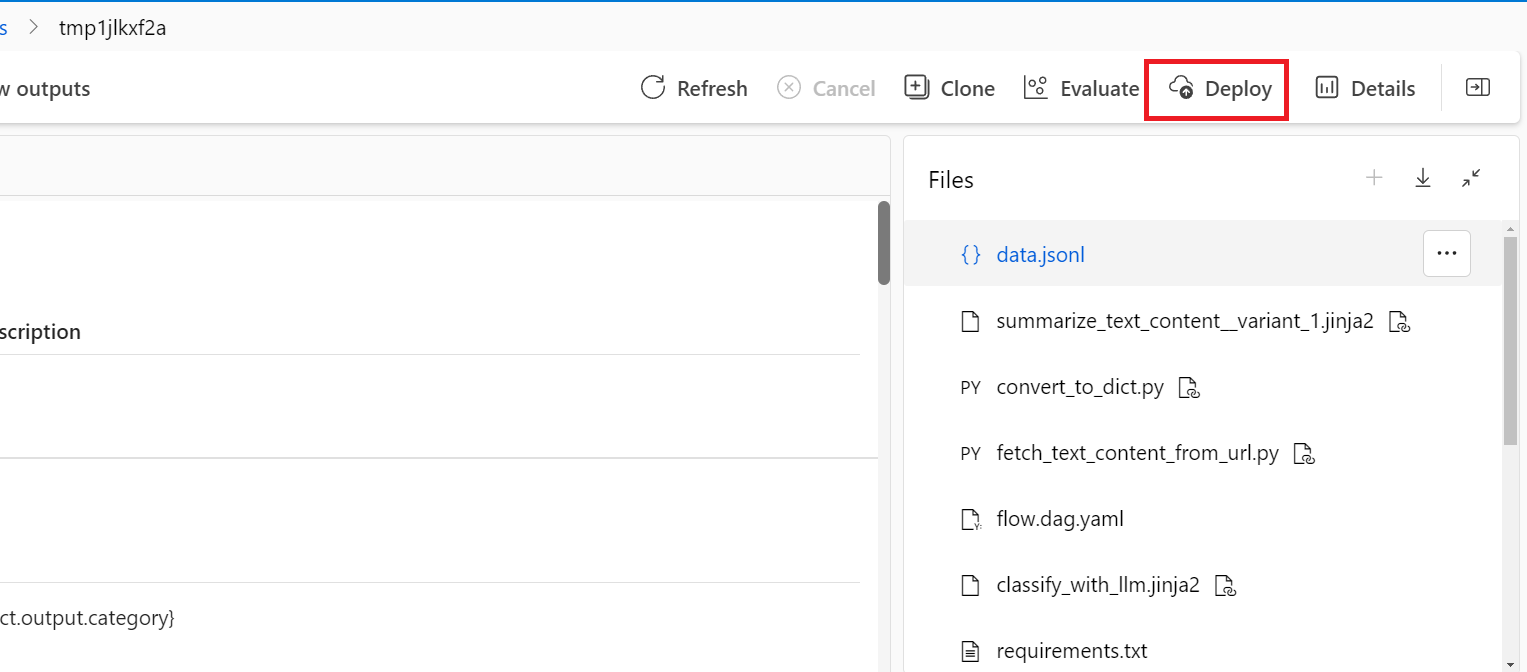
The Azure Machine Learning studio Deploy wizard helps you easily configure your deployment.