Note
Access to this page requires authorization. You can try signing in or changing directories.
Access to this page requires authorization. You can try changing directories.
In this tutorial series, you learn how to use the managed feature store to discover, create, and operationalize Azure Machine Learning features. Features seamlessly integrate the prototyping, training, and operationalization phases of the machine learning lifecycle.
Important
Azure Cache for Redis announced its retirement timeline for all SKUs. We recommend moving your existing Azure Cache for Redis instances to Azure Managed Redis as soon as you can.
Migration guidance:
- Migrate Basic, Standard, and Premium tiers to Azure Managed Redis
- Migrate Enterprise tier to Azure Managed Redis
For more details about the retirement:
In the prototyping phase, you experiment with various features, and in the operationalization phase, you deploy models that use inference steps to look up feature data. Features serve as the connective tissue in the lifecycle.
You use an Azure Machine Learning project workspace to train inference models by using features from feature stores. Many project workspaces can share and reuse the same feature store. For more information about managed feature store, see What is managed feature store and Understand top-level entities in managed feature store.
Prerequisites
- An Azure Machine Learning workspace. For more information about workspace creation, see Quickstart: Create workspace resources.
- Owner role on the resource group where the feature store is created.
SDK + CLI or SDK-only tutorial tracks
This tutorial series uses an Azure Machine Learning Spark notebook for development. You can choose between two tracks to complete the tutorial series, depending on your needs.
The SDK + CLI track uses the Python SDK for feature set development and testing, and uses Azure CLI for create, read, update, and delete (CRUD) operations. This track is useful for continuous integration and continuous delivery (CI/CD) or GitOps scenarios that use CLI and YAML.
The SDK-only track uses only Python SDKs. This track offers pure, Python-based development and deployment.
You select a track by opening the notebook in either the cli_and_sdk or sdk_only folder of your cloned notebook. Follow the instructions in the corresponding tab in the tutorials.
The SDK + CLI track uses the Azure CLI for CRUD operations and the feature store core SDK for feature set development and testing. This approach is useful for GitOps or CI/CD scenarios that use CLI and YAML. The conda.yml file you upload installs these resources.
- The CLI is used for CRUD operations on feature stores, feature sets, and feature store entities.
The feature store core SDK
azureml-featurestoreis for feature set development and consumption. The SDK performs the following operations:- Lists or gets a registered feature set.
- Generates or resolves a feature retrieval specification.
- Executes a feature set definition to generate a Spark DataFrame.
- Generates training by using point-in-time joins.
Tutorial 1: Develop and register a feature set
This first tutorial walks through creating a feature set specification with custom transformations. You then use that feature set to generate training data, enable materialization, and perform a backfill. You learn how to:
- Create a new, minimal feature store resource.
- Develop and locally test a feature set with feature transformation capability.
- Register a feature store entity with the feature store.
- Register the feature set that you developed with the feature store.
- Generate a sample training DataFrame by using the features you created.
- Enable offline materialization on the feature sets, and backfill the feature data.
Clone the notebook
In Azure Machine Learning studio, select Notebooks on the left navigation menu, and then select the Samples tab on the Notebooks page.
Expand the SDK v2 > sdk > python folders, right-click the featurestore_sample folder, and select Clone.

On the Select target directory pane, make sure Users > <your_username> > featurestore_sample appears, and select Clone. The featurestore_sample clones to your workspace user directory.
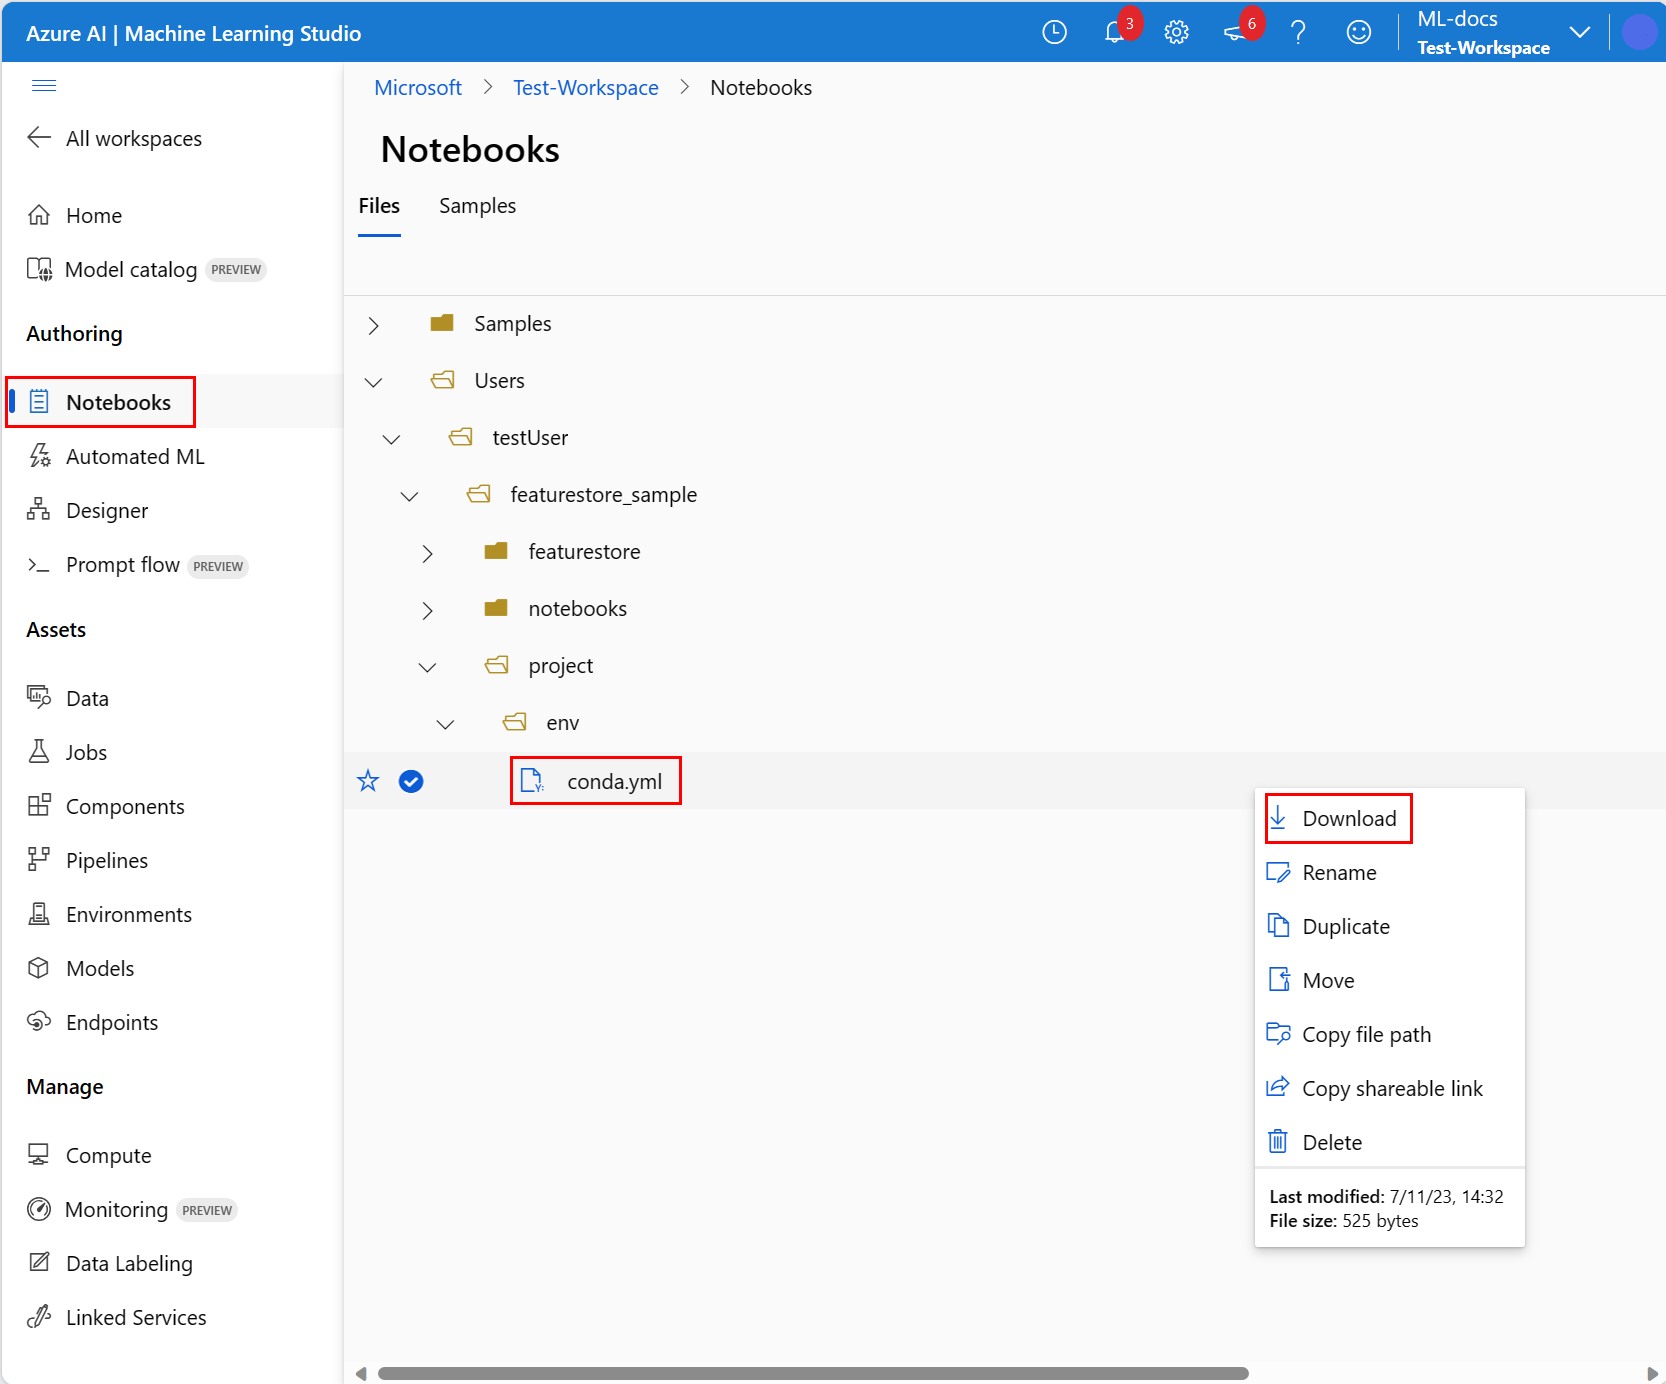
Go to your cloned notebook on the Files tab of the Notebook page, and expand Users > <your_username> > featurestore_sample > project > env.
Right-click the conda.yml file and select Download to download it to your computer, so you can later upload it to the server environment.
Prepare and start the notebook
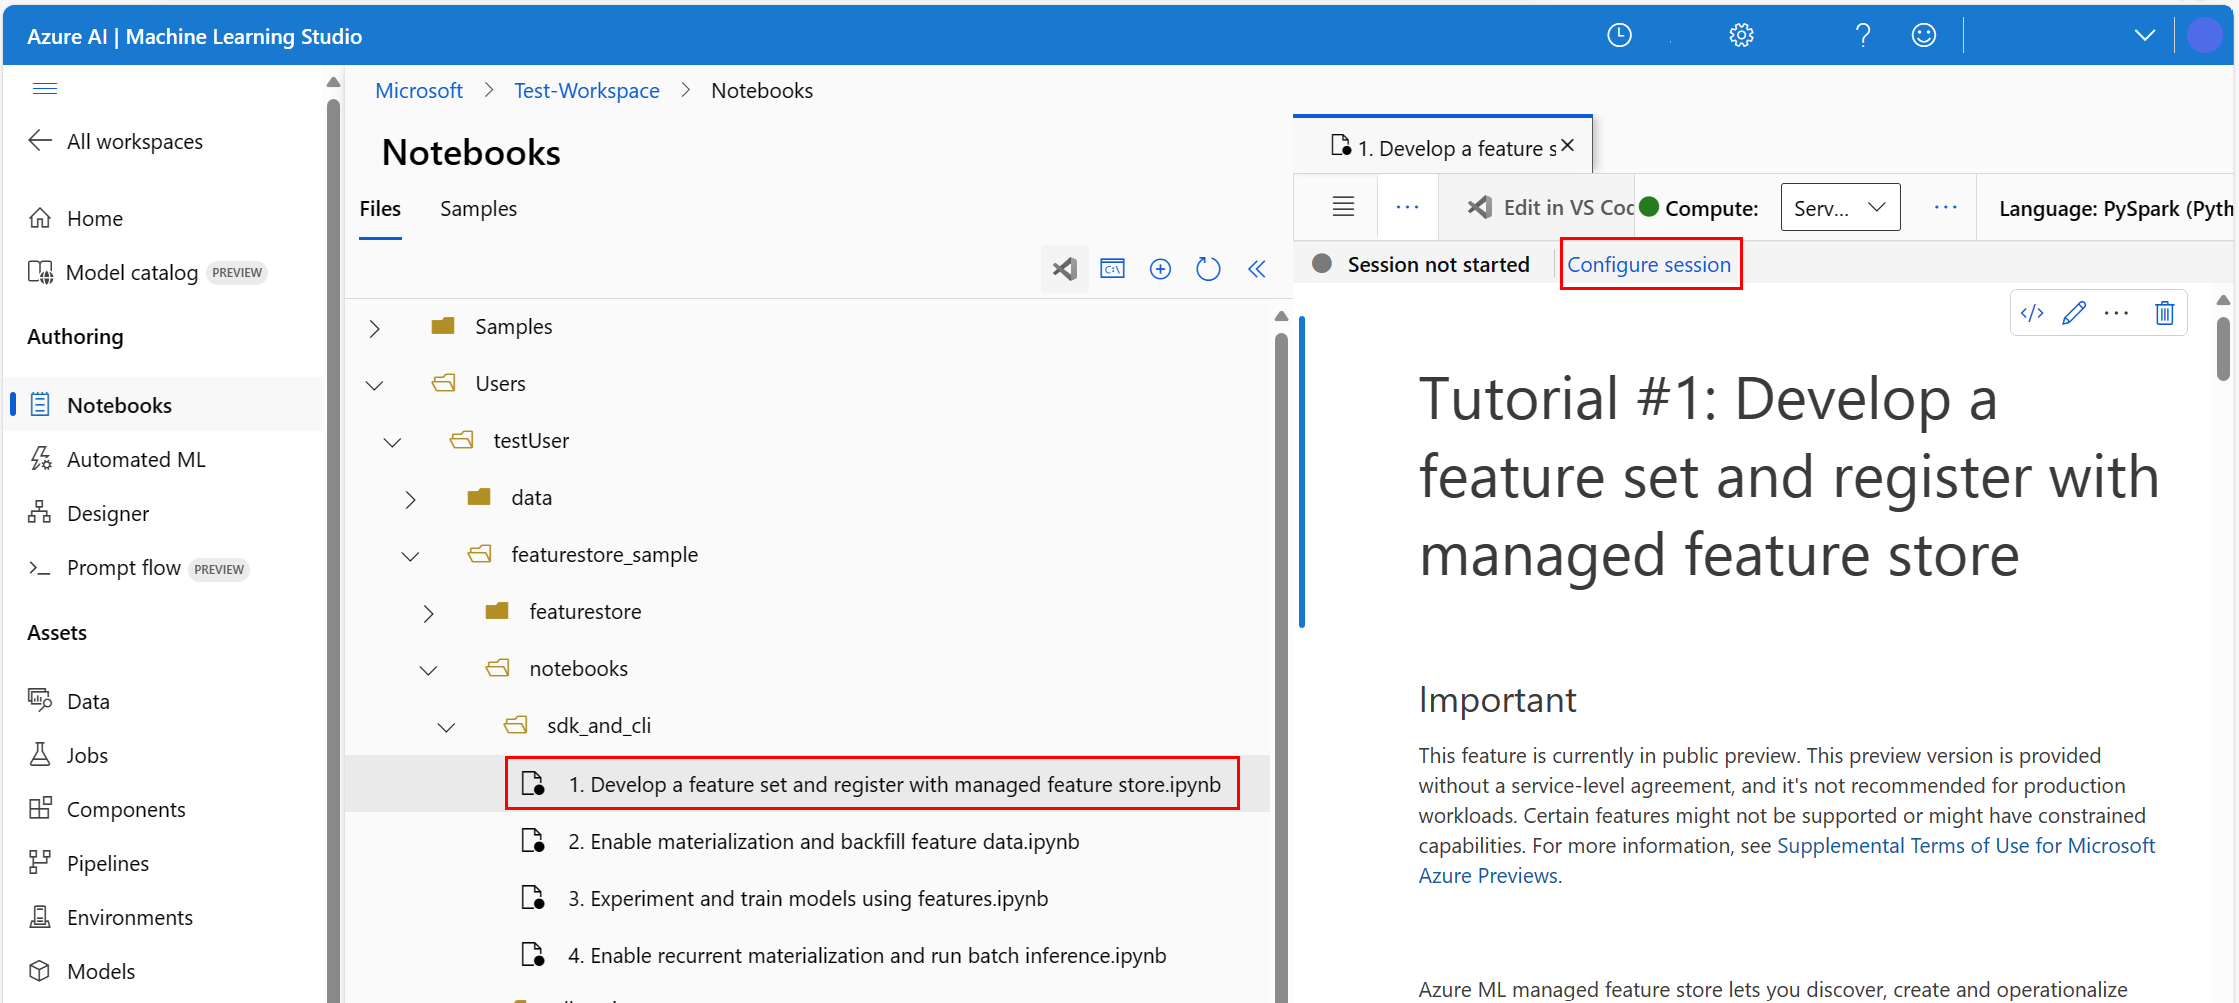
On the left pane in the Files tab, expand featurestore_sample > notebooks > sdk_and_cli or sdk_only, depending on the track you want to run.
Open the first chapter of the tutorial by selecting it.
In the upper right area of the Notebook page, select the dropdown arrow next to Compute, and select Serverless Spark Compute - Available. It might take a minute or two to attach the compute.
On the top bar above the notebook file, select Configure session.
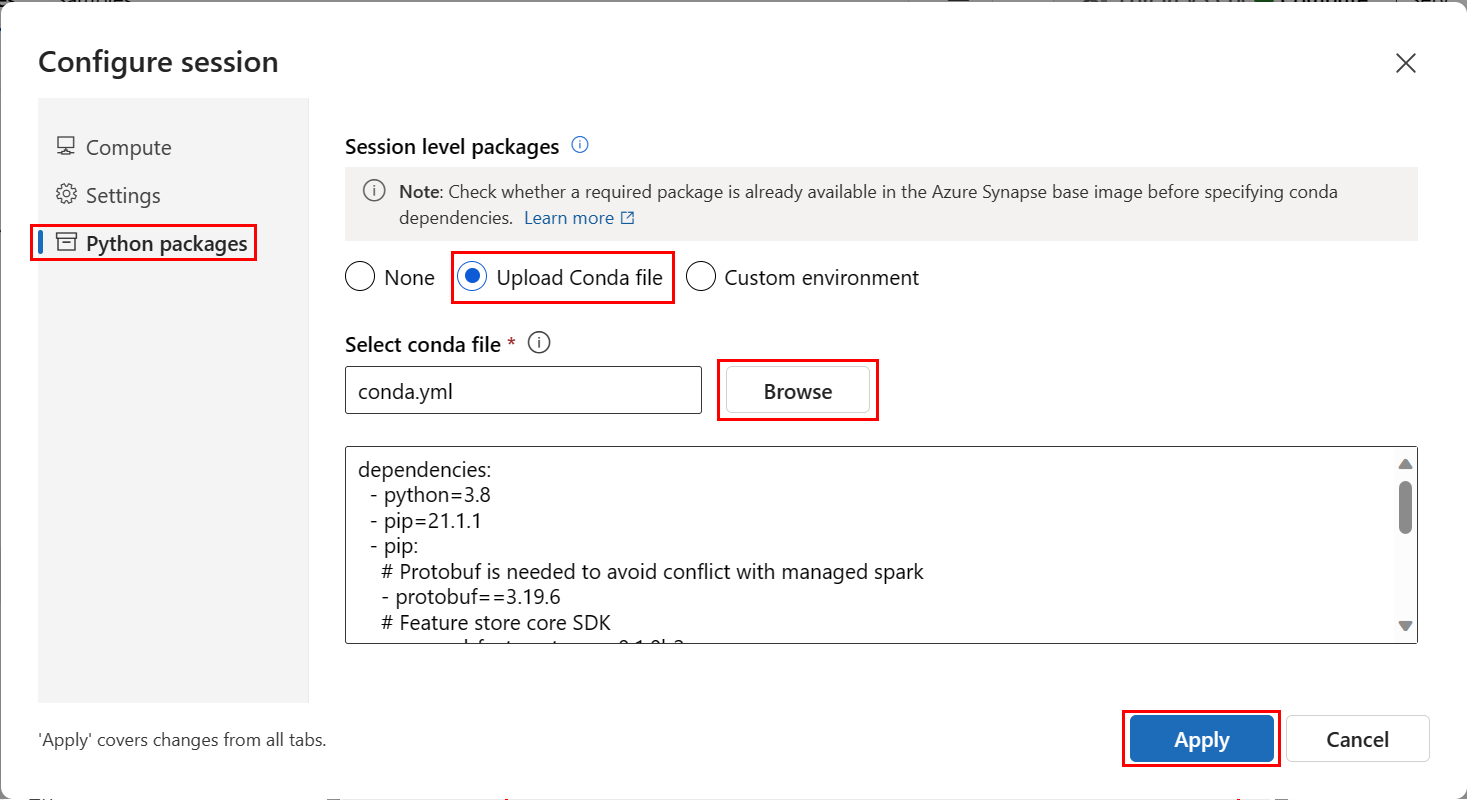
On the Configure session screen, select Python packages on the left pane.
Select Upload conda file, and under Select conda file, browse to and open the conda.yml file you downloaded.
Optionally, select Settings in the left pane and increase the Session timeout length to help prevent the serverless Spark startup time from timing out.
Select Apply.

Start the notebook
Scroll down in the notebook until you reach the first cell, and run it to start the session. The session can take up to 15 minutes to start.
# Run this cell to start the spark session (any code block will start the session ). This can take around 10 mins.
print("start spark session")
In the second cell, update the
<your_user_alias>placeholder with your username. Run the cell to set up the root directory for the sample.import os # Please update <your_user_alias> below (or any custom directory you uploaded the samples to). # You can find the name from the directory structure in the left navigation panel. root_dir = "./Users/<your_user_alias>/featurestore_sample" if os.path.isdir(root_dir): print("The folder exists.") else: print("The folder does not exist. Please create or fix the path")Run the next cell to install the Azure Machine Learning CLI extension.
# Install AzureML CLI extension
!az extension add --name ml
Run the next cell to authenticate to Azure CLI.
# Authenticate
!az login
Run the next cell to set the default Azure subscription.
# Set default subscription
import os

subscription_id = os.environ["AZUREML_ARM_SUBSCRIPTION"]

!az account set -s $subscription_id
Create a minimal feature store
Set feature store parameters, including name, location, and other values. Provide a
<FEATURESTORE_NAME>and then run the cell.# We use the subscription, resource group, region of this active project workspace. # You can optionally replace them to create the resources in a different subsciprtion/resource group, or use existing resources. import os featurestore_name = "<FEATURESTORE_NAME>" featurestore_location = "eastus" featurestore_subscription_id = os.environ["AZUREML_ARM_SUBSCRIPTION"] featurestore_resource_group_name = os.environ["AZUREML_ARM_RESOURCEGROUP"]Create the feature store.
!az ml feature-store create --subscription $featurestore_subscription_id --resource-group $featurestore_resource_group_name --location $featurestore_location --name $featurestore_nameInitialize a feature store core SDK client for Azure Machine Learning. The client is used to develop and consume features.
# feature store client
from azureml.featurestore import FeatureStoreClient
from azure.ai.ml.identity import AzureMLOnBehalfOfCredential

featurestore = FeatureStoreClient(
    credential=AzureMLOnBehalfOfCredential(),
    subscription_id=featurestore_subscription_id,
    resource_group_name=featurestore_resource_group_name,
    name=featurestore_name,
)
Grant your user identity the AzureML Data Scientist role on the feature store. Get your Microsoft Entra object ID value from the Azure portal as described in Find the user object ID.
Run the following cell to assign the AzureML Data Scientist role to your user identity, so that it can create resources in the feature store workspace. Replace the
<USER_AAD_OBJECTID>placeholder with your Microsoft Entra object ID. The permissions might need some time to propagate.your_aad_objectid = "<USER_AAD_OBJECTID>" !az role assignment create --role "AzureML Data Scientist" --assignee-object-id $your_aad_objectid --assignee-principal-type User --scope $feature_store_arm_idFor more information about access control, see Manage access control for managed feature store.
Prototype and develop a feature set
This notebook uses sample data hosted in a publicly accessible blob container, which you can read into Spark only through a wasbs driver. If you create feature sets by using your own source data, host them in an Azure Data Lake Storage account, and use an abfss driver in the data path.
Explore the transactions source data
Build a feature set named transactions that has rolling window aggregate-based features.
# remove the "." in the roor directory path as we need to generate absolute path to read from spark
transactions_source_data_path = "wasbs://data@azuremlexampledata.blob.core.windows.net/feature-store-prp/datasources/transactions-source/*.parquet"
transactions_src_df = spark.read.parquet(transactions_source_data_path)

display(transactions_src_df.head(5))
# Note: display(training_df.head(5)) displays the timestamp column in a different format. You can can call transactions_src_df.show() to see correctly formatted value
Locally develop the feature set
A feature set specification is a self-contained definition of a feature set that you can locally develop and test. Create the following rolling window aggregate features:
transactions three-day counttransactions amount three-day avgtransactions amount three-day sumtransactions seven-day counttransactions amount seven-day avgtransactions amount seven-day sum
from azureml.featurestore import create_feature_set_spec
from azureml.featurestore.contracts import (
    DateTimeOffset,
    TransformationCode,
    Column,
    ColumnType,
    SourceType,
    TimestampColumn,
)
from azureml.featurestore.feature_source import ParquetFeatureSource

transactions_featureset_code_path = (
    root_dir + "/featurestore/featuresets/transactions/transformation_code"
)

transactions_featureset_spec = create_feature_set_spec(
    source=ParquetFeatureSource(
        path="wasbs://data@azuremlexampledata.blob.core.windows.net/feature-store-prp/datasources/transactions-source/*.parquet",
        timestamp_column=TimestampColumn(name="timestamp"),
        source_delay=DateTimeOffset(days=0, hours=0, minutes=20),
    ),
    feature_transformation=TransformationCode(
        path=transactions_featureset_code_path,
        transformer_class="transaction_transform.TransactionFeatureTransformer",
    ),
    index_columns=[Column(name="accountID", type=ColumnType.string)],
    source_lookback=DateTimeOffset(days=7, hours=0, minutes=0),
    temporal_join_lookback=DateTimeOffset(days=1, hours=0, minutes=0),
    infer_schema=True,
)
Review the feature transformation code file: featurestore/featuresets/transactions/transformation_code/transaction_transform.py. Note the rolling aggregation defined for the features. This file is a Spark transformer. For more information about the feature set and transformations, see What is managed feature store?
Export as a feature set specification
To register the feature set specification with the feature store, you save that specification in a specified location and format, which supports source control.
import os

# Create a new folder to dump the feature set specification.
transactions_featureset_spec_folder = (
    root_dir + "/featurestore/featuresets/transactions/spec"
)

# Check if the folder exists, create one if it does not exist.
if not os.path.exists(transactions_featureset_spec_folder):
    os.makedirs(transactions_featureset_spec_folder)

transactions_featureset_spec.dump(transactions_featureset_spec_folder, overwrite=True)
To see the featurestore/featuresets/accounts/spec/FeaturesetSpec.yaml specification, open the generated transactions feature set specification from the file tree. The specification contains these elements:
source: A reference to a storage resource. In this case, it's a parquet file in a blob storage resource.features: A list of features and their datatypes. If you provide transformation code, the code must return a DataFrame that maps to the features and datatypes.index_columns: The join keys required to access values from the feature set.
Register a feature store entity
Entities help enforce the best practice of using the same join key definition across feature sets that use the same logical entities. Examples of entities include accounts and customers. Entities are typically created once and then reused across feature sets. To learn more, see Understand top-level entities in managed feature store.
Create an account entity that has the join key accountID of type string. Register the account entity with the feature store.
account_entity_path = root_dir + "/featurestore/entities/account.yaml"
!az ml feature-store-entity create --file $account_entity_path --resource-group $featurestore_resource_group_name --feature-store-name $featurestore_nameRegister the feature set with the feature store
The following code registers a feature set asset with the feature store. You can then reuse that asset and easily share it. Registration of a feature set asset offers managed capabilities, including versioning and materialization. Later tutorials in this series cover managed capabilities.
account_featureset_path = (
    root_dir + "/featurestore/featuresets/transactions/featureset_asset.yaml"
)
!az ml feature-set create --file $account_featureset_path --resource-group $featurestore_resource_group_name --feature-store-name $featurestore_nameExplore the feature store UI
Feature store asset creation and updates can happen only through the SDK and CLI. You can use the Machine Learning UI to search or browse through the feature store.
- Open the Azure Machine Learning global landing page.
- Select Feature stores on the left pane.
- From the list of accessible feature stores, select the feature store you created earlier in this tutorial.
Assign the Storage Blob Data Reader role
The Storage Blob Data Reader role must be assigned to your user account to ensure that the user account can read materialized feature data from the offline materialization store.
Get information about the offline materialization store from the feature store UI Overview page. The values for the storage account <SUBSCRIPTION_ID>, storage account <RESOURCE_GROUP>, and <STORAGE_ACCOUNT_NAME> for the offline materialization store are located in the Offline materialization store card.

Run the following code cell for role assignment. The permissions might need some time to propagate.
storage_subscription_id = "<SUBSCRIPTION_ID>"
storage_resource_group_name = "<RESOURCE_GROUP>"
storage_account_name = "<STORAGE_ACCOUNT_NAME>"

# Set the ADLS Gen2 storage account ARM ID
gen2_storage_arm_id = "/subscriptions/{sub_id}/resourceGroups/{rg}/providers/Microsoft.Storage/storageAccounts/{account}".format(
    sub_id=storage_subscription_id,
    rg=storage_resource_group_name,
    account=storage_account_name,
)

print(gen2_storage_arm_id)

!az role assignment create --role "Storage Blob Data Reader" --assignee-object-id $your_aad_objectid --assignee-principal-type User --scope $gen2_storage_arm_idFor more information about access control, see Manage access control for managed feature store.
Generate a training data DataFrame
Generate a training data DataFrame by using the registered feature set.
Load observation data captured during the event itself.
Observation data typically involves the core data used for training and inferencing, which joins with the feature data to create the full training data resource. The following data has core transaction data including transaction ID, account ID, and transaction amount values. Because you use the data for training, it also has an appended target variable
is_fraud.observation_data_path = "wasbs://data@azuremlexampledata.blob.core.windows.net/feature-store-prp/observation_data/train/*.parquet" observation_data_df = spark.read.parquet(observation_data_path) obs_data_timestamp_column = "timestamp" display(observation_data_df) # Note: the timestamp column is displayed in a different format. Optionally, you can can call training_df.show() to see correctly formatted valueGet the registered feature set and list its features.
# Look up the featureset by providing a name and a version.
transactions_featureset = featurestore.feature_sets.get("transactions", "1")
# List its features.
transactions_featureset.features
# Print sample values. display(transactions_featureset.to_spark_dataframe().head(5))Select the features to become part of the training data, and use the feature store SDK to generate the training data itself. A point-in-time join appends the features to the training data.
from azureml.featurestore import get_offline_features

# You can select features in pythonic way.
features = [
    transactions_featureset.get_feature("transaction_amount_7d_sum"),
    transactions_featureset.get_feature("transaction_amount_7d_avg"),
]

# You can also specify features in string form: featureset:version:feature.
more_features = [
    f"transactions:1:transaction_3d_count",
    f"transactions:1:transaction_amount_3d_avg",
]

more_features = featurestore.resolve_feature_uri(more_features)
features.extend(more_features)

# Generate training dataframe by using feature data and observation data.
training_df = get_offline_features(
    features=features,
    observation_data=observation_data_df,
    timestamp_column=obs_data_timestamp_column,
)

# Ignore the message that says feature set is not materialized (materialization is optional). We will enable materialization in the subsequent part of the tutorial.
display(training_df)
# Note: the timestamp column is displayed in a different format. Optionally, you can can call training_df.show() to see correctly formatted value
Enable offline materialization
Materialization computes the feature values for a feature window and stores those values in a materialization store. All feature queries can then use those values from the materialization store.
Without materialization, a feature set query applies transformations to the source on the fly and computes the features before returning the values. This process works well for the prototyping phase. However, for training and inference operations in a production environment, materializing the features provides greater reliability and availability.
The default blob store for the feature store is an Azure Data Lake Storage (ADLS) container. A feature store is always created with an offline materialization store and a user-assigned managed identity (UAI).
If a feature store is created with parameter default values offline_store=None and materialization_identity=None, the system performs the following setup:
- Creates an ADLS container as the offline store.
- Creates a UAI and assigns it to the feature store as the materialization identity.
- Assigns required role-based access control (RBAC) permissions to the UAI on the offline store.
Optionally, you can use an existing ADLS container as the offline store by defining the offline_store parameter. Only ADLS containers are supported for offline materialization stores.
Optionally, you can provide an existing UAI by defining a materialization_identity parameter. The required RBAC permissions are assigned to the UAI on the offline store during the feature store creation.
The following code sample shows the creation of a feature store with user-defined offline_store and materialization_identity parameters.
   import os
   from azure.ai.ml import MLClient
   from azure.ai.ml.identity import AzureMLOnBehalfOfCredential
   from azure.ai.ml.entities import (
      ManagedIdentityConfiguration,
      FeatureStore,
      MaterializationStore,
   )
   from azure.mgmt.msi import ManagedServiceIdentityClient

   # Get an existing offline store
   storage_subscription_id = "<OFFLINE_STORAGE_SUBSCRIPTION_ID>"
   storage_resource_group_name = "<OFFLINE_STORAGE_RESOURCE_GROUP>"
   storage_account_name = "<OFFLINE_STORAGE_ACCOUNT_NAME>"
   storage_file_system_name = "<OFFLINE_STORAGE_CONTAINER_NAME>"

   # Get ADLS container ARM ID
   gen2_container_arm_id = "/subscriptions/{sub_id}/resourceGroups/{rg}/providers/Microsoft.Storage/storageAccounts/{account}/blobServices/default/containers/{container}".format(
      sub_id=storage_subscription_id,
      rg=storage_resource_group_name,
      account=storage_account_name,
      container=storage_file_system_name,
   )

   offline_store = MaterializationStore(
      type="azure_data_lake_gen2",
      target=gen2_container_arm_id,
   )

   # Get an existing UAI
   uai_subscription_id = "<UAI_SUBSCRIPTION_ID>"
   uai_resource_group_name = "<UAI_RESOURCE_GROUP>"
   uai_name = "<FEATURE_STORE_UAI_NAME>"

   msi_client = ManagedServiceIdentityClient(
      AzureMLOnBehalfOfCredential(), uai_subscription_id
   )

   managed_identity = msi_client.user_assigned_identities.get(
      uai_resource_group_name, uai_name
   )

   # Get UAI information
   uai_principal_id = managed_identity.principal_id
   uai_client_id = managed_identity.client_id
   uai_arm_id = managed_identity.id

   materialization_identity1 = ManagedIdentityConfiguration(
      client_id=uai_client_id, principal_id=uai_principal_id, resource_id=uai_arm_id
   )

   # Create a feature store
   featurestore_name = "<FEATURE_STORE_NAME>"
   featurestore_location = "<AZURE_REGION>"
   featurestore_subscription_id = os.environ["AZUREML_ARM_SUBSCRIPTION"]
   featurestore_resource_group_name = os.environ["AZUREML_ARM_RESOURCEGROUP"]

   ml_client = MLClient(
      AzureMLOnBehalfOfCredential(),
      subscription_id=featurestore_subscription_id,
      resource_group_name=featurestore_resource_group_name,
   )

   # Use existing ADLS Gen2 container and UAI
   fs = FeatureStore(
      name=featurestore_name,
      location=featurestore_location,
      offline_store=offline_store,
      materialization_identity=materialization_identity1,
   )

   fs_poller = ml_client.feature_stores.begin_update(fs)

   print(fs_poller.result())
After you enable feature set materialization on the transactions feature set, you can perform a backfill. You can also schedule recurrent materialization jobs. For more information, see the third tutorial in this series, Enable recurrent materialization & run batch inference.
Set spark.sql.shuffle.partitions in the YAML file
The Spark configuration spark.sql.shuffle.partitions is an optional parameter that can affect the number of Parquet files generated per day when the feature set is materialized into the offline store. The default value of this parameter is 200.
As a best practice, avoid generation of many small Parquet files. If offline feature retrieval becomes slow after feature set materialization, open the corresponding folder in the offline store. Check whether the issue involves too many small Parquet files per day, and adjust the value of this parameter according to the feature data size.
Note
The sample data used in this notebook is small. Therefore, the spark.sql.shuffle.partitions parameter is set to 1 in the featureset_asset_offline_enabled.yaml file.
transaction_asset_mat_yaml = (
    root_dir
    + "/featurestore/featuresets/transactions/featureset_asset_offline_enabled.yaml"
)

!az ml feature-set update --file $transaction_asset_mat_yaml --resource-group $featurestore_resource_group_name --feature-store-name $featurestore_name
You can also save the feature set asset as a YAML resource.
Backfill data for the transactions feature set
Materialization computes the feature values for a feature window, and stores these computed values in a materialization store. Feature materialization increases the reliability and availability of the computed values. All feature queries now use the values from the materialization store. This step performs a one-time backfill for a feature window of 18 months.
Note
You might need to determine a backfill data window value. The window must match the window of your training data. For example, to use 18 months of data for training, you must retrieve features for 18 months. This means you should backfill for an 18-month window.
The following code cell materializes data by current status None or Incomplete for the defined feature window. You can provide a list of more than one data status, for example ["None", "Incomplete"], in a single backfill job.
feature_window_start_time = "2022-01-01T00:00.000Z"
feature_window_end_time = "2023-06-30T00:00.000Z"

!az ml feature-set backfill --name transactions --version 1 --by-data-status "['None', 'Incomplete']" --feature-window-start-time $feature_window_start_time --feature-window-end-time $feature_window_end_time --feature-store-name $featurestore_name --resource-group $featurestore_resource_group_nameTip
- The
timestampcolumn should followyyyy-MM-ddTHH:mm:ss.fffZformat. - The
feature_window_start_timeandfeature_window_end_timegranularity is limited to seconds. Milliseconds in thedatetimeobject are ignored. - A materialization job is submitted only if data in the feature window matches the
data_statusdefined when submitting the job.
Print sample data from the feature set. The output information shows that the data was retrieved from the materialization store. The get_offline_features() method retrieves the training and inference data and also uses the materialization store by default.
# Look up the feature set by providing a name and a version and display few records.
transactions_featureset = featurestore.feature_sets.get("transactions", "1")
display(transactions_featureset.to_spark_dataframe().head(5))
Further explore offline feature materialization
You can explore feature materialization status for a feature set in the Materialization jobs UI.
Select Feature stores on the left pane.
From the list of accessible feature stores, select the feature store you performed backfill for.
Select the Materialization jobs tab.
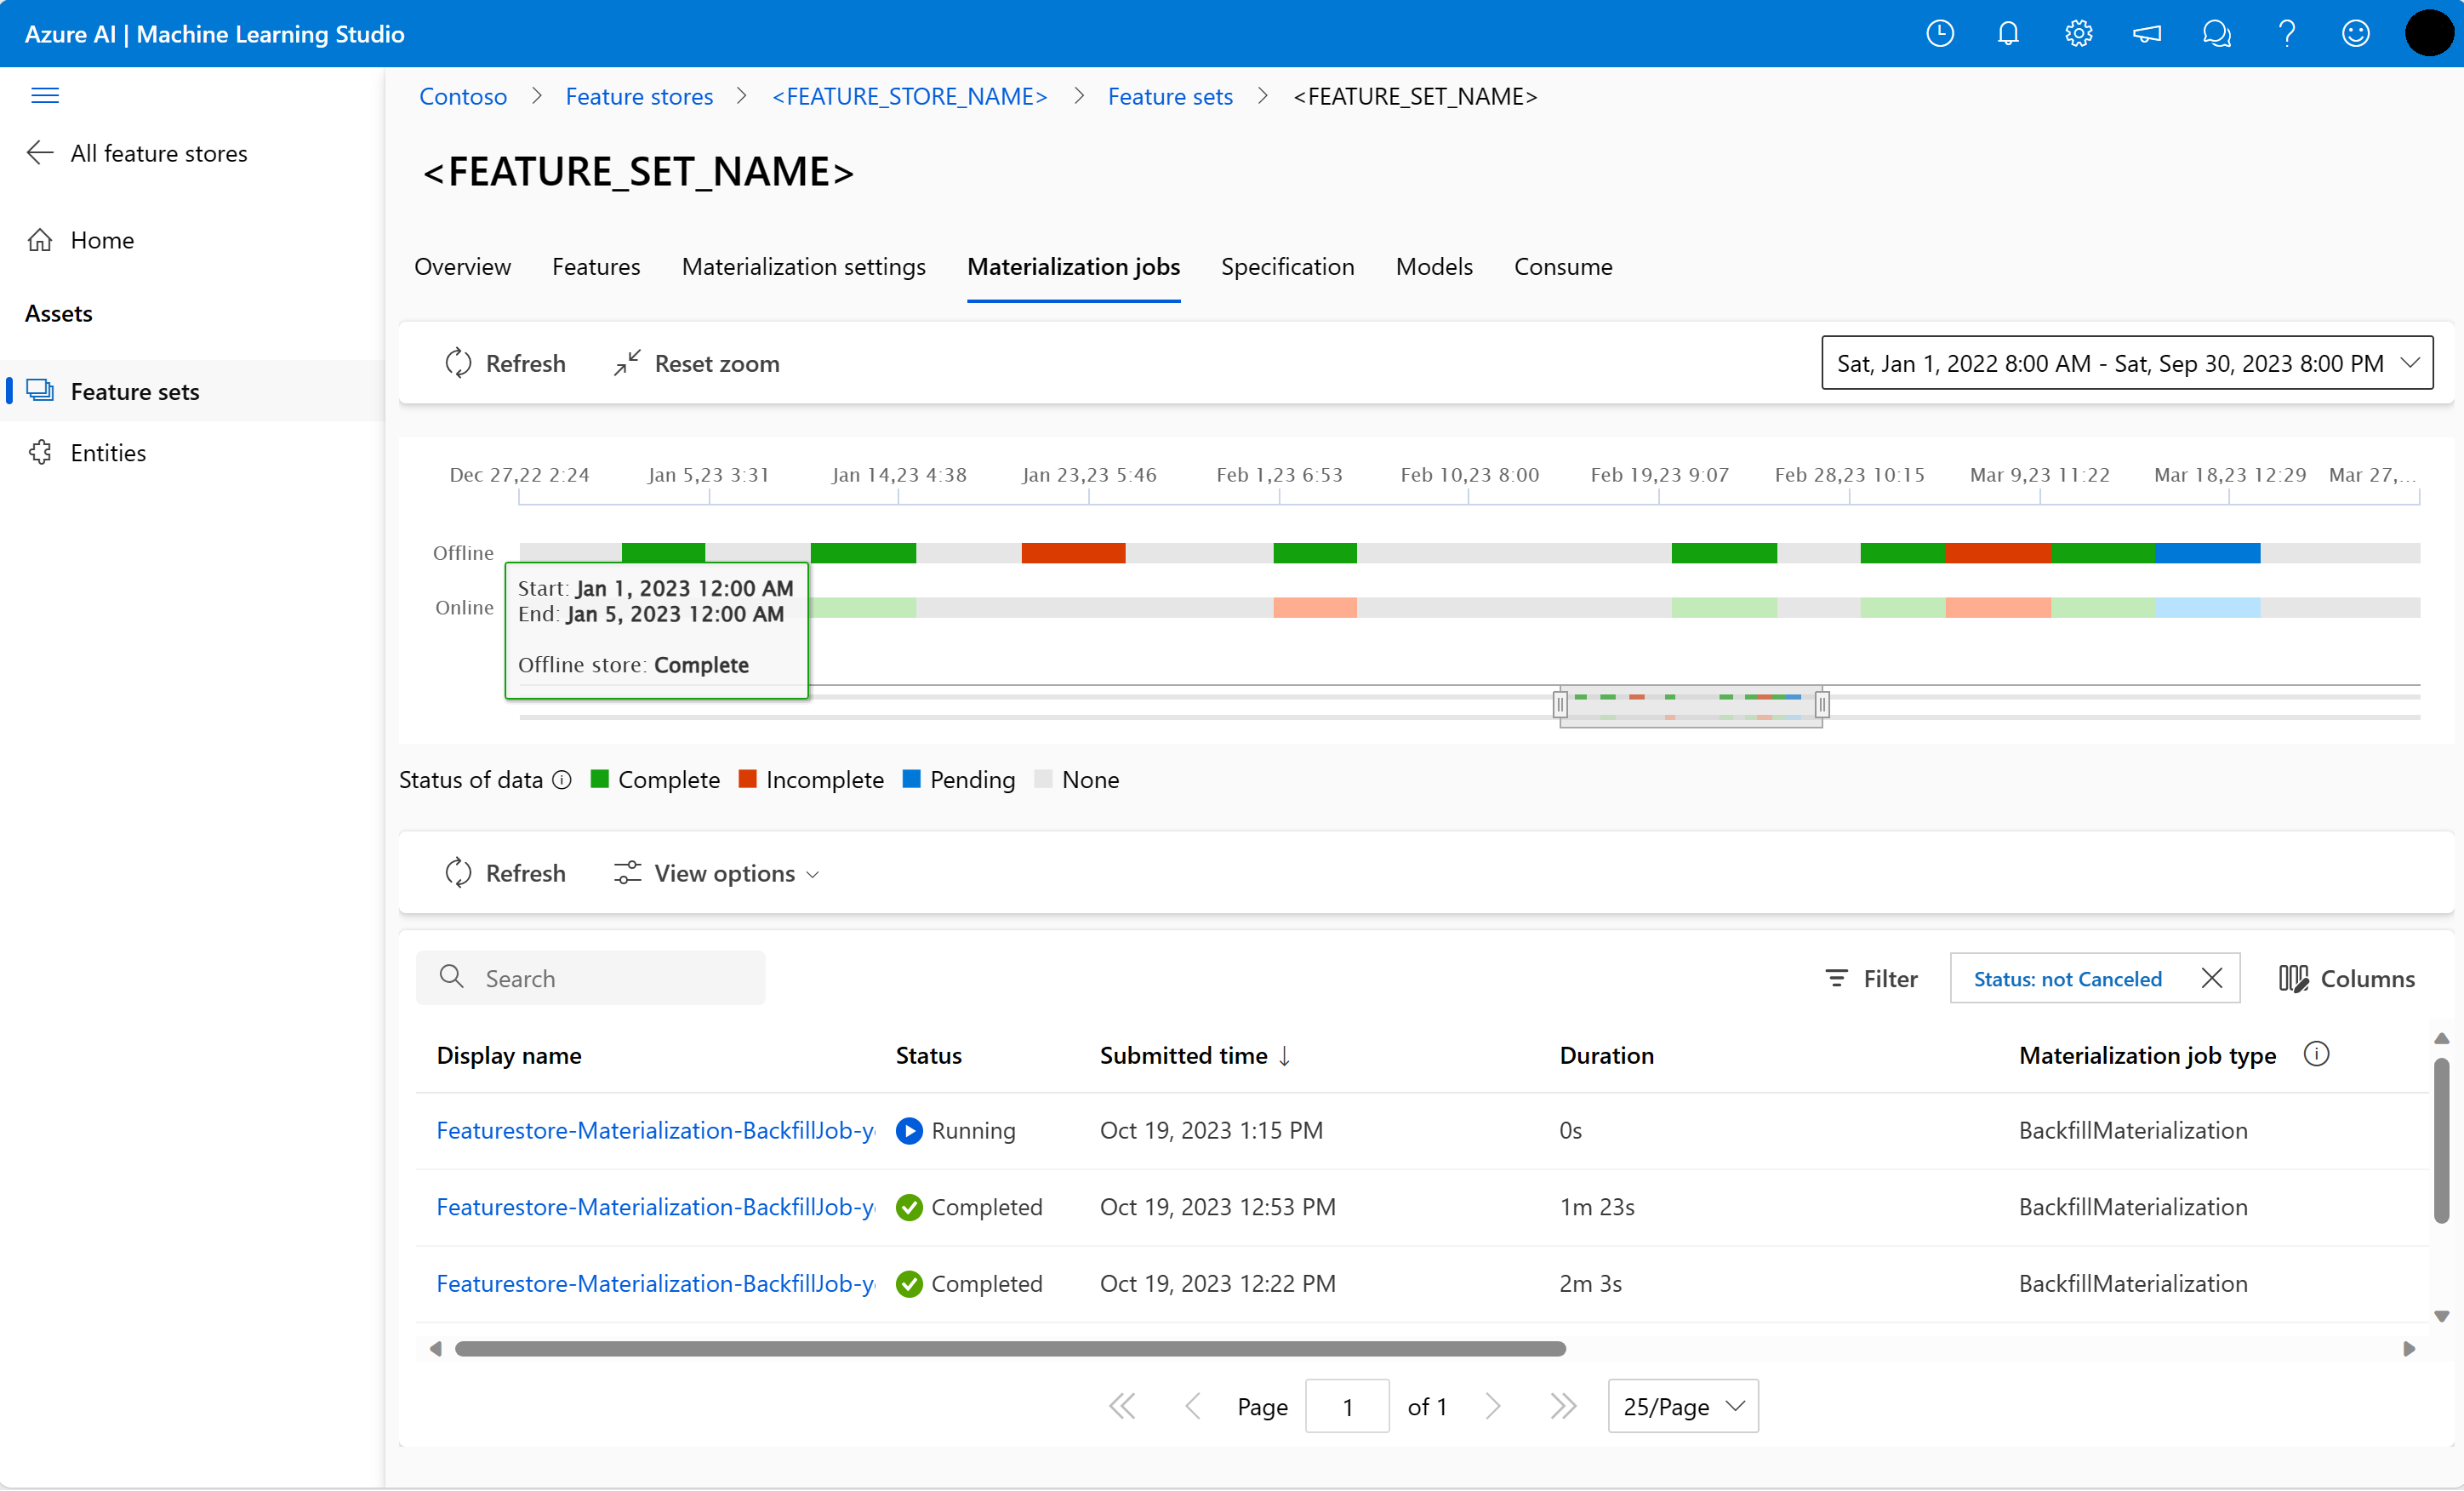

Data materialization status can be:
- Complete (green)
- Incomplete (red)
- Pending (blue)
- None (gray)
A data interval represents a contiguous portion of data with same data materialization status. For example, the earlier snapshot has 16 data intervals in the offline materialization store. The data can have a maximum of 2,000 data intervals. If your data contains more than 2,000 data intervals, create a new feature set version.
During backfill, a new materialization job is submitted for each data interval that falls within the defined feature window. No job is submitted if a materialization job is already pending or running for a data interval that isn't backfilled.
You can retry a failed materialization job.
Note
To get the job ID of a failed materialization job:
- Navigate to the feature set Materialization jobs UI.
- Select the Display name of a specific job with Status of Failed.
- Under the Name property on the job Overview page, locate the job ID starting with
Featurestore-Materialization-.
az ml feature-set backfill --by-job-id <JOB_ID_OF_FAILED_MATERIALIZATION_JOB> --name <FEATURE_SET_NAME> --version <VERSION> --feature-store-name <FEATURE_STORE_NAME> --resource-group <RESOURCE_GROUP>
Update an offline materialization store
If an offline materialization store must be updated at the feature store level, all feature sets in the feature store should have offline materialization disabled.
If offline materialization is disabled on a feature set, materialization status of the data already materialized in the offline materialization store resets. The reset renders data that is already materialized unusable. You must resubmit materialization jobs after enabling offline materialization.
Clean up
The fifth tutorial in this series, Develop a feature set with a custom source, describes how to delete the resources.
Next step
This tutorial built the training data with features from the feature store, enabled materialization to offline feature store, and performed a backfill.
The next tutorial in the series, Experiment and train models by using features, shows you how to run model training using these features.