Note
Access to this page requires authorization. You can try signing in or changing directories.
Access to this page requires authorization. You can try changing directories.
In this quickstart, you set up your Microsoft Discovery environment so that you can run your first AI-powered scientific investigation. You can complete the setup in two ways:
- Azure portal – Create each resource manually through a guided, step-by-step experience. Choose this path if you want to understand each component or you prefer a UI-driven workflow.
- Bicep – Deploy the full stack with a single infrastructure-as-code template. Choose this path if you want a repeatable, automated deployment.
Both paths provision the same core resources: networking, identity, storage, a supercomputer with a node pool, a workspace with a chat model deployment, a storage container, and a project.
Select the tab that matches your preferred experience under Deploy Microsoft Discovery infrastructure.
Prerequisites
The following prerequisites apply to both the Azure portal and Bicep experiences:
An active Azure subscription that's enabled (allow-listed) for Microsoft Discovery access. If your subscription isn't yet enabled, contact your Microsoft account representative to request access.
Sufficient permissions in your Azure subscription to register resource providers, assign roles, and create resources:
The Owner, Role Based Access Control Administrator, or User Access Administrator role is required to assign roles to administrators (Platform Admins, Scientists, and Engineers) who manage and use Discovery resources. For the full list of required roles, see Roles required by persona.
A Contributor or higher privileged role (for example, Owner) is required to register resource providers and create a resource group.
Tip
To assign the full Platform Administrator persona role set in a single, idempotent command, use the open-source
Set-DiscoveryRoleAssignments.ps1PowerShell script. See Assign Microsoft Discovery persona roles with a PowerShell script. This method is the recommended path for onboarding multiple users.
Register the required resource providers in your subscription. For more information, see Resource provider registration. To register
Microsoft.Discovery:- Sign in to the Azure portal.
- Navigate to Subscriptions and select your subscription.
- In the left-hand menu, select Resource Providers.
- Search for
Microsoft.Discovery. - Select the provider name and select Register.
Note
Ensure that the following resource providers are also registered on your subscription. If not, register them:
Microsoft.Network,Microsoft.Compute,Microsoft.Storage,Microsoft.ManagedIdentity,Microsoft.AlertsManagement,Microsoft.Authorization,Microsoft.CognitiveServices,Microsoft.ContainerInstance,Microsoft.ContainerRegistry,Microsoft.ContainerService,Microsoft.DocumentDB,Microsoft.Features,Microsoft.KeyVault,Microsoft.MachineLearningServices,Microsoft.OperationalInsights,Microsoft.ResourceGraph,Microsoft.Search,Microsoft.Web,Microsoft.Insights,Microsoft.Resources,Microsoft.Sql,Microsoft.App,Microsoft.BingAssign the Discovery NSP Perimeter Joiner role. Microsoft Discovery workspaces, bookshelves, and supercomputers are network-hardened by default using Network Security Perimeter (NSP) rules. Before you create your first workspace, bookshelf, or supercomputer, you must create the Discovery NSP Perimeter Joiner custom role. Once created, assign the Discovery NSP Perimeter Joiner custom role and the Reader role to the Discovery control-plane service App (the first-party service principal) so the control plane can configure Network Security Perimeters in your subscription. For step-by-step instructions, see Assign the NSP Perimeter Joiner role.
Microsoft Foundry, Azure OpenAI quotas, and VM SKU/quotas available in your chosen region. See Quota reservations.
An existing resource group, or permissions to create a new one. Creating a resource group requires Contributor role on the subscription.
Important
Microsoft Discovery resources are supported in three production regions: East US, Sweden Central, and UK South. Create all resources for a single deployment in the same region, subscription, and resource group for simplicity.
Note
You can associate a virtual network with only one Microsoft Discovery workspace. If you need multiple workspaces, create a separate virtual network and subnets for each one.
Important
If you deploy the networking resources into a separate resource group from your other Discovery resources, make sure you assign yourself the appropriate permissions on the virtual network's resource group so that the supercomputer resource deploys successfully. The permissions to consider are Network Contributor and Microsoft Discovery Platform Administrator (Preview). If you use the Bicep template, update it to create the virtual network in that separate resource group.
Tip
You can deploy Discovery resources with complete network isolation. When networkIsolation is enabled, all resources are shielded within the private network and are reachable only through the private endpoint and Network Security Perimeter (NSP). You can still reach the workspace over the public network through Discovery Studio and the REST API. To lock down access to your private network only, disable public network access for your workspace and create private endpoints for the workspace resources. For guidance, see Configure network security for Microsoft Discovery workspaces.
Deploy Microsoft Discovery infrastructure
Select the Azure portal tab to create each resource manually, or the Bicep tab to deploy the full stack by using an infrastructure-as-code template.
Use the Azure portal to create each Microsoft Discovery resource through a guided experience.
1. Set up networking, identity, and storage
Before proceeding with the deployment of Microsoft Discovery infrastructure components, use an existing resource group or create a new one.
a. Assign roles to administrators
Tip
Instead of assigning the roles listed below one-by-one through the Azure portal, you can assign the full Platform Administrator persona role set in a single, idempotent command using the open-source Set-DiscoveryRoleAssignments.ps1 PowerShell script. See Assign Microsoft Discovery persona roles with a PowerShell script. This is the recommended path for onboarding multiple users.
Assign the following built-in roles to users at the desired scope (subscription or resource group):
- Microsoft Discovery Platform Administrator (Preview)
- Managed Identity Contributor
- Managed Identity Operator
- Storage Account Contributor
- Storage Blob Data Contributor
- Network Contributor
- ACRPush
- Foundry User
- Microsoft Discovery Bookshelf Index Data Reader (Preview)
Note
If you're assigning all roles at the subscription level, you can skip this note. If you're assigning roles at the resource group level, skip the Foundry User role for now. Continue with the next steps and revisit this role assignment after the workspace resource is created. This role must be assigned to each Platform Admin or Scientist user at the workspace managed resource group level.
Steps to assign roles:
- Sign in to the Azure portal.
- Navigate to Subscriptions and select your subscription.
- In the left-hand menu, select Access control (IAM).
- Select Add, then select Add role assignment.
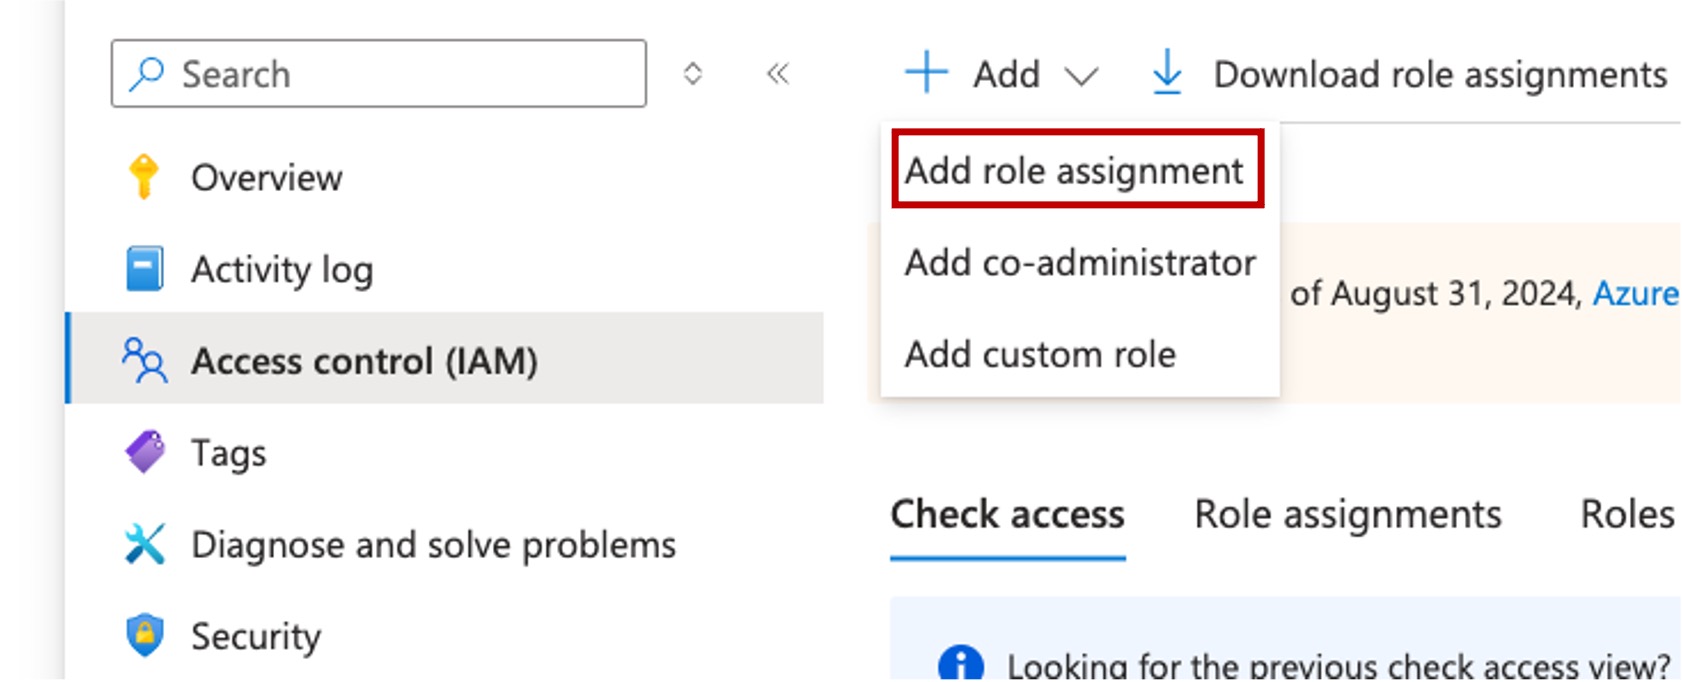
- On the Add role assignment pane, search for each role one at a time, then select Next.
- On the Members tab, ensure Assign access to is set to User, group, or service principal.
- Select + Select members, choose the members to assign this permission to, then select Next.
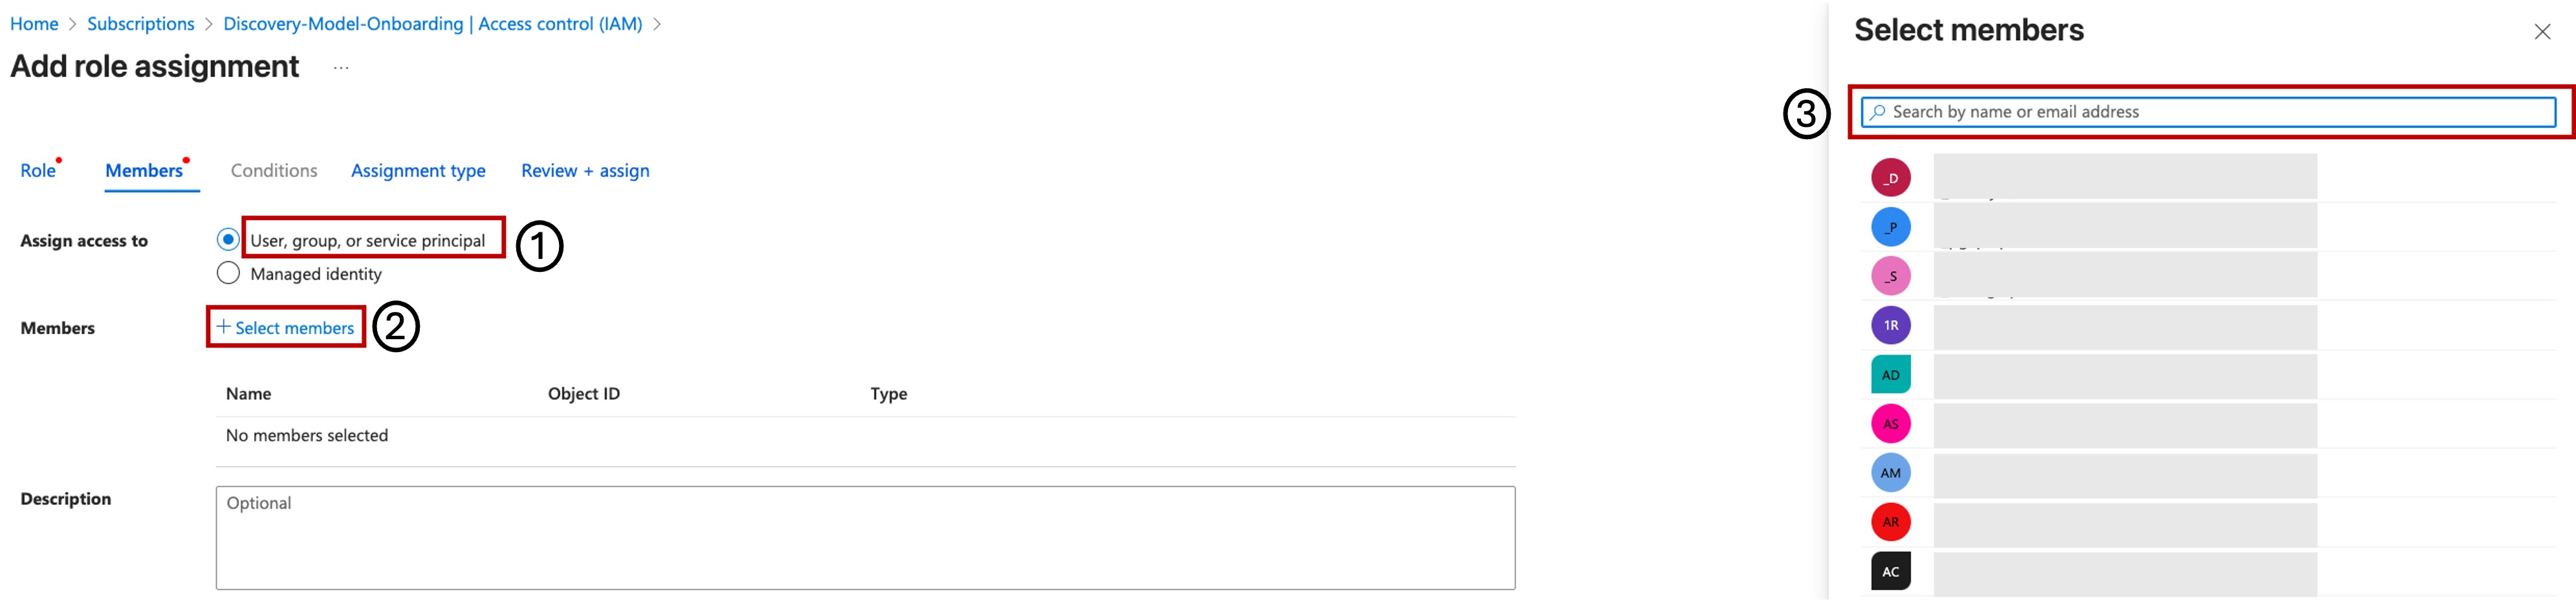
- On the Conditions tab, select Allow user to assign all roles except privileged administrator roles Owner, UAA, RBAC (Recommended), then select Next.
- On the Assignment Type tab, select the configuration that best suits your organization, then select Next.
- On the Review + assign tab, verify the information, and select Review + assign.
Repeat this process for all the required roles.
b. Create a virtual network and subnets
- Sign in to the Azure portal.
- Search for Virtual networks and select it from the results.
- Select Create to start creating a new virtual network.
- Enter details such as Subscription, Resource Group, Name, and Region, then select Next.
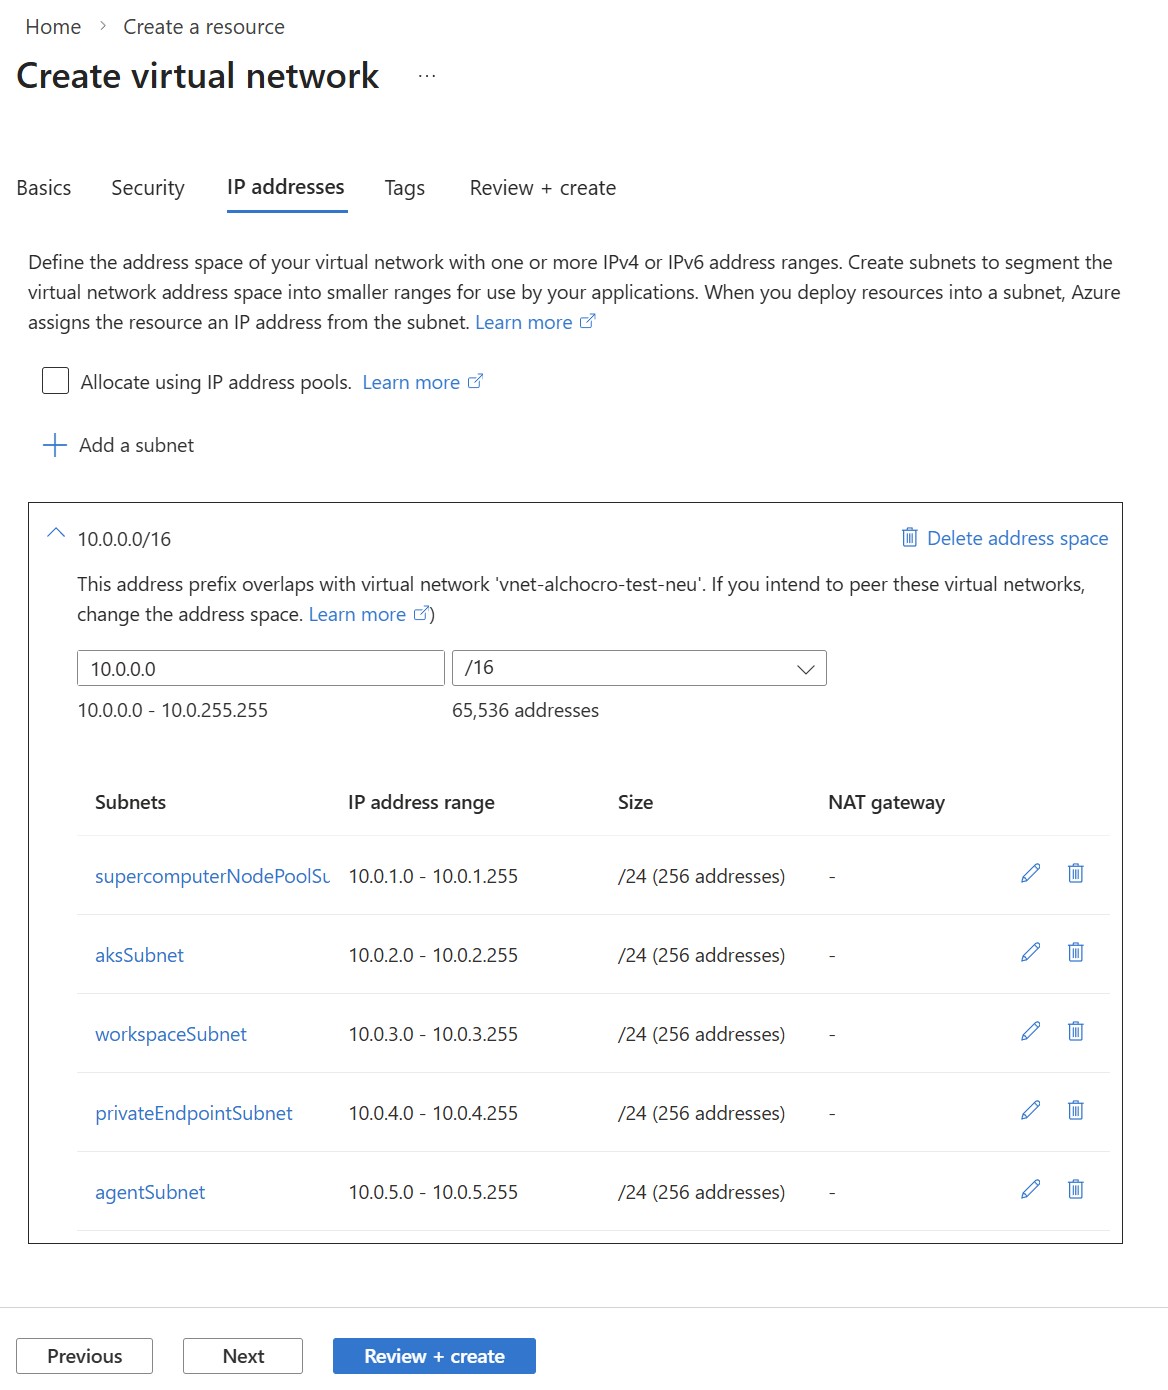
- Configure IP addresses:
- IPv4 address space: Enter your chosen CIDR (Classless Inter-Domain Routing) block (for example,
10.0.0.0/16). - Add the following subnets:
supercomputerNodepoolSubnet:10.0.1.0/24aksSubnet:10.0.2.0/24workspaceSubnet:10.0.3.0/24privateEndpointSubnet:10.0.4.0/24agentSubnet:10.0.5.0/24searchSubnet:10.0.6.0/24
- IPv4 address space: Enter your chosen CIDR (Classless Inter-Domain Routing) block (for example,
- For
workspaceSubnet,agentSubnetandsearchSubnet, under SubnetDelegation, selectMicrosoft.App/environments.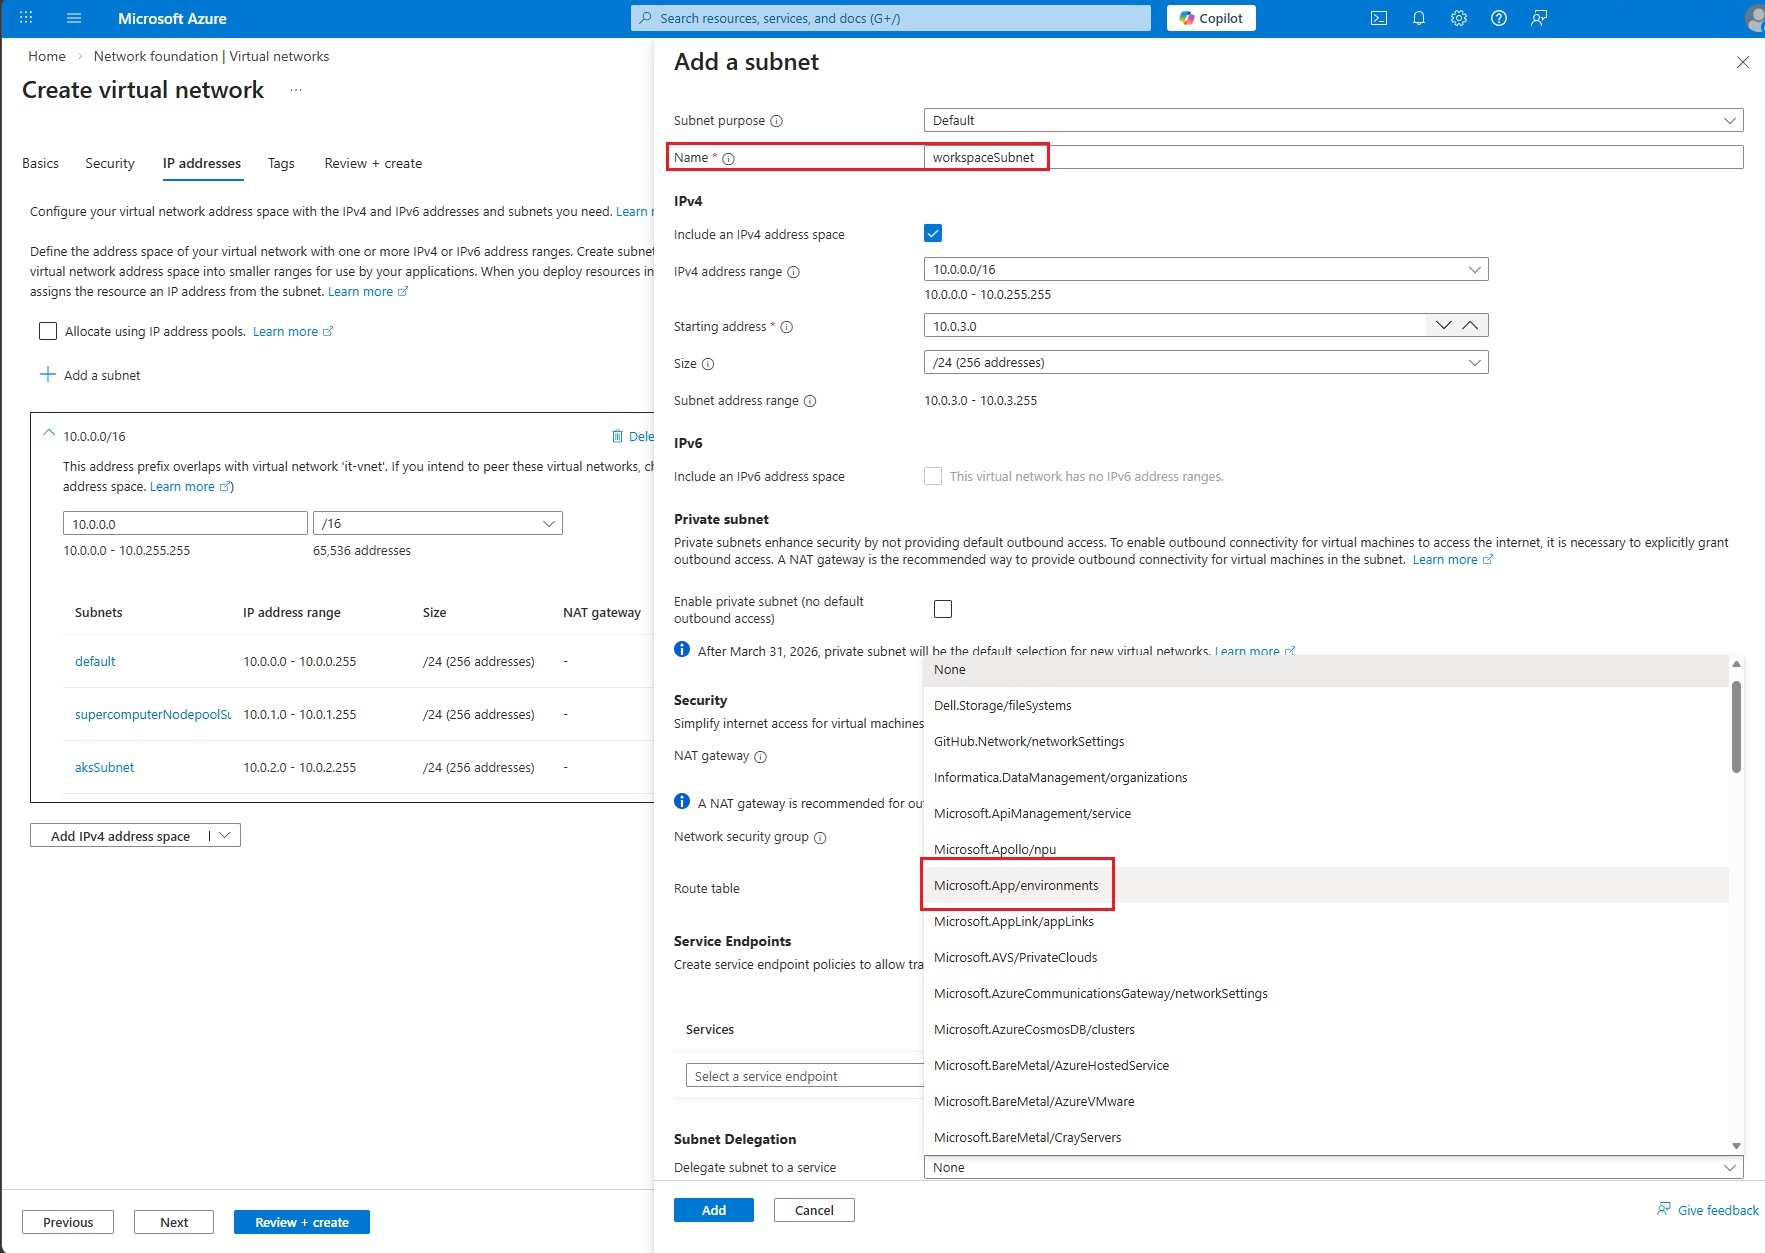
- For
workspaceSubnet,agentSubnet,supercomputerNodepoolSubnet, andaksSubnet, under Service Endpoints, addMicrosoft.Storage.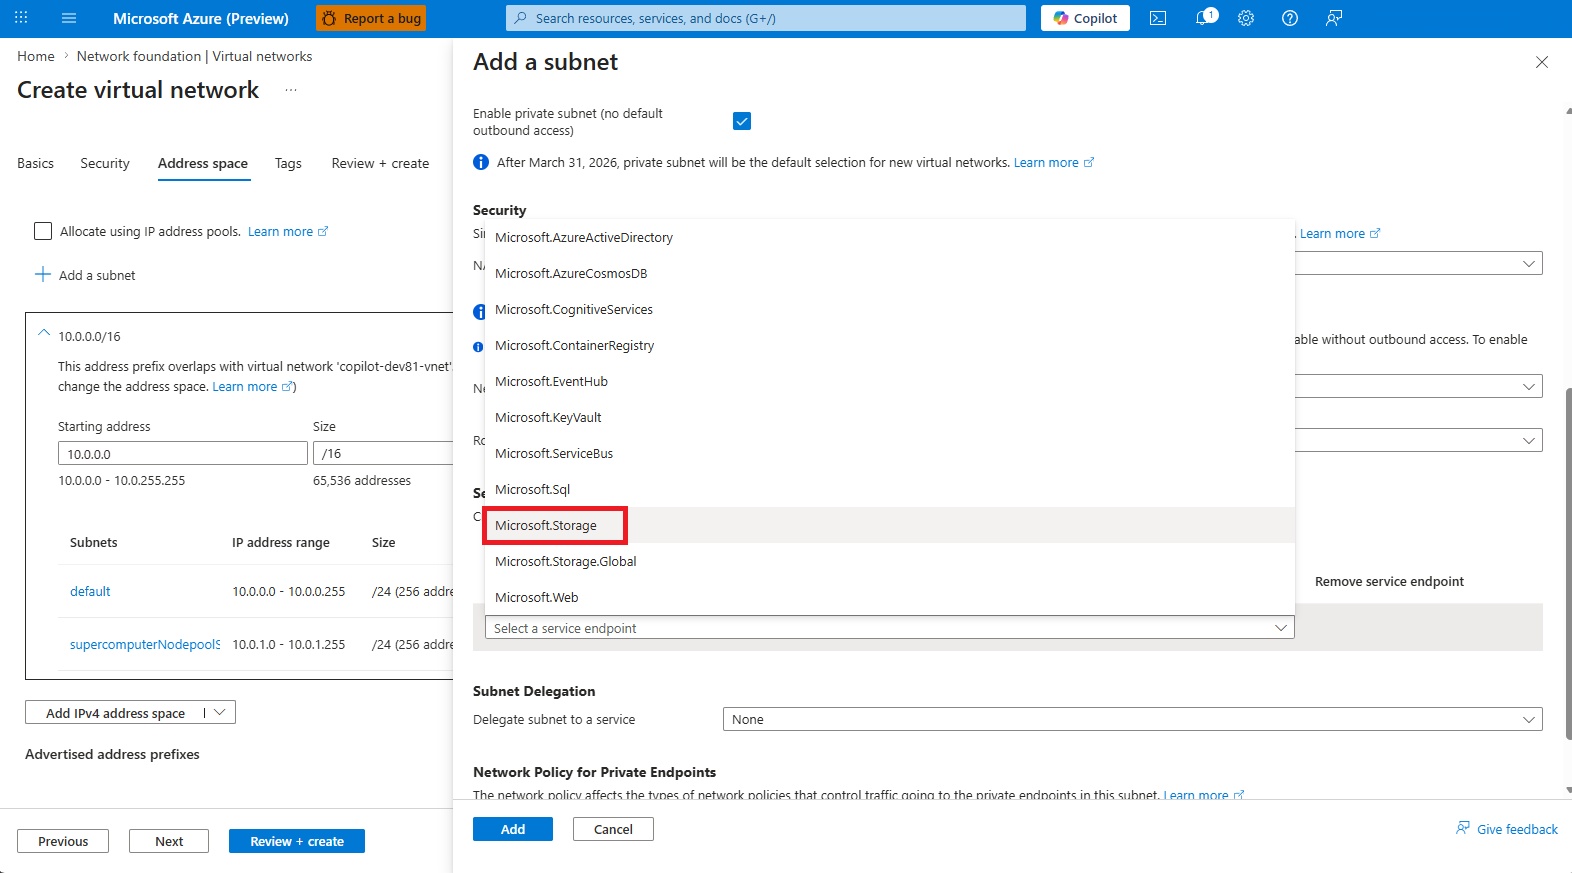
- Optionally, you can remove the
defaultsubnet from the list. - Review and create the virtual network.
Note
Network Security Groups (NSGs) aren't mentioned in this step, but it's a general best practice to implement NSGs for each subnet in a virtual network, depending on your organization's policies.
c. Create a user assigned managed identity (UAMI)
You can create different UAMIs each with their own required permissions for specific resource access, or you can create a single UAMI with all necessary permissions for the platform. For this exercise, create a single UAMI by following these steps:
- Sign in to the Azure portal.
- Search for Managed Identities and select it from the list.
- Select Create.
- Fill in the required details such as subscription, resource group, region, and name.
- Select Review + Create, then select Create.
d. Assign Azure Role Based Access Control (RBAC) roles to UAMI
Assign the following built-in roles to the new User Assigned Managed Identity at Resource Group level:
- Microsoft Discovery Platform Contributor (Preview)
- Storage Blob Data Contributor
- ACRPull
- Navigate to Subscriptions and select your subscription.
- Select the resource group that you're using for this exercise.
- In the left-hand menu, select Access control (IAM).
- Select Add, then select Add role assignment.
- On the Add role assignment pane, search for each role one at a time, then select Next.
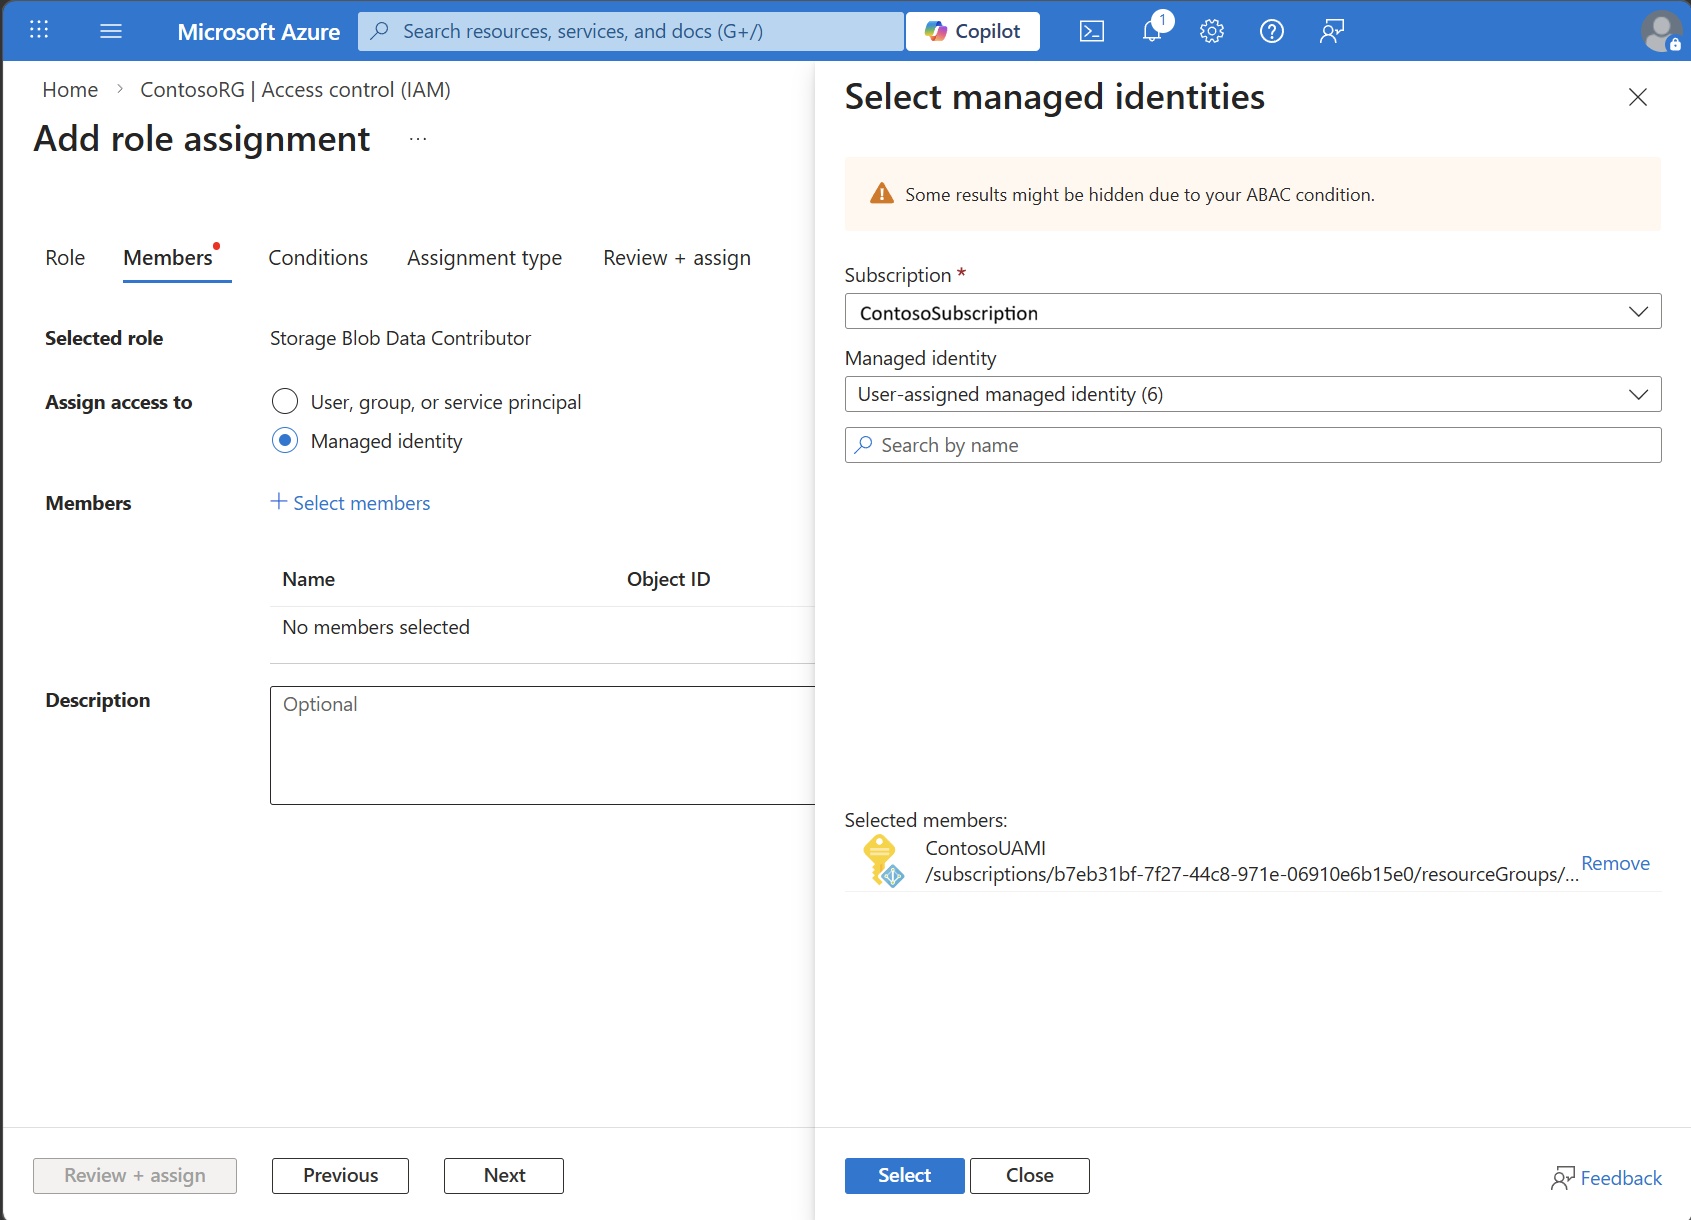
- On the Members tab, ensure Assign access to is set to Managed Identity.
- Select + Select members. In the Select managed identities pane, select your subscription, select User-assigned managed identity type, select the managed identity you created in the previous step, then select Select.
- On the Review + assign tab, verify all the information, and select Review + assign.
e. Create an Azure Blob Storage account
To store input and output data for your investigations, create an Azure blob storage account to associate with your storage container or use an existing one with the following requirements:
- Create a container within the storage account named
discoveryoutputswhere the output files are stored. - The storage account must allow access from the Virtual Network used to create the supercomputer and workspace.
- The storage account must allow access from your client public IP or local network so you can access the output data.
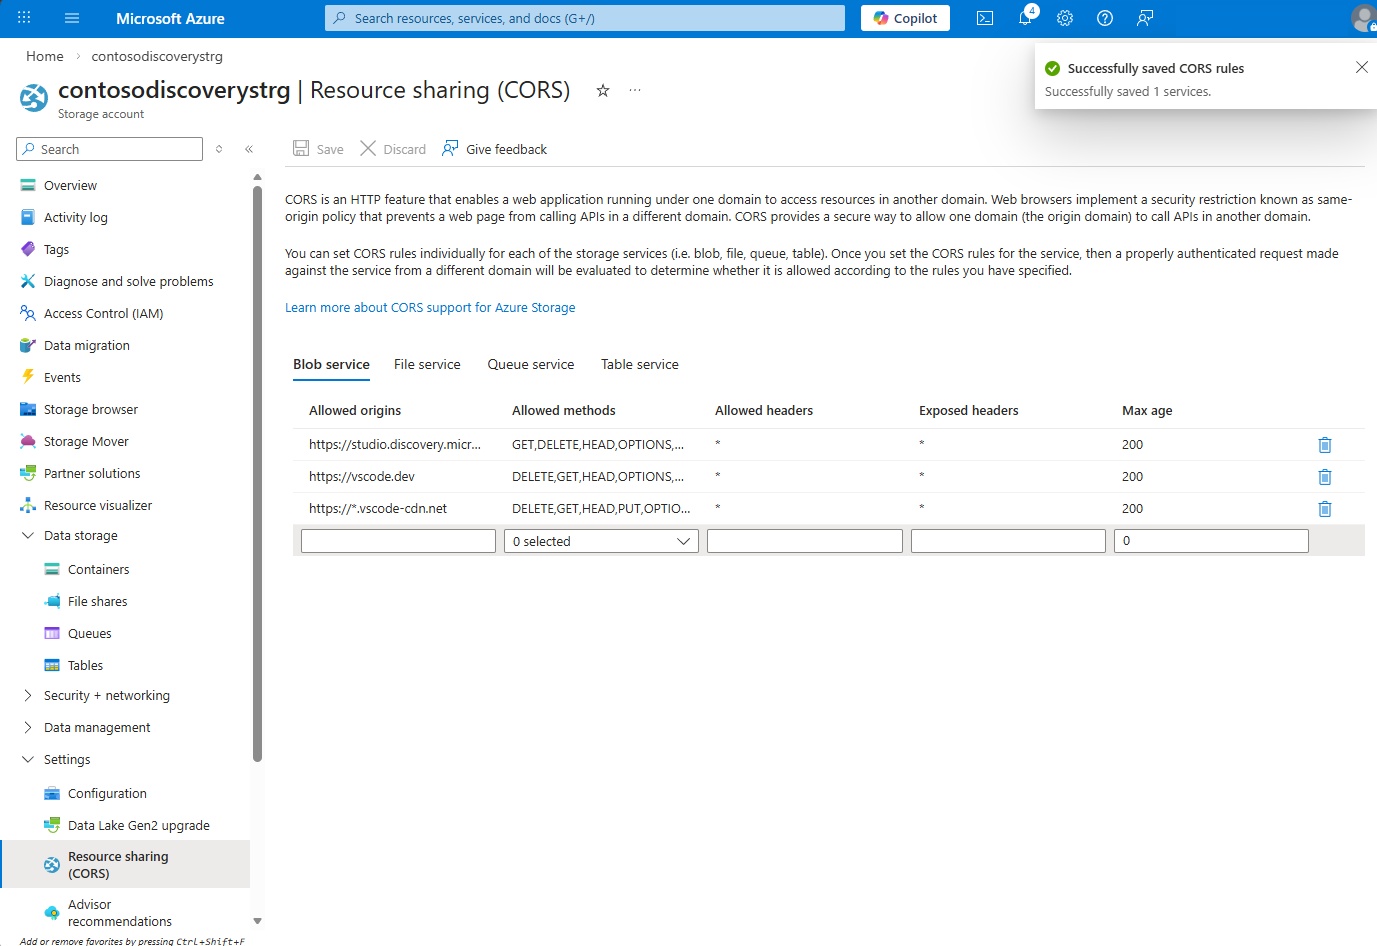
- The storage account must have the correct CORS settings. You must allow these origins:
https://studio.discovery.microsoft.com,https://vscode.dev, andhttps://*.vscode-cdn.net. Set the allowed operations to includeGET,HEAD,DELETE, andPUTand setAllowed HeadersandExposed Headersto*, andMax Ageto200. This setting is found under the Resource sharing (CORS) page under the Settings tab. - Ensure that the storage account has
Storage Blob Data Contributoraccess to the UAMI created in the previous step.
To create an Azure blob storage account:
- Sign in to the Azure portal.
- Search for Storage accounts and select it from the results.
- Select Create to start creating a new storage account.
- Enter details such as Subscription, Resource Group, Name, and Region.
- Select Azure Blob Storage as the primary service, then select the Networking tab.
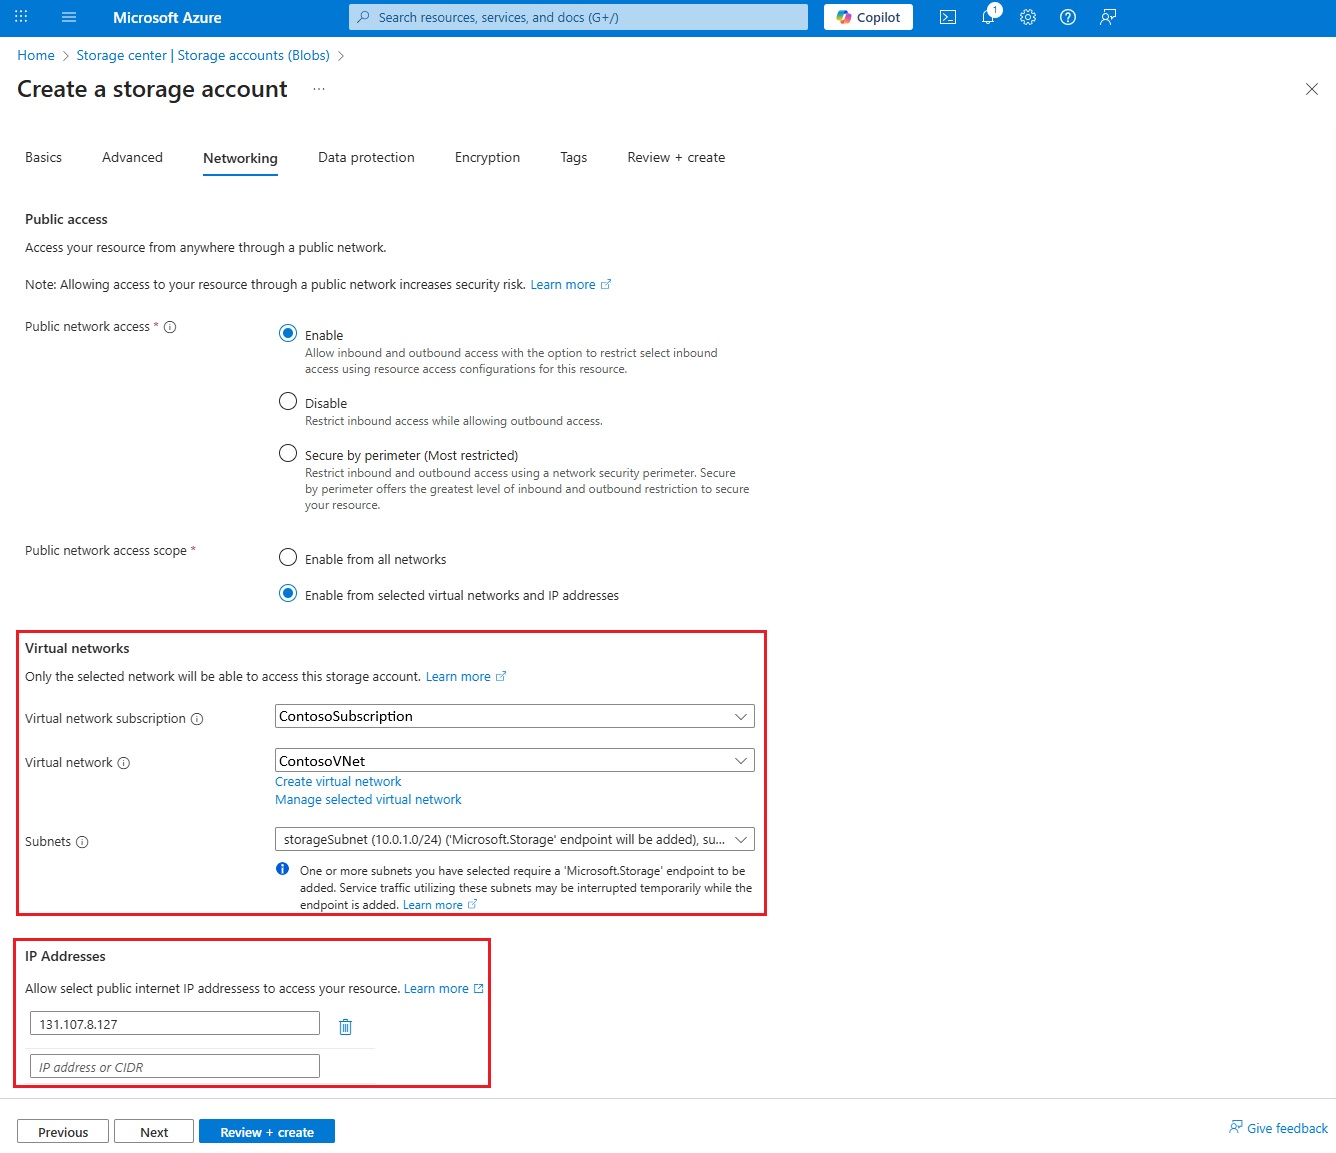
- Under public network access, select Enable public access from selected virtual networks and IP addresses.
- Select the Virtual Network and all subnets created in step 1.
- Select Add your client IP address if you're accessing data over the internet, or ensure your client can access the storage account and virtual network via private link, Site-to-Site VPN, or ExpressRoute.
- Select Review + create, then select Create.
Note
To view and download output files, your client or browser needs network access to the blob storage. You can allow public internet access by opening public access to all networks. You can also allow your client's public IP address in the storage networking and firewall settings. Alternatively, configure private access via Azure VPN or ExpressRoute.
Create a blob container
- After the storage account is created, navigate to the storage account overview page.
- In the left navigation pane, under Data storage, select Containers.
- Select Add container.
- Enter
discoveryoutputsas the name and select Create.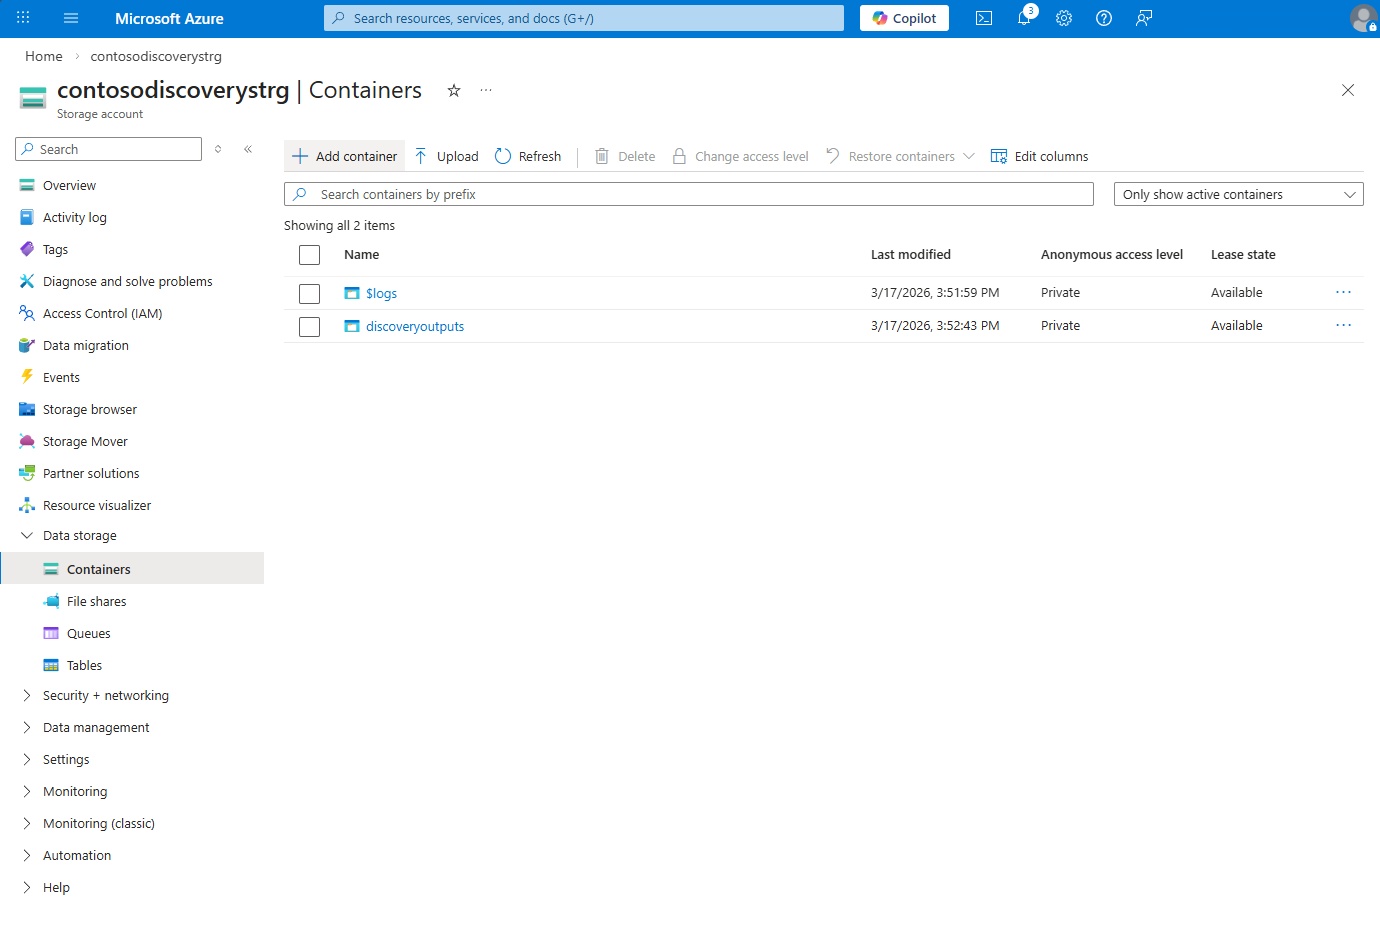
Enable CORS and UAMI access
- Open the storage account we created in the previous step.
- Under the Settings tab, select Resource sharing (CORS).
- Under Blob service in the Allowed origins column, enter
https://studio.discovery.microsoft.com,https://vscode.dev, andhttps://*.vscode-cdn.net. For all three, set the allowed operations to includeGET,HEAD,DELETE,OPTIONS, andPUT. SetAllowed HeadersandExposed Headersto*, andMax Ageto200. - Select Save.
2. Create a supercomputer
You need a supercomputer with associated node pools to deploy and run scientific tools, and to index your data in Bookshelf knowledge bases. The supercomputer also executes GPU and CPU intensive workloads for simulation and modeling. It provides the compute resources on a specific virtual network within your subscription.
- Sign in to the Azure portal.
- Search for Microsoft Discovery Supercomputers.
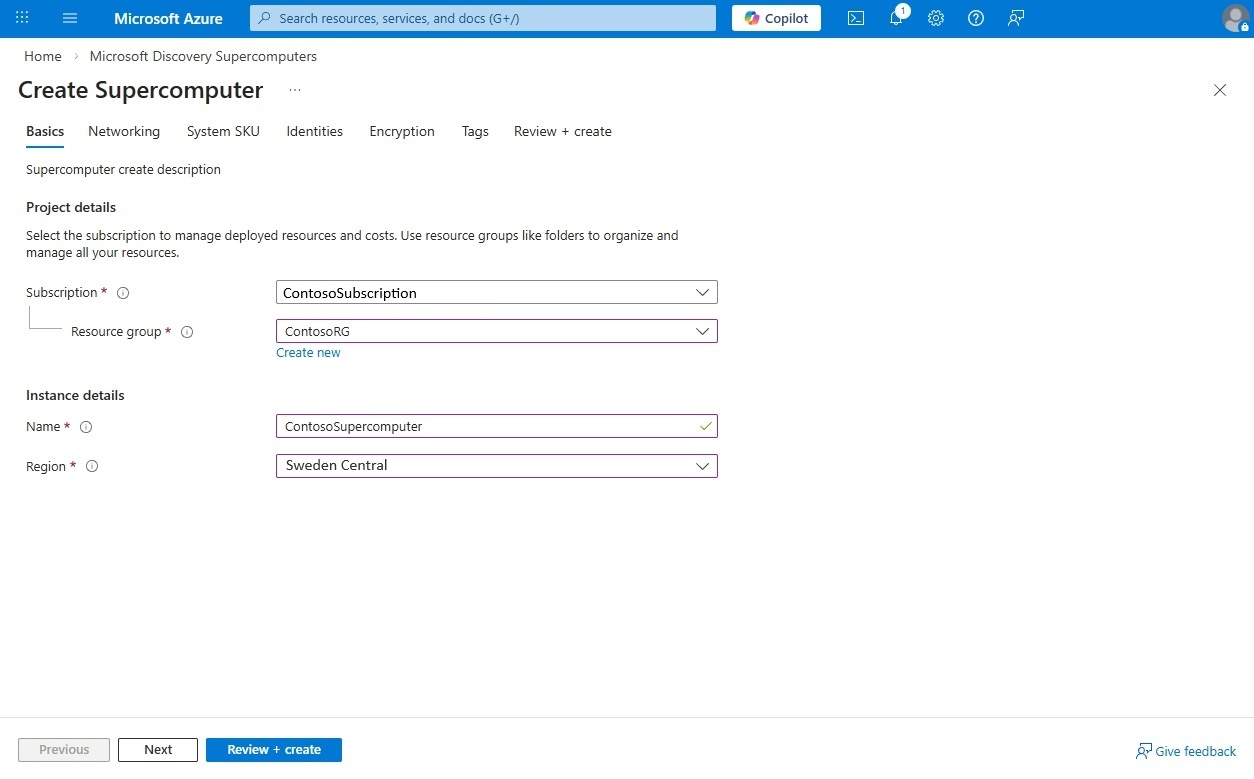
- Select Create and enter details such as Subscription ID, Resource Group name, Location, and Name, then select Next.
- In the Networking tab, select the virtual network and
aksSubnetthat you created in step 1, and then select Next.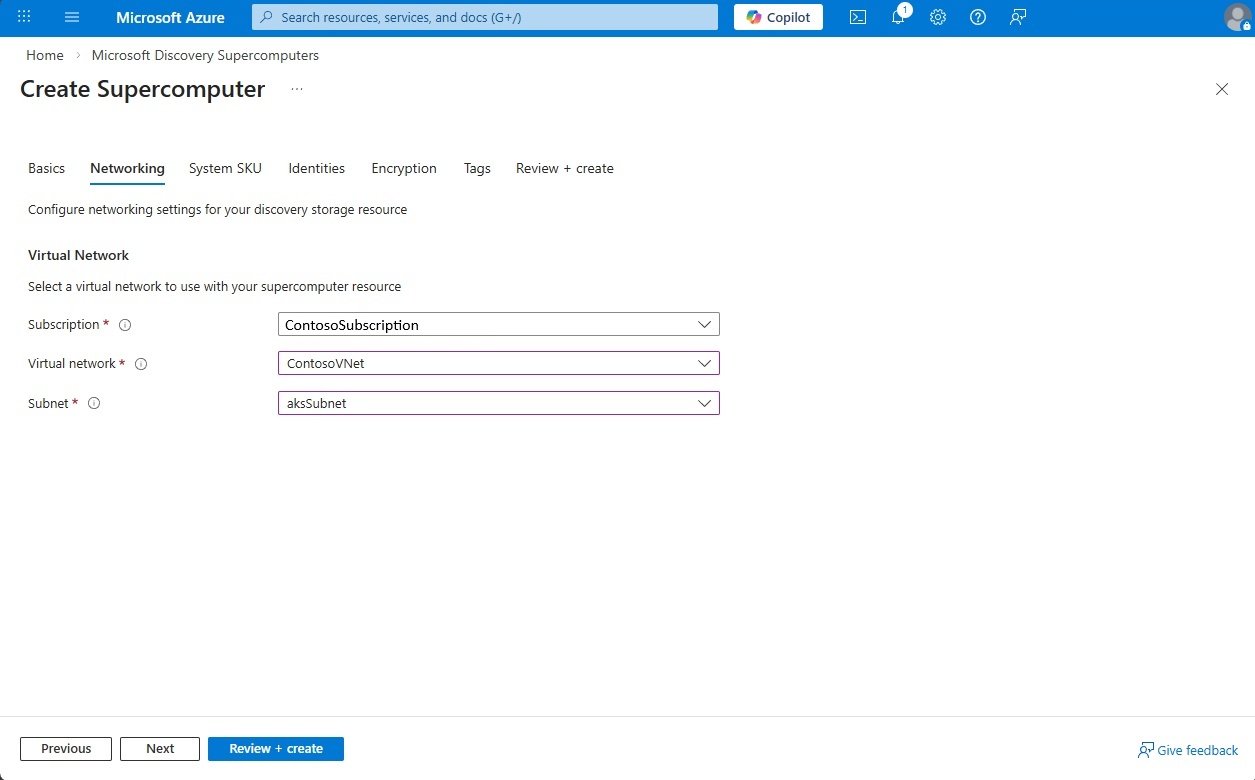
- In the System SKU tab, select Standard_D4s_v6 as the System SKU for this deployment and select Next.
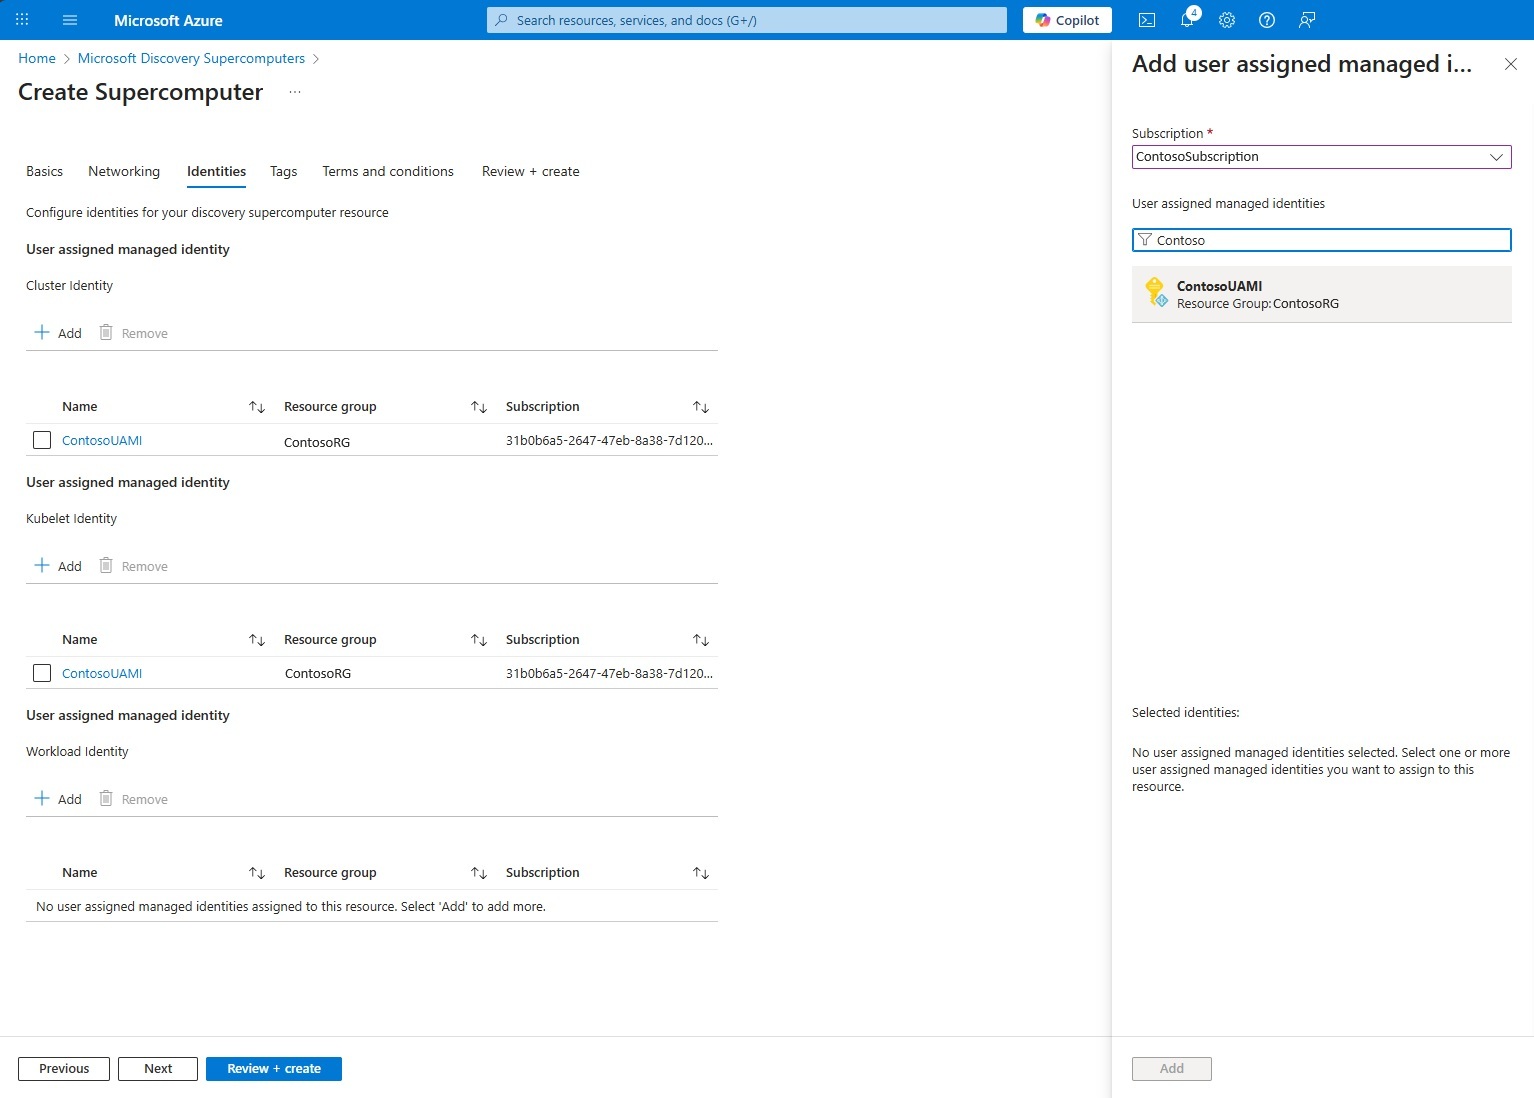
- In the Identities tab, add the user assigned managed identity (UAMI) that you created in step 1 for the cluster identity, kubelet identity, and workload identity. Supercomputer instances use this managed identity to access data from your Azure resources. When you finish, select Next.
- In the Encryption tab, since we're using Microsoft-managed keys for this exercise, uncheck the "Enable Customer Managed Keys" option and select Next.
- Add tags as needed, and move to the next tab.
- Review the Terms and Conditions and select Next.
- Once validation is successful, select Create.
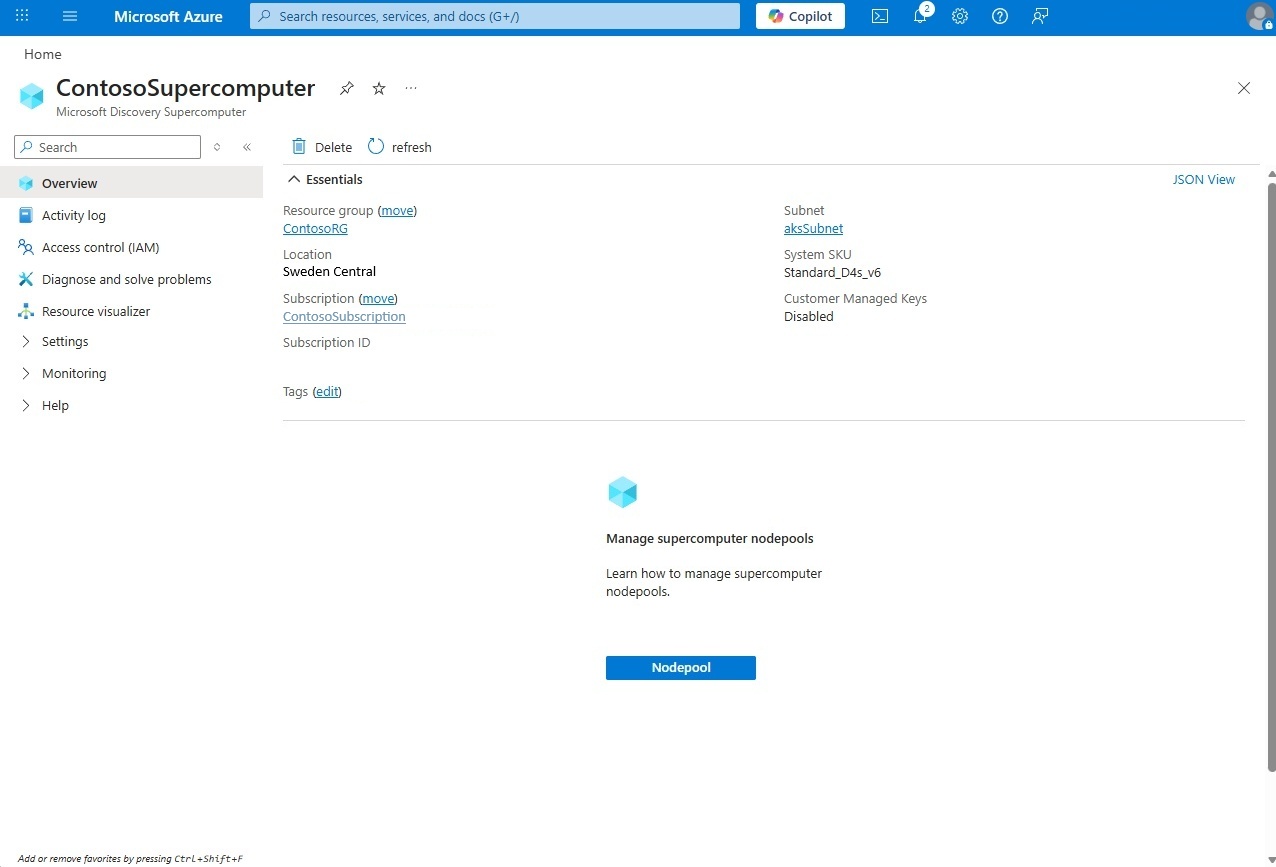
3. Create node pools
After your supercomputer is created, follow these steps to create a node pool:
- Open the Supercomputer that we created in the previous step.
- In the left pane, select Node pool under Settings, then select Create.
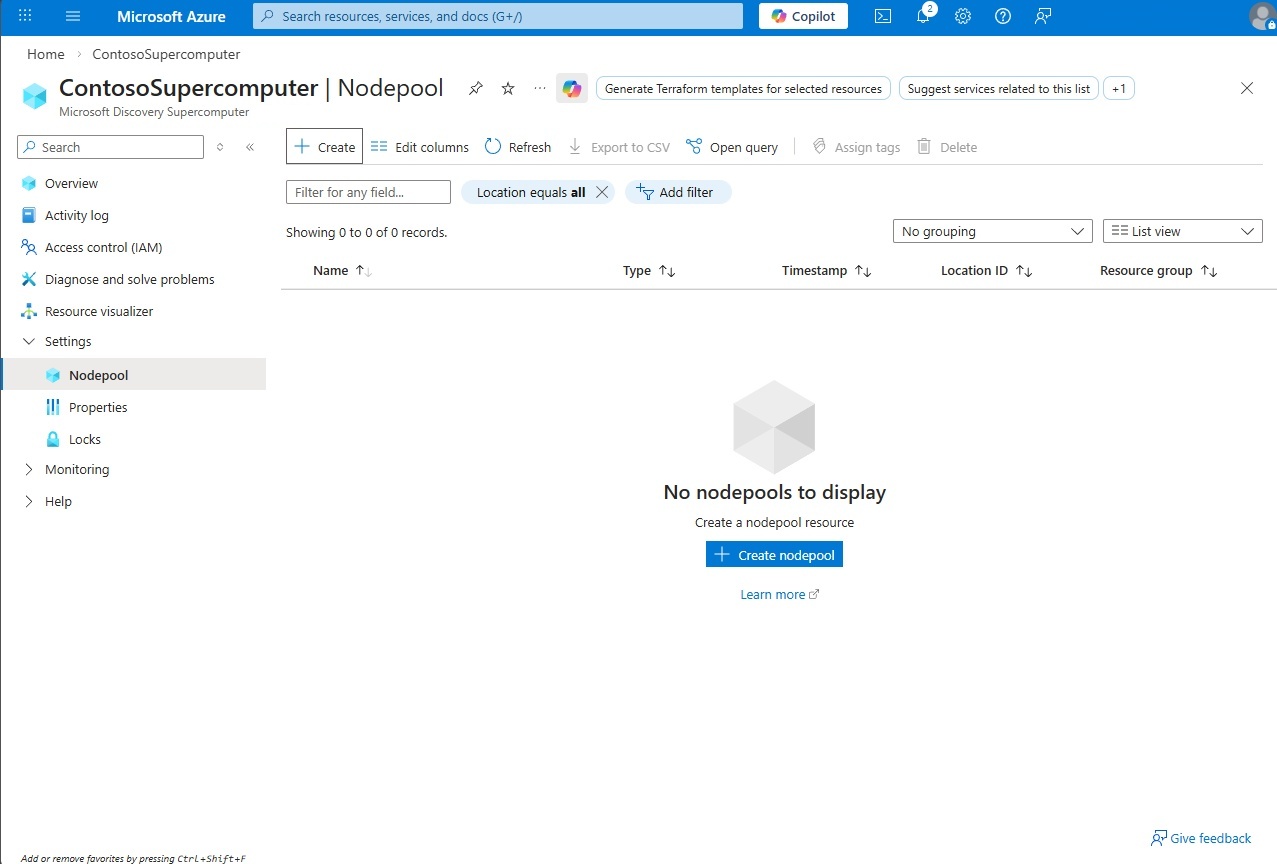
- Enter the name and location for the node pool, then select Next.
Note
Node pool names must be all lowercase, a maximum of 12 characters, must start with a letter, and can only contain letters and numbers.
- On the Networking tab, select the virtual network and
supercomputerNodepoolSubnetthat you created in step 1, and select Next. Note: Use the same virtual network selected for the supercomputer in step 2.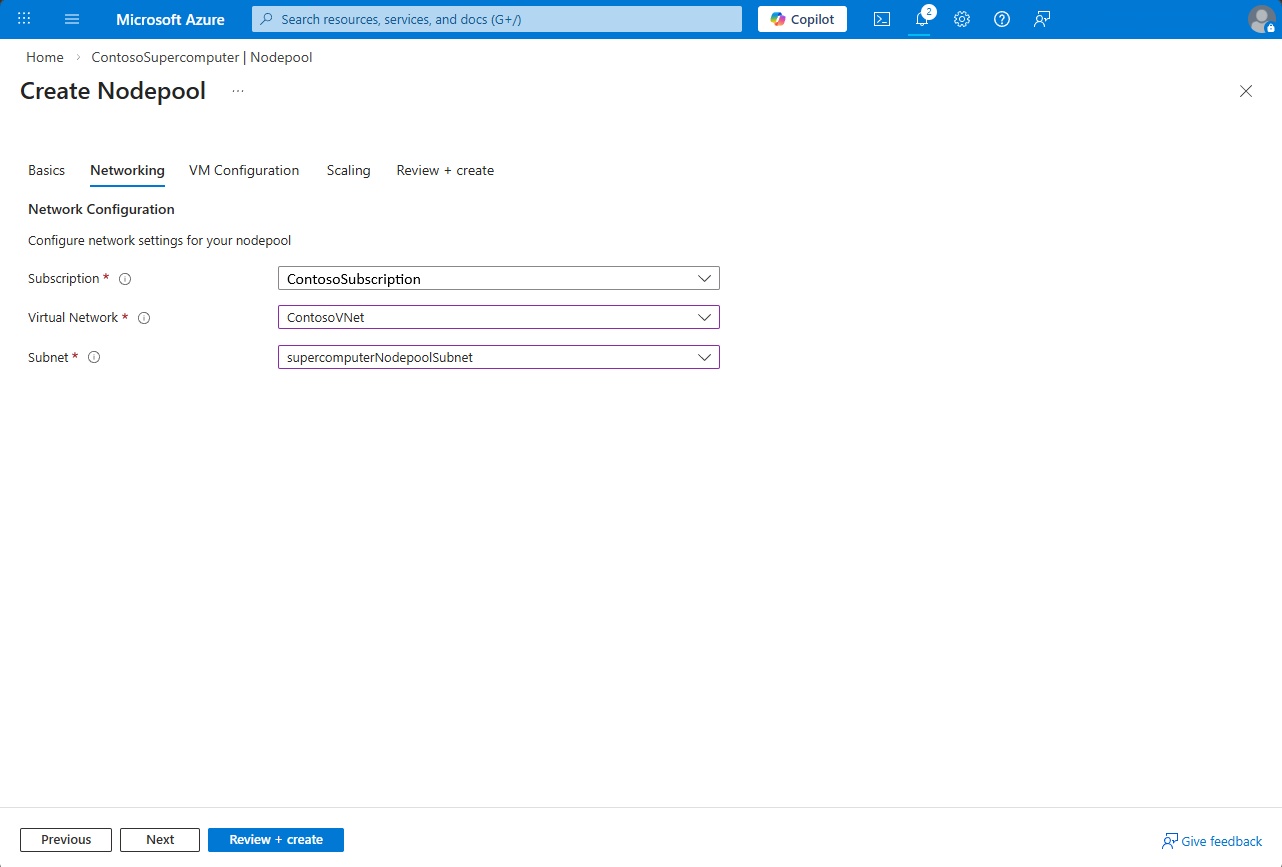
- On the VM configuration tab, select the Virtual Machine (VM) SKU to use for the node pool, then select Next. The selected SKU and quota must be available in the region where you deploy the node pool.
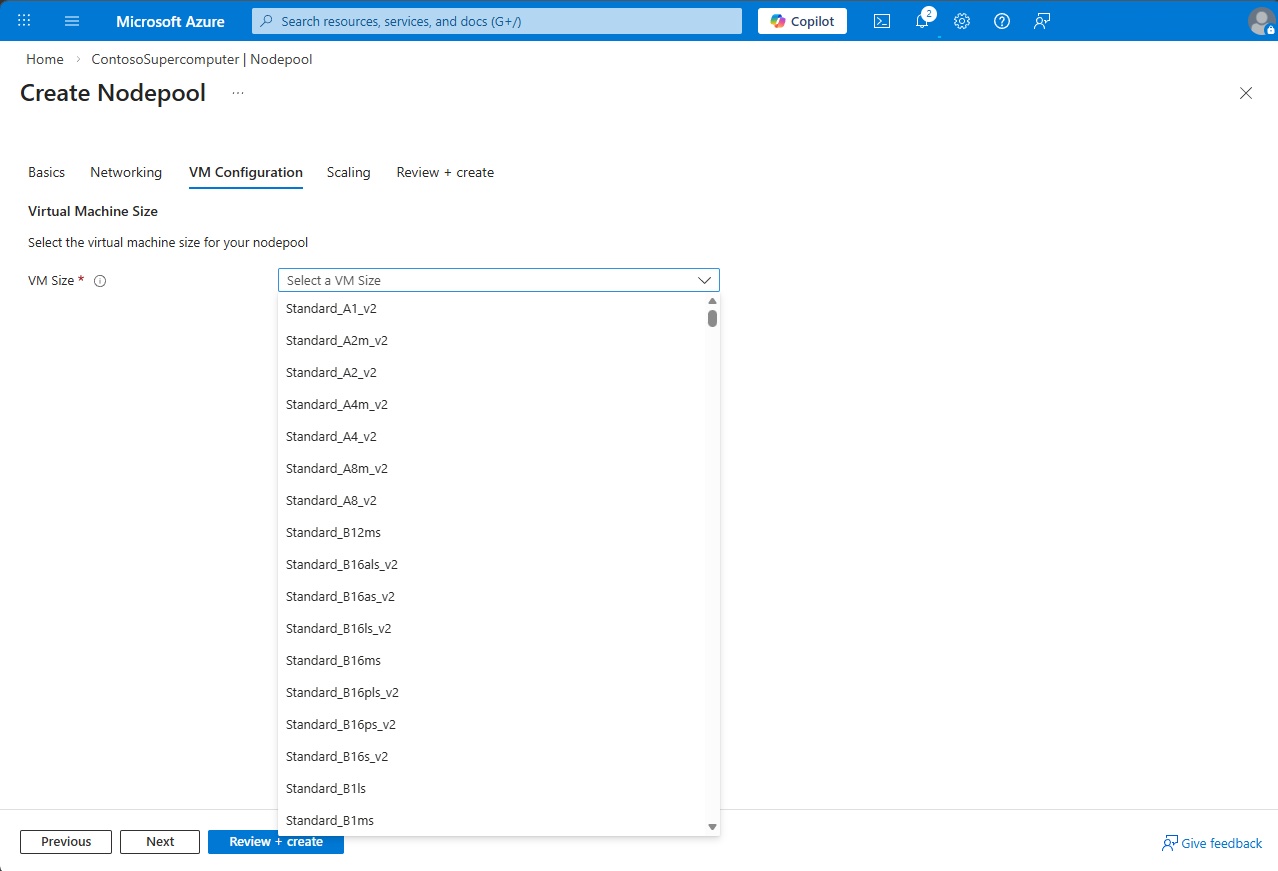
- In the Scaling section, enter the maximum node count that your node pool can scale to, for example: 5 and select Next.
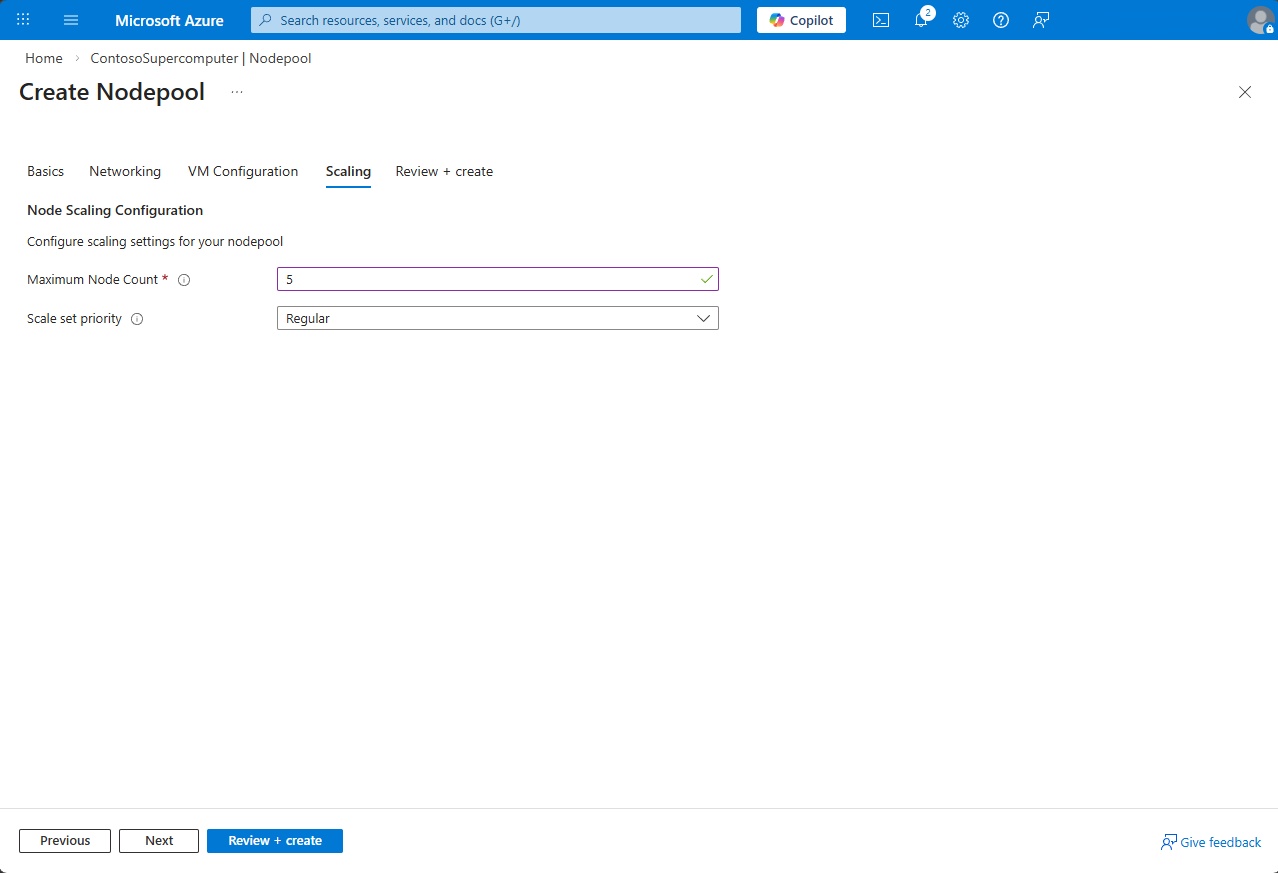
- Select Review + Create and Create.
4. Create a workspace
A workspace is a collaborative environment where teams manage large-scale scientific initiatives. Workspaces bring together the infrastructure resources such as supercomputers, agents, tools, and knowledge bases (Bookshelves) into a single secure boundary. You can create projects under workspaces, allowing researchers to organize experiments, analyze data, and use AI agents within a shared space.
Important
Make sure your workspace name is globally unique and uses only lowercase letters.
Sign in to the Azure portal.
Search for Microsoft Discovery Workspaces.
Select + Create and enter details such as Subscription, Resource Group, Name, and Region, then select Next.
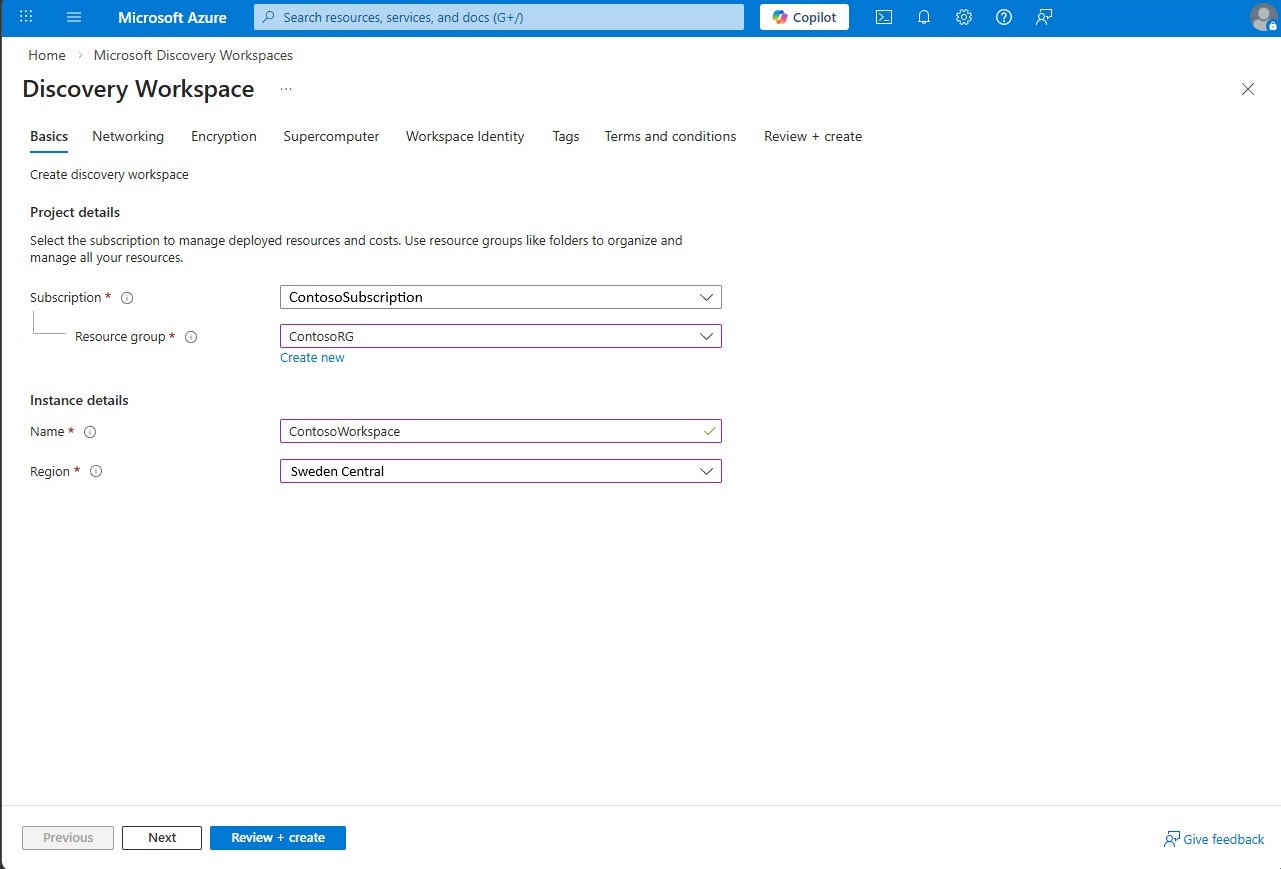
On the Networking tab, select Public network access as Enable for this exercise. After that, enter the details for Private Endpoint subnet, Agent subnet, and Workspace subnet with the subnets you created earlier in step 1, and then select Next.
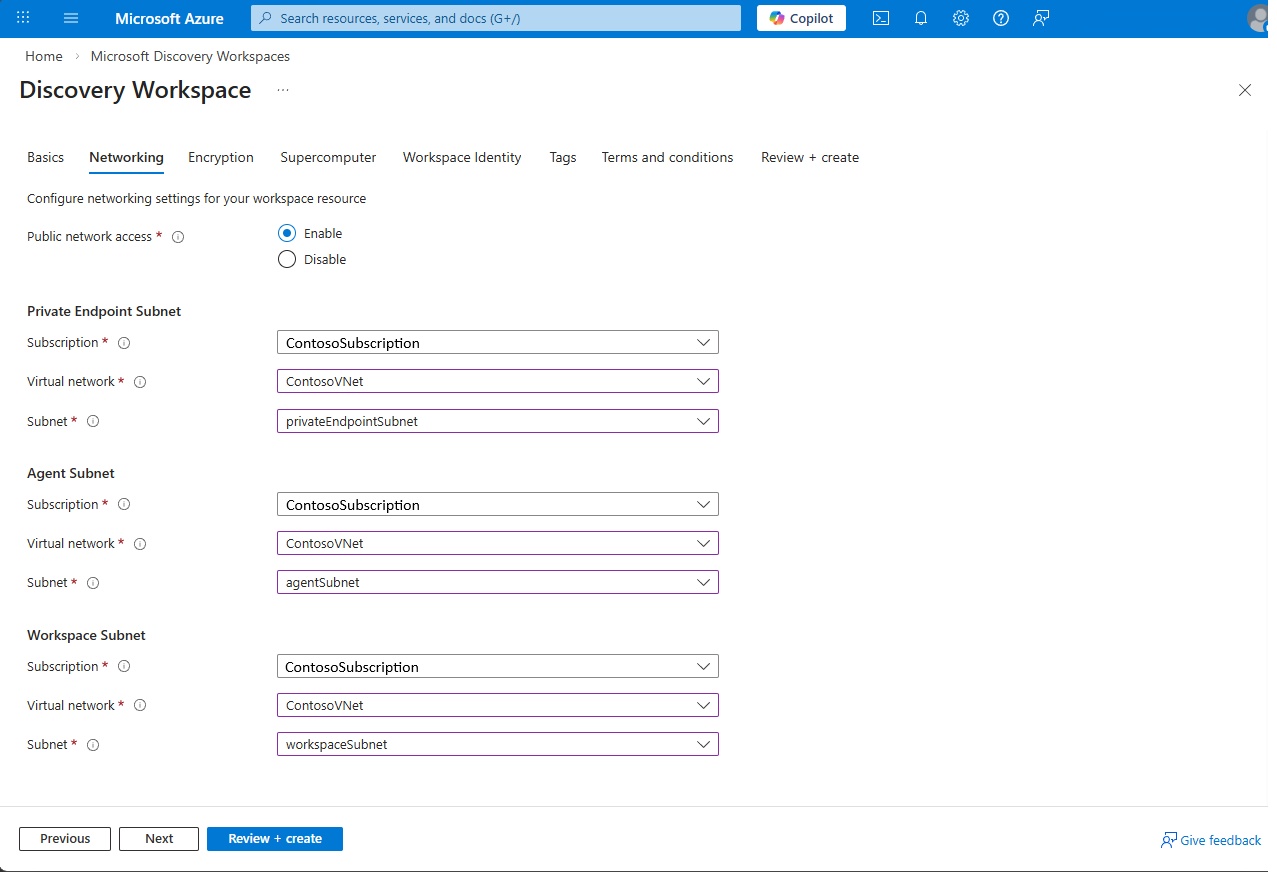
On the Encryption tab, leave the Enable customer-managed keys (CMK) unchecked. For this exercise, we'll use Microsoft-Managed Keys (MMK), just select Next to go to the next tab.
On the Supercomputer tab, select Add Supercomputer and select your subscription, resource group, and the supercomputer created in step 2, then select Next.
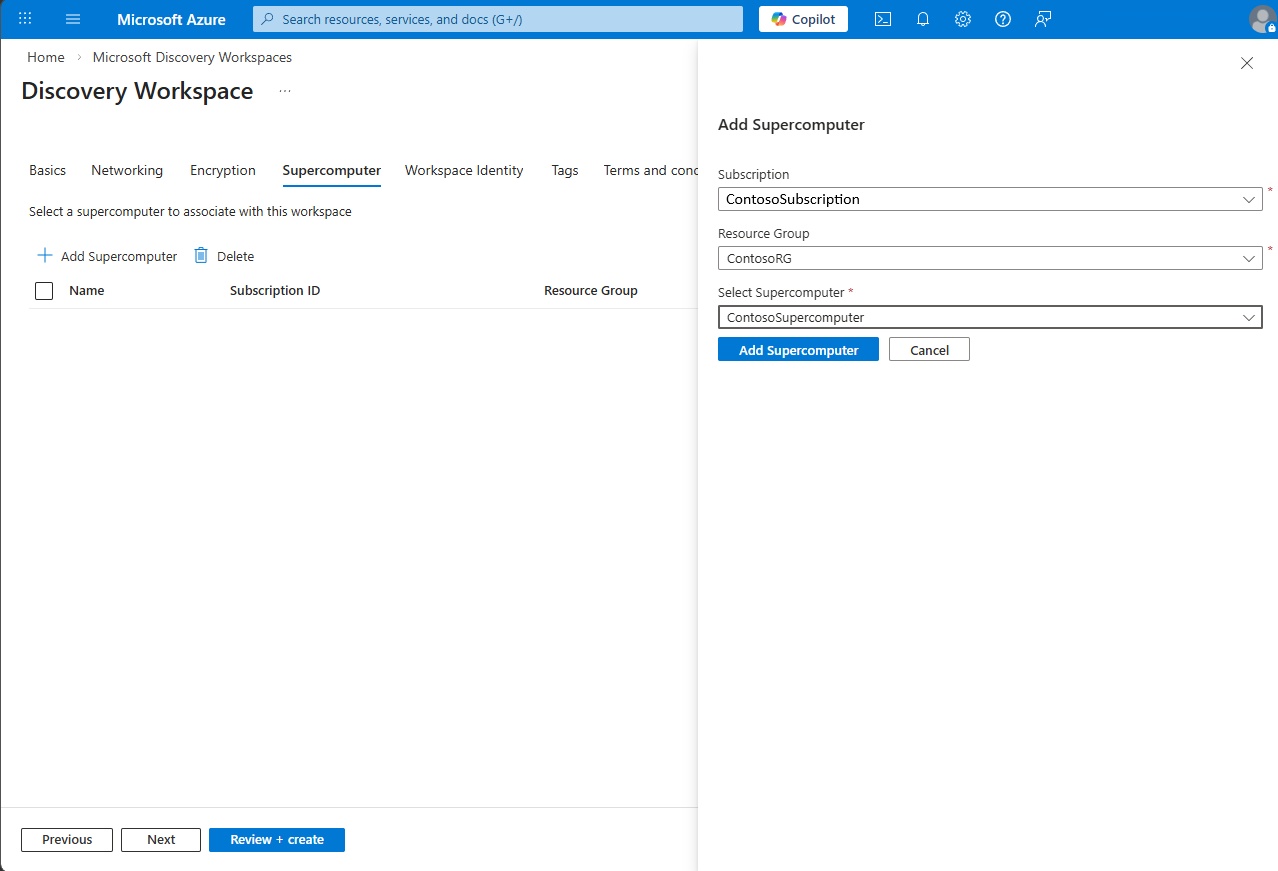
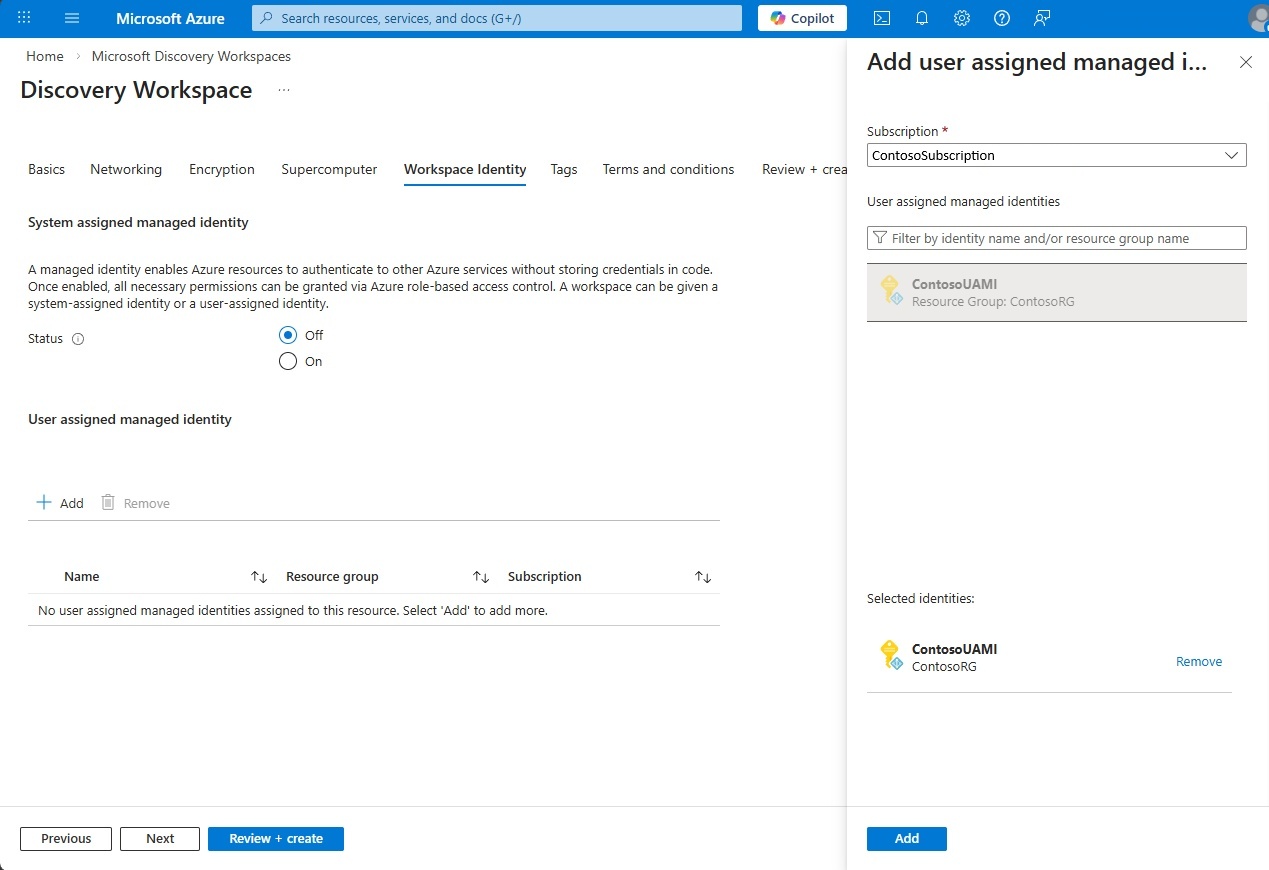
On the Workspace Identity tab, select Add under User Assigned Managed Identity (UAMI) and select the identity you created in step 1 to provide access to the workspace.
On the Tags tab, add tags as needed. (Optional) To enable GitHub Copilot and configure workspace access, add the following tags. For details, see Use GitHub Copilot in Microsoft Discovery.
discovery.workbench.enableGhcpAiFeaturesset totrue— Enables GitHub Copilot and AI features for the workspace.discovery.workbench.enableExtensionsset totrue— Enables the VS Code Extension Marketplace in the preview experience.NetworkIsolationset tofalse— Enables public access to the preview experience (workbench) and other managed resource group (MRG) resources. If you keep network isolation enabled (default), you need to be connected on a VPN or ExpressRoute to the virtual network where the workspace is deployed to access over private network.
Tip
You can deploy Discovery resources with complete network isolation. When
networkIsolationis enabled, all resources are shielded within the private network and are reachable only through the private endpoint and Network Security Perimeter (NSP). You can still reach the workspace over the public network through Discovery Studio and the REST API. To lock down access to your private network only, disable public network access for your workspace and create private endpoints for the workspace resources. For guidance, see Configure network security for Microsoft Discovery workspaces.Note
Tags are immutable for Microsoft Discovery resource types, including workspaces, supercomputers, node pools, and bookshelves. After a resource is created, you can't add, change, or remove its tags. Any tag modification, including adding a tag, requires redeploying the resource.
Review the Terms and Conditions, then select Review + Create.
Once validation is successful, select Create.
5. Assign Foundry User role on the managed resource group
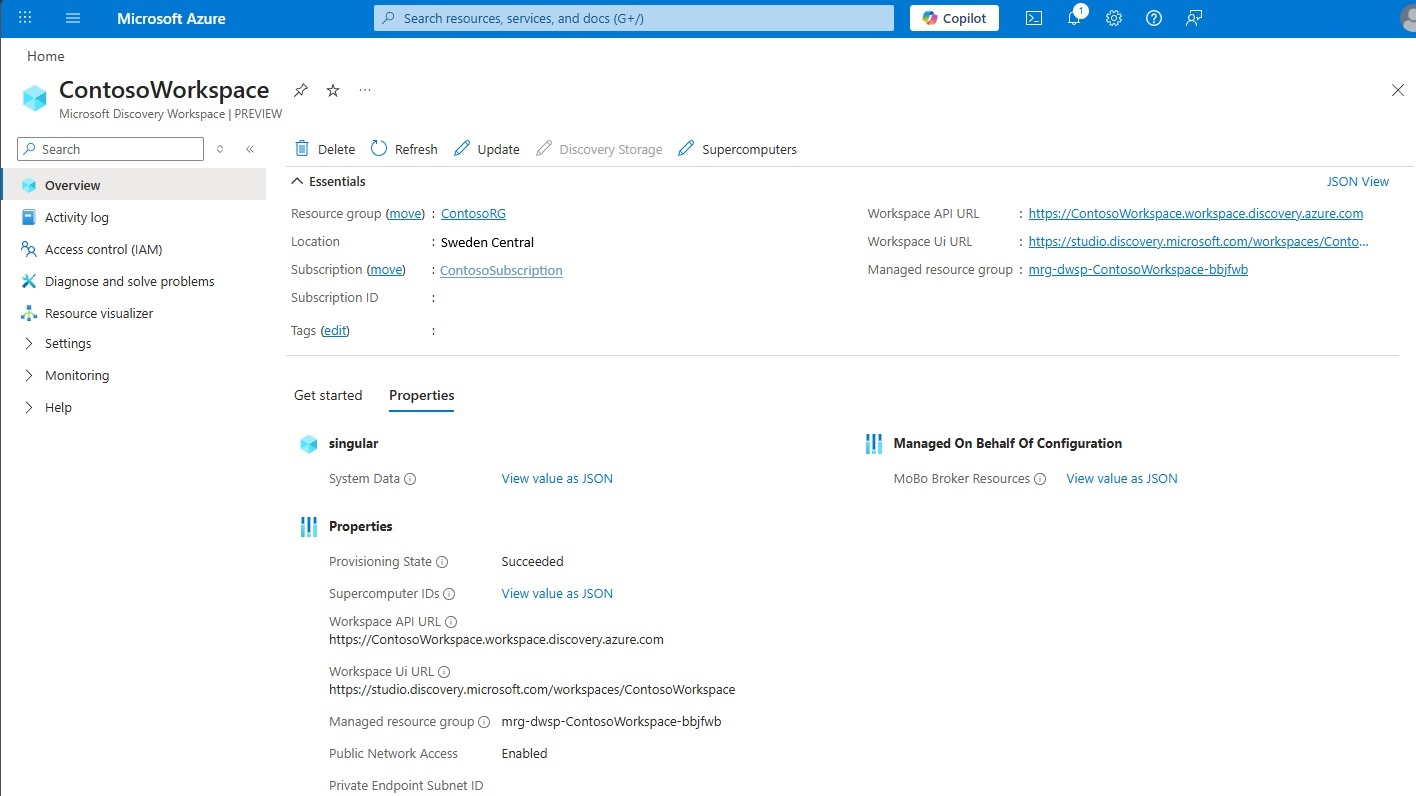
When a workspace is created, a managed resource group is automatically provisioned alongside it. To allow users to modify agents and workflows within a project directly in Foundry portal for advanced settings, you must assign them the Foundry User role on this managed resource group.
- Sign in to the Azure portal.
- Go to the workspace you created in step 4 and find the Managed Resource Group name on the workspace overview page.
- Navigate to that managed resource group.
- In the left-hand menu, select Access control (IAM).
- Select Add, then select Add role assignment.
- On the Add role assignment pane, search for Foundry User and select it, then select Next.
- On the Members tab, ensure Assign access to is set to User, group, or service principal.
- Select + Select members, choose the users who need to modify agents and workflows, then select Select.
- Select Review + assign, verify the information, and select Review + assign.
Repeat this process for all users who require access to agents and workflows in the workspace. Any changes made in Foundry portal directly are reflected in Discovery agent configuration automatically.
6. Create Chat Model Deployment
Chat model deployments provision foundational language models such as GPT-5.4 for use within the Microsoft Discovery Workspace. Agents created within projects can use these chat model deployments.
Go to the overview page of Microsoft Discovery workspace, created in the previous step.
Under the Settings tab on left navigation pane, select Chat Model Deployments.
Select the + Create option at the top.
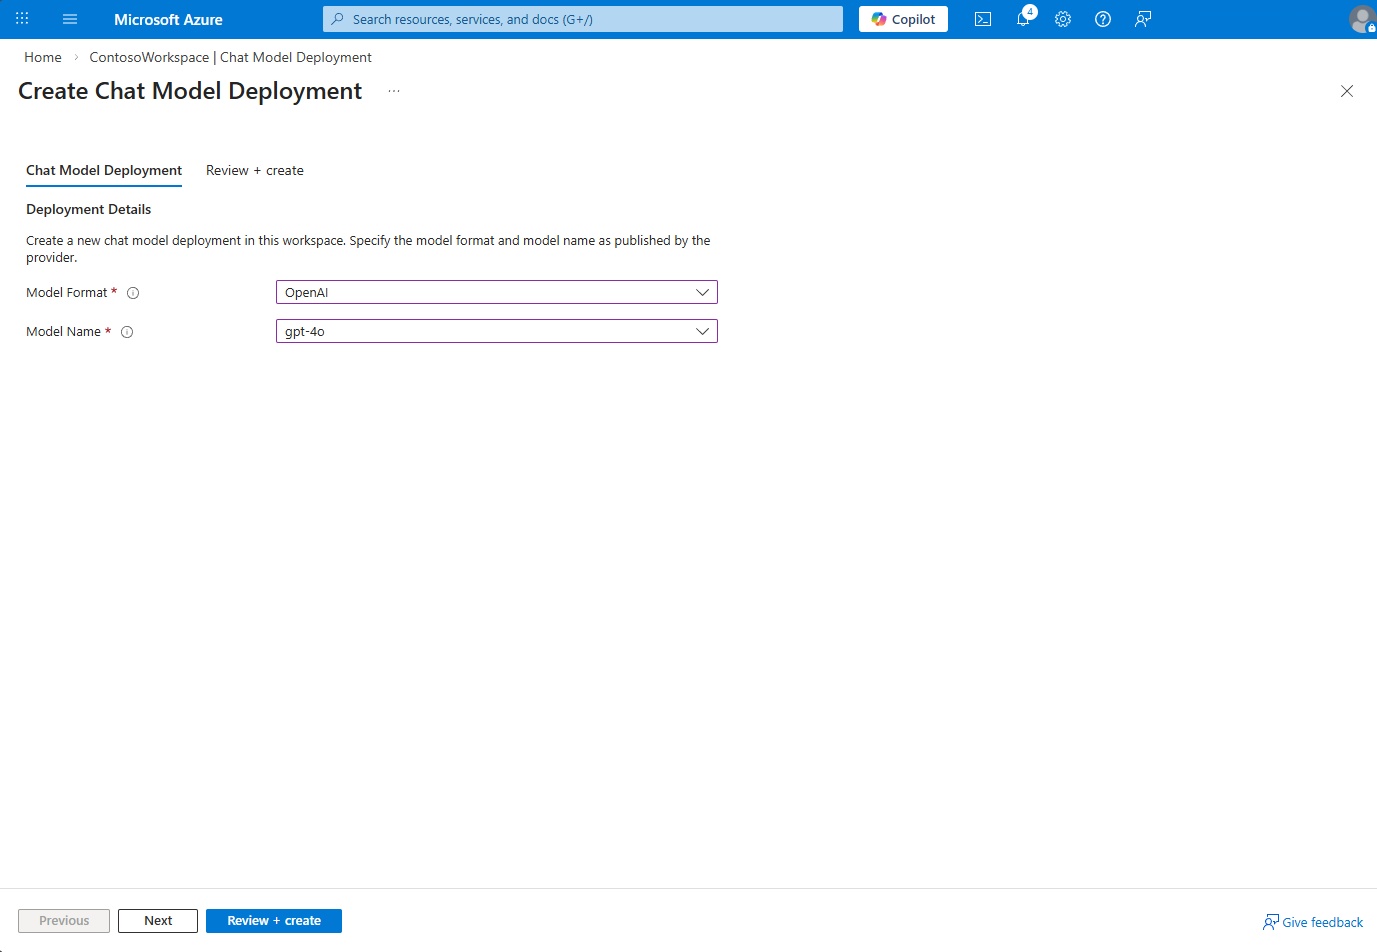
Enter the Name as
gpt-5-4.Select the Model Format as
OpenAIand Model Name asgpt-5.4in the drop-down.Then select Review + create button at the bottom and select Create.
Important
To use Discovery Engine and tasks within your sessions, you must use this specific deployment with name gpt-5-4 and model name gpt-5.4. However, you can have additional chat model deployments for use with agents.
You can provide access to users via Role Based Access Control (RBAC) at the resource group level. Microsoft Discovery Administrator (Preview) role is required to create projects within a workspace.
7. Sign in to Microsoft Discovery Studio
Microsoft Discovery Studio is a secure, AI-powered research environment. It enables scientists and engineers to accelerate innovation through autonomous agents, simulation workflows, and integrated data tools within a unified interface.
After your infrastructure is set up, you can sign in to Microsoft Discovery Studio directly via the URL, or find the URL in the Workspace overview page in the Azure portal.
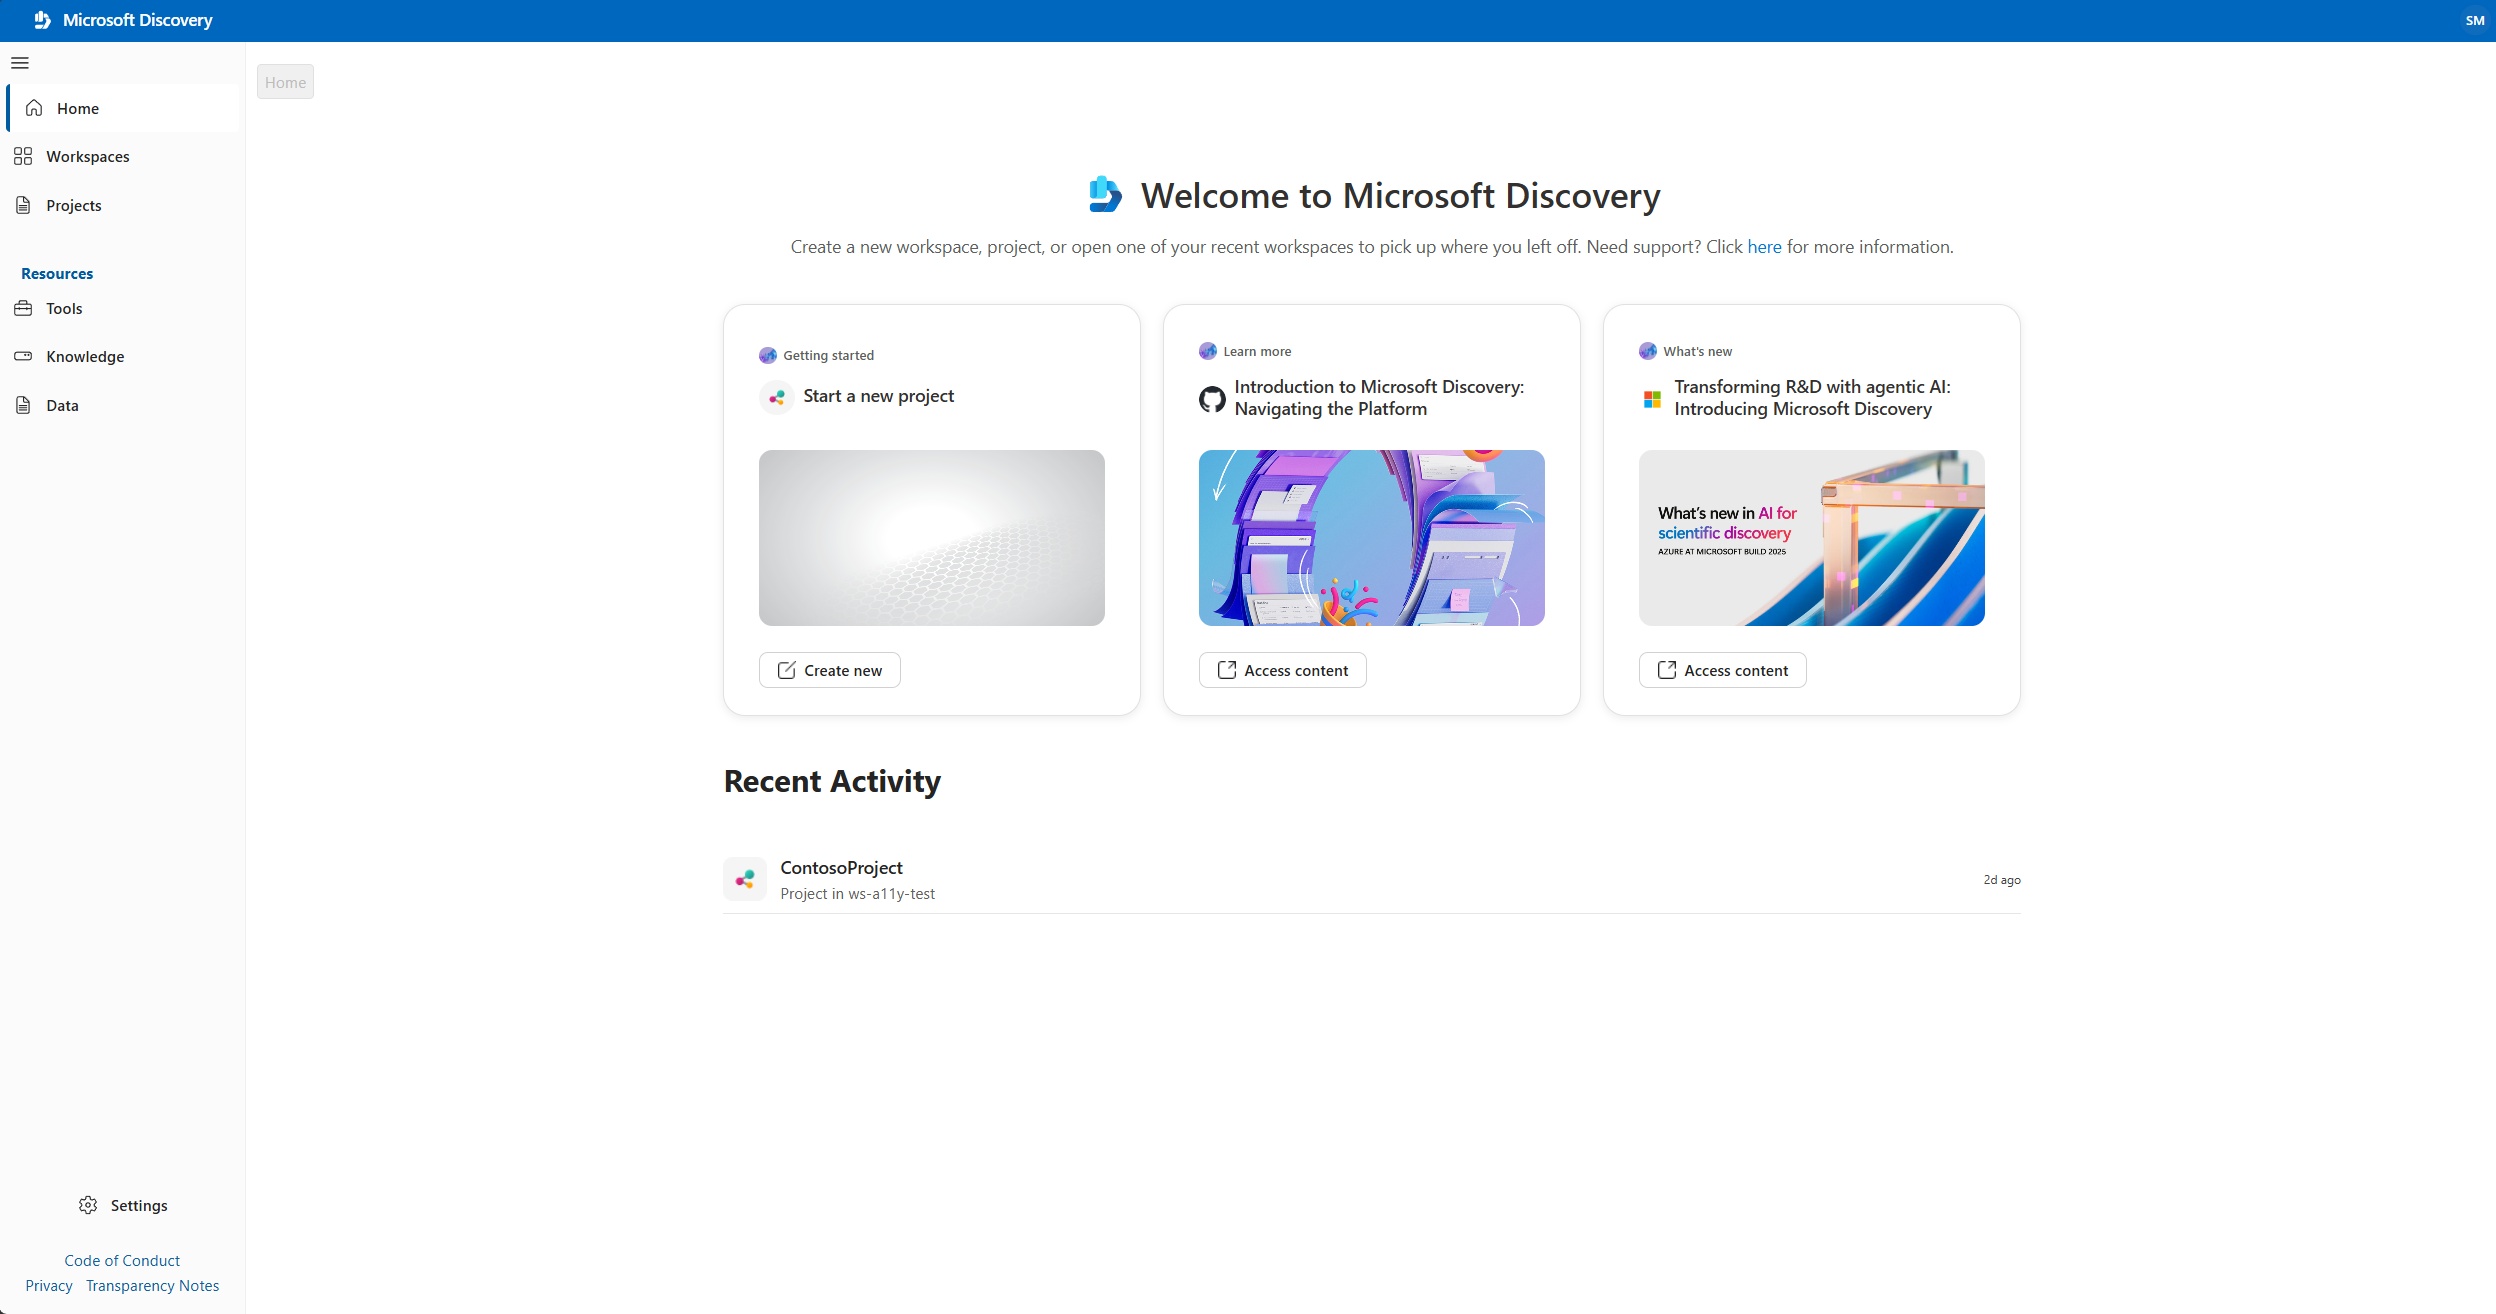
You must sign in with your Microsoft Entra ID credentials for your work or school account. Studio supports single sign-on with Microsoft Entra ID. You don't have to explicitly provide credentials if you're already signed in to another service with your Microsoft Entra ID in the same browser.
Note
If you have access to multiple Microsoft Entra tenants, select the right tenant by selecting your profile icon on the top right corner of the page.
8. Create storage containers
After you sign in to the studio, create storage containers to organize and manage your storage assets used in your projects.
Storage containers store both input and output data as storage assets. Both inputs and outputs use a storage container of type Azure Storage Blob, backed by the storage account created in step 1.
- In Microsoft Discovery Studio, on the left navigation pane, select the Data tab.
- Storage Containers (new) tab is selected by default.
- Select Create Container.
- Enter details such as name, subscription, resource group, and location.
- Select the storage account created in step 1.
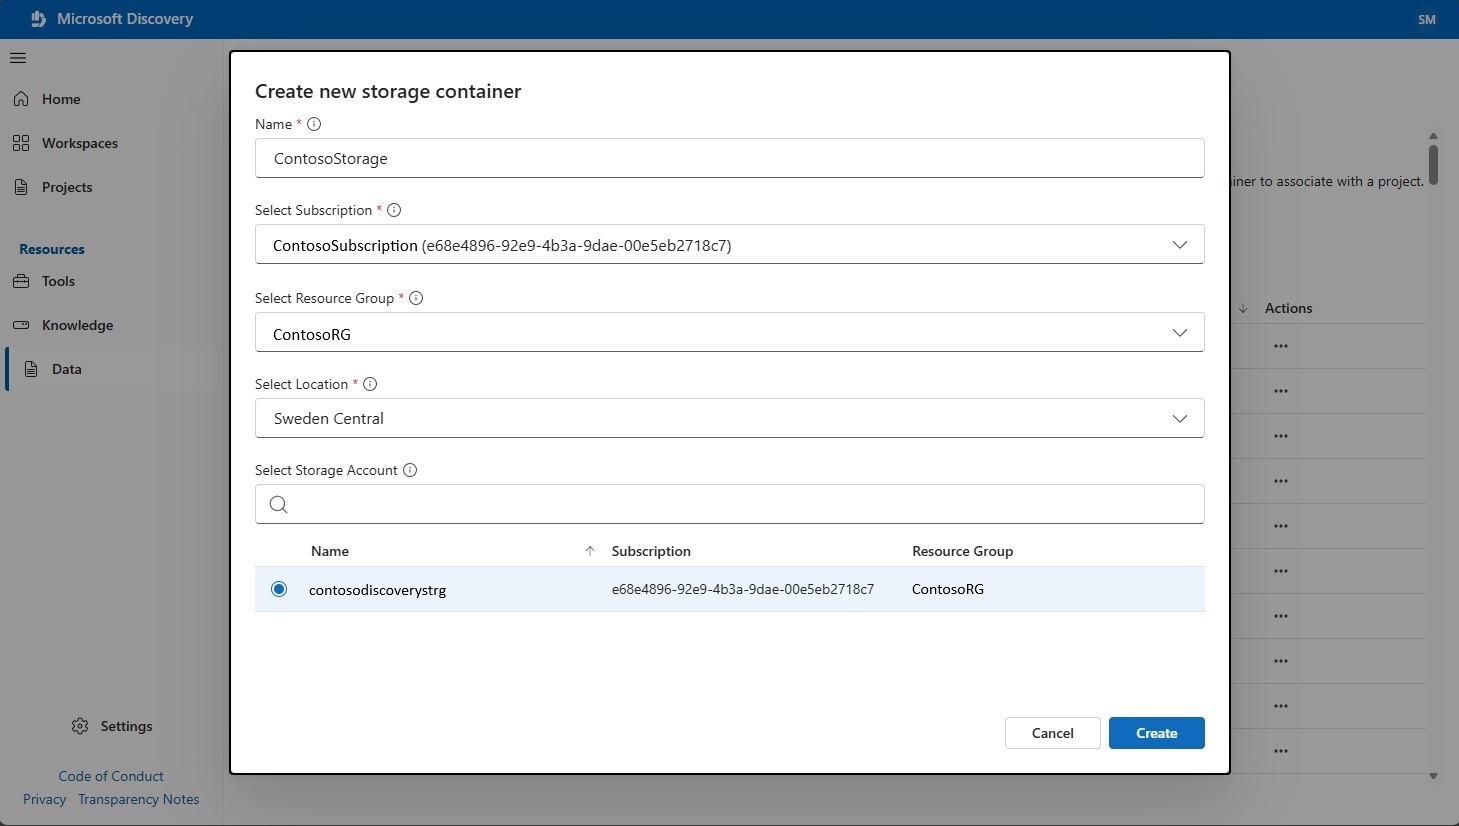
- Select Create.
Note
After you select Create, the resource is initially in the Accepted state. Refresh the page and wait until the Provisioning State changes to Succeeded before proceeding. This operation typically takes a few minutes.
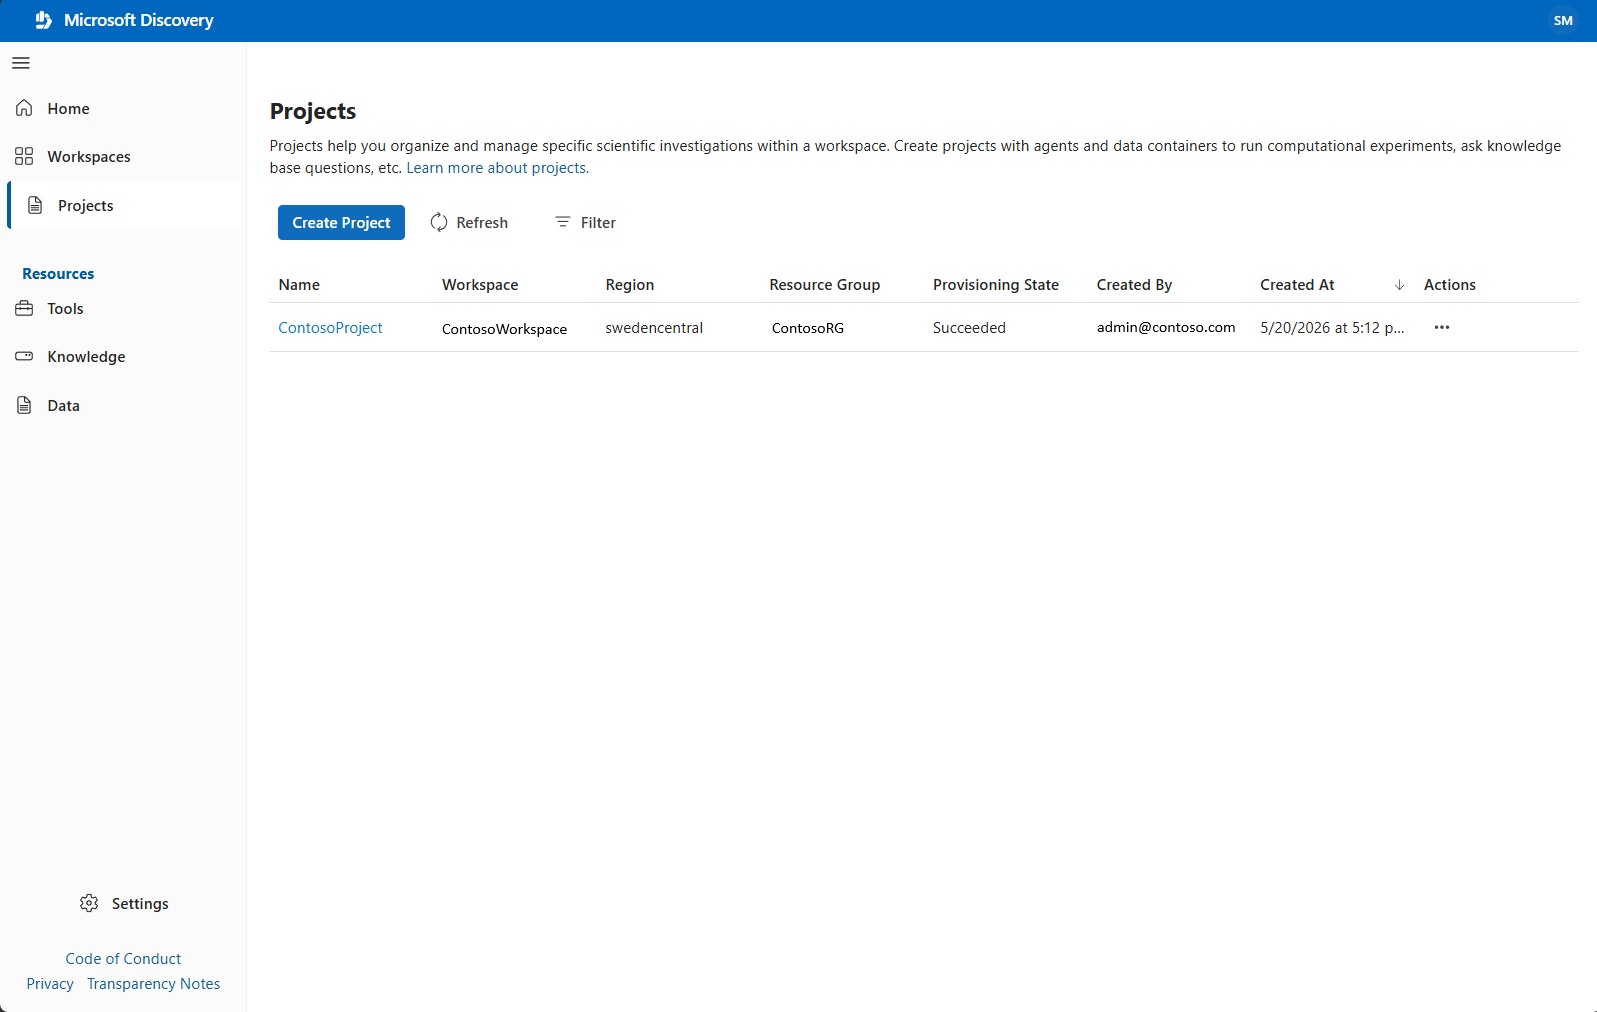
9. Create a project
Projects help you organize and manage scientific investigations within a workspace. Each project defines the functional boundary for access to your agents, tools, and storage containers. Within a project, you can run experiments, analyze data, apply AI models, and track research progress in a collaborative environment.
Important
Your project name must be all lowercase and no more than 12 characters long. Also, ensure you refresh the page before you create a project. You can create a project by opening your workspace in the studio.
In Microsoft Discovery Studio, on the left navigation pane, select Workspaces. This lists all existing workspaces across your Azure subscriptions.
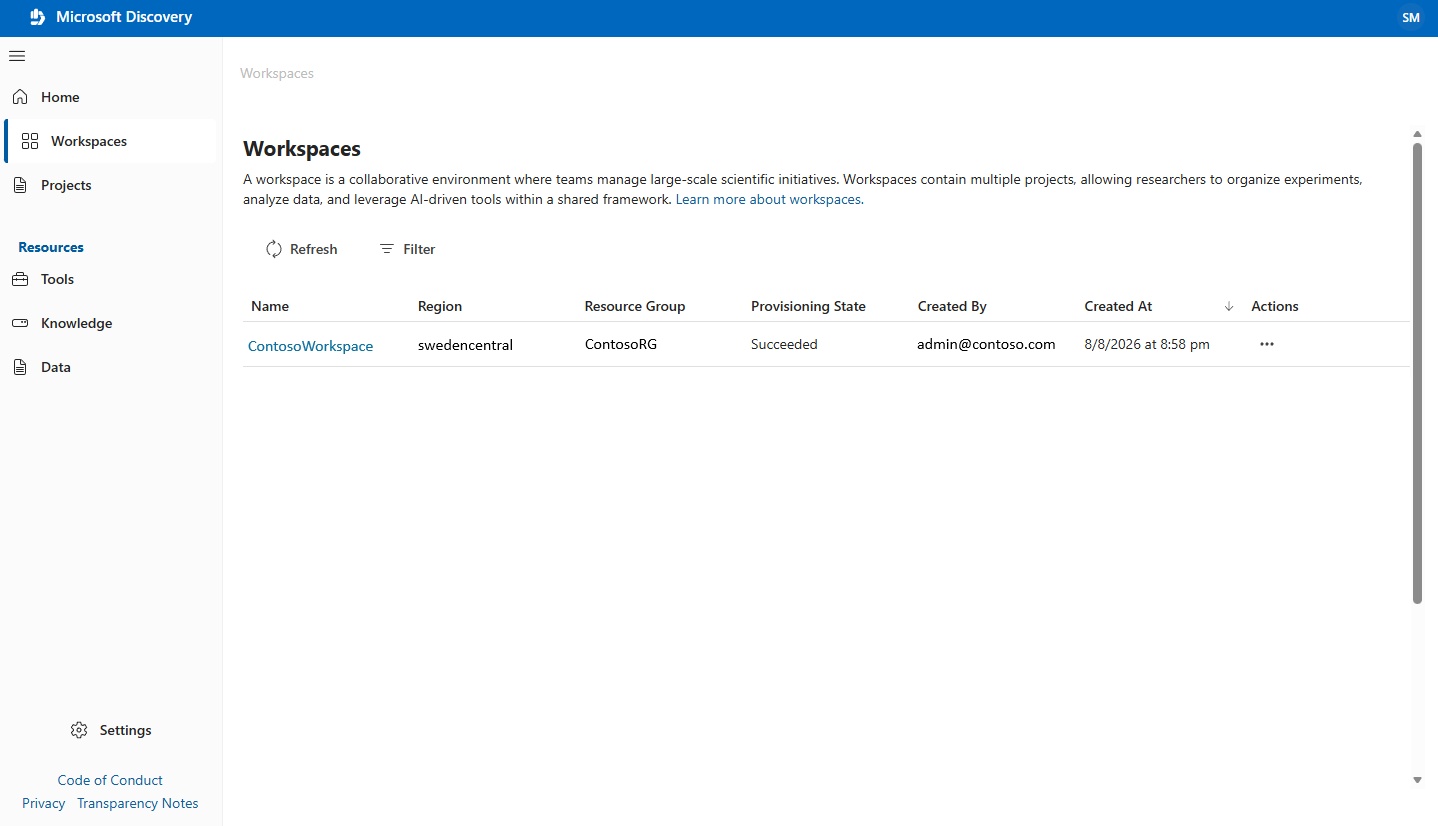
Select the workspace you created in step 4. This action opens your workspace in the studio.
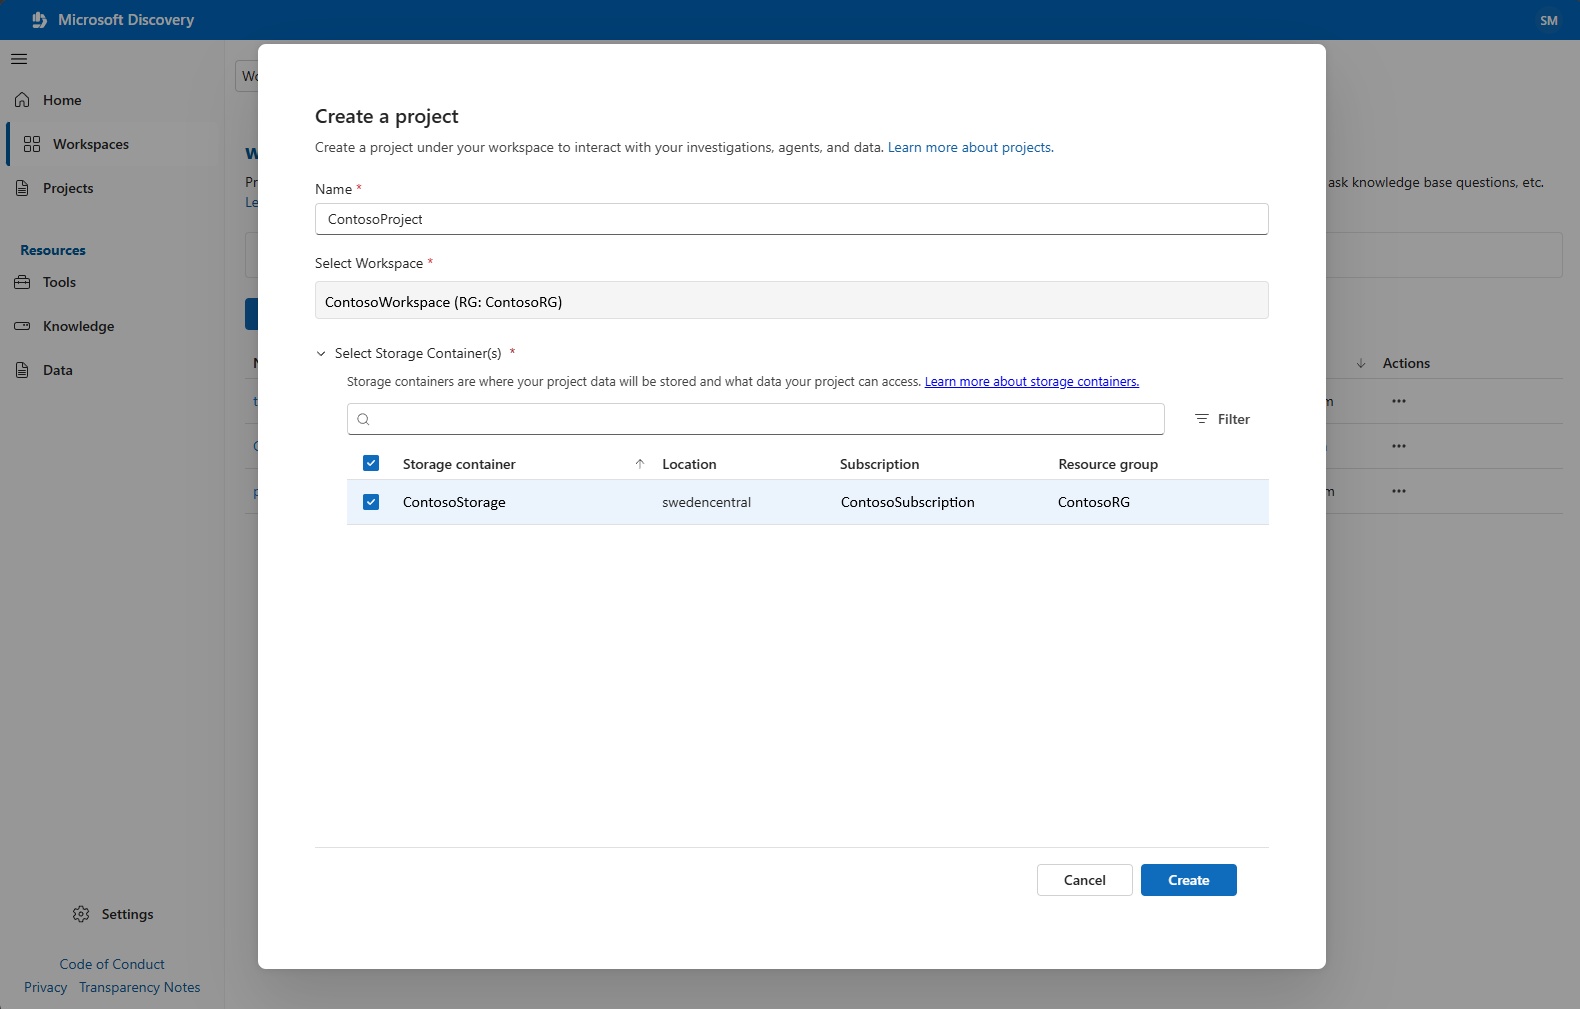
Select Create Project.
Enter the name of the project and select the storage container you created in step 8.
Select Create.
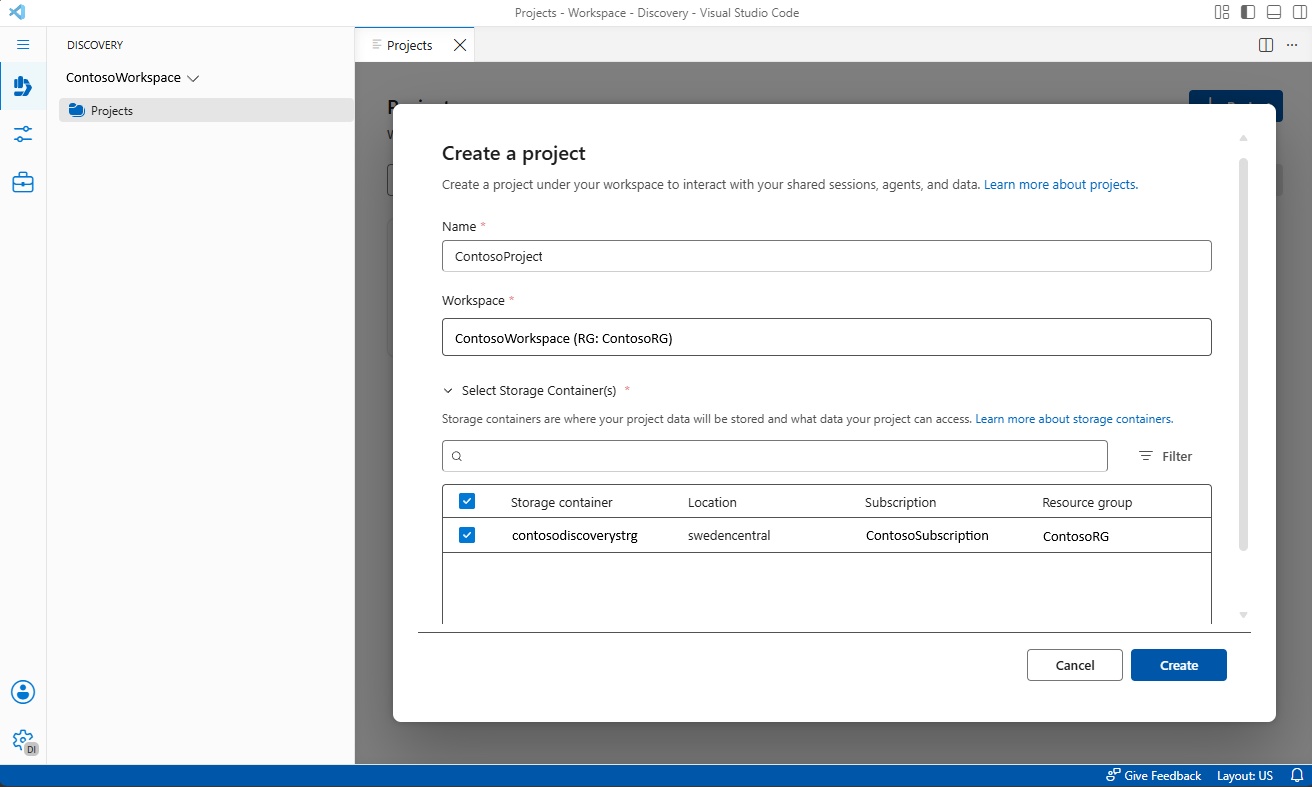
Note
After you select Create, the project is initially in the Accepted state. Refresh the page and wait until the Provisioning State changes to Succeeded before proceeding.
Next step
After you set up your infrastructure and create your project, continue with the following next step: