Note
Access to this page requires authorization. You can try signing in or changing directories.
Access to this page requires authorization. You can try changing directories.
The packet capture feature of Azure Network Watcher creates capture sessions to track traffic in and out of virtual machines (VMs). The capture file can have a filter that you define to track only the traffic that you want to monitor. This data is stored in a storage blob or locally on the guest machine.
You can start this capability remotely from other automation scenarios, such as from Azure Functions. You can run proactive captures based on defined network anomalies. Other uses include gathering network statistics, getting information about network intrusions, and debugging client/server communications.
Resources that are deployed in Azure run continuously. It's difficult to actively monitor the status of all resources at all times. For example, what happens if a problem occurs at 2:00 AM?
By using Network Watcher alerts and functions from within the Azure ecosystem, you can proactively respond with the data and tools to solve problems in your network.
Prerequisites
- The latest version of Azure PowerShell.
- An existing instance of Network Watcher. If you don't already have one, create an instance of Network Watcher.
- An existing virtual machine in the same region as Network Watcher with the Windows extension or Linux virtual machine extension.
Scenario
In this example, a virtual machine has more outgoing traffic than usual and you want to be alerted. You can use a similar process to create alerts for any condition.
When an incident triggers an alert, the packet-level data helps you analyze why the outgoing traffic increased. You can take steps to return the virtual machine to its original state.
This scenario assumes that you have an existing instance of Network Watcher and a resource group with a valid virtual machine.
Here's the workflow for packet capture:
- An incident triggers an alert on your virtual machine (VM).
- The alert calls your Azure function.
- Your Azure function processes the alert and starts a Network Watcher packet capture session.
- The packet capture runs on the VM and collects data.
- The packet capture file is uploaded to a storage account for review and diagnosis.
To automate this process, you create and connect an alert on your VM to be triggered when the incident occurs. You also create a function to call Network Watcher.
This scenario:
- Creates an Azure function that starts a packet capture.
- Creates an alert rule on a virtual machine and configures the alert rule to call the Azure function.
Create an Azure function
To create an Azure function to process the alert and create a packet capture, you first need to create a function app:
Sign in to the Azure portal.
In the search box at the top of the portal, enter function app. Select Function App from the search results.
Select + Create.
On the Basics tab of Create Function App, enter or select values for the following settings:
- Under Project Details, select the subscription for which you want to create the function app and the resource group to contain the app.
- Under Instance Details:
- For Function App name, enter the name of the function app. This name is appended with .azurewebsites.net.
- For Do you want to deploy code or container image?, select the mode of publishing: Code or Container image.
- For Runtime stack, select a runtime stack.
- For Version, select the version of the runtime stack.
- For Region, select the region in which you want to create the function app.
- Under Operating system, select the type of operating system that you currently use. Azure recommends the type of operating system based on your runtime stack selection.
- Under Hosting, select the type of plan that you want to use for the function app. Choose from the following options:
- Consumption (Serverless): For event-driven scaling for the lowest cost.
- Functions Premium: For enterprise-level, serverless applications with event-based scaling and network isolation.
- App Service plan: For reusing compute from an existing Azure App Service plan.
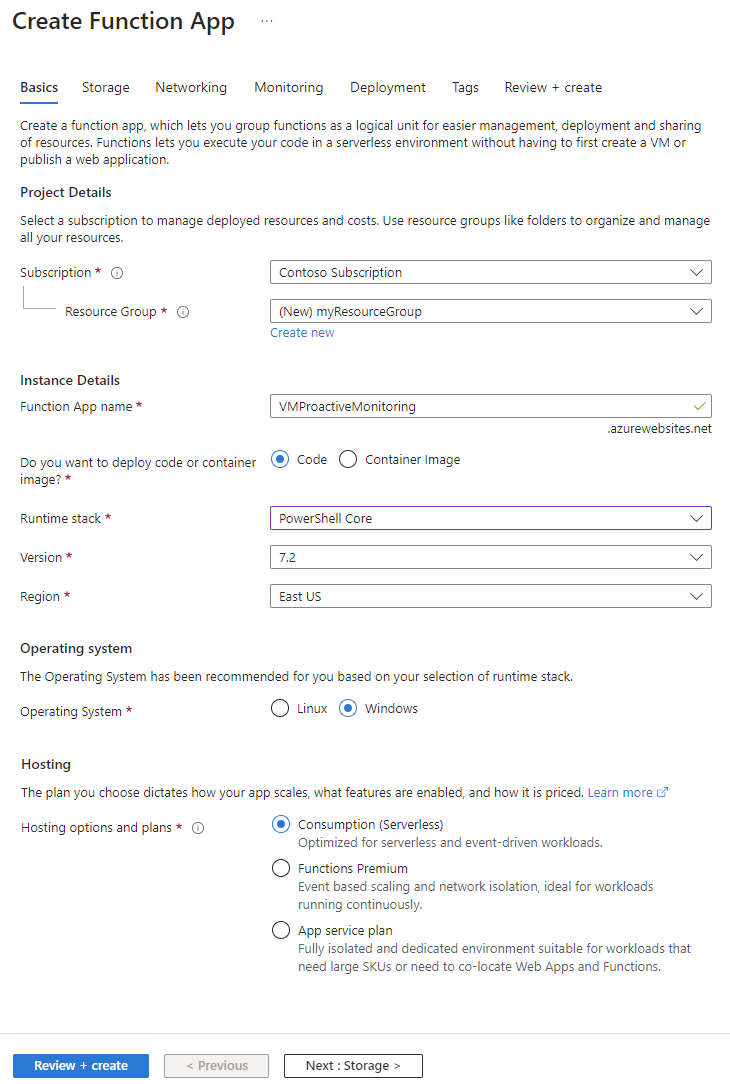
Select Review + create to create the app.

Now you can create a function:
In the function app that you created, select Functions, and then select Create to open the Create function pane.
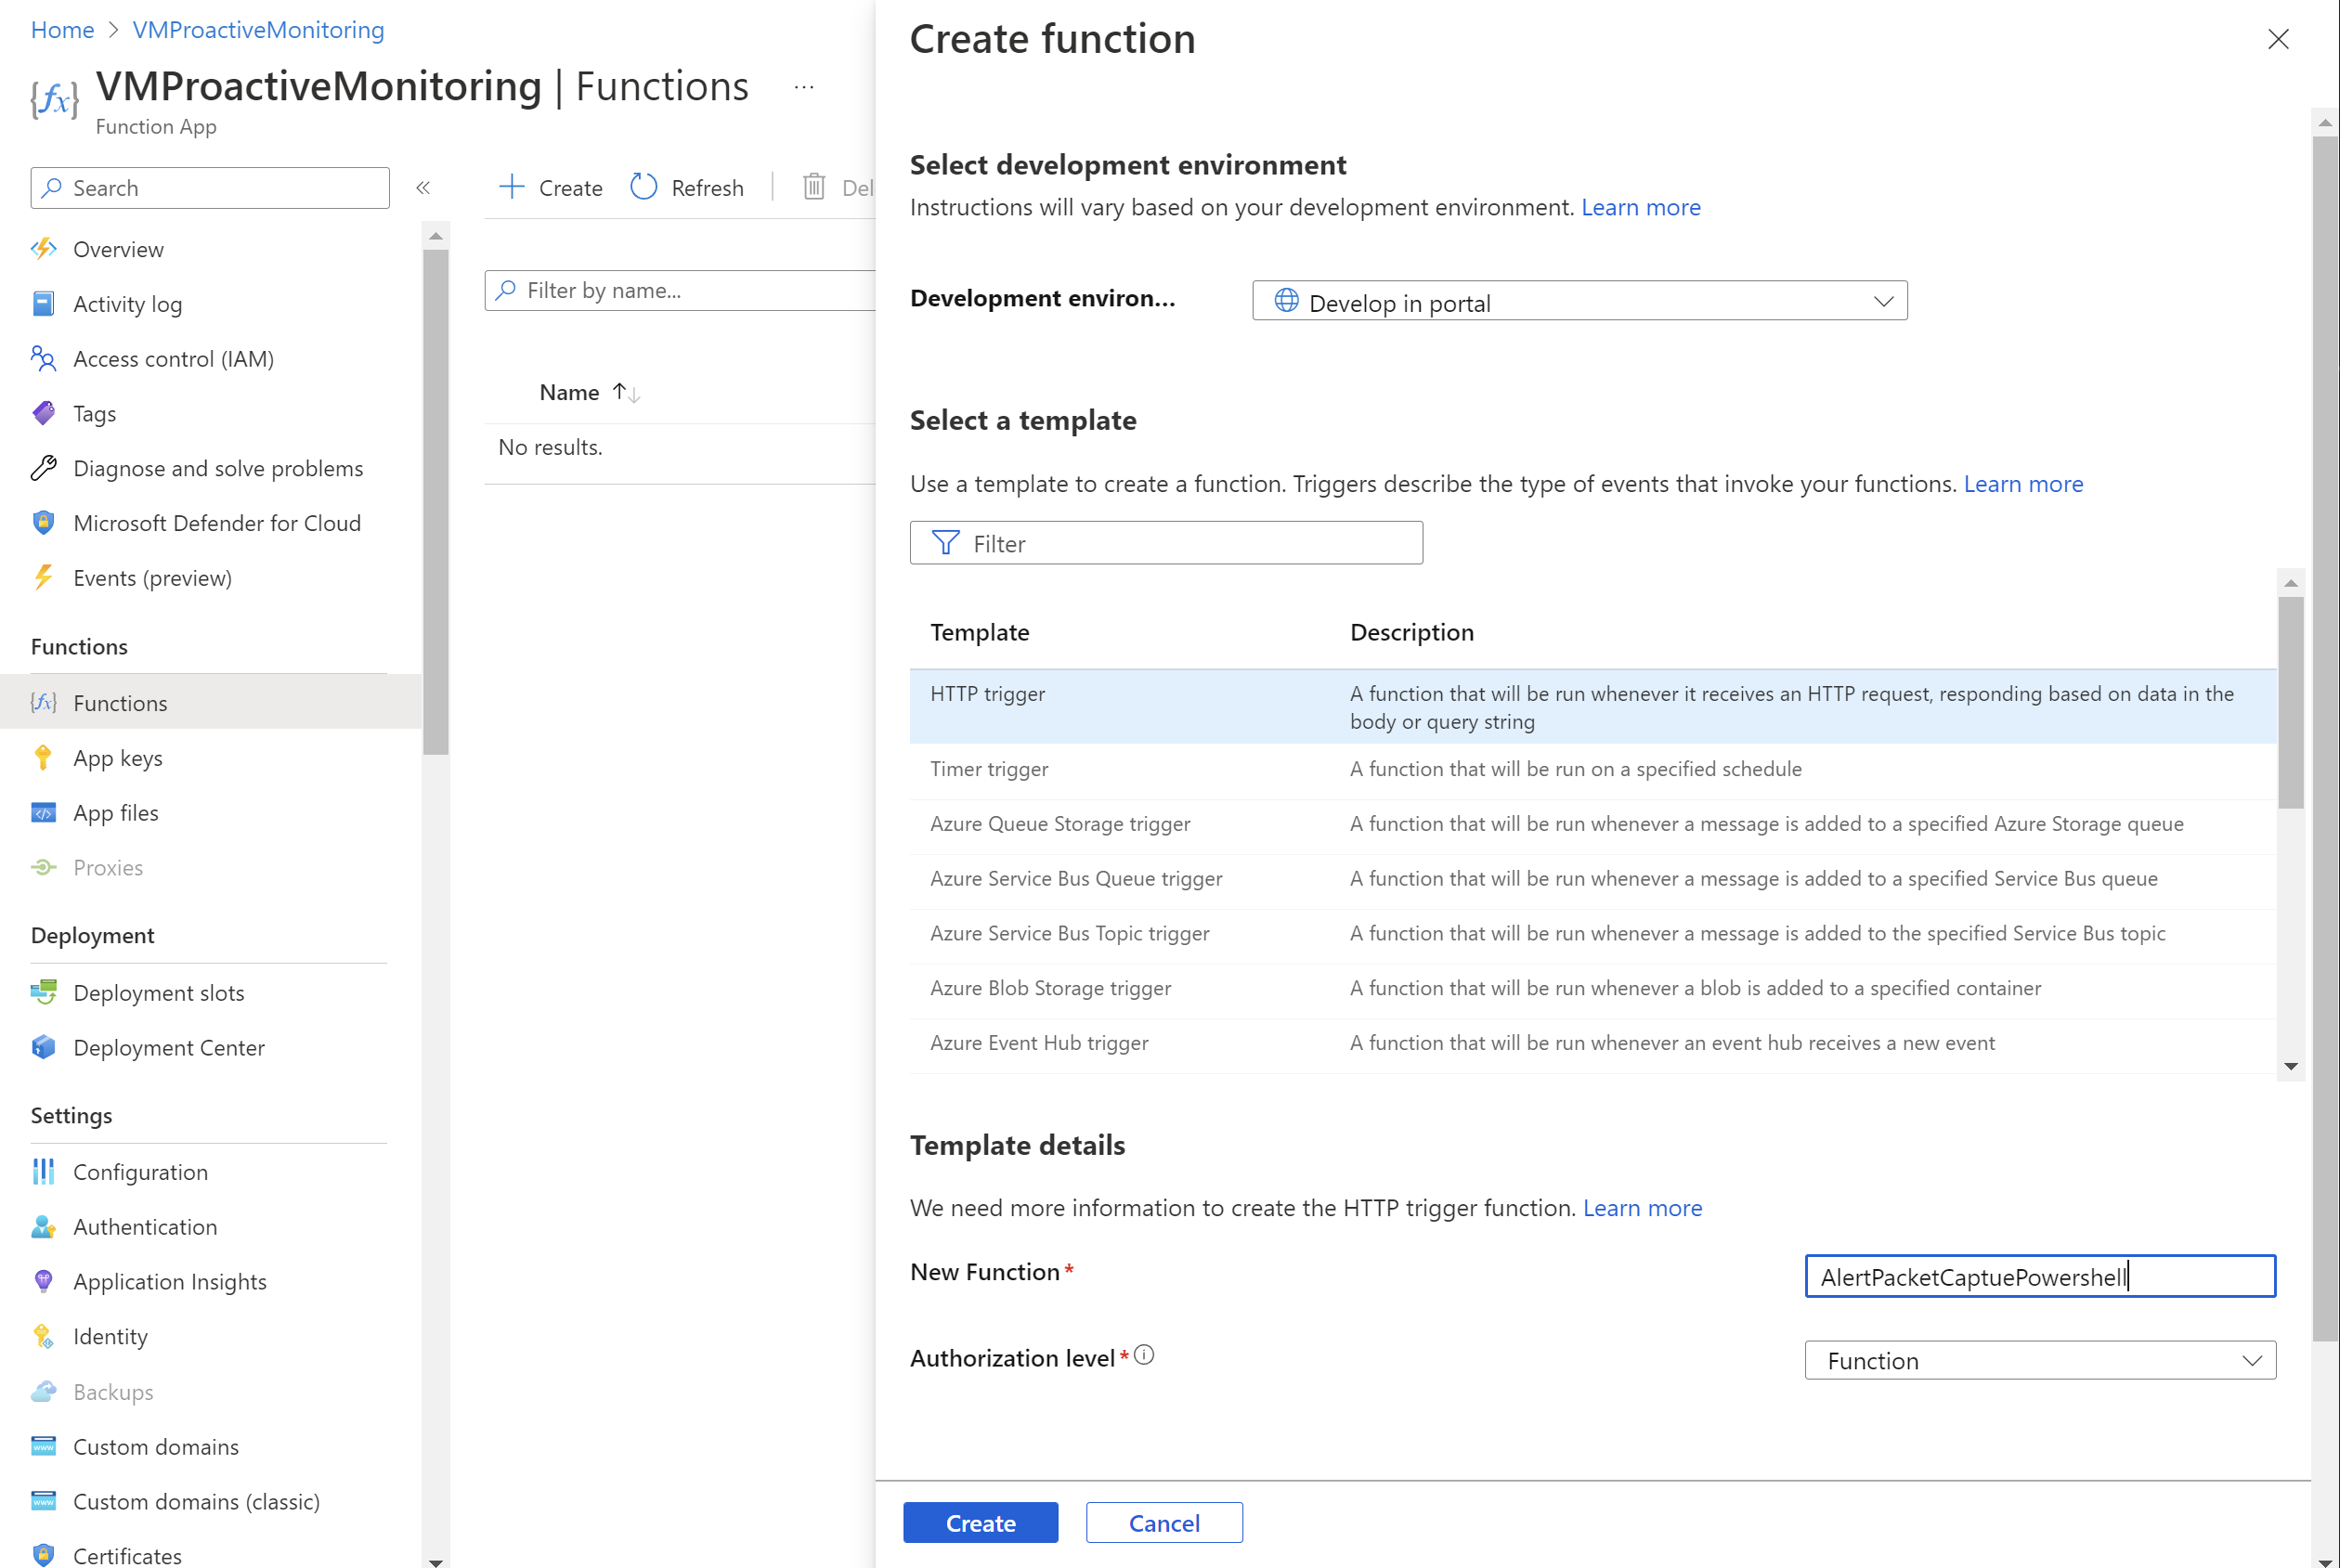
For Development environment, select Develop in portal.
Under Select a template, select HTTP trigger.
In the Template details section:
- For New Function, enter the name of the function.
- For Authorization level, select Function.
Select Create.
Go to the function that you created and select Code + Test.
Update the script and select Save.
Configure authentication
To use the PowerShell cmdlets, you must configure authentication in the function app. To configure authentication, you must configure environment variables and upload an encrypted key file to the function app.
Note
This scenario provides only one example of how to implement authentication with Azure Functions. There are other ways to do the same action.
The following PowerShell script creates a key file called PassEncryptKey.key. It also provides an encrypted version of the supplied password. This password is the same password that's defined for the Microsoft Entra application that's used for authentication.
#Variables
$keypath = "C:\temp\PassEncryptKey.key"
$AESKey = New-Object Byte[] 32
$Password = "<insert a password here>"

#Keys
[Security.Cryptography.RNGCryptoServiceProvider]::Create().GetBytes($AESKey)
Set-Content $keypath $AESKey

#Get encrypted password
$secPw = ConvertTo-SecureString -AsPlainText $Password -Force
$AESKey = Get-content $KeyPath
$Encryptedpassword = $secPw | ConvertFrom-SecureString -Key $AESKey
$Encryptedpassword
Retrieve values for environment variables
Set up the following environment variables, which are necessary to access the values for authentication:
AzureClientIDAzureTenantAzureCredPassword
If you already have an application ID, use the AzureClientID, AzureTenant, and AzureCredPassword values of that application. If you don't have one, proceed to the Store the environment variables section.
AzureClientID
The client ID is the ID of an application in Microsoft Entra ID. To get the client ID:
If you don't already have an application to use, run the following cmdlet to create an application:
$app = New-AzADApplication -DisplayName "ExampleAutomationAccount_MF" -HomePage "https://exampleapp.com" -IdentifierUris "https://exampleapp1.com/ExampleFunctionsAccount" -Password "<same password as defined earlier>"
New-AzADServicePrincipal -ApplicationId $app.ApplicationId
Start-Sleep 15]
New-AzRoleAssignment -RoleDefinitionName Contributor -ServicePrincipalName $app.ApplicationId
Note
The password that you use when you create the application should be the same password that you created earlier when you saved the key file.
In the Azure portal, select Subscriptions. Select the subscription to use, and then select Access control (IAM).
Choose the account to use, and then select Properties. Copy the application ID.
AzureTenant
Get the tenant ID by running the following PowerShell cmdlet:
(Get-AzSubscription -SubscriptionName "<subscriptionName>").TenantId
AzureCredPassword
The value of the AzureCredPassword environment variable is the value that you get from running the following PowerShell sample. This sample is the same one that the preceding Configure authentication section showed. The value that you need is the output of the $Encryptedpassword variable. This output is the service principal password that you encrypted by using the PowerShell script.
#Variables
$keypath = "C:\temp\PassEncryptKey.key"
$AESKey = New-Object Byte[] 32
$Password = "<insert a password here>"

#Keys
[Security.Cryptography.RNGCryptoServiceProvider]::Create().GetBytes($AESKey)
Set-Content $keypath $AESKey

#Get encrypted password
$secPw = ConvertTo-SecureString -AsPlainText $Password -Force
$AESKey = Get-content $KeyPath
$Encryptedpassword = $secPw | ConvertFrom-SecureString -Key $AESKey
$Encryptedpassword
Store the environment variables
To store the environment variables:
Go to the function app. Select Configurations > Application settings.
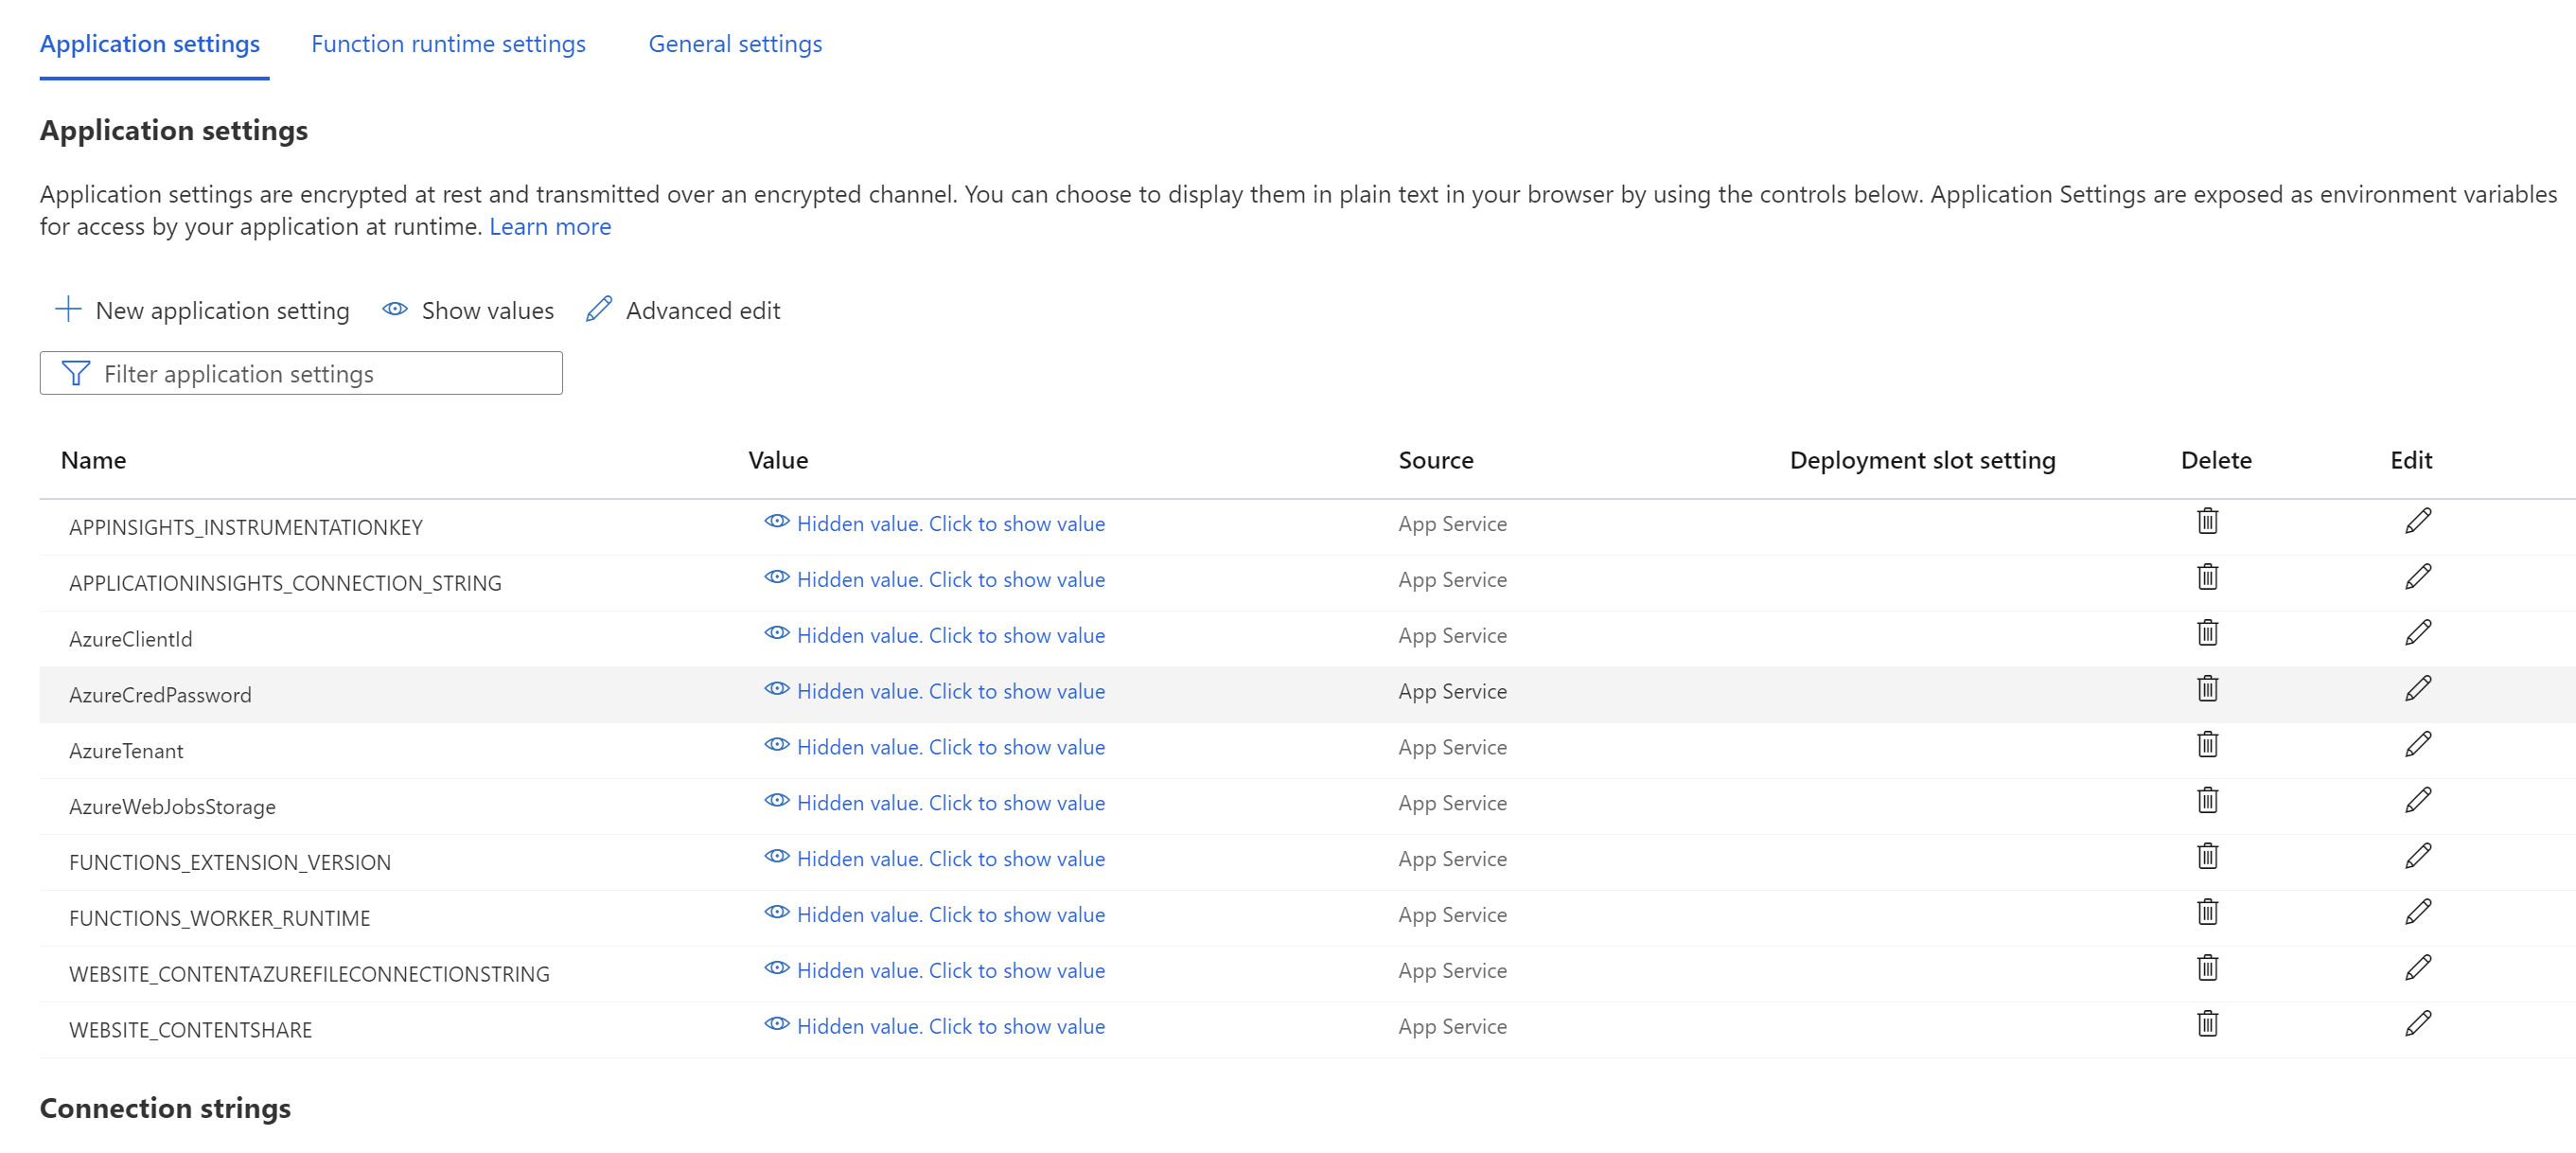
Add the environment variables and their values to the app settings, and then select Save.
Add PowerShell to the function
Now, make calls into Network Watcher from within the Azure function. Depending on the requirements, the implementation of this function can vary. However, the general flow of the code is as follows:
- Process input parameters.
- Query existing packet captures to verify limits and resolve name conflicts.
- Create a packet capture with appropriate parameters.
- Poll the packet capture periodically until it's complete.
- Notify the user that the packet capture session is complete.
The following example is PowerShell code that you can use in the function. You need to replace the values for subscriptionId, resourceGroupName, and storageAccountName.
# Input bindings are passed in via parameter block
param($Request, $TriggerMetadata)

$essentials = $Request.body.data.essentials
$alertContext = $Request.body.data.alertContext


# Storage account ID to save captures in
$storageaccountid = "/subscriptions/{subscriptionId}/resourceGroups/{resourceGroupName}/providers/Microsoft.Storage/storageAccounts/{storageAccountName}"

# Packet capture variables
$packetCaptureName = "PSAzureFunction"
$packetCaptureLimit = 100
$packetCaptureDuration = 30

# Credentials
# Set the credentials in the configurations
$tenant = $env:AzureTenant
$pw = $env:AzureCredPassword
$clientid = $env:AzureClientId
$password = ConvertTo-SecureString $pw -AsPlainText -Force
$credential = New-Object System.Management.Automation.PSCredential ($clientid, $password)

Connect-AzAccount -ServicePrincipal -Tenant $tenant -Credential $credential #-WarningAction SilentlyContinue | out-null

if ($alertContext.condition.allOf.metricNamespace -eq "Microsoft.Compute/virtualMachines") {

    # Get the VM firing this alert
    $vm = Get-AzVM -ResourceId $essentials.alertTargetIDs[0]

    # Get the Network Watcher instance in the VM's region
    $networkWatcher = Get-AzNetworkWatcher -Location $vm.Location

    # Get existing packet captures
    $packetCaptures = Get-AzNetworkWatcherPacketCapture -NetworkWatcher $networkWatcher

    # Remove an existing packet capture created by the function (if it exists)
    $packetCaptures | ForEach-Object { if ($_.Name -eq $packetCaptureName)
        {
            Remove-AzNetworkWatcherPacketCapture -NetworkWatcher $networkWatcher -PacketCaptureName $packetCaptureName
        }
    }

    # Initiate packet capture on the VM that fired the alert
    if ($packetCaptures.Count -lt $packetCaptureLimit) {
        Write-Output "Initiating Packet Capture"
        New-AzNetworkWatcherPacketCapture -NetworkWatcher $networkWatcher -TargetVirtualMachineId $vm.Id -PacketCaptureName $packetCaptureName -StorageAccountId $storageaccountid -TimeLimitInSeconds $packetCaptureDuration
    }
}
Use the following PowerShell code if you're using the old schema:
# Input bindings are passed in via parameter block
param($Request, $TriggerMetadata)
$details = $Request.RawBody | ConvertFrom-Json


# Process alert request body
$requestBody = $Request.Body.data

# Storage account ID to save captures in
$storageaccountid = "/subscriptions/{subscriptionId}/resourceGroups/{resourceGroupName}/providers/Microsoft.Storage/storageAccounts/{storageAccountName}"

# Packet capture variables
$packetCaptureName = "PSAzureFunction"
$packetCaptureLimit = 100
$packetCaptureDuration = 30

# Credentials
# Set the credentials in the configurations
$tenant = $env:AzureTenant
$pw = $env:AzureCredPassword
$clientid = $env:AzureClientId

$password = ConvertTo-SecureString $pw -AsPlainText -Force
$credential = New-Object System.Management.Automation.PSCredential ($clientid, $password)

Connect-AzAccount -ServicePrincipal -Tenant $tenant -Credential $credential #-WarningAction SilentlyContinue | out-null

if ($requestBody.context.resourceType -eq "Microsoft.Compute/virtualMachines") {

    # Get the VM firing this alert
    $vm = Get-AzVM -ResourceGroupName $requestBody.context.resourceGroupName -Name $requestBody.context.resourceName

    # Get the Network Watcher instance in the VM's region
    $networkWatcher = Get-AzNetworkWatcher -Location $vm.Location

    # Get existing packet captures
    packetCaptures = Get-AzNetworkWatcherPacketCapture -NetworkWatcher $networkWatcher

    # Remove an existing packet capture created by the function (if it exists)
    $packetCaptures | ForEach-Object { if ($_.Name -eq $packetCaptureName)
        {
            Remove-AzNetworkWatcherPacketCapture -NetworkWatcher $networkWatcher -PacketCaptureName $packetCaptureName
        }
    }

    # Initiate packet capture on the VM that fired the alert
    if ($packetCaptures.Count -lt $packetCaptureLimit) {
        Write-Output "Initiating Packet Capture"
        New-AzNetworkWatcherPacketCapture -NetworkWatcher $networkWatcher -TargetVirtualMachineId $requestBody.context.resourceId -PacketCaptureName $packetCaptureName -StorageAccountId $storageaccountid -TimeLimitInSeconds $packetCaptureDuration
    }
}
Configure an alert on a virtual machine
You can configure alerts to notify individuals when a specific metric crosses a threshold that you assigned to it. In this example, the alert is on the Network Out Total metric that's sent, but you can trigger the alert for many other metrics.
Create the alert rule
Go to an existing virtual machine and add an alert rule. On the Create an Alert rule page, take the following steps:
On the Select a signal pane, search for the name of the signal and select it. In this example, Network Out Total is the selected signal. It denotes the number of bytes out on all network interfaces by the virtual machine.
On the Conditions tab, set the following values, and then select Next: Actions.
Setting Value Threshold Static Aggregation type Average Operator Greater than Threshold value 3 Check every 1 minute Lookback period 5 minutes On the Actions tab, select Create an action group.
On the Create action group page, select the Subscription, Resource group, and Region values. Also enter the action group name and the display name, and then select Next: Notifications.
On the Notifications tab, for Action type, select Azure Function.
On the Azure Function pane, select the Subscription, Resource group, Function app, and Azure Function values.
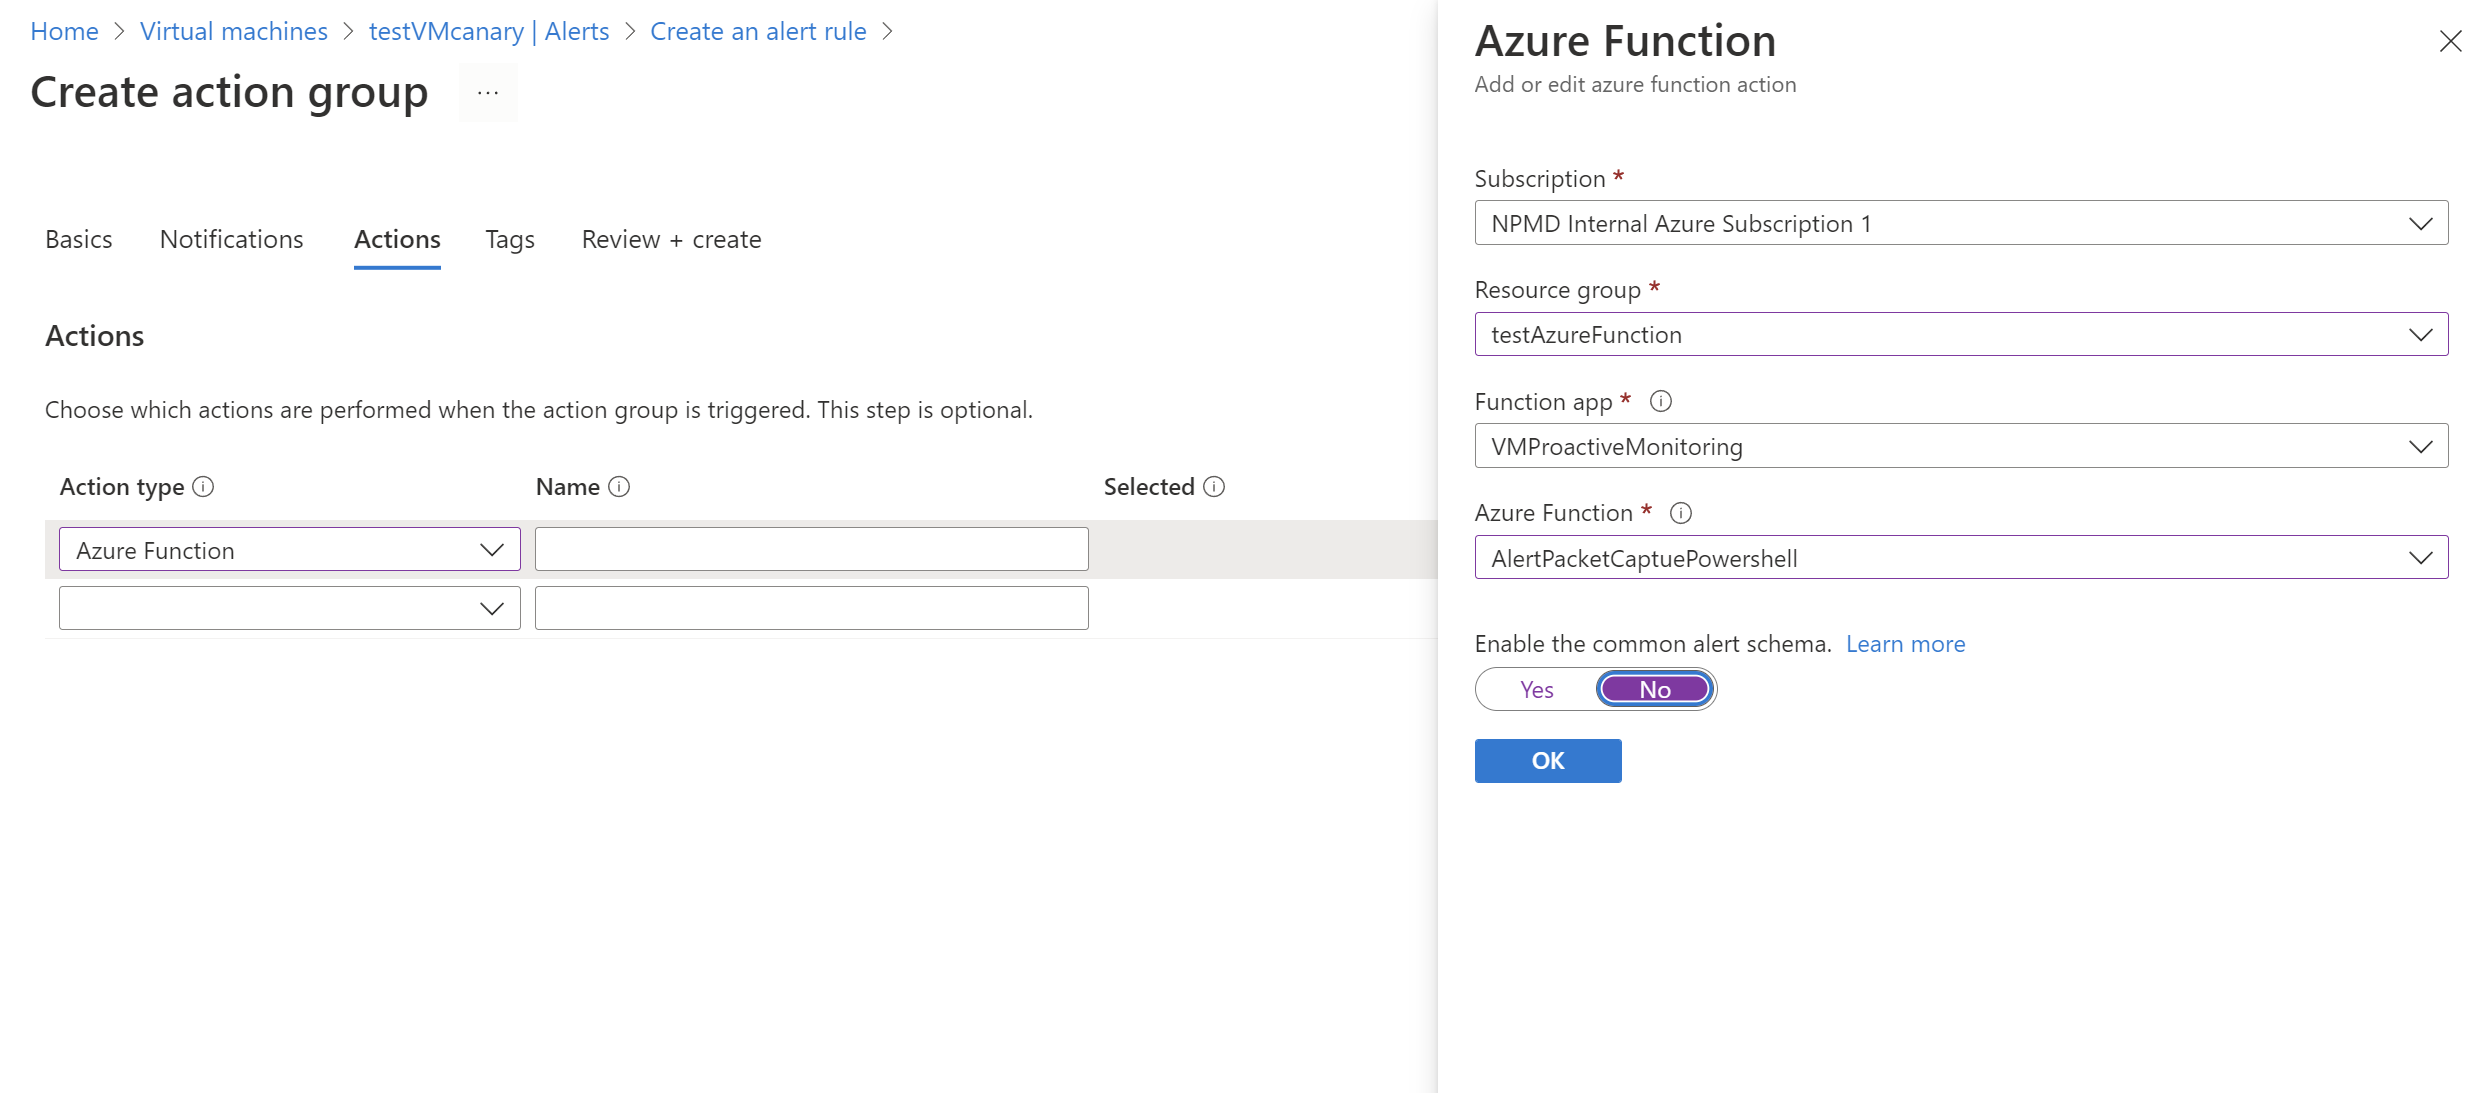
In Enable the common alert schema slider, select No. Then select OK.
Review the results
After the criteria trigger an alert, Network Watcher creates a packet capture. Go to Network Watcher and select Packet capture. On this page, you can select the file link to download the packet capture.
If the capture file is stored locally, you can get it by signing in to the virtual machine.
For instructions on downloading files from Azure storage accounts, see the quickstart for the Azure Blob Storage client library for .NET. You can also use the Azure Storage Explorer tool.
After you download your capture, you can view it using tools like Wireshark that can read a .cap file.