In this article, you learn how to use the Azure Network Watcher packet capture feature to remotely configure, start, stop, download, and delete packet captures.
Prerequisites
An Azure account with an active subscription. Create an account for free.
A virtual machine (VM) or virtual machine scale set with outbound TCP connectivity to: 169.254.169.254 over port 80 and 168.63.129.16 over port 8037. The Network Watcher agent VM extension uses these IP addresses to communicate with the Azure platform.
Network Watcher Agent VM extension installed on the target virtual machine. Whenever you use Network Watcher packet capture in the Azure portal, the agent is automatically installed on the target VM or scale set if it wasn't previously installed. To update an already installed agent, see Update Azure Network Watcher extension to the latest version.
An Azure storage account with VM outbound TCP connectivity to it over port 443. If you don't have a storage account, see Create a storage account using the Azure portal.
- The storage account must be accessible from the subnet of the target virtual machine or scale set. For more information, see Configure Azure Storage firewalls and virtual networks.
- The storage account key access must be enabled to allow requests from Network Watcher using shared access signature (SAS) tokens.
Sign in to the Azure portal with your Azure account.
An Azure account with an active subscription. Create an account for free.
A virtual machine (VM) with outbound TCP connectivity to: 169.254.169.254 over port 80 and 168.63.129.16 over port 8037. The Network Watcher agent VM extension uses these IP addresses to communicate with the Azure platform.
Network Watcher Agent VM extension installed on the target virtual machine. For more information, see Manage Network Watcher Agent VM extension for Windows or Manage Network Watcher Agent VM extension for Linux.
An Azure storage account with VM outbound TCP connectivity to it over port 443. If you don't have a storage account, see Create a storage account using PowerShell.
- The storage account must be accessible from the subnet of the target virtual machine or scale set. For more information, see Configure Azure Storage firewalls and virtual networks.
- The storage account key access must be enabled to allow requests from Network Watcher using shared access signature (SAS) tokens.
Azure Cloud Shell or Azure PowerShell.
The steps in this article run the Azure PowerShell cmdlets interactively in Azure Cloud Shell. To run the commands in the Cloud Shell, select Open Cloud Shell at the upper-right corner of a code block. Select Copy to copy the code and then paste it into Cloud Shell to run it. You can also run the Cloud Shell from within the Azure portal.
You can also install Azure PowerShell locally to run the cmdlets. This article requires the Az PowerShell module. For more information, see How to install Azure PowerShell. If you run PowerShell locally, sign in to Azure using the Connect-AzAccount cmdlet.
An Azure account with an active subscription. Create an account for free.
A virtual machine (VM) with outbound TCP connectivity to: 169.254.169.254 over port 80 and 168.63.129.16 over port 8037. The Network Watcher agent VM extension uses these IP addresses to communicate with the Azure platform.
Network Watcher Agent VM extension installed on the target virtual machine. For more information, see Manage Network Watcher Agent VM extension for Windows or Manage Network Watcher Agent VM extension for Linux.
An Azure storage account with VM outbound TCP connectivity to it over port 443. If you don't have a storage account, see Create a storage account using the Azure CLI.
- The storage account must be accessible from the subnet of the target virtual machine or scale set. For more information, see Configure Azure Storage firewalls and virtual networks.
- The storage account key access must be enabled to allow requests from Network Watcher using shared access signature (SAS) tokens.
Azure Cloud Shell or Azure CLI.
The steps in this article run the Azure CLI commands interactively in Azure Cloud Shell. To run the commands in the Cloud Shell, select Open Cloud Shell at the upper-right corner of a code block. Select Copy to copy the code, and paste it into Cloud Shell to run it. You can also run the Cloud Shell from within the Azure portal.
You can also install Azure CLI locally to run the commands. If you run Azure CLI locally, sign in to Azure using the az login command.
Note
Azure creates a Network Watcher instance in the virtual machine's region if Network Watcher wasn't enabled for that region. For more information, see Enable or disable Azure Network Watcher.
If a network security group is associated to the virtual machine's network interface, or subnet that the network interface is in, ensure that rules exist to allow outbound connectivity. Similarly, ensure outbound connectivity when adding user-defined routes to your network.
Start a packet capture
To start a capture session, use the following steps:
In the search box at the top of the portal, enter Network Watcher. Select Network Watcher from the search results.

Select Packet capture under Network diagnostic tools, then select + Add to create a packet capture.

In Add packet capture, enter or select values for the following settings:
| Setting |
Value |
| Basic Details |
|
| Subscription |
Select the Azure subscription of the virtual machine. |
| Resource group |
Select the resource group of the virtual machine. |
| Target type |
Select Virtual machine or Virtual machine scale set. |
| Target virtual machine |
Select the virtual machine.
This option is available if you select Virtual machine as the target type. |
| Target virtual machine scale set |
Select the virtual machine scale set.
This option is available if you select Virtual machine scale set as the target type. |
| Target instance |
Select the virtual machine scale set instance.
This option is available if you select Virtual machine scale set as the target type. |
| Packet capture name |
Enter a name or leave the default name. |
| Packet capture storage |
|
| Capture location |
Select in storage account (default option), in local file storage, or Both. |
| Storage accounts |
Select your Standard storage account1.
This option is available if you select in storage account or Both as the capture location.
The storage account must be in the same region as the target instance. |
| Local file path |
Enter a valid local file path where you want the capture to be saved in the target virtual machine.
If you're using a Linux machine, the path can start with /var/captures.
If you're using a Windows machine, the path can start with C:\Captures.
This option is available if you select in local file storage or Both as the capture location. |
| Packet capture configuration |
|
| Enable continuous capture3 |
Check this checkbox if you want to enable continuous packet capture. For more information, see Continuous packet capture. |
| Maximum bytes per packet |
Enter the maximum number of bytes to be captured per each packet. All bytes are captured if left blank or 0 entered. |
| New files created3 |
Enter the maximum number of files created. The default value is 100 MB and the maximum value is 4 GB.
This option is available if you enable continuous capture. |
| Bytes per file3 |
Enter the number of bytes per file. Once the value is reached, a new file is created. |
| Time limit (seconds) |
Enter the time limit of the packet capture session in seconds. Once the value is reached the packet capture stops.
If left blank:
- Up to 5 hours (18,000 seconds) is captured without enabling continuous capture.
- Up to 1 day (86,400 seconds) is captured if you enable continuous capture. The maximum value is 604,800 seconds (7 days). |
| Packet filtering (optional) |
|
| Packet filtering |
Select Enable packet filtering to enable packet filtering. |
| Add a filter |
Select Add filter criteria to add a new filter. You can define as many filters as you need. |
| Protocol |
Filters the packet capture based on the selected protocol. Available values are TCP, UDP, or Any. |
| Local IP address2 |
Filters the packet capture for packets where the local IP address matches this value. |
| Local port2 |
Filters the packet capture for packets where the local port matches this value. |
| Remote IP address2 |
Filters the packet capture for packets where the remote IP address matches this value. |
| Remote port2 |
Filters the packet capture for packets where the remote port matches this value. |
1 Premium storage accounts are currently not supported for storing packet captures.
2 Port and IP address values can be a single value, a range such as 80-1024, or multiple values such as 80, 443.
3 Continuous capture is currently in preview. For more information, see Continuous packet capture.
Select Start packet capture.

The packet capture stops once the time limit is reached.
To start a capture session, use New-AzNetworkWatcherPacketCapture cmdlet:
# Place the virtual machine configuration into a variable.
$vm = Get-AzVM -ResourceGroupName 'myResourceGroup' -Name 'myVM'

# Place the storage account configuration into a variable.
$storageAccount = Get-AzStorageAccount -ResourceGroupName 'myResourceGroup' -Name 'mystorageaccount'

# Start the Network Watcher capture session.
New-AzNetworkWatcherPacketCapture -Location 'eastus' -PacketCaptureName 'myVM_1' -TargetVirtualMachineId $vm.Id  -StorageAccountId $storageAccount.Id
Once the capture session is started, you see the following output:
ProvisioningState Name   BytesToCapturePerPacket TotalBytesPerSession TimeLimitInSeconds
----------------- ----   ----------------------- -------------------- ------------------
Succeeded         myVM_1 0                       1073741824           18000
The following table describes the optional parameters that you can use with the New-AzNetworkWatcherPacketCapture cmdlet:
| Parameter |
description |
-Filter |
Add filter(s) to capture only the traffic you want. For example, you can capture only TCP traffic from a specific IP address to a specific port. |
-TimeLimitInSeconds |
Set the maximum duration of the capture session. The default value is 18000 seconds (5 hours). |
-BytesToCapturePerPacket |
Set the maximum number of bytes to be captured per each packet. All bytes are captured if not used or 0 entered. |
-TotalBytesPerSession |
Set the total number of bytes that are captured. Once the value is reached the packet capture stops. Up to 1 GB (1,073,741,824 bytes) is captured if not used. |
-LocalFilePath |
Enter a valid local file path if you want the capture to be saved in the target virtual machine (For example, C:\Capture\myVM_1.cap). If you're using a Linux machine, the path must start with /var/captures. |
The packet capture stops once the time limit or the file size (maximum bytes per session) is reached.
To start a capture session, use az network watcher packet-capture create command:
# Start the Network Watcher capture session.
az network watcher packet-capture create --name 'myVM_1' --resource-group 'myResourceGroup' --vm 'myVM' --storage-account 'mystorageaccount'
# Start the Network Watcher capture session (storage account is in different resource group from the VM).
az network watcher packet-capture create --name 'myVM_1' --resource-group 'myResourceGroup' --vm 'myVM' --storage-account '/subscriptions/aaaa0a0a-bb1b-cc2c-dd3d-eeeeee4e4e4e/resourceGroups/myResourceGroup2/providers/Microsoft.Storage/storageAccounts/mystorageaccount'
Once the capture session is started, you see the following output:
{
  "bytesToCapturePerPacket": 0,
  "etag": "W/\"aaaaaaaa-0000-1111-2222-bbbbbbbbbbbb\"",
  "filters": [],
  "id": "/subscriptions/aaaa0a0a-bb1b-cc2c-dd3d-eeeeee4e4e4e/resourceGroups/NetworkWatcherRG/providers/Microsoft.Network/networkWatchers/NetworkWatcher_eastus/packetCaptures/myVM_1",
  "name": "myVM_1",
  "provisioningState": "Succeeded",
  "resourceGroup": "NetworkWatcherRG",
  "scope": {
    "exclude": [],
    "include": []
  },
  "storageLocation": {
    "storageId": "/subscriptions/aaaa0a0a-bb1b-cc2c-dd3d-eeeeee4e4e4e/resourceGroups/myResourceGroup/providers/Microsoft.Storage/storageAccounts/mystorageaccount",
    "storagePath": "https://mystorageaccount.blob.core.windows.net/network-watcher-logs/subscriptions/aaaa0a0a-bb1b-cc2c-dd3d-eeeeee4e4e4e/resourcegroups/myresourcegroup/providers/microsoft.compute/virtualmachines/myvm/2025/01/31/packetcapture_16_39_41_077.cap"
  },
  "target": "/subscriptions/aaaa0a0a-bb1b-cc2c-dd3d-eeeeee4e4e4e/resourceGroups/myResourceGroup/providers/Microsoft.Compute/virtualMachines/myVM",
  "targetType": "AzureVM",
  "timeLimitInSeconds": 18000,
  "totalBytesPerSession": 1073741824
}
The following table describes the optional parameters that you can use with the az network watcher packet-capture create command:
| Parameter |
description |
--filters |
Add filter(s) to capture only the traffic you want. For example, you can capture only TCP traffic from a specific IP address to a specific port. |
--time-limit |
Set the maximum duration of the capture session. The default value is 18000 seconds (5 hours). |
--capture-size |
Set the maximum number of bytes to be captured per each packet. All bytes are captured if not used or 0 entered. |
--capture-limit |
Set the total number of bytes that are captured. Once the value is reached the packet capture stops. Up to 1 GB (1,073,741,824 bytes) is captured if not used. |
--file-path |
Enter a valid local file path if you want the capture to be saved in the target virtual machine (For example, C:\Capture\myVM_1.cap). If you're using a Linux machine, the path must start with /var/captures. |
The packet capture stops once the time limit or the file size (maximum bytes per session) is reached.
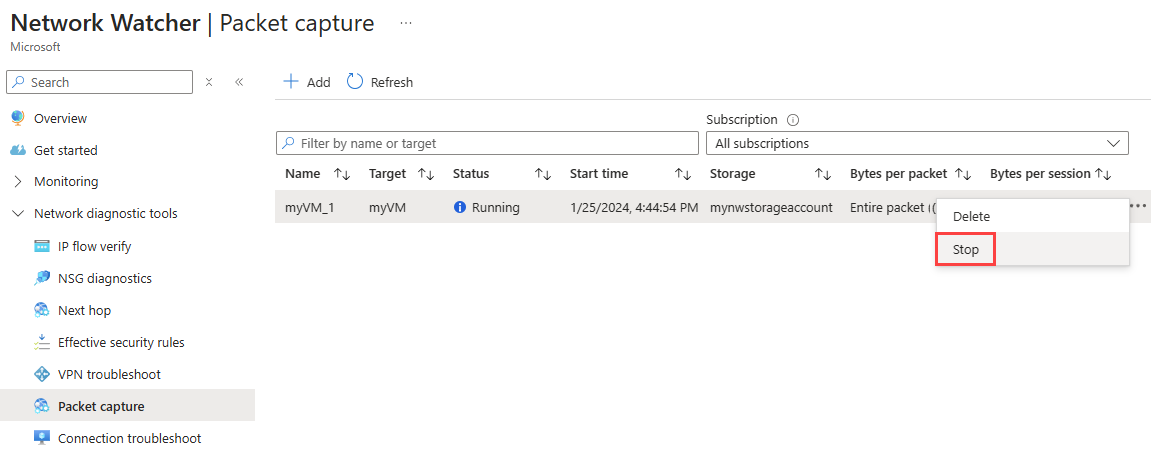
Stop a packet capture
To manually stop a packet capture session before it reaches its time or file size limits, select the ellipsis ... on the right-side of the packet capture, or right-click it, then select Stop.
To manually stop a packet capture session before it reaches its time or file size limits, use the Stop-AzNetworkWatcherPacketCapture cmdlet.
# Manually stop a packet capture session.
Stop-AzNetworkWatcherPacketCapture -Location 'eastus' -PacketCaptureName 'myVM_1'
Note
The cmdlet doesn't return a response whether ran on a currently running capture session or a session that has already stopped.
To manually stop a packet capture session before it reaches its time or file size limits, use the az network watcher packet-capture stop command.
# Manually stop a packet capture session.
az network watcher packet-capture stop --location 'eastus' --name 'myVM_1'
Note
The command doesn't return a response whether ran on a currently running capture session or a session that has already stopped.
View packet capture status
Go to the Packet capture page of Network Watcher to list existing packet captures regardless of their status.

Use Get-AzNetworkWatcherPacketCapture cmdlet to retrieve the status of a packet capture (running or completed).
# Get information, properties, and status of a packet capture.
Get-AzNetworkWatcherPacketCapture -Location 'eastus' -PacketCaptureName 'myVM_1'
The following output is an example of the output from the Get-AzNetworkWatcherPacketCapture cmdlet. The following example is after the capture is complete. The PacketCaptureStatus value is Stopped, with a StopReason of TimeExceeded. This value shows that the packet capture was successful and ran its time.
ProvisioningState Name   Target                                                                                                                              BytesToCapturePerPacket TotalBytesPerSession TimeLimitInSeconds
----------------- ----   ------                                                                                                                              ----------------------- -------------------- ------------------
Succeeded         myVM_1 /subscriptions/aaaa0a0a-bb1b-cc2c-dd3d-eeeeee4e4e4e/resourceGroups/myResourceGroup/providers/Microsoft.Compute/virtualMachines/myVM 0                       1073741824           18000
Note
To get more details in the output, add | Format-List to the end of the command.
Use az network watcher packet-capture show-status command to retrieve the status of a packet capture (running or completed).
# Get information, properties, and status of a packet capture.
az network watcher packet-capture show-status --location 'eastus' --name 'myVM_1'
The following example is the output from the az network watcher packet-capture show-status command. You can see that packetCaptureStatus value is Stopped, with a StopReason value of TimeExceeded:
{
  "additionalProperties": {
    "status": "Succeeded"
  },
  "captureStartTime": "2016-12-06T17:20:01.5671279Z",
  "id": "/subscriptions/aaaa0a0a-bb1b-cc2c-dd3d-eeeeee4e4e4e/resourceGroups/NetworkWatcherRG/providers/Microsoft.Network/networkWatchers/NetworkWatcher_eastus/packetCaptures/myVM_1",
  "name": "packetCaptureName",
  "packetCaptureError": [],
  "packetCaptureStatus": "Stopped",
  "stopReason": "TimeExceeded"
}
Download a packet capture
After your packet capture session completes, the resulting capture file is saved to Azure Storage, a local file on the target virtual machine, or both. The storage destination for the packet capture is specified during its creation. For more information, see Start a packet capture section.
To download a packet capture file saved to Azure storage, follow these steps:
In the Packet capture page, select the packet capture that you want to download its file.
In the Details section, select the packet capture file link.
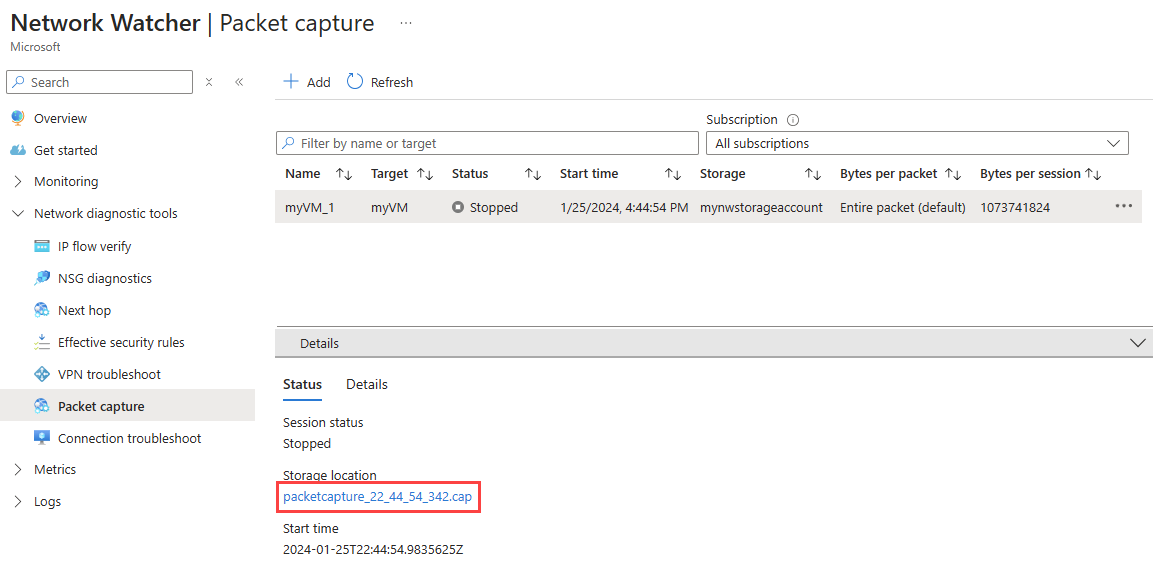
In the blob page, select Download.
You can also download capture files by directly going to the storage account container at the following path:
https://{storageAccountName}.blob.core.windows.net/network-watcher-logs/subscriptions/{subscriptionId}/resourcegroups/{storageAccountResourceGroup}/providers/microsoft.compute/virtualmachines/{virtualMachineName}/{year}/{month}/{day}/packetcapture_{UTCcreationTime}.cap
If a storage account is specified, capture files are saved to the storage account at the following path:
https://{storageAccountName}.blob.core.windows.net/network-watcher-logs/subscriptions/{subscriptionId}/resourcegroups/{storageAccountResourceGroup}/providers/microsoft.compute/virtualmachines/{virtualMachineName}/{year}/{month}/{day}/packetcapture_{UTCcreationTime}.cap
To download a packet capture from Azure storage to the local disk, use Get-AzStorageBlobContent cmdlet:
# Download the packet capture file from Azure storage container.
Get-AzStorageBlobContent -Container 'network-watcher-logs' -Blob '/subscriptions/aaaa0a0a-bb1b-cc2c-dd3d-eeeeee4e4e4e/resourcegroups/myresourcegroup/providers/microsoft.compute/virtualmachines/myvm/2024/01/25/packetcapture_22_44_54_342.cap' -Destination 'C:\Capture\myVM_1.cap'
If a storage account is specified, capture files are saved to the storage account at the following path:
https://{storageAccountName}.blob.core.windows.net/network-watcher-logs/subscriptions/{subscriptionId}/resourcegroups/{storageAccountResourceGroup}/providers/microsoft.compute/virtualmachines/{virtualMachineName}/{year}/{month}/{day}/packetcapture_{UTCcreationTime}.cap
To download a packet capture from Azure storage to the local disk, use az storage blob download command:
# Download the packet capture file from Azure storage container.
az storage blob download --container-name 'network-watcher-logs' --blob-url '/subscriptions/aaaa0a0a-bb1b-cc2c-dd3d-eeeeee4e4e4e/resourcegroups/myresourcegroup/providers/microsoft.compute/virtualmachines/myvm/2024/01/25/packetcapture_22_44_54_342.cap' --file 'C:\Capture\myVM_1.cap'
Note
You can use Azure Storage Explorer to download capture files from the storage account container. Storage Explorer is a standalone app that you can conveniently use to access and work with Azure Storage data. For more information, see Get started with Storage Explorer.
Important
During the packet capture session, the capture file might not immediately appear in the storage account container because it's initially saved to a temporary location. The file is transferred to its final location after the capture session is completed.
To download a packet capture file saved to the virtual machine (VM), connect to the VM and download the file from the local path specified during the packet capture creation.
Delete a packet capture
In the Packet capture page, select ... on the right-side of the packet capture that you want to delete, or right-click it, then select Delete.
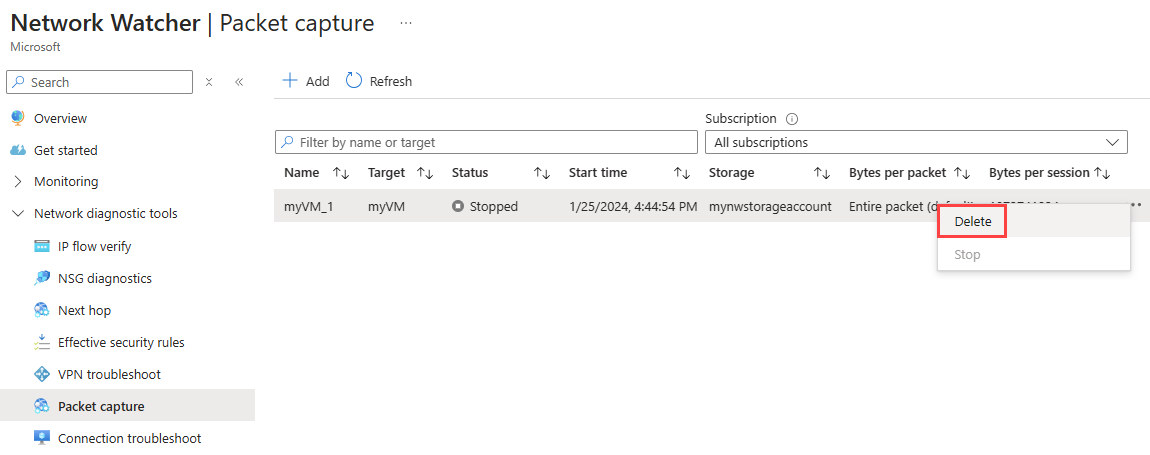
Select Yes.
Use Remove-AzNetworkWatcherPacketCapture to delete a packet capture resource.
# Delete a packet capture resource.
Remove-AzNetworkWatcherPacketCapture -Location 'eastus' -PacketCaptureName 'myVM_1'
Important
Deleting the packet capture resource in Network Watcher doesn't delete the capture file from the storage account or the virtual machine. If you don't need the capture file anymore, you must manually delete it from the storage account or virtual machine.
Related content


