Deploy an Azure Operator Insights Data Product
In this article, you learn how to create an Azure Operator Insights Data Product instance.
Note
Access is currently only available by request. More information is included in the application form. We appreciate your patience as we work to enable broader access to Azure Operator Insights Data Product. Apply for access by filling out this form.
Prerequisites
- An Azure subscription for which the user account must be assigned the Contributor role. If needed, create a free subscription before you begin.
- Access granted to Azure Operator Insights for the subscription. Apply for access by completing this form.
- (Optional) If you plan to integrate Data Product with Microsoft Purview, you must have an active Purview account. Make note of the Purview collection ID when you set up Microsoft Purview with a Data Product.
- After obtaining your subscription access, register the Microsoft.NetworkAnalytics and Microsoft.HybridNetwork Resource Providers (RPs) to continue. For guidance on registering RPs in your subscription, see Register resource providers in Azure.
Prepare your Azure portal or Azure CLI environment
You can use the Azure portal or the Azure CLI to follow the steps in this article.
Confirm that you can sign in to the Azure portal and can access the subscription.

Create a resource group
A resource group is a logical container into which Azure resources are deployed and managed.
If you plan to use CMK-based data encryption or Microsoft Purview, set up a resource group now:
- Sign in to the Azure portal.
- Select Resource groups.
- Select Create and follow the prompts.
For more information, see Create resource groups.
If you don't plan to use CMK-based date encryption or Microsoft Purview, you can set up a resource group now or when you create the Data Product resource.
Set up resources for CMK-based data encryption or Microsoft Purview
If you plan to use CMK-based data encryption or Microsoft Purview, you must set up an Azure Key Vault instance and a user-assigned managed identity (UAMI) first.
Set up a key in an Azure Key Vault
An Azure Key Vault instance stores your Customer Managed Key (CMK) for data encryption. The Data Product uses this key to encrypt your data over and above the standard storage encryption. You need to have Subscription/Resource group owner permissions to perform this step.
- Create an Azure Key Vault resource in the same subscription and resource group that you set up in Create a resource group.
- Provide your user account with the Key Vault Administrator role on the Azure Key Vault resource. This is done via the Access Control (IAM) tab on the Azure Key Vault resource.
- Navigate to the object and select Keys. Select Generate/Import.
- Enter a name for the key and select Create.
- Select the newly created key and select the current version of the key.
- Copy the Key Identifier URI to your clipboard to use when creating the Data Product.
Set up a user-assigned managed identity
- Create a user-assigned managed identity using Microsoft Entra ID for CMK-based encryption. The Data Product also uses the user-assigned managed identity (UAMI) to interact with the Microsoft Purview account.
- Navigate to the Azure Key Vault resource that you created earlier and assign the UAMI with Key Vault Administrator role.
Create an Azure Operator Insights Data Product resource
You create the Azure Operator Insights Data Product resource.
Sign in to the Azure portal.
In the search bar, search for Operator Insights and select Azure Operator Insights - Data Products.
On the Azure Operator Insights - Data Products page, select Create.
On the Basics tab of the Create a Data Product page:
- Select your subscription.
- Select the resource group you previously created for the Key Vault resource.
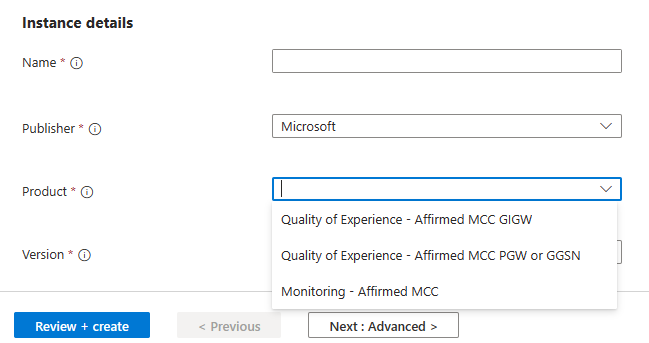
- Under Instance details, complete the following fields:
- Name - Enter the name for your Data Product resource. The name must start with a lowercase letter and can contain only lowercase letters and numbers.
- Publisher - Select the organization that created and published the Data Product that you want to deploy.
- Product - Select the name of the Data Product.
- Version - Select the version.
Select Next: Advanced.
In the Advanced tab of the Create a Data Product page:
- Enable Purview if you're integrating with Microsoft Purview. Select the subscription for your Purview account, select your Purview account, and enter the Purview collection ID.
- Enable Customer managed key if you're using CMK for data encryption.
- Select the user-assigned managed identity that you set up as a prerequisite.
- Carefully paste the Key Identifier URI that was created when you set up Azure Key Vault as a prerequisite.
To add owner(s) for the Data Product, which will also appear in Microsoft Purview, select Add owner, enter the email address, and select Add owners.
In the Tags tab of the Create a Data Product page, select or enter the name/value pair used to categorize your Data Product resource.
Select Review + create.
Select Create. Your Data Product instance is created in about 20-25 minutes. During this time, all the underlying components are provisioned. After this process completes, you can work with your data ingestion, explore sample dashboards and queries, and so on.
Deploy sample insights
Once your Data Product instance is created, you can deploy a sample insights dashboard. This dashboard works with the sample data that came along with the Data Product instance.
- Navigate to your Data Product resource on the Azure portal and select the Permissions tab on the Security section.
- Select Add Reader. Type the user's email address to be added to Data Product reader role.
Note
The reader role is required for you to have access to the insights consumption URL.
- Download the sample JSON template file for your Data Product's dashboard:
- Quality of Experience - Affirmed MCC GIGW: https://go.microsoft.com/fwlink/p/?linkid=2254536
- Monitoring - Affirmed MCC: https://go.microsoft.com/fwlink/p/?linkid=2254551
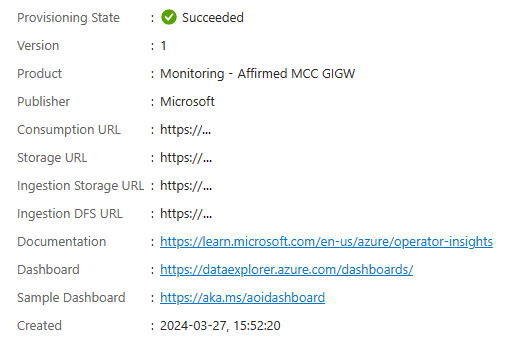
- Copy the consumption URL from the Data Product overview screen into the clipboard.
- Open a web browser, paste in the URL and select enter.
- When the URL loads, select on the Dashboards option on the left navigation pane.
- Select the New Dashboard drop down and select Import dashboard from file. Browse to select the JSON file downloaded previously, provide a name for the dashboard and select Create.
- Select the three dots (...) at the top right corner of the consumption URL page and select Data Sources.
- Select the pencil icon next to the Data source name in order to edit the data source.
- Under the Cluster URI section, replace the URL with your Data Product consumption URL and select connect.
- In the Database drop-down, select your Database. Typically, the database name is the same as your Data Product instance name. Select Apply.
Note
These dashboards are based on synthetic data and may not have complete or representative examples of the real-world experience.
Explore sample data using Kusto
The consumption URL also allows you to write your own Kusto query to get insights from the data.
On the Overview page, copy the consumption URL and paste it in a new browser tab to see the database and list of tables.
Use the ADX query plane to write Kusto queries.
For Quality of Experience - Affirmed MCC GIGW, try the following queries:
enriched_flow_events_sample
| summarize Application_count=count() by flowRecord_dpiStringInfo_application
| order by Application_count desc
| take 10
enriched_flow_events_sample | summarize SumDLOctets = sum(flowRecord_dataStats_downLinkOctets) by bin(eventTimeFlow, 1h) | render columnchartFor Monitoring - Affirmed MCC Data Product, try the following queries:
SYSTEMCPUSTATISTICSCORELEVEL_SAMPLE
| where systemCpuStats_core >= 25 and systemCpuStats_core <= 36
| summarize p90ssm_avg_1_min_cpu_util=round(percentile(ssm_avg_1_min_cpu_util, 90), 2) by resourceId
PGWCALLPERFSTATSGRID_SAMPLE | summarize clusterTotal=max(NumUniqueSubscribers) by bin(timestamp, 1d) | render linechart
Optionally, delete Azure resources
If you're using this Data Product to explore Azure Operator Insights, you should delete the resources you've created to avoid unnecessary Azure costs.
- On the Home page of the Azure portal, select Resource groups.
- Select the resource group for your Azure Operator Insights Data Product and verify that it contains the Azure Operator Insights Data Product instance.
- At the top of the Overview page for your resource group, select Delete resource group.
- Enter the resource group name to confirm the deletion, and select Delete.
Next step
Upload data to your Data Product. If you're planning to do this with the Azure Operator Insights ingestion agent:
- Read the documentation for your Data Product to determine the requirements.
- Install the Azure Operator Insights ingestion agent and configure it to upload data.
Feedback
Coming soon: Throughout 2024 we will be phasing out GitHub Issues as the feedback mechanism for content and replacing it with a new feedback system. For more information see: https://aka.ms/ContentUserFeedback.
Submit and view feedback for