How and where to install the OSConfig agent for Linux
This article is for persons who want to add OSConfig capabilities to their devices, so their configuration can be provisioned, managed, and monitored via Azure IoT services. This can include device builders, systems integrators, solution builders, and so on.
The OSConfig agent is a compact Linux component which projects each device's local configuration into Azure IoT for at-scale provisioning and management. For context on OSConfig motivations and usage, see: What is OSConfig for IoT.
Fleet scale or single device?
To get started trying out scenarios, you can install OSConfig on a single device.
At scale, each device whose configuration will be provisioned and managed must have the OSConfig agent, as in the following diagram.
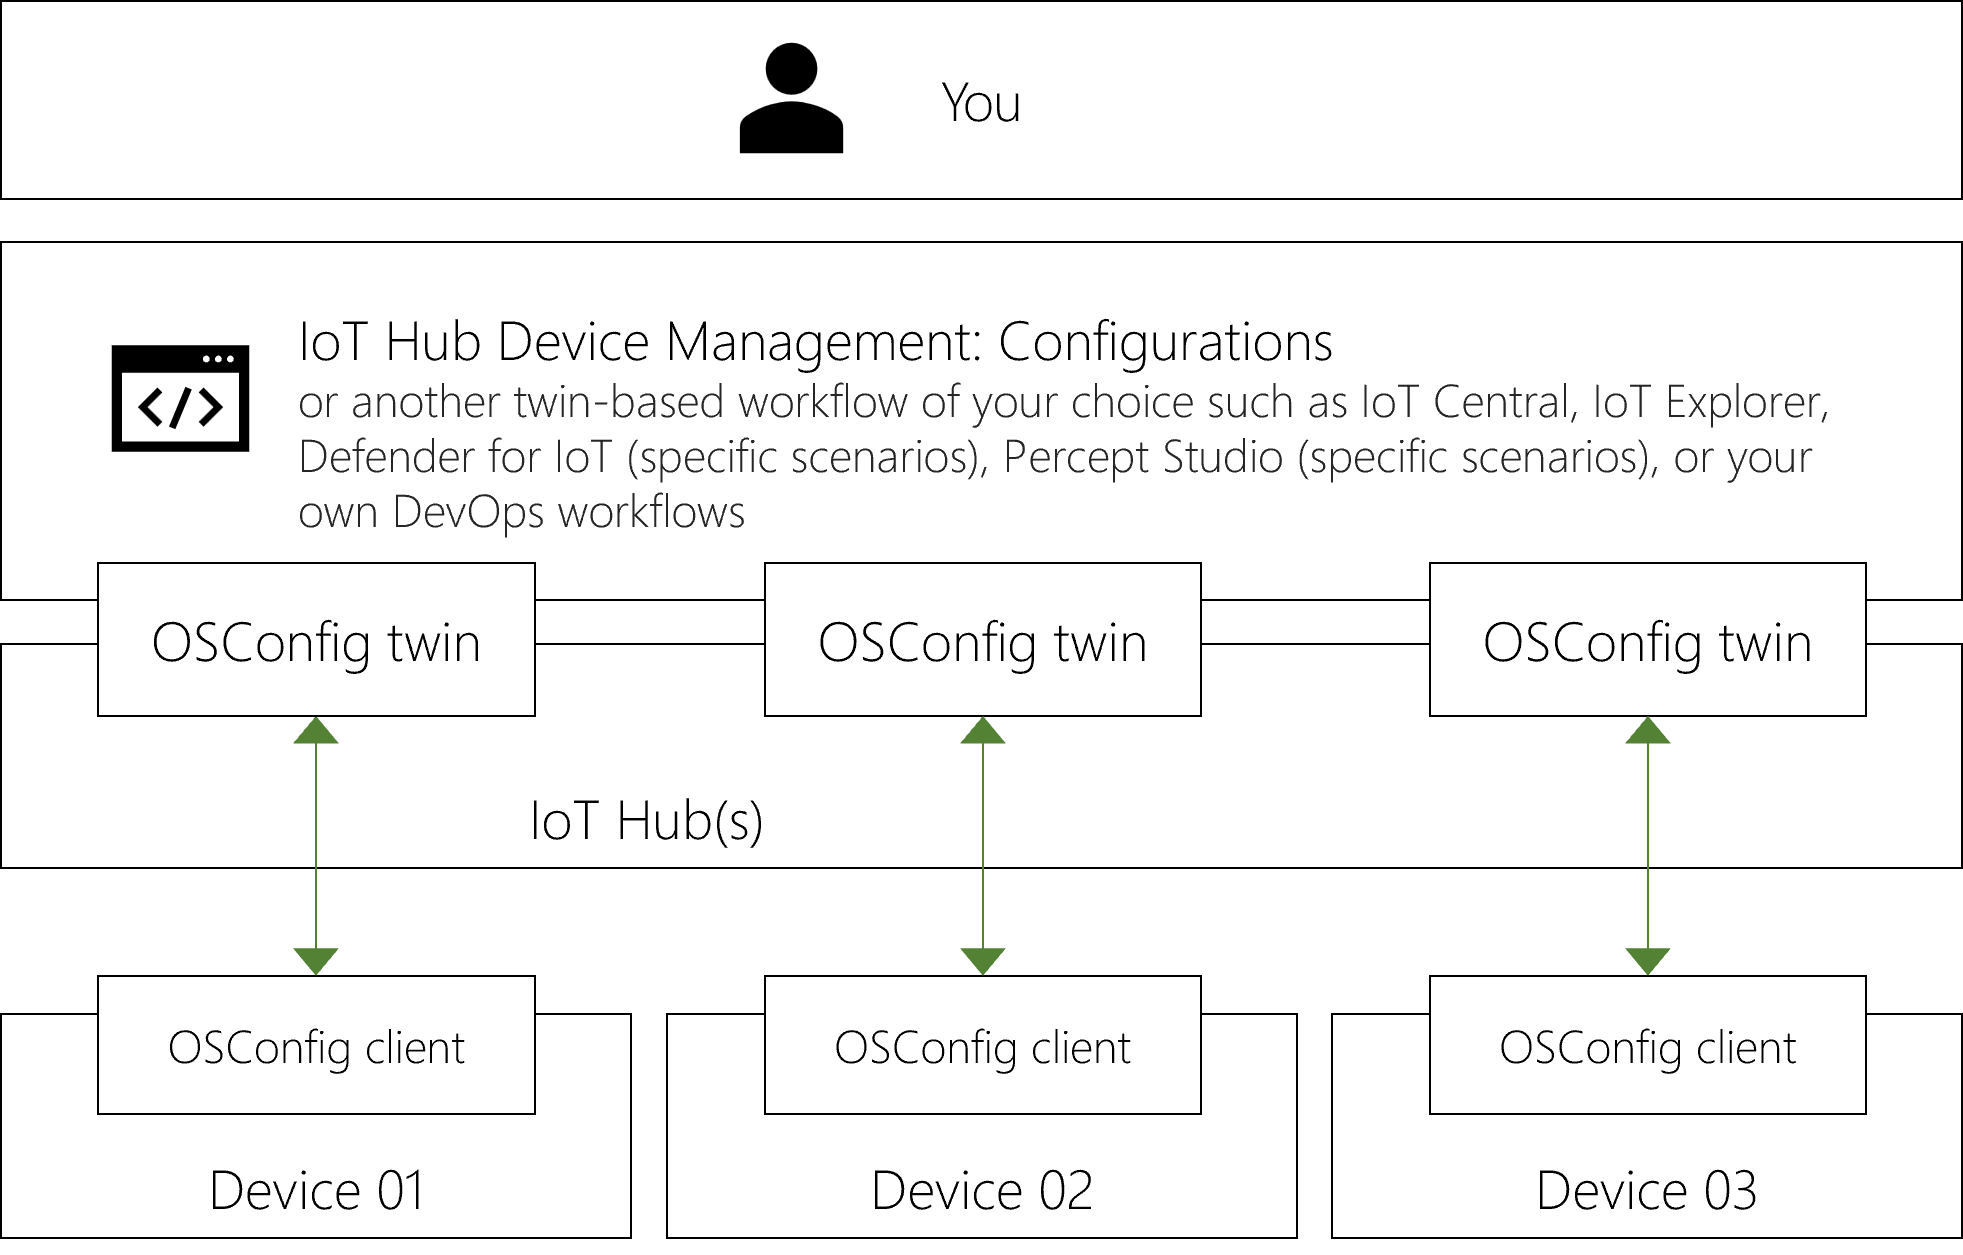
Typically the OSConfig agent would be included in reference device OS images, which are then applied to many devices.
What kinds of devices?
Hardware classes
See the table below for a summary. Detailed notes follow the table.
| Install OSConfig? | |
|---|---|
| MCU class ¹ | Not at this time |
| Less powerful MPU/CPU w/ Linux ² | Yes |
| More powerful devices w/ Linux ³ | Yes |
| Devices running Windows IoT | Similar capabilities built-in, CSP reference |
¹ MCU class: For context, these would include Arduino devices, RP2040 based devices, and so on. These devices typically run scenario specific code bare-metal or with a micro-OS such as AzureRTOS or FreeRTOS.
² Less powerful MPU/CPU class w/ Linux: The agent is designed to be compact and efficient, enabling use down to smaller devices capable of running Linux.
³ More powerful edge compute w/ Linux: As an efficient device-side component, the OSConfig agent is perfectly at home on more powerful edge compute devices such as NVidia Jetson kits.
Linux "IoT devices" vs. Linux "Edge devices"
In the Azure IoT ecosystem for Linux, the terms IoT device vs. Edge device are sometimes used to differentiate whether the device has IoT Edge installed. There is also a loose correlation with device class (larger devices tend to have IoT Edge installed).
OSConfig works in either context. It can run side-by-side with IoT Edge, but does not require IoT Edge.
What about device secrets, and what about multiple apps/agents/modules?
We recommend using OSConfig together with the Azure IoT Identity Service (AIS).
AIS is Microsoft’s on-device broker for handling secrets and authentication. AIS makes it seamless for multiple apps, agents, and/or Edge modules to share a single device identity. The steps below demonstrate using AIS and OSConfig together.
AIS is available standalone, and it is also included in IoT Edge 1.2 and greater. Consider the following when installing.
| Install AIS? | |
|---|---|
| Device does not have IoT Edge (aka "IoT device") | Yes |
| Device has IoT Edge 1.2 or greater | Yes¹ |
| Device has IoT Edge 1.1 or lower | No² |
¹ IoT Edge 1.2 and greater include the AIS components. For simplicity of instructions, the steps below always include AIS installation. This approach lets your package manager detect whether this step is a no-op, rather than recreating that logic externally.
² Do not install AIS on devices with IoT Edge 1.1 or lower. Consider moving to a later version of IoT Edge. If you are not ready to upgrade IoT Edge but you still want to explore OSConfig scenarios, consider trying the scenarios on another device or VM for now.
Job 1. Install the components on the device
There are three options to suit your needs:
- A. Install packages
- B. Build from source
- C. Use devices with the capabilities built in
Choose your preferred experience below for instructions:
Ready-made install packages are available for arm64 (aka aarch64), amd64 (aka x86_64) on:
- Debian 10
- Debian 11
- Ubuntu Server 18.04
- Ubuntu Server 20.04
Step 1.1. Connect a device to packages.microsoft.com
You can use the following example commands to connect your OS package manager to the stable channel on packages.microsoft.com.
#!/bin/bash

## For Ubuntu and on Debian 10+

## Register packages.microsoft.com key and prod channel
sudo wget https://packages.microsoft.com/keys/microsoft.asc -O /etc/apt/trusted.gpg.d/packages-microsoft-com_key.asc
os_name=$(grep ^ID= /etc/os-release | tr -d "ID=")
os_version=$(grep ^VERSION_ID /etc/os-release | tr -d "VERSION_ID=")
sudo wget https://packages.microsoft.com/config/"$os_name"/"$os_version"/prod.list -O /etc/apt/sources.list.d/packages-microsoft-com_prod.list
sudo apt update
Tip
The example above connects your package manager to the prod channel on packages.microsoft.com, which is appropriate for most devices and situations. For information about preview builds, see: About OSConfig preview or "insiders" builds
Step 1.2. Install the AIS package
Caution
As noted above, do not install AIS on a device with IoT Edge 1.1 or lower. AIS is for devices without IoT Edge, or devices with IoT Edge 1.2 or higher.
sudo apt-get install -y aziot-identity-service
Step 1.3. Install the OSConfig package
sudo apt-get install -y osconfig
If you are only installing the components at this time (for example preparing a base image) not connecting to Azure, you can stop here. The following steps would be performed later, perhaps by your customer.
Job 2. Connect to Azure
Now that the OSConfig agent and AIS are present on the device, the next step is to configure the device with an identity so it can connect to Azure.
Tip
Some devices may have mechanisms to do this on your behalf. For example, Azure Percept devices include a setup experience to get the device connected.
Step 2.1. Setting the device credential into AIS on the device
AIS supports multiple deployment scenarios and authentication methods.
The following simplistic example uses a connection string with a symmetric key. For production scenarios, choose from the stronger authentication options described at Configuring the Azure IoT Identity Service.
Quick Example: Connect with symmetric key
In the Azure portal:
- Navigate to your IoT Hub device list
- Create a device identity if needed
- Browse to the properties of the device, and copy the connection string
On the device:
- Run the following commands to set the credential into AIS, replacing the connection string placeholder with your own.
sudo aziotctl config mp –-connection-string "<your connection string from IoT Hub>"
sudo aziotctl config apply
Step 2.2. Verify successful connection to Azure
You can verify that AIS and OSConfig are connecting to IoT Hub using these commands on the device:
sudo aziotctl check
sudo systemctl status osconfig | grep Active
The output of the aziotctl check command should indicate all tests passing.
The output of the systemctl status osconfig should include Active: active. In some cases you may see Active: activating (auto-restart) instead, which means systemd is waiting on a timer to restart the service. To move past this immediately rather than waiting, run sudo systemctl restart osconfig, then try the status command again.
That’s it! The OSConfig client is now running on your device.
Optional agent settings
Many people can skip this section and simply use the default behaviors. If you have environment or governance constraints such as proxy servers, outbound firewall restrictions, or layered networks, see the following:
IoT Hub protocol selection
Tip
Protocol selection was added to the prod/stable channel in version v1.0.2.2022040405. Ensure you are using the latest prod/stable version of OSConfig.
When communicating with the IoT Hub, the OSConfig agent can use plain Message Queuing Telemetry Transport (MQTT) or it can use MQTT over WebSockets (MQTT_WS).
Many people don't need to specify a protocol, and can simply use default behaviors. If you do need to specify a protocol based on one of the following considerations, you would set the Protocol value in /etc/osconfig/osconfig.json.
| MQTT | MQTT_WS | |
|---|---|---|
| TCP port ¹ | 8883 | 443 |
| Proxy server ² | No | Yes |
| IoT Edge gateway (parent/child) ³ |
Yes | No |
| Protocol identifier to set in osconfig.json |
1 | 2 |
¹ Refers to the TCP port used when the OSConfig agent on the device connects outbound to IoT Hub
² Refers to whether OSConfig can explicitly use an HTTP proxy server (via https_proxy environment variable)
³ Refers to the IoT Edge Transparent Gateway scenario, in which OSConfig running on a child device connects to IoT Hub via a parent device
Connecting through an HTTP proxy server
If your environment requires OSConfig to connect to IoT Hub via an HTTP proxy server, see the following:
Tip
Proxy server support was added to the prod/stable channel in version v1.0.2.2022040405. Ensure you are using the latest prod/stable version of OSConfig.
As noted in IoT Hub protocol selection, only MQTT_WS can be used with an HTTP proxy server. To activate MQTT_WS, ensure that the
Protocolvalue in /etc/osconfig/osconfig.json is set to2.Ensure that the
https_proxyorHTTPS_PROXYenvironment variable is set in the context where OSConfig runs.Typically, sysadmins or image builders convey this by editing the systemd unit files for any services (including OSConfig) which should use the proxy server.
For example, you would add a line like
Environment="https_proxy=http://myproxy.example.com:3128"
to the[Service]portion of /etc/systemd/system/osconfig.service.
Be sure to runsudo systemctl daemon-reloadandsudo systemctl restart osconfigafter editing the file.
Next Steps
Now that you have a device running OSConfig and connected to Azure IoT, you can try out management scenarios.
For an overview of OSConfig scenarios and capabilities, see:
For specific practical examples, see: