Note
Access to this page requires authorization. You can try signing in or changing directories.
Access to this page requires authorization. You can try changing directories.
Important
Microsoft Playwright Testing will be retired on March 8, 2026. To continue running your Playwright tests, create a new Playwright Workspace in Azure App Testing, now generally available. Learn how to migrate.
In this tutorial, you learn how to integrate your Playwright test suite with Microsoft Playwright Testing, run tests faster using cloud-hosted browsers, and troubleshoot efficiently using the service's reporting features. You simulate a Playwright test suite, connect it to the service for faster execution, and use reporting tools for streamlined troubleshooting.
In this tutorial, you:
- Set up a Playwright test suite.
- Integrate the Playwright test suite with Microsoft Playwright Testing service.
- Run the test suite with the service for faster execution and efficient troubleshooting.
Prerequisites
- An Azure account with an active subscription. If you don't have an Azure subscription, create a free account before you begin.
- The Azure CLI installed on your local computer.
- Azure CLI version 2.2.0 or later. Run
az --versionto check the installed version on your computer. If you need to install or upgrade the Azure CLI, see How to install the Azure CLI. - Visual Studio Code. If you don't have it, download and install it.
- Git. If you don't have it, download and install it.
Prerequisites check
Before you start, validate your environment:
Sign in to the Azure portal and check that your subscription is active.
Check your version of the Azure CLI in a terminal or command window by running
az --version. For the latest version, see the latest release notes.If you don't have the latest version, update your installation by following the installation guide for your operating system or platform.
Set up Playwright test suite
In this step, you are creating a Playwright test suite which is integrated with the service.
- Clone the sample repository and navigate to test folder.
git clone https://github.com/microsoft/playwright-testing-service
cd playwright-testing-service/samples/get-started
- Install dependencies.
npm install
- Run Playwright tests.
Run this command to execute tests locally, outside of the service, to identify any problems before integrating with the service. This project is used in the next steps to integrate with the service.
npx playwright test
Integrate Playwright test suite with Microsoft Playwright Testing service
Integrate the Playwright test suite you created in the previous tutorial with Playwright Testing service.
Follow these steps to set up the service and integrate the test suite.
Create a Playwright Testing workspace
To get started with running your Playwright tests at scale on cloud browsers, you first create a Microsoft Playwright Testing workspace in the Playwright portal.
Sign in to the Playwright portal with your Azure account.
If you already have a workspace, select an existing workspace, and move to the next step.
Tip
If you have multiple workspaces, you can switch to another workspace by selecting the workspace name at the top of the page, and then select Manage all workspaces.
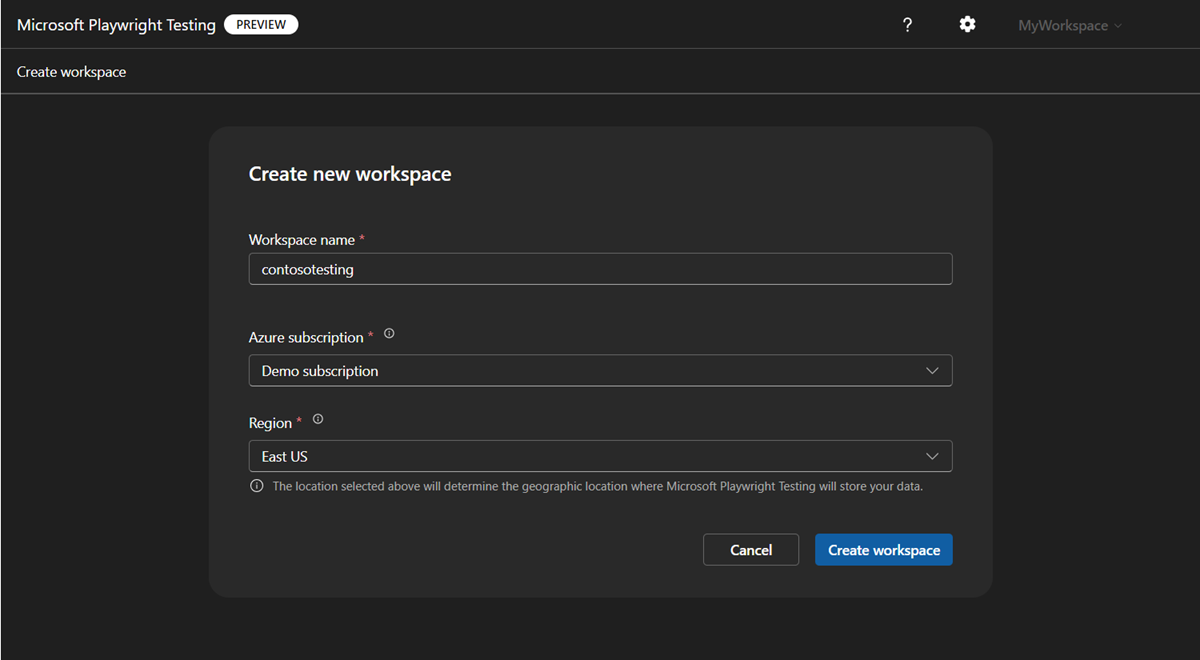
If you don't have a workspace yet, select + New workspace, and then provide the following information:
Field Description Workspace name Enter a unique name to identify your workspace.
The name can only consist of alphanumerical characters, and have a length between 3 and 64 characters.Azure subscription Select the Azure subscription that you want to use for this Microsoft Playwright Testing workspace. Region Select a geographic location to host your workspace.
This is the location where the test run data is stored for the workspace.Select Create workspace to create the workspace in your subscription.
During the workspace creation, a new resource group and a Microsoft Playwright Testing Azure resource are created in your Azure subscription.
When the workspace creation finishes, you're redirected to the setup guide.
Install Microsoft Playwright Testing package
To install service package, navigate to the location of your test suite you created in the previous tutorial and run this command:
npm init @azure/microsoft-playwright-testing@latest
This command generates playwright.service.config.ts file which serves to:
- Direct and authenticate Playwright to the Microsoft Playwright Testing service.
- Adds a reporter to publish test results and artifacts.
Configure the service region endpoint
In your setup, you have to provide the region-specific service endpoint. The endpoint depends on the Azure region you selected when creating the workspace.
To get the service endpoint URL, perform the following steps:
In Add region endpoint in your setup, copy the region endpoint for your workspace.
The endpoint URL matches the Azure region that you selected when creating the workspace. Ensure this URL is available in
PLAYWRIGHT_SERVICE_URLenvironment variable.
Set up your environment
To set up your environment, you have to configure the PLAYWRIGHT_SERVICE_URL environment variable with the value you obtained in the previous steps.
We recommend that you use the dotenv module to manage your environment. With dotenv, you define your environment variables in the .env file.
Add the
dotenvmodule to your project:npm i --save-dev dotenvCreate a
.envfile alongside theplaywright.config.tsfile in your Playwright project:PLAYWRIGHT_SERVICE_URL={MY-REGION-ENDPOINT}Make sure to replace the
{MY-REGION-ENDPOINT}text placeholder with the value you copied earlier.
Set up authentication
To run your Playwright tests in your Microsoft Playwright Testing workspace, you need to authenticate the Playwright client where you're running the tests with the service. Authenticate with the dev workstation where you are running the Playwright tests.
Microsoft Entra ID is the default and recommended authentication for the service. Use Azure CLI to sign-in
az login
Note
If you're a part of multiple Microsoft Entra tenants, make sure you sign in to the tenant where your workspace belongs. You can get the tenant ID from Azure portal. See Find your Microsoft Entra Tenant. Once you get the ID, sign-in using the command az login --tenant <TenantID>
Enable artifacts in your Playwright setup
In the playwright.config.ts file of your project, ensure you are collecting all the required artifacts.
  use: {
    trace: 'on-first-retry',
    video:'retain-on-failure',
    screenshot:'on'
  }
Run your tests at scale and troubleshoot easily with Microsoft Playwright Testing
You've now prepared the configuration for running your Playwright tests in the cloud with Microsoft Playwright Testing.
Run Playwright tests with the service
With Microsoft Playwright Testing, you get charged based on the number of total test minutes and number of test results published. If you're a first-time user or getting started with a free trial, you may run a single test at scale instead of your full test suite to avoid exhausting your free trial limits.
Follow these steps to run Playwright tests with Microsoft Playwright Testing:
Open a terminal window.
Enter the following command to run your Playwright test suite on remote browsers and publish test results to your workspace.
npx playwright test --config=playwright.service.config.ts --workers=20After the test completes, you can view the test status in the terminal.
Running 600 tests using 20 workers
    600 passed (3m)

Test report: https://playwright.microsoft.com/workspaces/<workspace-id>/runs/<run-id>
View test runs and results in the Playwright portal
You can now troubleshoot the failed test cases in the Playwright portal.
After your test run completes, a link to the Playwright Portal is generated. Open this link to view detailed test results and associated artifacts. The portal displays essential information, including:
- CI build details
- Overall test run status
- The commit ID linked to the test run
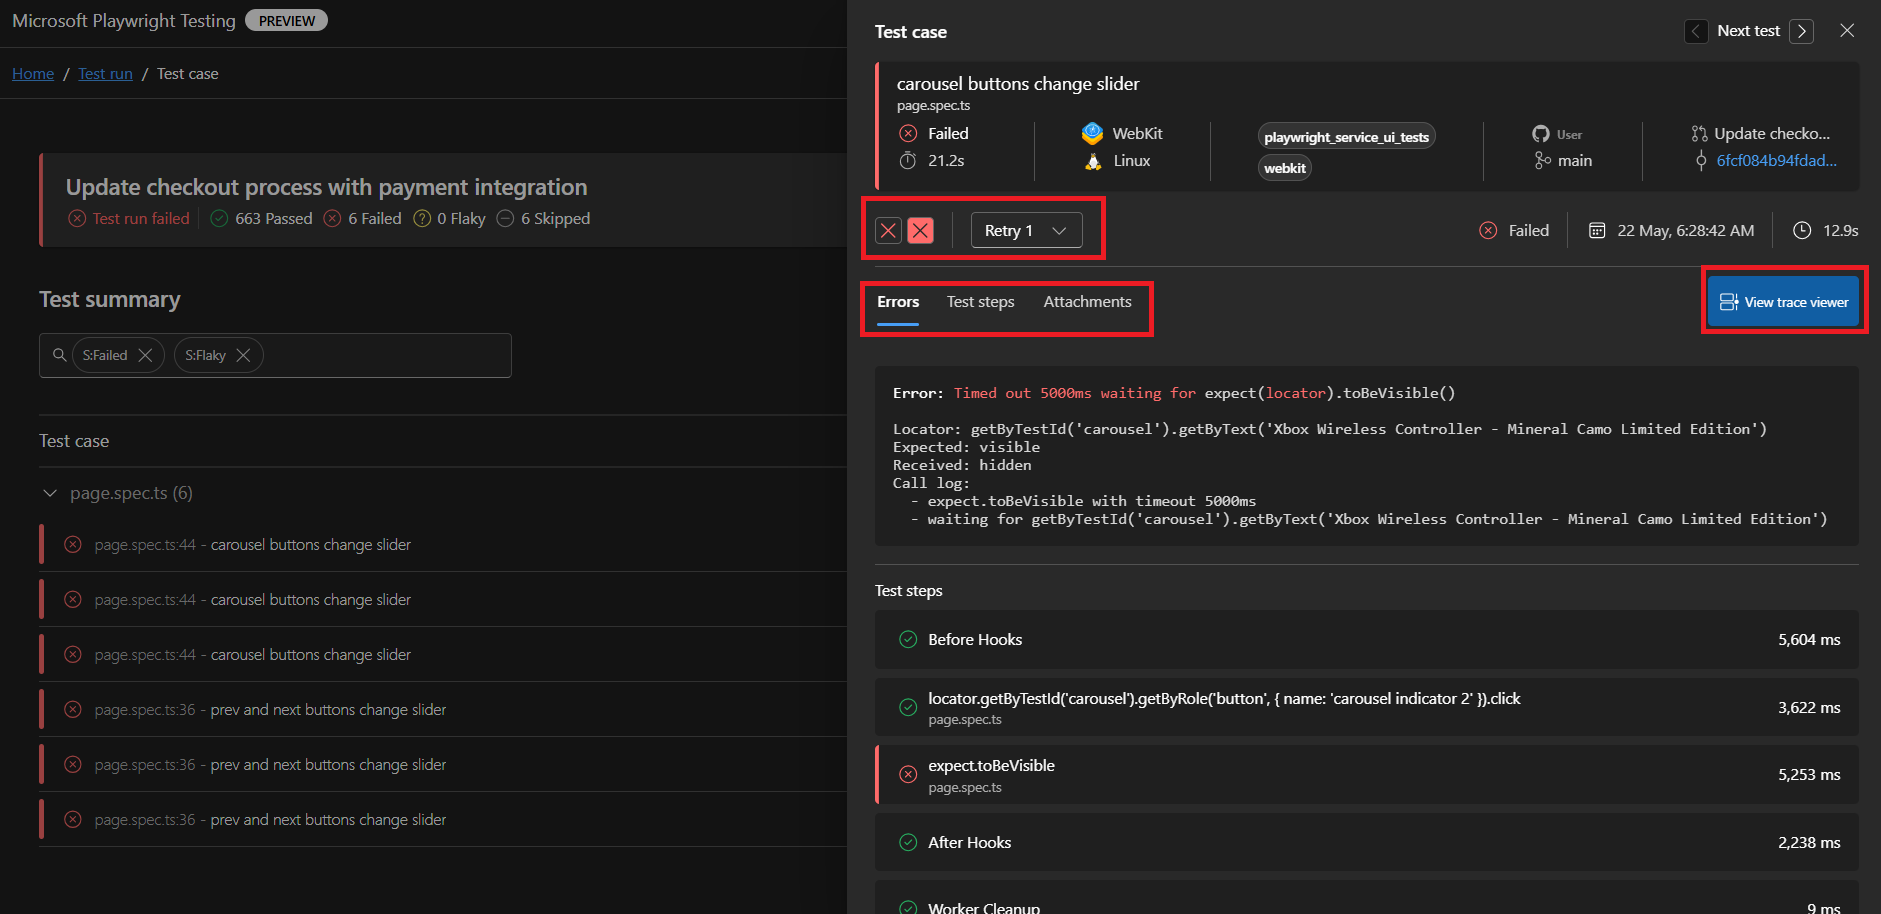
The Playwright portal provides all the necessary information for troubleshooting. You can:
- Switch between retries.
- View detailed error logs, test steps, and attached artifacts such as screenshots or videos.
- Navigate directly to the Trace Viewer for deeper analysis.
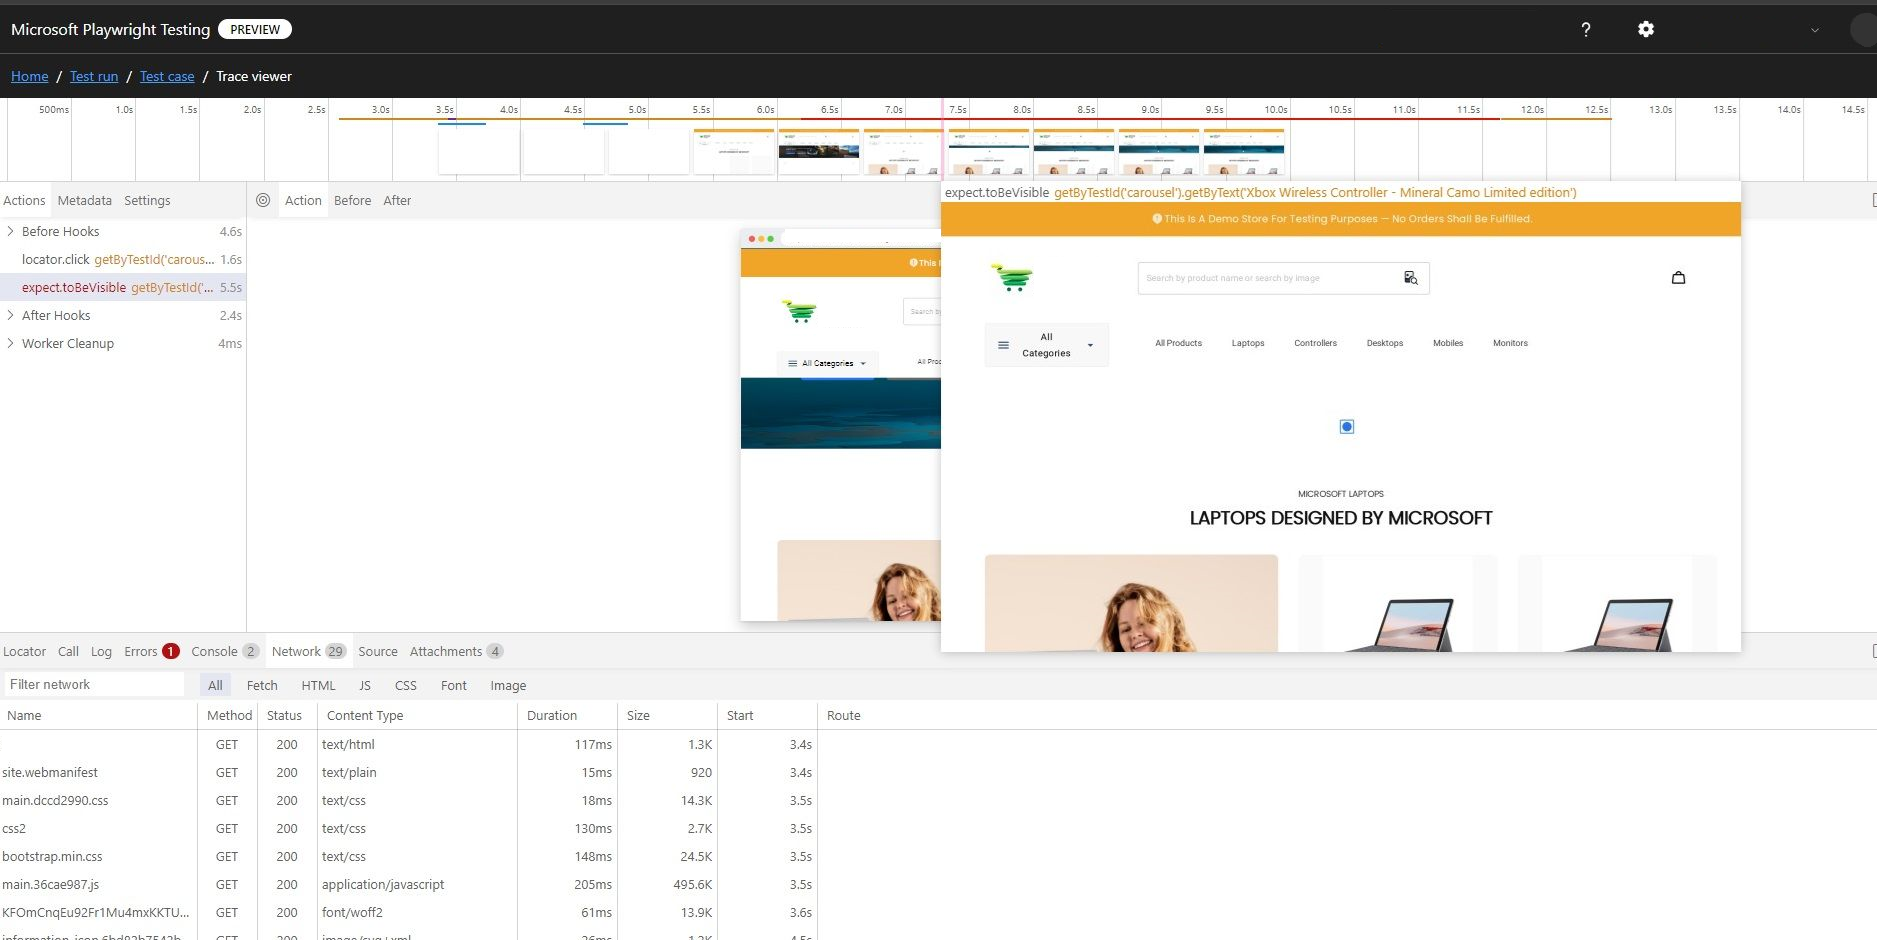
The Trace Viewer allows you to step through your test execution visually. You can:
- Use the timeline to hover over individual steps, revealing the page state before and after each action.
- Inspect detailed logs, DOM snapshots, network activity, errors, and console output for each step.
Tip
You can use Microsoft Playwright Testing service features independently. You can publish test results to the portal without using the cloud-hosted browsers feature and you can also use only cloud-hosted browsers to expedite your test suite without publishing test results.
Note
The test results and artifacts that you publish are retained on the service for 90 days. After that, they are automatically deleted.


