Note
Access to this page requires authorization. You can try signing in or changing directories.
Access to this page requires authorization. You can try changing directories.
The azure_ai extension adds the ability to use large language models (LLMs) and build generative AI applications within an Azure Database for PostgreSQL database by integrating the power of Azure AI services.
Generative AI is a form of artificial intelligence in which LLMs are trained to generate original content based on natural language input. By using the azure_ai extension, you can use generative AI's capabilities for processing natural language queries directly from the database.
This article showcases adding rich AI capabilities to an Azure Database for PostgreSQL flexible server instance by using the azure_ai extension. It shows how you can integrate both Azure OpenAI and the Azure AI Language service into your database by using the extension.
Prerequisites
An Azure subscription. Create one for free.
Access granted to Azure OpenAI in the desired Azure subscription. Currently, the application grants access to this service. You can apply for access to Azure OpenAI by completing the form in Limited access for Azure OpenAI Service.
An Azure OpenAI resource with the
text-embedding-ada-002(version 2) model deployed. This model is currently available only in certain regions. If you don't have a resource, the process for creating one is documented in the Azure OpenAI resource deployment guide.An Azure AI Language resource. If you don't have a Language resource, you can create one in the Azure portal by following the instructions provided in the quickstart for summarization. You can use the free pricing tier (
Free F0) to try the service and upgrade later to a paid tier for production.An Azure Database for PostgreSQL flexible server instance in your Azure subscription. If you don't have this resource, see Create an Azure Database for PostgreSQL.
Connect to the database by using psql in Azure Cloud Shell
Open Azure Cloud Shell in a web browser. Select Bash as the environment. If you're prompted, select the subscription that you used for your Azure Database for PostgreSQL database, and then select Create storage.
To retrieve the database connection details:
In the Azure portal, go to your Azure Database for PostgreSQL flexible server instance.
On the left menu, under Settings, select Connect. Copy the Connection details block.
Paste the copied declaration lines for environment variables into the Azure Cloud Shell terminal. Replace the
{your-password}token with the password that you set when you created the database.export PGHOST={your-server-name}.postgresql.database.azure.com export PGUSER={your-user-name} export PGPORT=5432 export PGDATABASE={your-database-name} export PGPASSWORD="{your-password}"Connect to your database by using the psql command-line tool. Enter the following command at the prompt:
psql
Install the azure_ai extension
You can use the azure_ai extension to integrate Azure OpenAI and Azure Cognitive Services into your database. For more information, see Generate vector embeddings with Azure OpenAI in Azure Database for PostgreSQL.
To enable the extension in your database:
Add the extension to your allowlist, as described in Allow extensions.
In the database in which you plan to use the
azure_aiextension, install the extension as described in Create extensions.
Inspect the objects in the azure_ai extension
Reviewing the objects that the azure_ai extension contains can provide a better understanding of the capabilities that it offers. You can use the \dx meta-command from the psql command prompt to list the objects in the extension:
\dx+ azure_ai
The meta-command output shows that the azure_ai extension creates three schemas, multiple user-defined functions (UDFs), and several composite types in the database. The following table describes the schemas that the extension adds:
| Schema | Description |
|---|---|
azure_ai |
Provides the principal schema where the configuration table and UDFs for interacting with it reside. |
azure_openai |
Contains the UDFs that enable calling an Azure OpenAI endpoint. |
azure_cognitive |
Provides UDFs and composite types related to integrating the database with Azure Cognitive Services. |
The functions and types are all associated with one of the schemas. To review the functions defined in the azure_ai schema, use the \df meta-command. Specify the schema whose functions should be displayed. The \x auto commands before the \df command turn the expanded display on and off automatically, to make the output from the command easier to view in Azure Cloud Shell.
\x auto
\df+ azure_ai.*
Use the azure_ai.set_setting() function to set the endpoint and critical values for Azure AI services. It accepts a key and the value to assign it. The azure_ai.get_setting() function provides a way to retrieve the values that you set with the set_setting() function. It accepts the key of the setting that you want to view. For both methods, the key must be one of the following:
| Key | Description |
|---|---|
azure_openai.endpoint |
A supported Azure OpenAI endpoint (for example, https://example.openai.azure.com). |
azure_openai.subscription_key |
A subscription key for an Azure OpenAI resource. |
azure_cognitive.endpoint |
A supported Cognitive Services endpoint (for example, https://example.cognitiveservices.azure.com). |
azure_cognitive.subscription_key |
A subscription key for a Cognitive Services resource. |
Important
Because the connection information for Azure AI services, including API keys, is stored in a configuration table in the database, the azure_ai extension defines a role called azure_ai_settings_manager to help ensure that this information is protected and accessible only to users who have that role. This role enables reading and writing of settings related to the extension.
Only superusers and members of the azure_ai_settings_manager role can invoke the azure_ai.get_setting() and azure_ai.set_setting() functions. In Azure Database for PostgreSQL, all admin users have the azure_ai_settings_manager role.
Generate vector embeddings with Azure OpenAI
The azure_ai extension's azure_openai schema enables the use of Azure OpenAI for creating vector embeddings for text values. By using this schema, you can generate embeddings with Azure OpenAI directly from the database to create vector representations of input text. These representations can then be used in vector similarity searches and consumed by machine learning models.
Embeddings are a technique of using machine learning models to evaluate how closely related information is. This technique allows for efficient identification of relationships and similarities between data, so that algorithms can identify patterns and make accurate predictions.
Set the Azure OpenAI endpoint and key
Before you use the azure_openai functions, configure the extension with your Azure OpenAI service endpoint and key:
In the Azure portal, go to your Azure OpenAI resource. On the left menu, under Resource Management, select Keys and Endpoint.
Copy your endpoint and access key. You can use either
KEY1orKEY2. Always having two keys allows you to securely rotate and regenerate keys without causing service disruption.In the following command, replace the
{endpoint}and{api-key}tokens with values that you retrieved from the Azure portal. Then run the commands from thepsqlcommand prompt to add your values to the configuration table.SELECT azure_ai.set_setting('azure_openai.endpoint','{endpoint}'); SELECT azure_ai.set_setting('azure_openai.subscription_key', '{api-key}');Verify the settings written in the configuration table:
SELECT azure_ai.get_setting('azure_openai.endpoint');
SELECT azure_ai.get_setting('azure_openai.subscription_key');
The azure_ai extension is now connected to your Azure OpenAI account and ready to generate vector embeddings.
Populate the database with sample data
This article uses a small subset of the BillSum dataset to provide sample text data for generating vectors. This dataset provides a list of United States congressional and California state bills. You can download the bill_sum_data.csv file that contains this data from the GitHub repo for Azure samples.
To host the sample data in the database, create a table named bill_summaries:
CREATE TABLE bill_summaries
(
    id bigint PRIMARY KEY,
    bill_id text,
    bill_text text,
    summary text,
    title text,
    text_len bigint,
    sum_len bigint
);
By using the PostgreSQL COPY command from the psql command prompt, load the sample data from the CSV file into the bill_summaries table. Specify that the first row of the CSV file is a header row.
\COPY bill_summaries (id, bill_id, bill_text, summary, title, text_len, sum_len) FROM PROGRAM 'curl "https://raw.githubusercontent.com/Azure-Samples/Azure-OpenAI-Docs-Samples/main/Samples/Tutorials/Embeddings/data/bill_sum_data.csv"' WITH CSV HEADER ENCODING 'UTF8'
Enable vector support
You can use the azure_ai extension to generate embeddings for input text. To enable the generated vectors to be stored alongside the rest of your data in the database, you must install the pgvector extension. Follow the guidance in the documentation about enabling vector support in your database.
With vector support added to your database, add a new column to the bill_summaries table by using the vector data type to store embeddings within the table. The text-embedding-ada-002 model produces vectors with 1,536 dimensions, so you must specify 1536 as the vector size.
ALTER TABLE bill_summaries
ADD COLUMN bill_vector vector(1536);
Generate and store vectors
The bill_summaries table is now ready to store embeddings. By using the azure_openai.create_embeddings() function, you create vectors for the bill_text field and insert them into the newly created bill_vector column in the bill_summaries table.
Before you use the create_embeddings() function, run the following command to inspect it and review the required arguments:
\df+ azure_openai.*
The Argument data types property in the output of the \df+ azure_openai.* command reveals the list of arguments that the function expects:
| Argument | Type | Default | Description |
|---|---|---|---|
deployment_name |
text |
Name of the deployment in the Azure AI Foundry portal that contains the text-embeddings-ada-002 model. |
|
input |
text |
Input text used to create embeddings. | |
timeout_ms |
integer |
3600000 |
Timeout in milliseconds, after which the operation is stopped. |
throw_on_error |
boolean |
true |
Flag that indicates whether the function should, on error, throw an exception that results in a rollback of the wrapping transactions. |
The first argument is the deployment_name value, which was assigned when your embedding model was deployed in your Azure OpenAI account. To retrieve this value:
Go to your Azure OpenAI resource in the Azure portal.
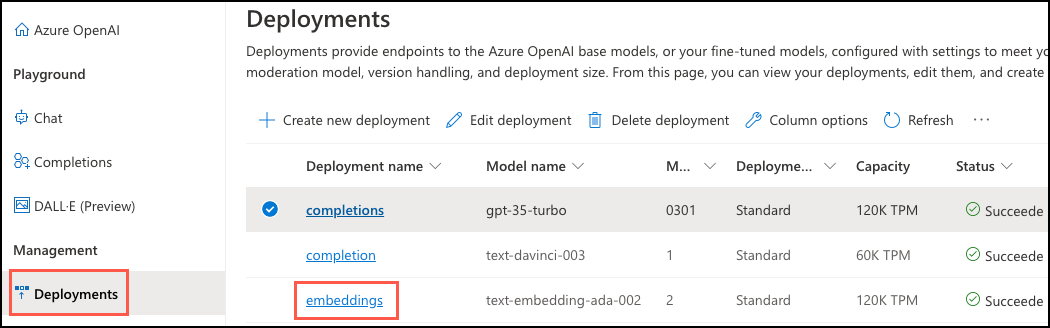
On the left menu, under Resource Management, select Model deployments to open the Azure AI Foundry portal.
In the Azure AI Foundry portal, select Deployments. On the Deployments pane, copy the Deployment name value that's associated with the
text-embedding-ada-002model deployment.
By using this information, run a query to update each record in the bill_summaries table. Insert the generated vector embeddings for the bill_text field into the bill_vector column by using the azure_openai.create_embeddings() function. Replace {your-deployment-name} with the Deployment name value that you copied from the Azure AI Foundry portal's Deployments pane. Then run the following command:
UPDATE bill_summaries b
SET bill_vector = azure_openai.create_embeddings('{your-deployment-name}', b.bill_text);
Run the following query to view the embedding that's generated for the first record in the table. You can run \x first if the output is difficult to read.
SELECT bill_vector FROM bill_summaries LIMIT 1;
Each embedding is a vector of floating-point numbers. The distance between two embeddings in the vector space is correlated with semantic similarity between two inputs in the original format.
Perform a vector similarity search
Vector similarity is a method for measuring how similar two items are by representing them as vectors. Vectors are a series of numbers. They're often used to perform searches via LLMs.
Vector similarity is commonly calculated through distance metrics, such as:
- Euclidean distance: Measures the straight-line distance between two vectors in the n-dimensional space.
- Cosine similarity: Measures the cosine of the angle between two vectors.
Enable more efficient searching over the vector field by creating an index on bill_summaries via cosine distance and Hierarchical Navigable Small World (HNSW). HNSW allows pgvector to use the latest graph-based algorithms to approximate nearest-neighbor queries.
CREATE INDEX ON bill_summaries USING hnsw (bill_vector vector_cosine_ops);
With everything now in place, you're ready to execute a cosine similarity search query against the database.
In the following query, the embeddings are generated for an input question and then cast to a vector array (::vector). The vector array allows the question to be compared against the vectors stored in the bill_summaries table.
SELECT bill_id, title FROM bill_summaries
ORDER BY bill_vector <=> azure_openai.create_embeddings('embeddings', 'Show me bills relating to veterans entrepreneurship.')::vector
LIMIT 3;
The query uses the <=> vector operator. This operator represents the cosine distance operator that's used to calculate the distance between two vectors in a multidimensional space.
Integrate Azure Cognitive Services
The Azure AI services integrations included in the azure_cognitive schema of the azure_ai extension provide a rich set of AI language features that you can access directly from the database. The functionalities include sentiment analysis, language detection, key phrase extraction, entity recognition, and text summarization. Access to these capabilities is enabled through the Azure AI Language service.
To review the complete Azure AI capabilities that you can access through the extension, see Integrate Azure Database for PostgreSQL with Azure Cognitive Services.
Set the Azure AI Language service endpoint and key
As with the azure_openai functions, to successfully make calls against Azure AI services by using the azure_ai extension, you must provide the endpoint and a key for your Azure AI Language service resource:
In the Azure portal, go to your Language service resource.
On the left menu, under Resource Management, select Keys and Endpoint.
Copy your endpoint and access key. You can use either
KEY1orKEY2.In the
psqlcommand prompt, run the following commands to add your values to the configuration table. Replace the{endpoint}and{api-key}tokens with the values that you retrieved from the Azure portal.SELECT azure_ai.set_setting('azure_cognitive.endpoint','{endpoint}'); SELECT azure_ai.set_setting('azure_cognitive.subscription_key', '{api-key}');
Summarize bills
To demonstrate some of the capabilities of the azure_cognitive functions of the azure_ai extension, you can generate a summary of each bill. The azure_cognitive schema provides two functions for summarizing text:
summarize_abstractive: Abstractive summarization produces a summary that captures the main concepts from input text but might not use identical words.summarize_extractive: Extractive summarization assembles a summary by extracting critical sentences from the input text.
To use the Azure AI Language service's ability to generate new, original content, you use the summarize_abstractive function to create a summary of text input. Use the \df meta-command from psql again, this time to look specifically at the azure_cognitive.summarize_abstractive function:
\df azure_cognitive.summarize_abstractive
The Argument data types property in the output of the \df azure_cognitive.summarize_abstractive command reveals the list of arguments that the function expects:
| Argument | Type | Default | Description |
|---|---|---|---|
text |
text |
Input text to summarize. | |
language |
text |
Two-letter ISO 639-1 representation of the language in which the input text is written. For allowed values, check Language support for Language features. | |
timeout_ms |
integer |
3600000 |
Timeout in milliseconds, after which the operation is stopped. |
throw_on_error |
boolean |
true |
Flag that indicates whether the function should, on error, throw an exception that results in a rollback of the wrapping transactions. |
sentence_count |
integer |
3 |
Maximum number of sentences to include in the generated summary. |
disable_service_logs |
boolean |
false |
Setting that disables Language service logs. The Language service logs your input text for 48 hours solely to allow for troubleshooting issues. Setting this property to true disables input logging and might limit our ability to investigate issues that occur. For more information, see the Cognitive Services compliance and privacy notes and the Microsoft Responsible AI principles. |
The summarize_abstractive function requires the following arguments: azure_cognitive.summarize_abstractive(text TEXT, language TEXT).
The following query against the bill_summaries table uses the summarize_abstractive function to generate a new one-sentence summary for the text of a bill. It allows you to incorporate the power of generative AI directly into your queries.
SELECT
    bill_id,
    azure_cognitive.summarize_abstractive(bill_text, 'en', sentence_count => 1) one_sentence_summary
FROM bill_summaries
WHERE bill_id = '112_hr2873';
You can also use the function to write data into your database tables. Modify the bill_summaries table to add a new column for storing the one-sentence summaries in the database:
ALTER TABLE bill_summaries
ADD COLUMN one_sentence_summary TEXT;
Next, update the table with the summaries. The summarize_abstractive function returns an array of text (text[]). The array_to_string function converts the return value to its string representation. In the following query, the throw_on_error argument is set to false. This setting allows the summarization process to continue if an error occurs.
UPDATE bill_summaries b
SET one_sentence_summary = array_to_string(azure_cognitive.summarize_abstractive(b.bill_text, 'en', throw_on_error => false, sentence_count => 1), ' ', '')
where one_sentence_summary is NULL;
In the output, you might notice a warning about an invalid document for which an appropriate summarization couldn't be generated. This warning results from setting throw_on_error to false in the preceding query. If you left that flag to the default of true, the query would fail, and no summaries would be written to the database. To view the record that threw the warning, run this command:
SELECT bill_id, one_sentence_summary FROM bill_summaries WHERE one_sentence_summary is NULL;
You can then query the bill_summaries table to view the new, one-sentence summaries that the azure_ai extension generates for the other records in the table:
SELECT bill_id, one_sentence_summary FROM bill_summaries LIMIT 5;
Conclusion
Congratulations! You just learned how to use the azure_ai extension to integrate large language models and generative AI capabilities into your database.