Note
Access to this page requires authorization. You can try signing in or changing directories.
Access to this page requires authorization. You can try changing directories.
Azure Database Migration Service (DMS) is a managed migration service that moves data between databases. DMS provisions and manages the migration infrastructure, so you don't need to deploy migration VMs or install migration software.
DMS supports offline data migration from Oracle to Azure Database for PostgreSQL Flexible Server through the Azure portal. In an offline migration, you stop applications and scheduled jobs that modify the source data while keeping the Oracle database and listener running. DMS copies a point-in-time snapshot to the target and lets you monitor progress.
Applications remain unavailable until copying, validation, and the switch to Azure Database for PostgreSQL Flexible Server are complete. Changes made to the source after the snapshot aren't synchronized. Rehearse the migration to plan your production migration window, including time for data copying, validation, application switching, and contingency.
In this tutorial, you learn how to:
- Prepare the source database, destination database, and connectivity.
- Create an Azure DMS resource.
- Connect DMS to your Oracle source and Flexible Server.
- Choose the Oracle schemas to copy and specify their destination schemas.
- Kick off an offline migration.
- Monitor the migration, validate the results, and switch your application to Flexible Server.
For an explanation of the architecture and migration scope, see the data migration overview
Prerequisites
Before you begin, complete the following preparation.
Supported configurations and regions
Use the following table to check the migration scenario before preparing your databases.
| Component | Supported configuration |
|---|---|
| Source database | Oracle Database 19c and later. |
| Target database | Supported versions of Azure Database for PostgreSQL Flexible Server. Create the destination database and complete schema conversion using the PostgreSQL extension for Visual Studio Code to deploy the destination schema objects before migrating data. |
| Migration mode | Offline, snapshot-based data migration. Changes after the snapshot aren't synchronized. |
| Selection scope | Oracle schemas. Individual-table selection isn't available. |
| DMS regions | East US, Central US, East US 2, West US 2, West US 3, Indonesia Central, Central India, Japan East, Korea Central, South India, Australia East, Canada Central, France Central, Sweden Central, West Europe, Germany West Central, UK South, Switzerland North, and West Central US. |
Create DMS in the same region as your source and target when possible. If they're in different regions, or DMS isn't available in their region, choose a supported region that's geographically close to the database endpoints to minimize network latency and avoid unnecessarily long migration times.
Ensure that you have Azure permissions to create or use DMS and access the required target and networking resources.
Prepare your Oracle server
Keep the Oracle database running and configure the listener to accept connections on the port Azure DMS uses.
Identify the Oracle schemas to migrate.
Connect by using an Oracle user account with access to the schemas you want to migrate and the permissions required for snapshot reads. If the account owns the schema you want to migrate, it can read its own tables. To migrate schemas owned by other users, grant the following permissions.
Oracle privilege Purpose CREATE SESSIONConnect to Oracle. SELECT ANY TABLERead source table data. SELECT ANY SEQUENCERead sequence metadata or values used by the migration implementation. SELECT ANY DICTIONARYRead required database metadata. FLASHBACK ANY TABLERead table data at the migration snapshot. EXECUTE ON SYS.DBMS_FLASHBACKAccess the flashback functionality used by the migration implementation. These privileges are broad. Have your DBA review their scope and remove temporary access after migration when appropriate.
Prepare your Flexible Server
- Provision an Azure Database for PostgreSQL Flexible Server in a supported configuration.
- Create the destination database.
- Use the Oracle schema conversion tool to convert and deploy the required schema objects.
- Ensure that destination table names match the table names in the selected Oracle schemas. DMS matches table names case-insensitively.
- Verify that destination columns, data types, and schema mappings are compatible with the migration.
- Use the password-based admin user you created when you provisioned the Flexible Server cluster, not the Microsoft Entra admin user. To use a different password-based user for migration, ask the administrator of the server to grant the
azure_pg_adminrole to the user by running the following command.
Run the following command on the target as the administrator, replacing migration_user with your migration user's name:
GRANT azure_pg_admin TO migration_user;
Configure connectivity
DMS can connect to your Oracle source and Azure Database for PostgreSQL flexible server target through public or private networks. Plan the network path to each endpoint and configure name resolution, routing, firewall rules, and connection security before starting the migration.
Choose public or private connectivity
| Connectivity | How DMS reaches your databases | What you configure |
|---|---|---|
| Public | DMS connects to publicly accessible database endpoints. | Obtain the DMS outbound IP addresses from the Network tab in the Azure portal migration wizard and allow list them in the database firewalls and any applicable network firewalls for the required database ports. |
| Private | DMS migration resources run inside a virtual network and attempt to establish peering with the configured source and target virtual networks. | Select the source and target virtual networks and private DNS settings in the migration wizard. Provide private access to the databases through private endpoints where supported, VM private IP addresses, or a VPN or ExpressRoute connection for Oracle sources outside Azure. Ensure the required peering permissions, DNS resolution, routes, and firewall access are in place. |
Configure database ports and Oracle transport security
| Endpoint | Connection information |
|---|---|
| Oracle source | Hostname, TCP or TCPS listener port, Oracle service name, and migration credentials. |
| Azure Database for PostgreSQL Flexible Server target | Hostname, port, database name, and migration credentials. |
DMS supports both TCP and TCPS connections to Oracle:
- TCPS is recommended. It uses TLS to encrypt the Oracle connection. Configure an Oracle TCPS listener and the certificate/trust settings required by the migration connection.
- TCP can be used if your Oracle server isn't configured for TCPS. Selecting TCP doesn't itself provide TLS encryption. Review your organization's security requirements before using it.
Migration process
This section walks through the offline data migration workflow. You create or select a DMS resource, configure connectivity, and connect to the Oracle source and PostgreSQL target. You then select the Oracle schemas to migrate and map them to schemas in the target database. After manually stopping writes to the source, you start the migration, monitor its progress, and review the schema- and table-level copy results.
Create or select Azure Database Migration Service
If you already have a compatible DMS resource, open it and continue to Configure the migration. Otherwise, create a service using the following steps.
Select the source and target types
- Sign in to the Azure portal.
- Search for Azure Database Migration Service.
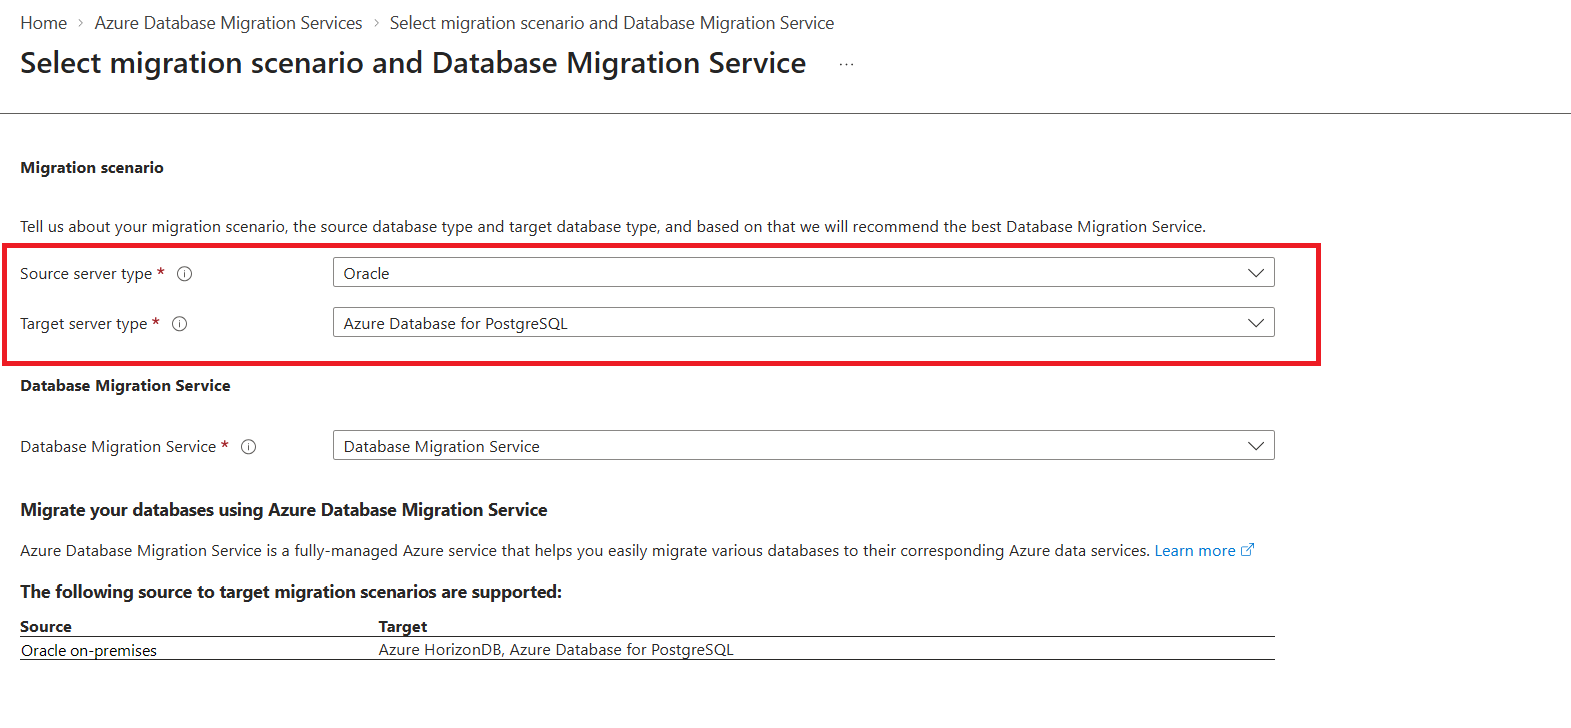
- Select Create to open the migration scenario selection page.
- Select Oracle for Source server type and Azure Database for PostgreSQL for Target server type.
- Select Database Migration Service as the migration service.
Enter the service details
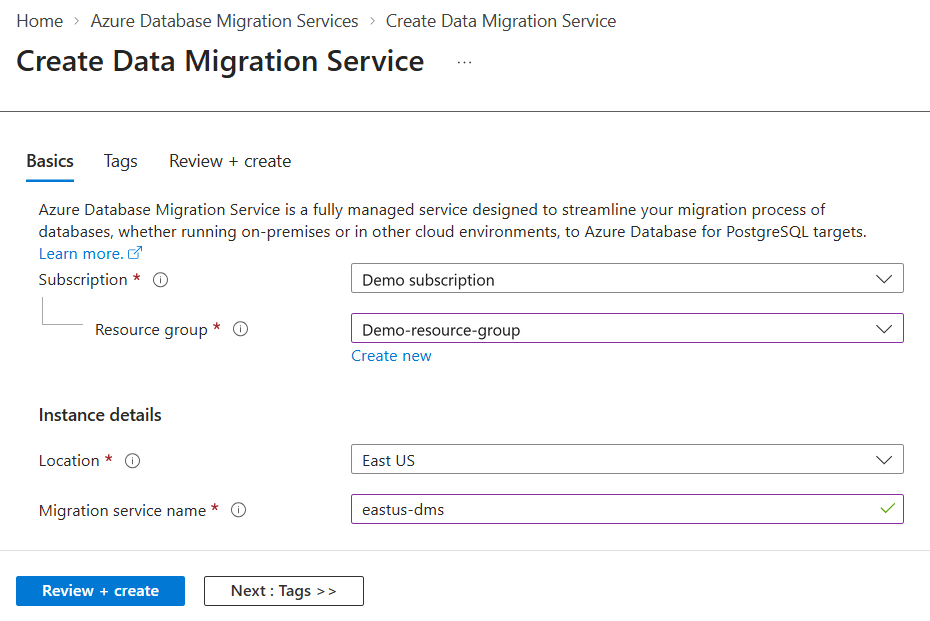
- On the Basics tab, select your subscription and resource group.
- Select a supported Location, following the regional placement guidance.
- Enter a Migration service name.
- Add tags if required, and select Review + create.
The following example uses Demo subscription, Demo-resource-group, East US, and the service name eastus-dms.
Review and create the service
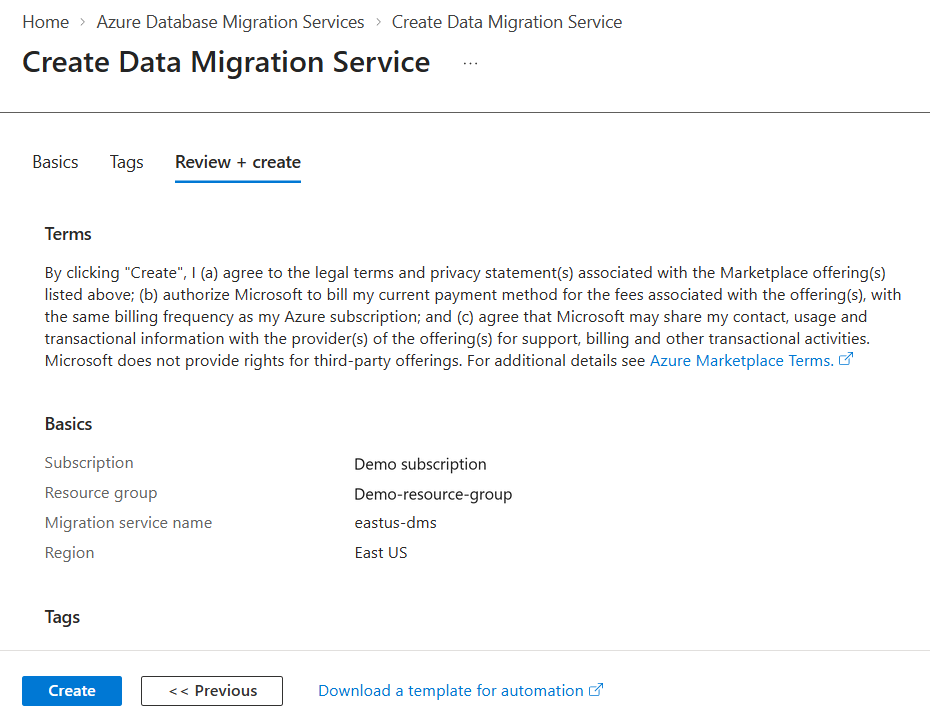
- On Review + create, verify the subscription, resource group, migration service name, and region.
- Review the details and select Create.
- Wait for provisioning to complete, and then open the DMS resource.
Configure the migration
On the DMS resource, select Get Started and select Start Migrations.
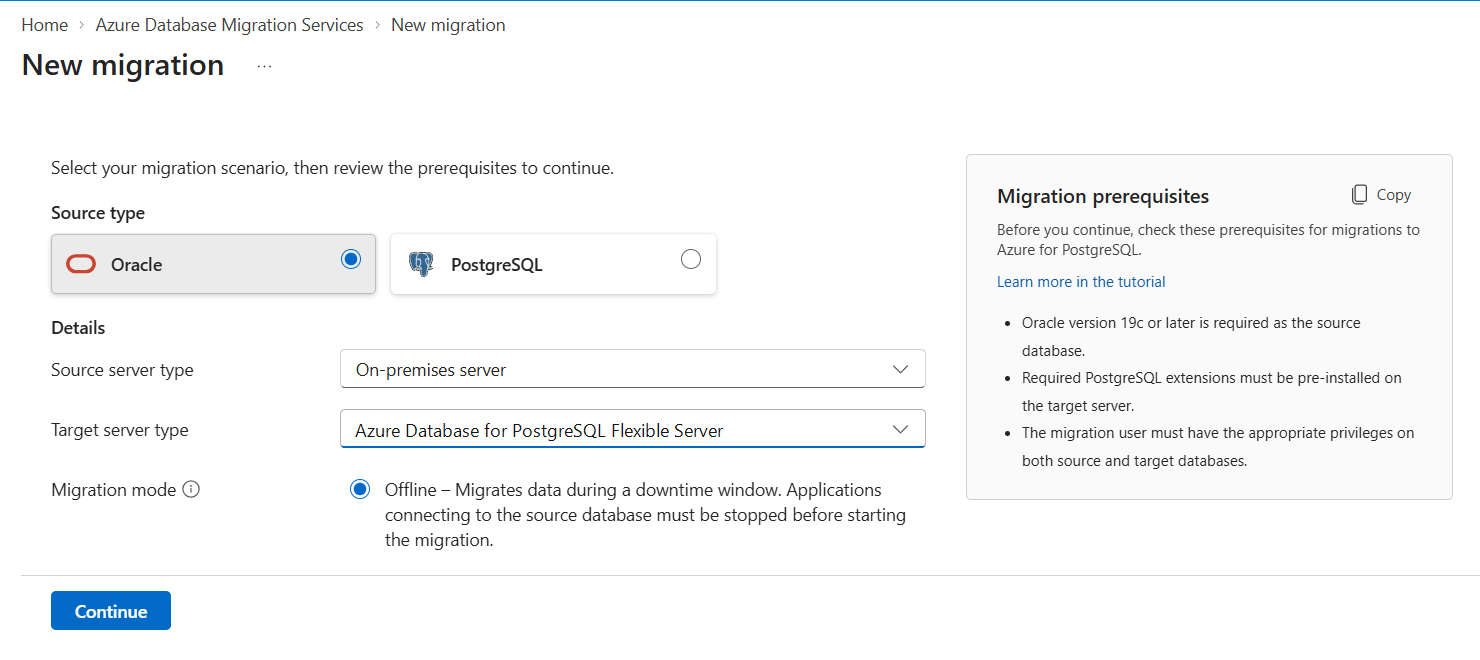
1. Select the migration scenario
- Select Oracle as the source type.
- Select Azure Database for PostgreSQL Flexible Server as the Target server type.
- Select Offline as the migration mode.
- Review the migration prerequisites and select Continue.
2. Configure network access
On the Network tab, choose how the migration runtime reaches your source and target. Complete the public or private access configuration.
Public access
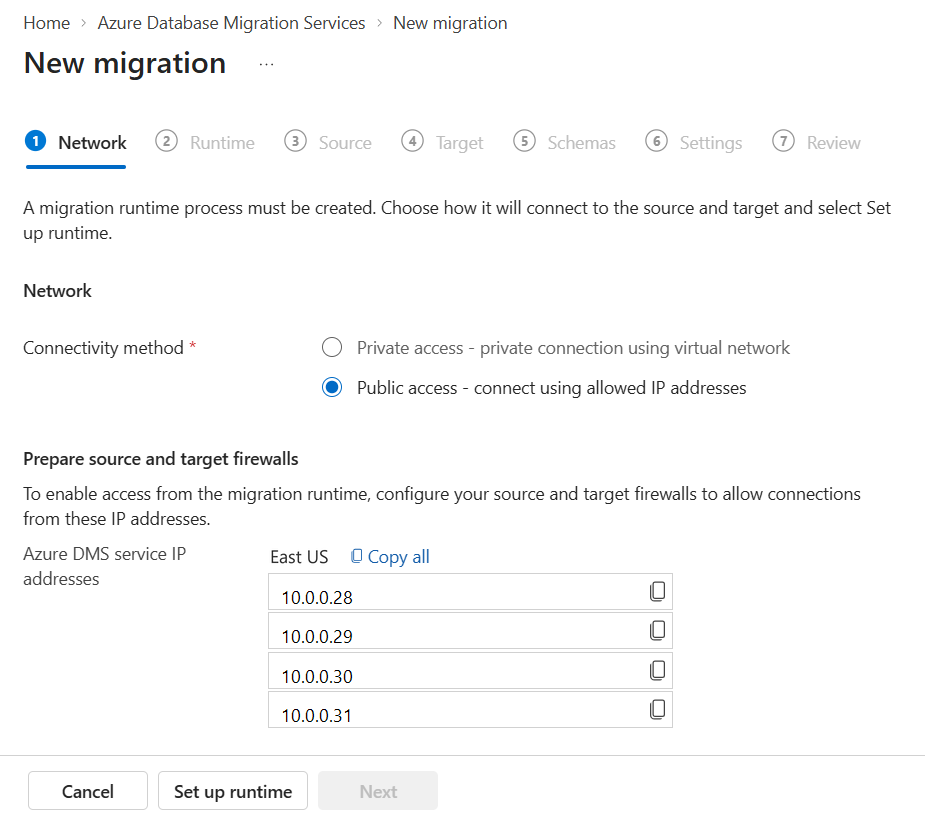
- Select Public access - connect using allowed IP addresses.
- Review the Azure DMS service IP addresses shown for your configuration. Use Copy all to copy them.
- Allow list the displayed addresses in the source and target firewalls and any applicable network access rules.
- Select Set up runtime after preparing access.
The IP addresses in the following screenshot are illustrative replacements. Don't use them in your firewall rules. Use the actual addresses displayed in your migration wizard.
Private access
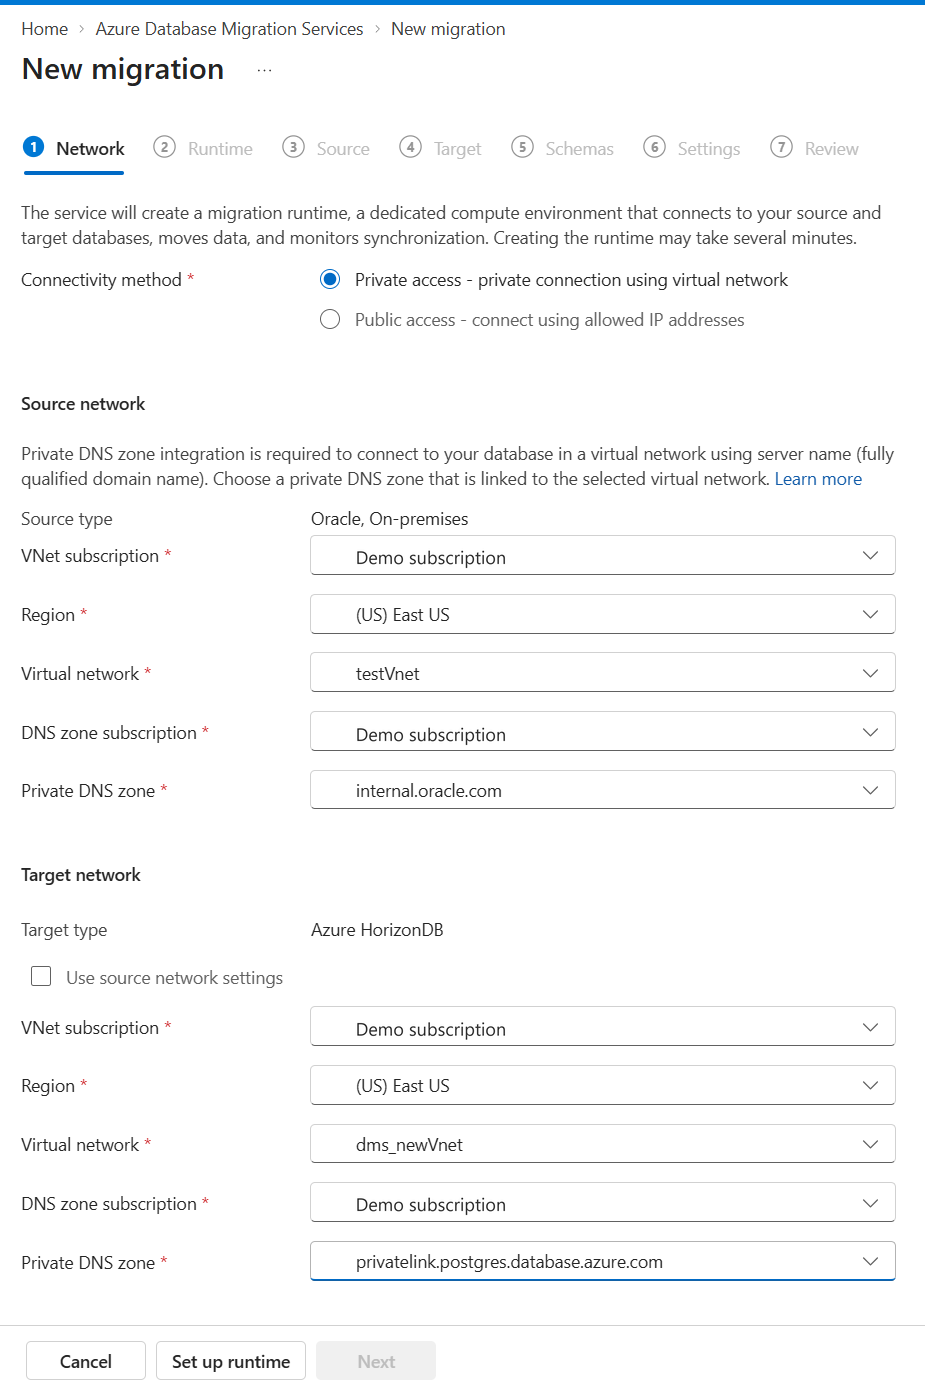
- Select Private access - private connection using virtual network.
- Under Source network, select the virtual network subscription, region, and virtual network.
- Select the DNS zone subscription and private DNS zone linked to the source virtual network, as required for hostname resolution.
- Under Target network, select Use source network settings if the same settings apply. Otherwise, configure the target virtual network and private DNS settings separately.
- Confirm that the selected networks provide the routes, DNS resolution, and database-port access described in Configure connectivity.
- Select Set up runtime.
3. Wait for the migration runtime
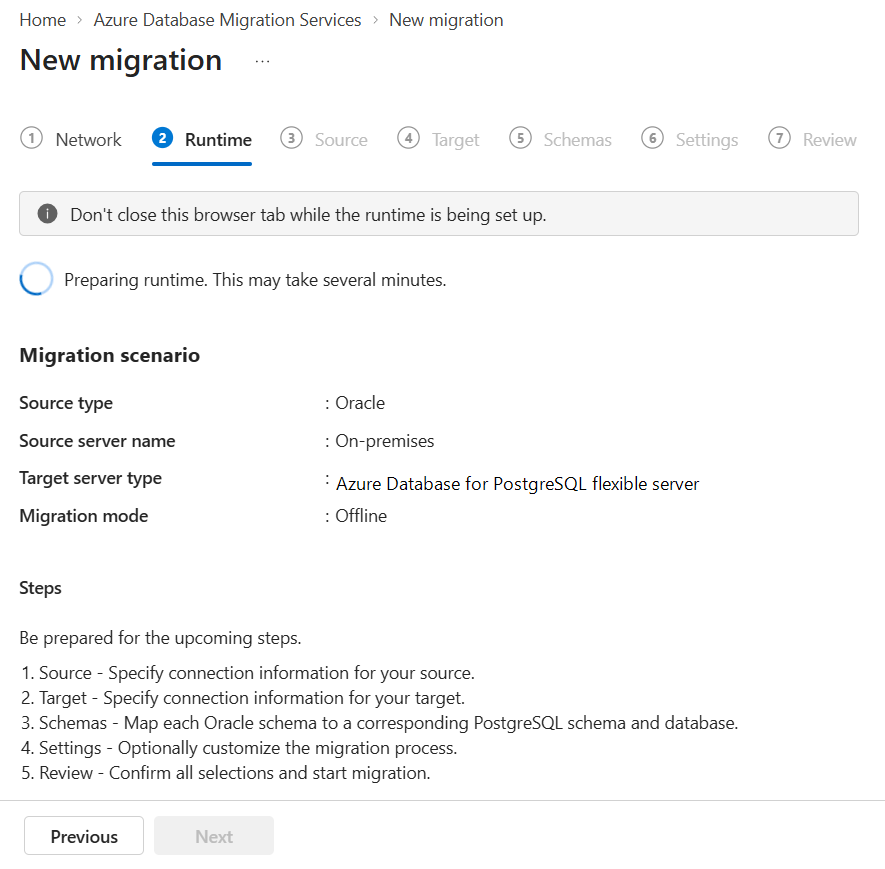
The Runtime tab shows progress while DMS prepares the compute environment that connects to your databases and copies data. This process can take several minutes.
Keep the browser tab open while the runtime is being set up. Review the next steps and continue to the source connection step when setup finishes.
4. Connect to Oracle
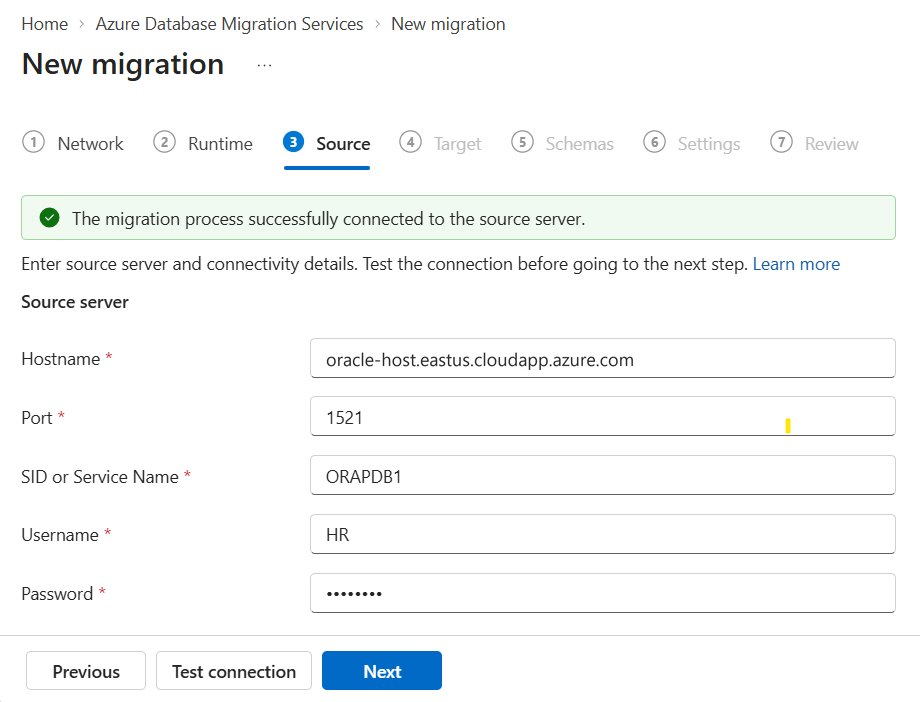
- Enter the source hostname, listener port, and service name.
- Enter the Oracle migration account credentials.
- Configure the supported connection-security settings.
- Select Test connection and resolve any reported errors.
- When the source connection succeeds, select Next.
Use the Oracle service name or SID that your connection expects in SID or Service Name.
The following example connects to oracle-host.eastus.cloudapp.azure.com on port 1521, using service ORAPDB1 and account HR.
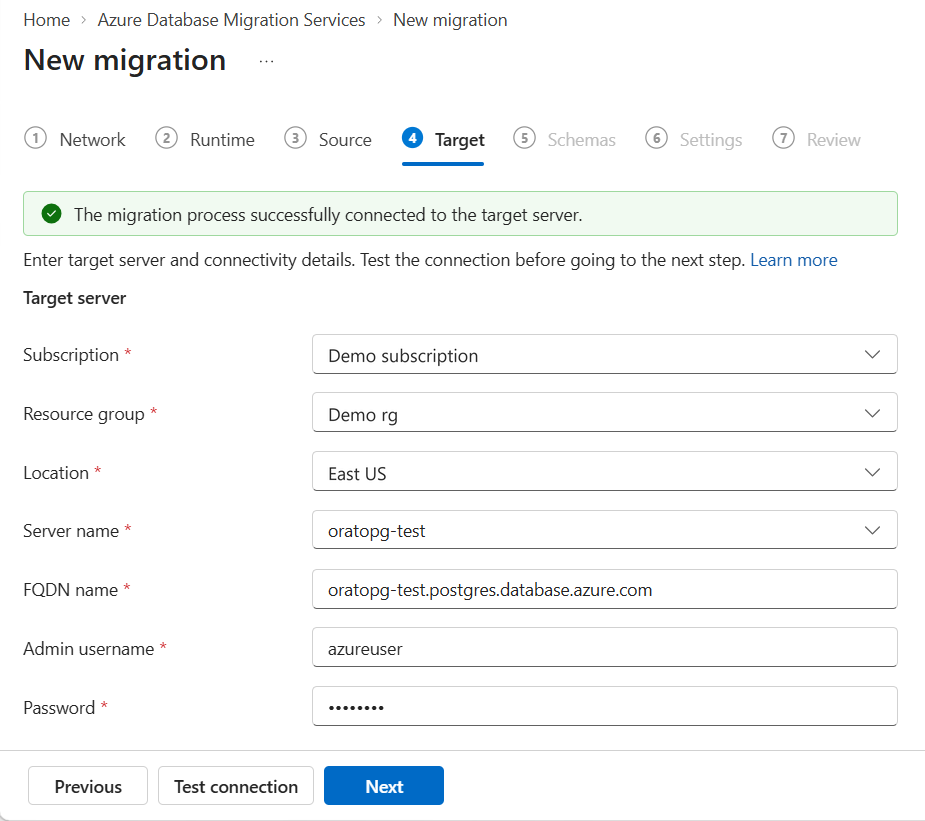
5. Connect to Azure Database for PostgreSQL Flexible Server
- On the Target tab, select the subscription, resource group, and location of your target.
- Select the Server name and verify the FQDN name.
- Enter the target migration account in Admin username and enter its password. Use the details mentioned in Prepare your flexible server.
- Select Test connection and resolve any reported errors.
- When the target connection succeeds, select Next.
6. Select schemas and review mappings
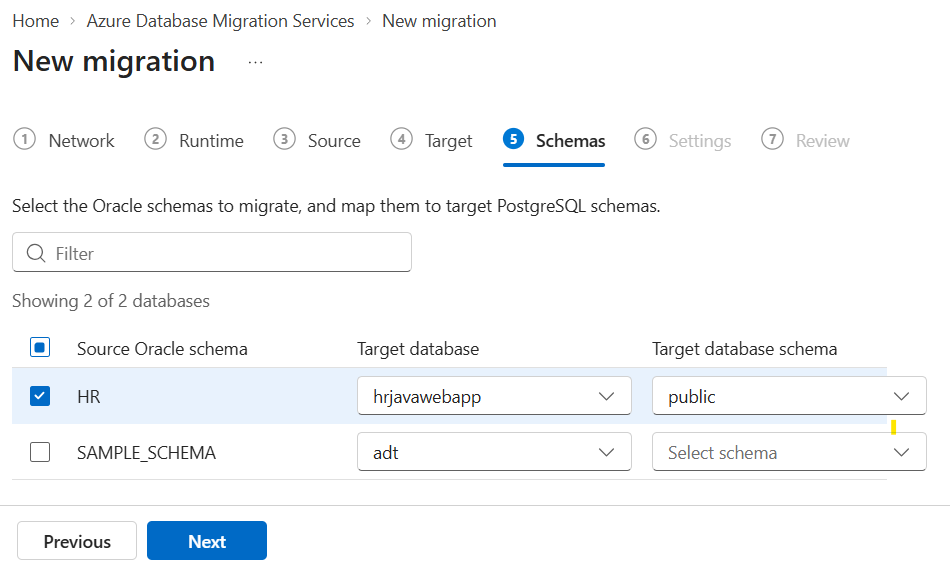
- On the Schemas tab, select the Oracle schemas to migrate.
- For each selected schema, choose the Target database and Target database schema.
- Verify that the corresponding destination objects exist and are ready for data loading.
- Review the mappings and select Next.
Selection is at schema level, not individual-table level. Review all tables within each selected schema before proceeding.
In the following example, the selected Oracle schema HR maps to the public schema in the target database hrjavawebapp. The SAMPLE_SCHEMA schema isn't selected.
Start the offline migration
- Stop application writes and pause scheduled jobs, integrations, and other writers that modify the selected source data.
- Confirm with the application owner that writes have stopped.
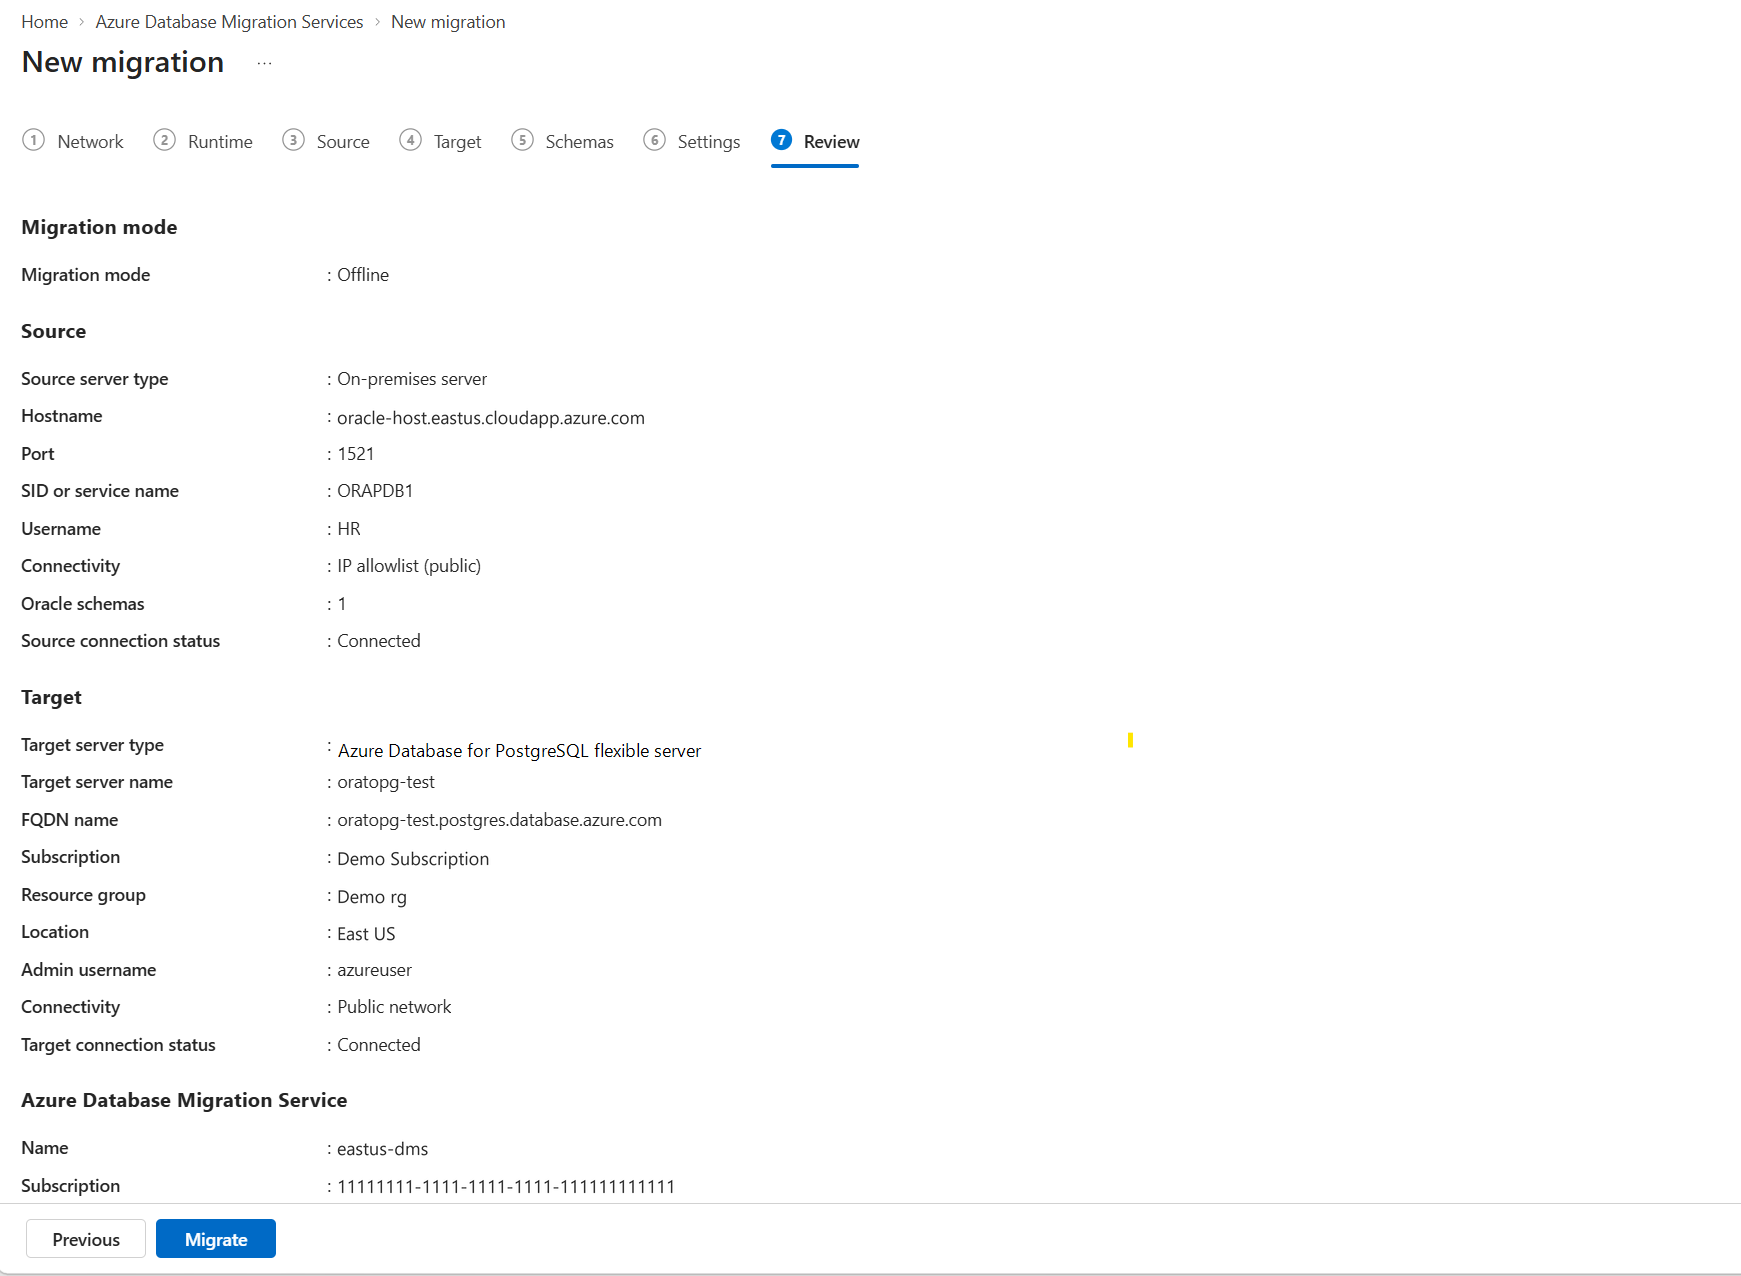
- On Review, verify the source, target, selected schema count, connection status, migration mode, and DMS resource. Recheck the schema mappings in the preceding steps.
- Select Migrate.
- Record the migration identifier for monitoring and support.
Monitor the migration
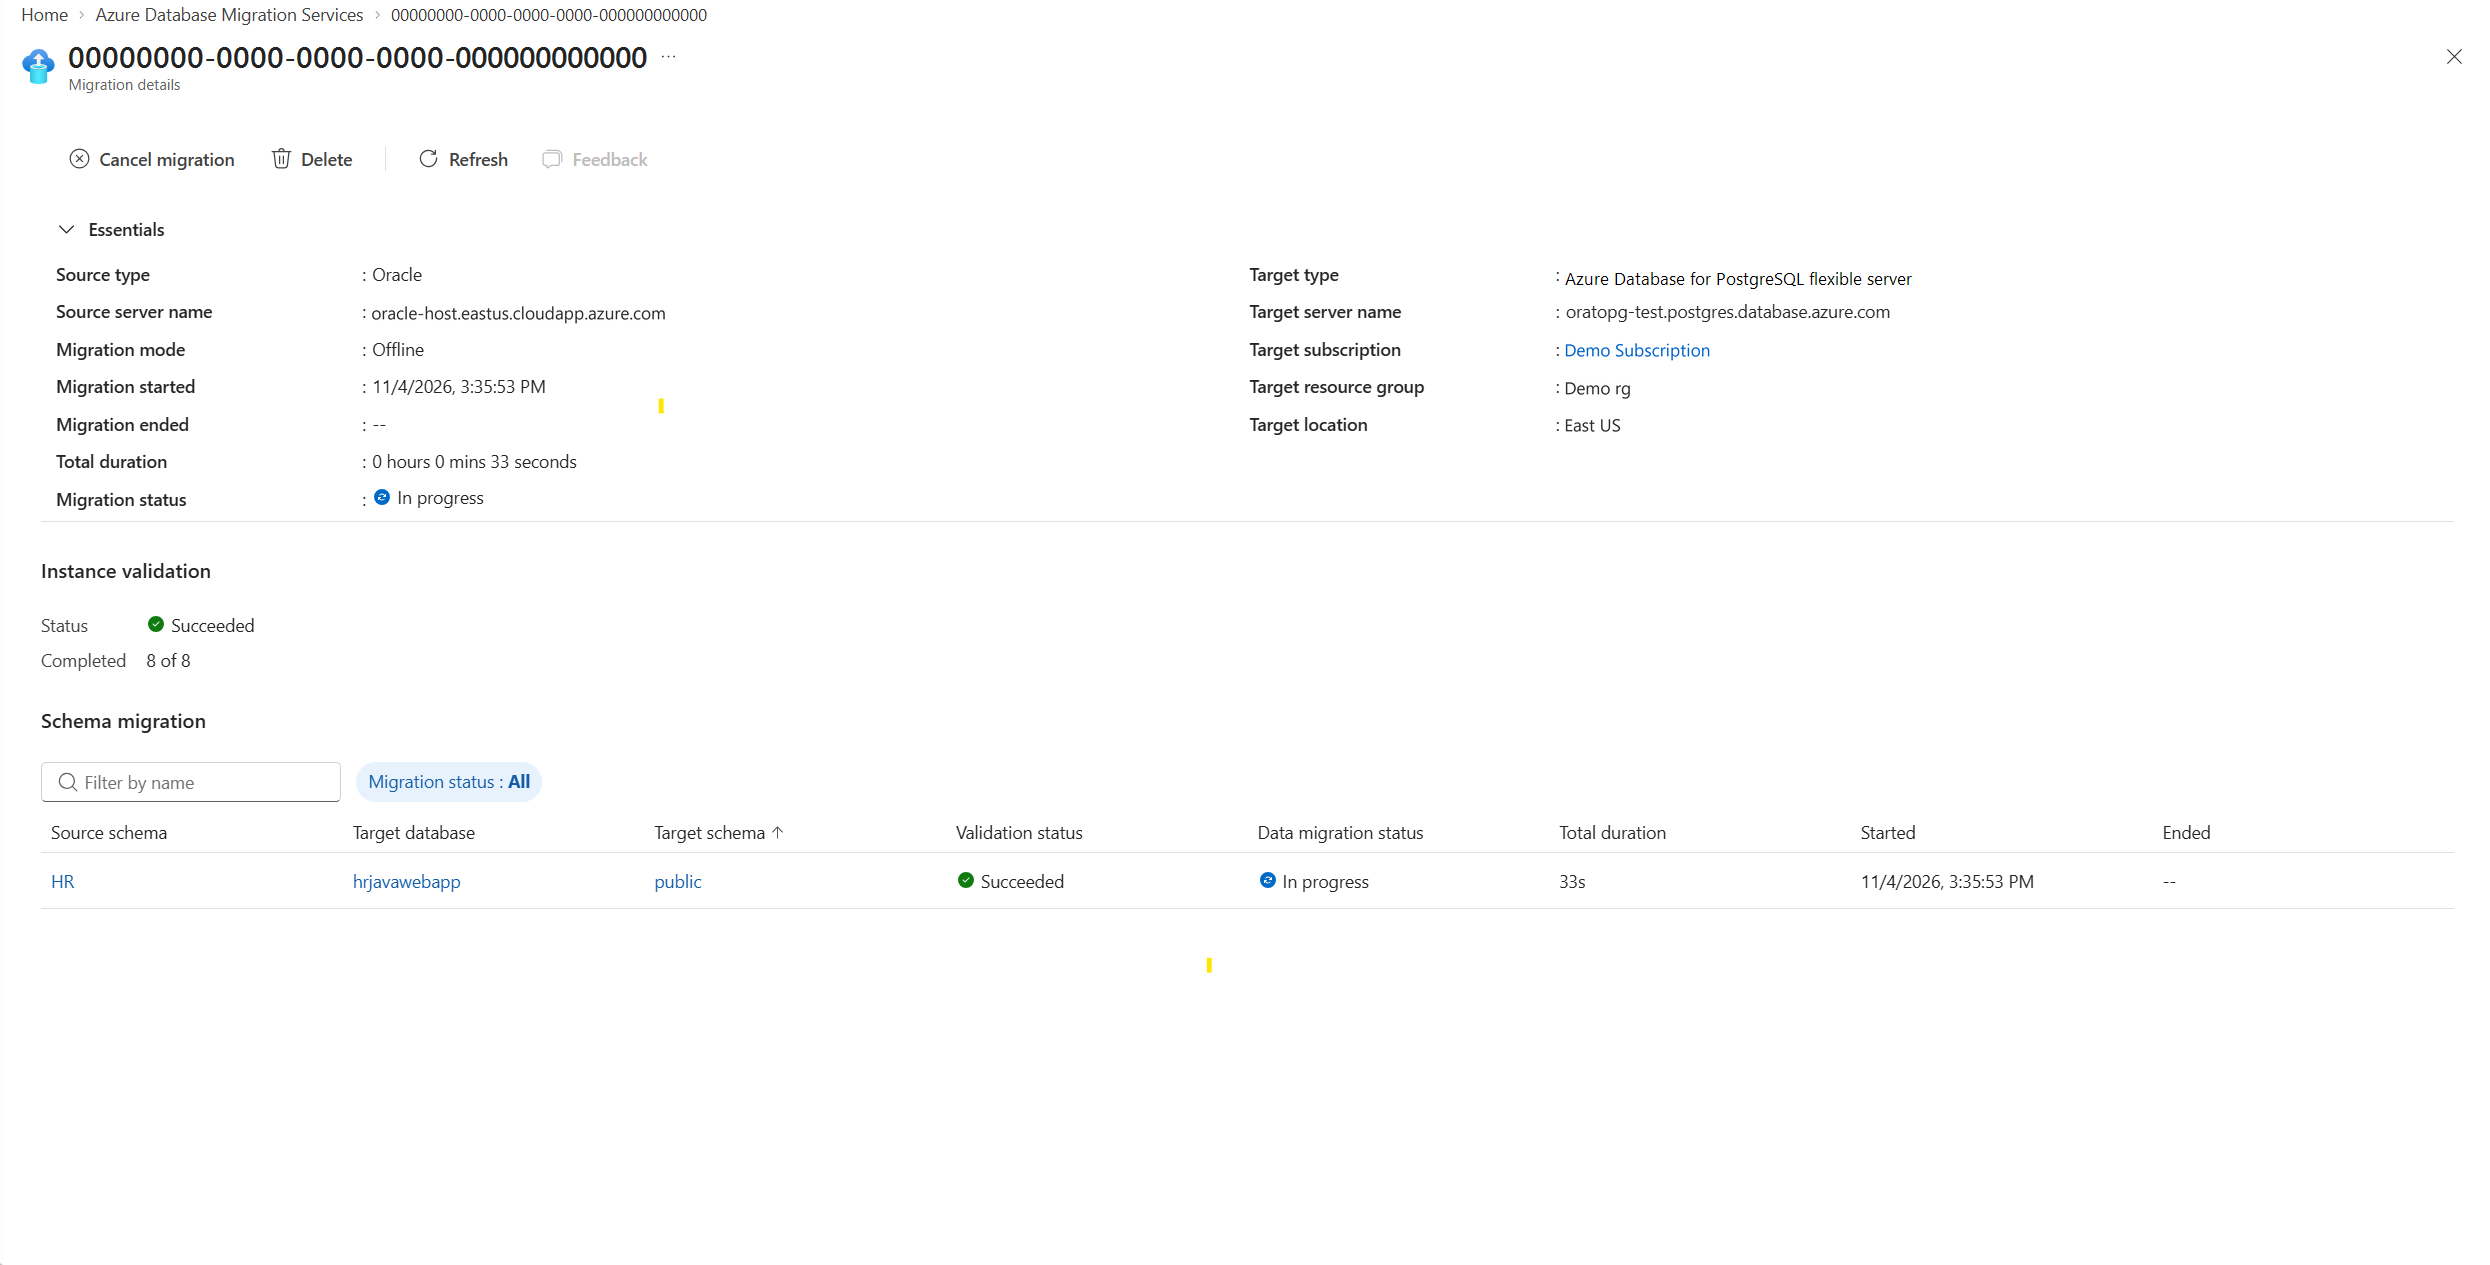
Open the migration details and monitor progress until the migration reaches a terminal state.
Review overall progress
The Essentials section shows connection information, migration mode, timestamps, duration, and overall status. Below it, Instance validation shows validation progress, and Schema migration lists the selected schema mappings and their validation and data migration status.
| Outcome | What to do next |
|---|---|
| In progress | Keep source writes stopped and monitor for errors and resource pressure. |
| Succeeded | Review the object-level results available in the service, then validate data and the application. |
| Failed | Review the reported error and affected scope. Resolve the underlying cause before starting a new migration. If the cause is unclear, submit a support request for assistance. |
| Canceled | Confirm that processing has stopped. Assess any data already copied before deciding whether to rerun. |
The current Oracle workflow doesn't provide a resume capability. Treat a new migration as a fresh operation, not a continuation from the previous migration's checkpoints.
If you need to cancel, use the migration's cancellation action and wait for confirmation before starting another operation against the same target.
Inspect validation results
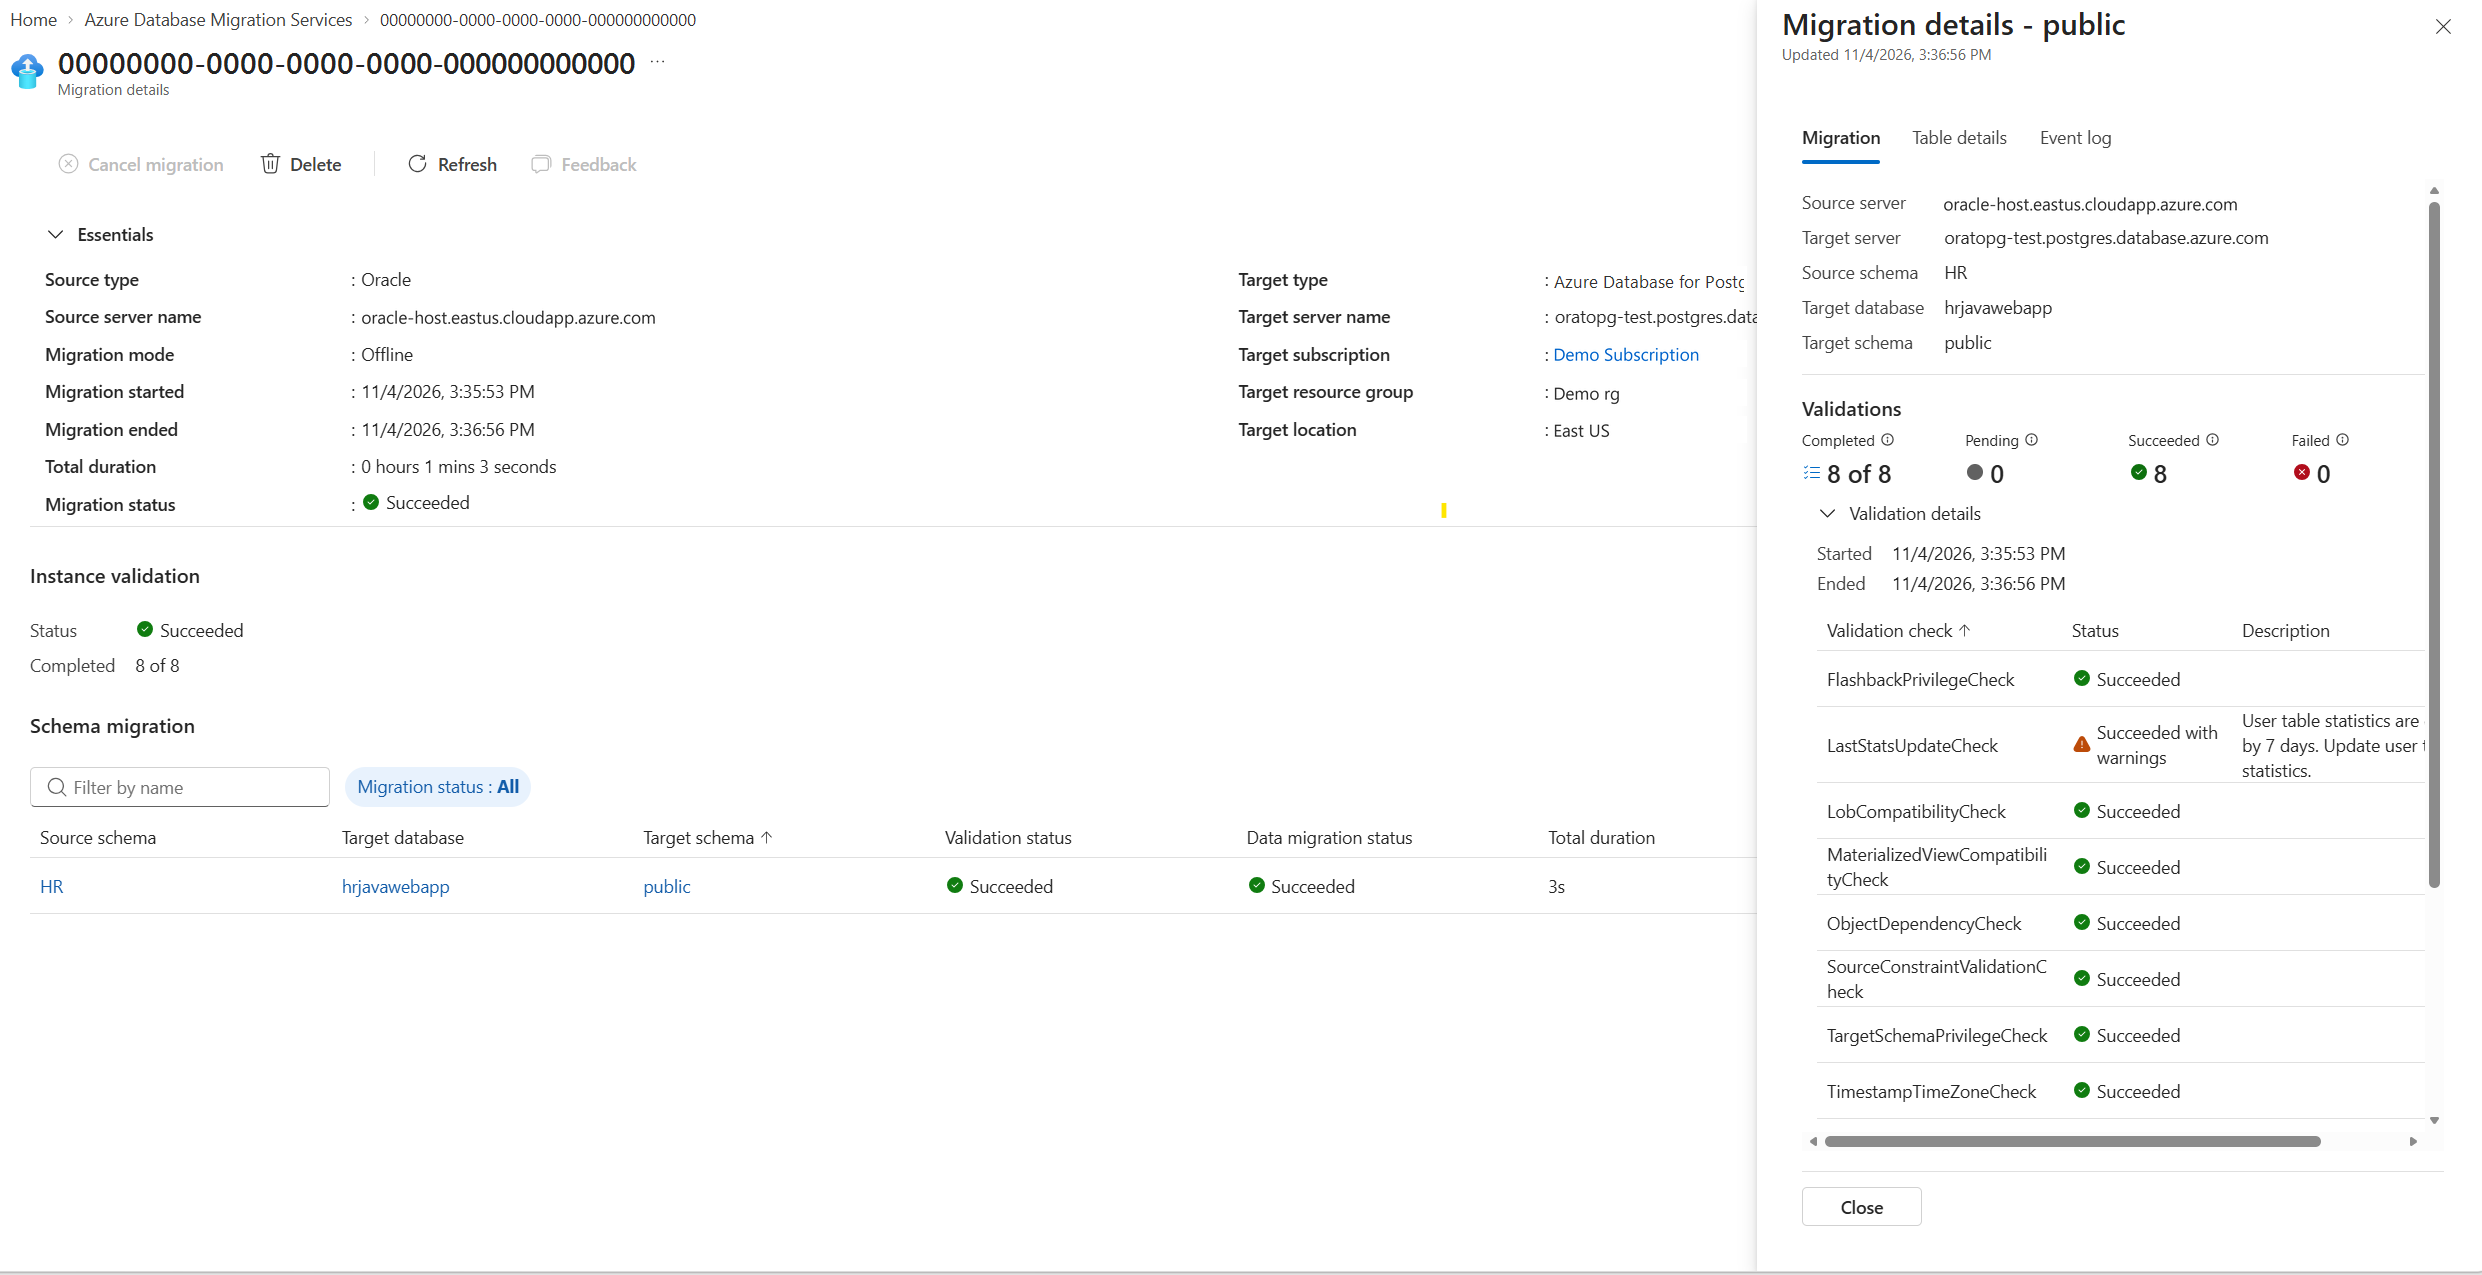
Select the schema entry to open its details pane. On the Migration tab, expand Validations to review checks for migration prerequisites and compatibility. If a check fails, the migration enters the Failed state and data copying doesn't begin. Warnings don't block the migration, but review them even if the migration succeeds.
Review schema copy results
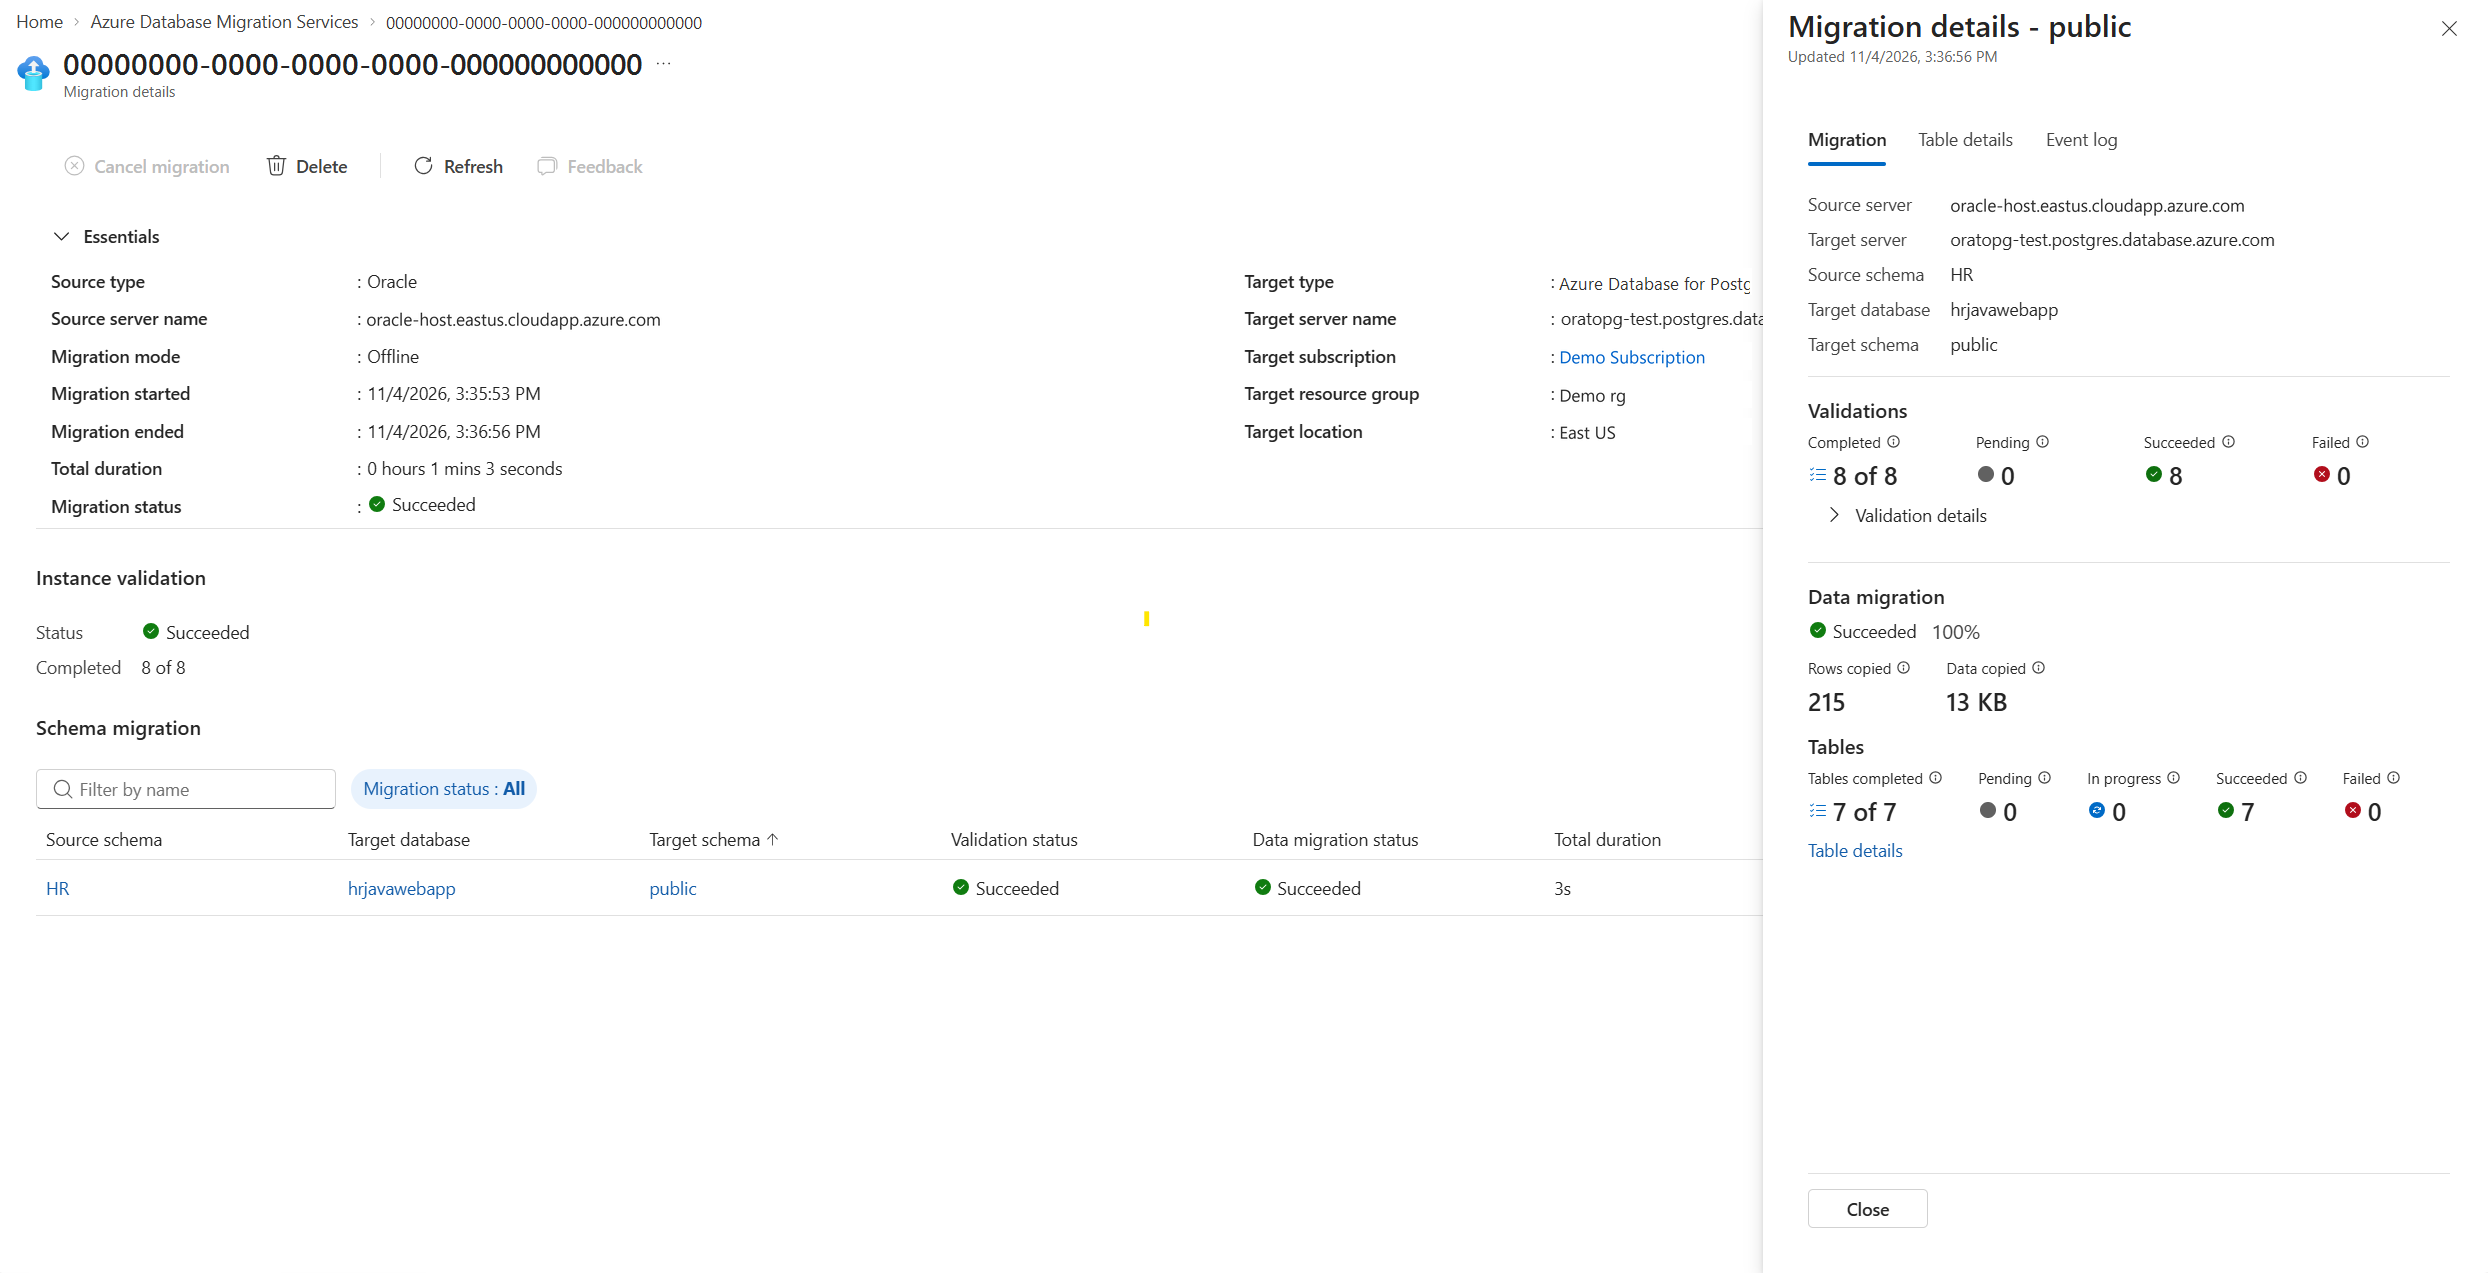
In the schema's Migration details, review the Data Migration section for rows copied, data copied, and table completion counts.
The following example shows a successful copy of 215 rows across 7 tables, with no failed tables.
Inspect individual table results
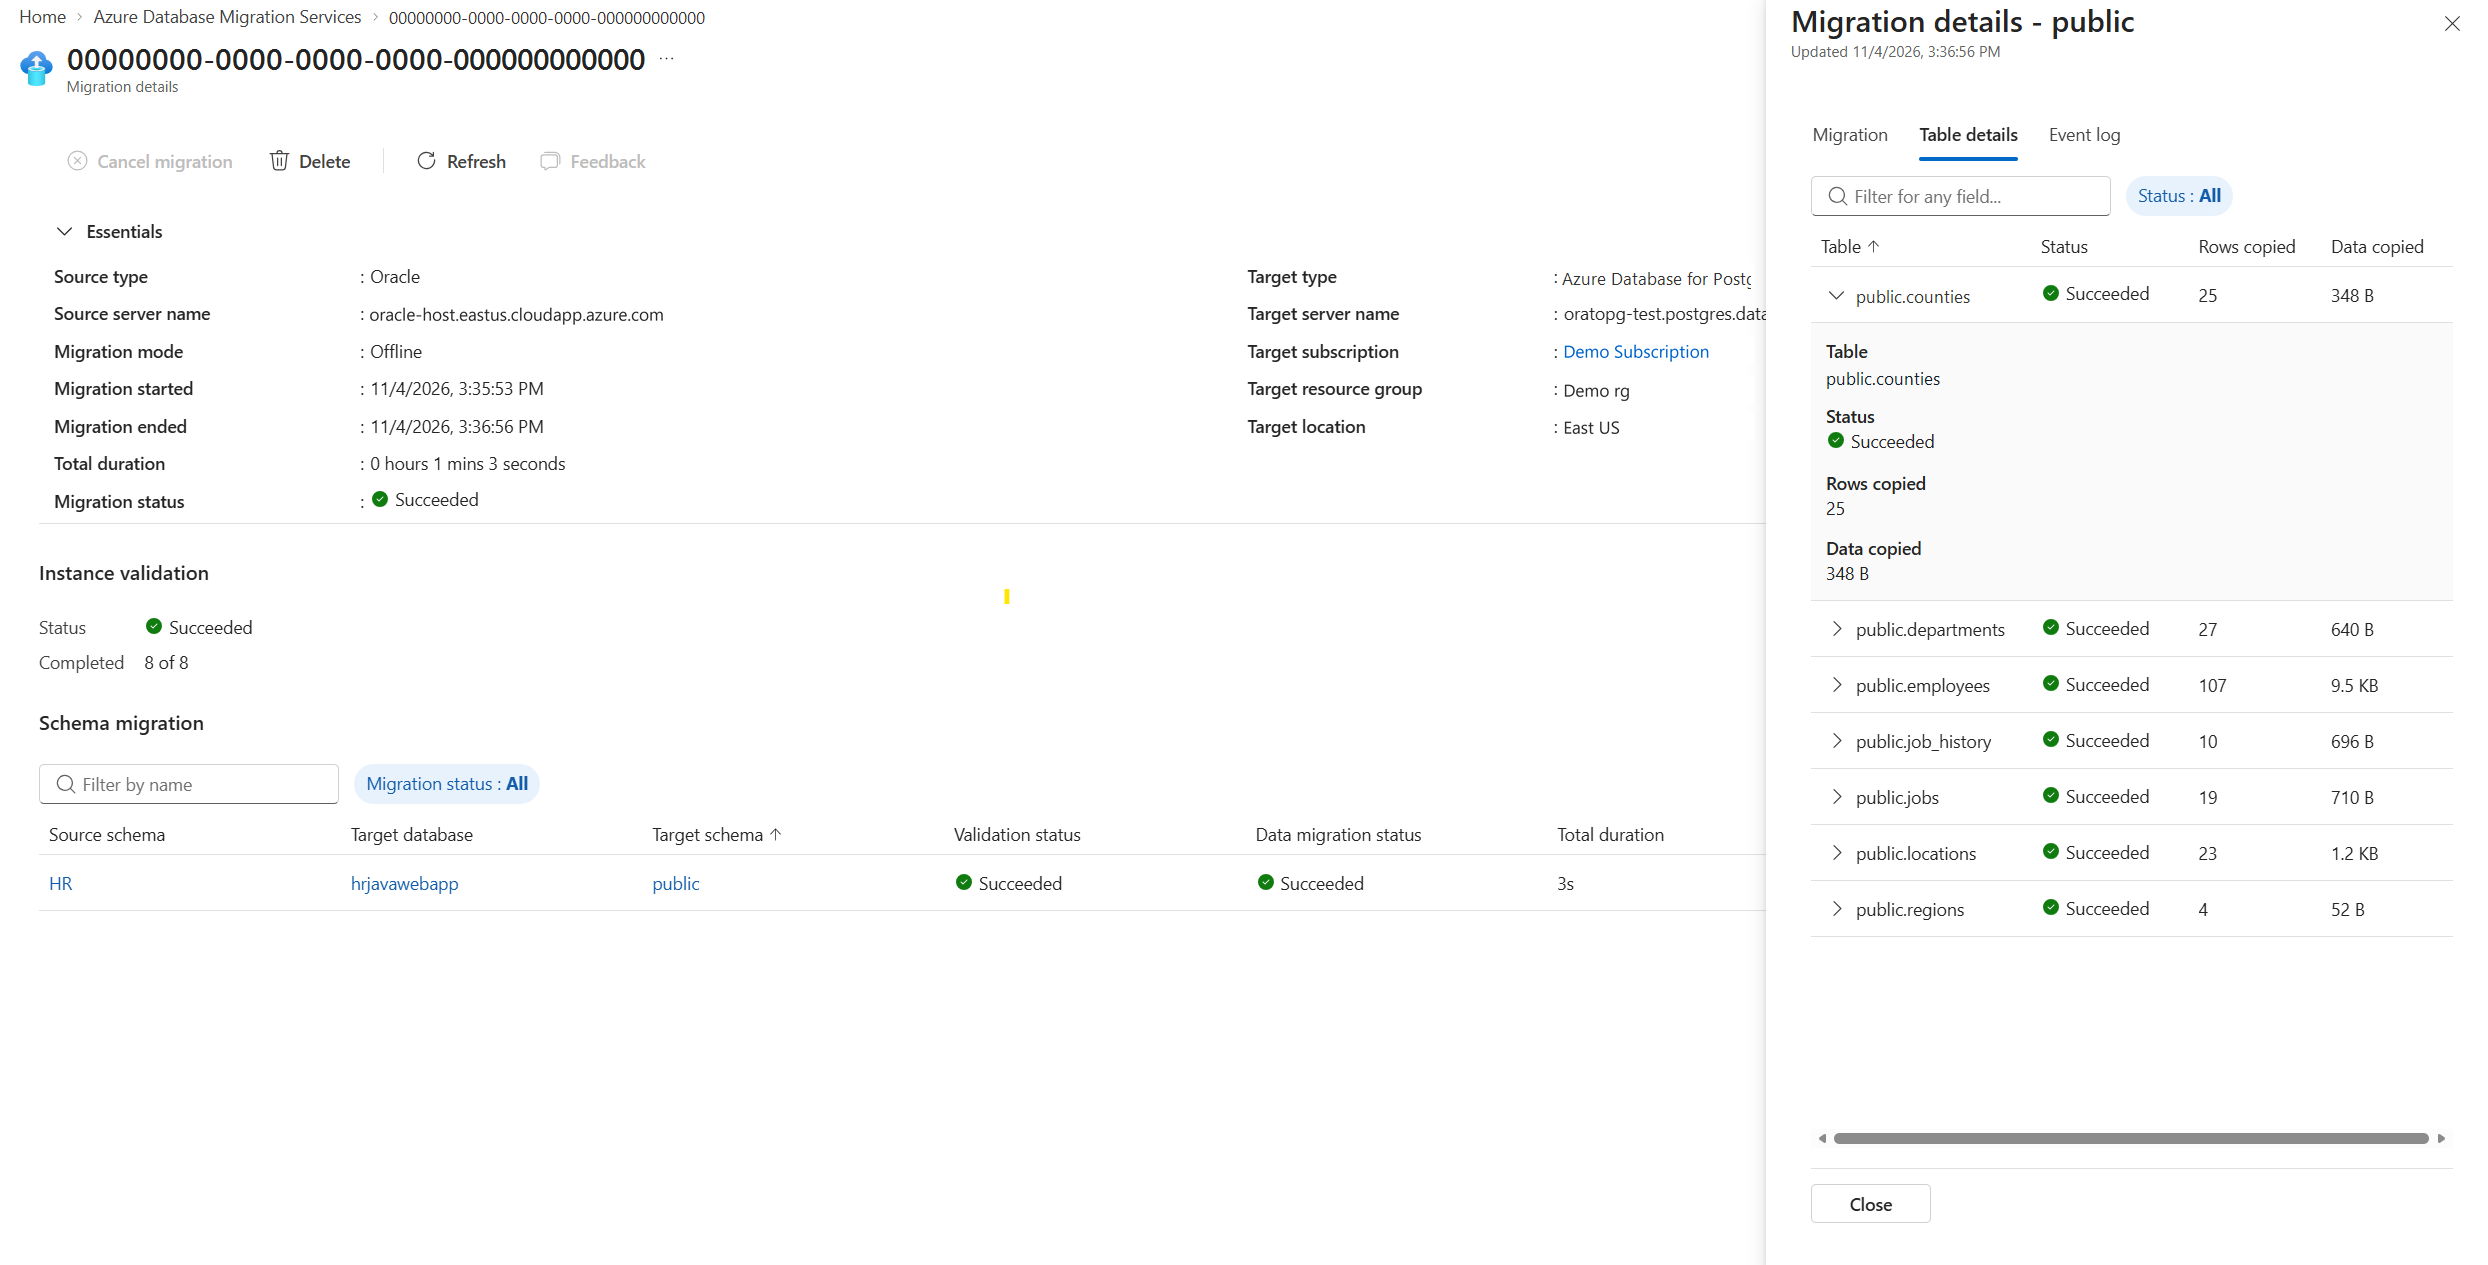
Select the Table details tab to view the copied tables and their status, row counts, and copied data sizes. Expand a table to inspect its copy summary.
Validate and switch applications
Keep source writes stopped while completing validation.
| Validation area | Checks |
|---|---|
| Migration scope | Account for every expected table, including empty tables and any failures or exclusions. |
| Data completeness | Compare row counts for the selected tables against the quiesced source. Investigate every unexplained difference. |
| Data correctness | Check representative rows and business aggregates, including nulls, numeric precision, timestamps, character data, and large objects where supported. |
| Schema readiness | Verify required constraints, indexes, defaults, and other converted objects. |
| Generated values | Verify sequence and identity state so new application inserts don't conflict with migrated keys. Don't assume data copying adjusts these values. |
| Application | Test authentication, permissions, critical queries, transactions, integrations, and background jobs. |
| Operations | Verify target monitoring, backups, alerts, and the application's rollback plan. |
After the application owner approves the results:
- Update application configuration and secrets to use the Azure Database for PostgreSQL Flexible Server endpoint and database.
- Start the application against Azure Database for PostgreSQL Flexible Server and enable writes only on the intended system.
- Re-enable scheduled jobs and integrations against the target as appropriate.
- Monitor errors, query latency, connection usage, and target resource consumption.
- Retain the source according to your recovery and retention plan.
Important
Once applications write to Azure Database for PostgreSQL Flexible Server, the Oracle source no longer contains those new changes. Redirecting applications back to Oracle isn't a lossless rollback unless you have a separate reconciliation or reverse-data-movement plan.
Troubleshoot common issues
| Symptom | Checks and next steps |
|---|---|
| Source or target connection fails | Verify the endpoint, configured port, service or database name, credentials, DNS, routing, firewall rules, and connection-security settings from the DMS network path. |
| Permission error | Verify the approved grants in the correct Oracle service, PDB, or Flexible Server database. Check object access and any required truncation privileges. |
| Missing or incompatible destination table | Verify schema conversion, object names and case, column compatibility, and the configured schema mapping. |
| Oracle snapshot-read error | Have the DBA investigate the specific Oracle error, including undo availability and concurrent database changes where applicable. Plan a fresh attempt after resolving the cause. |
| Migration slows or target stops responding | Check source and target resource utilization, storage capacity and latency, connection pressure, and network throughput. Don't assume a larger target SKU fixes every bottleneck. |
| Failed or canceled migration leaves destination data | Review the error and destination state. Confirm the fresh-load clearing behavior before rerunning; don't assume resume or automatic rollback. |
For support, collect the migration identifier, timestamps with time zone, source and target versions, and the reported error. Don't include passwords, access tokens, or unredacted connection strings.
Clean up
After the migration is accepted:
- Remove temporary firewall access and migration-account privileges that you no longer need.
- Review whether you still need the DMS resource before deleting it.