Note
Access to this page requires authorization. You can try signing in or changing directories.
Access to this page requires authorization. You can try changing directories.
Important
This article covers private endpoints for the classic Microsoft Purview governance portal (https://web.purview.azure.com). If you're using the new Microsoft Purview portal (https://purview.microsoft.com/), follow the documentation for private endpoints in the Microsoft Purview portal.
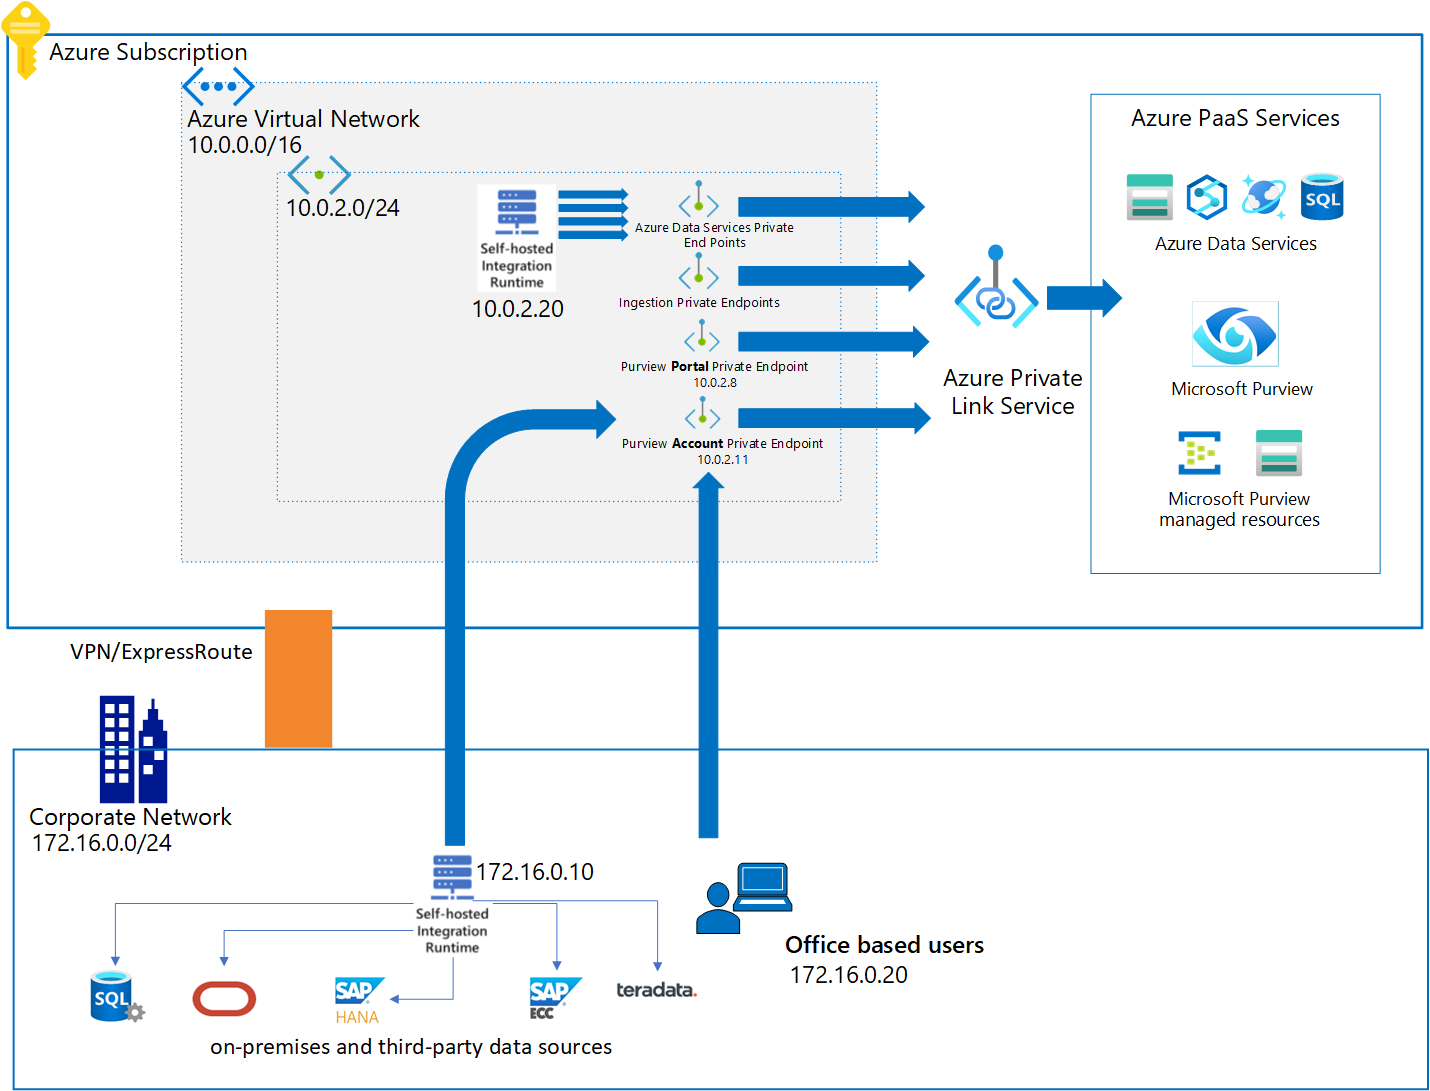
In this guide, you'll learn how to deploy account, _portal, and ingestion private endpoints for your Microsoft Purview account to access purview account and scan data sources using a self-hosted integration runtime securely and privately, enabling end-to-end network isolation.=
The Microsoft Purview account private endpoint is used to add another layer of security by enabling scenarios where only client calls that originate from within the virtual network are allowed to access the Microsoft Purview account. This private endpoint is also a prerequisite for the portal private endpoint.
The Microsoft Purview portal private endpoint is required to enable connectivity to the classic Microsoft Purview governance portal using a private network.
Microsoft Purview can scan data sources in Azure or an on-premises environment by using ingestion private endpoints. Depending on your accounts deployment date and configuration, up to three private endpoint resources are required to be deployed and linked to Microsoft Purview configured resources when ingestion private endpoint is deployed:
If you're using a managed Event Hubs for kafka notifications, a namespace private endpoint is linked to a Microsoft Purview configured Event Hubs namespace.
If your account was created before December 15, 2023:
- Blob private endpoint is linked to a Microsoft Purview managed storage account.
- Queue private endpoint is linked to a Microsoft Purview managed storage account.
If your account was created after December 15, 2023 (or deployed using API version 2023-05-01-preview onwards):
- Blob private endpoint is linked to a Microsoft Purview ingestion storage.
- Queue private endpoint is linked to a Microsoft Purview ingestion storage.
Deployment checklist
Following the instructions further in this guide, you can deploy these private endpoints for an existing Microsoft Purview account:
Choose an appropriate Azure virtual network and a subnet to deploy Microsoft Purview private endpoints. Select one of the following options:
- Deploy a new virtual network in your Azure subscription.
- Locate an existing Azure virtual network and a subnet in your Azure subscription.
Define an appropriate DNS name resolution method, so you can access Microsoft Purview account and scan data sources using private network. You can use any of the following options:
- Deploy new Azure DNS zones using the steps explained further in this guide.
- Add required DNS records to existing Azure DNS zones using the steps explained further in this guide.
- After completing the steps in this guide, add required DNS A records in your existing DNS servers manually.
Deploy private endpoints for an existing Microsoft Purview account.
Enable access to Microsoft Entra ID if your private network has network security group rules set to deny for all public internet traffic.
Deploy and register Self-hosted integration runtime inside the same virtual network or a peered virtual network where Microsoft Purview account and ingestion private endpoints are deployed.
After completing this guide, adjust DNS configurations if needed.
Validate your network and name resolution between management machine, self-hosted IR VM and data sources to Microsoft Purview.
Note
If you configure your own Event Hubs namespace or enable a managed Event Hubs namespace after deploying your ingestion private endpoint, you'll need to redeploy the ingestion private endpoint.
Enable account and portal private endpoint
Go to the Azure portal, and then select your Microsoft Purview account, and under Settings select Networking, and then select Private endpoint connections.
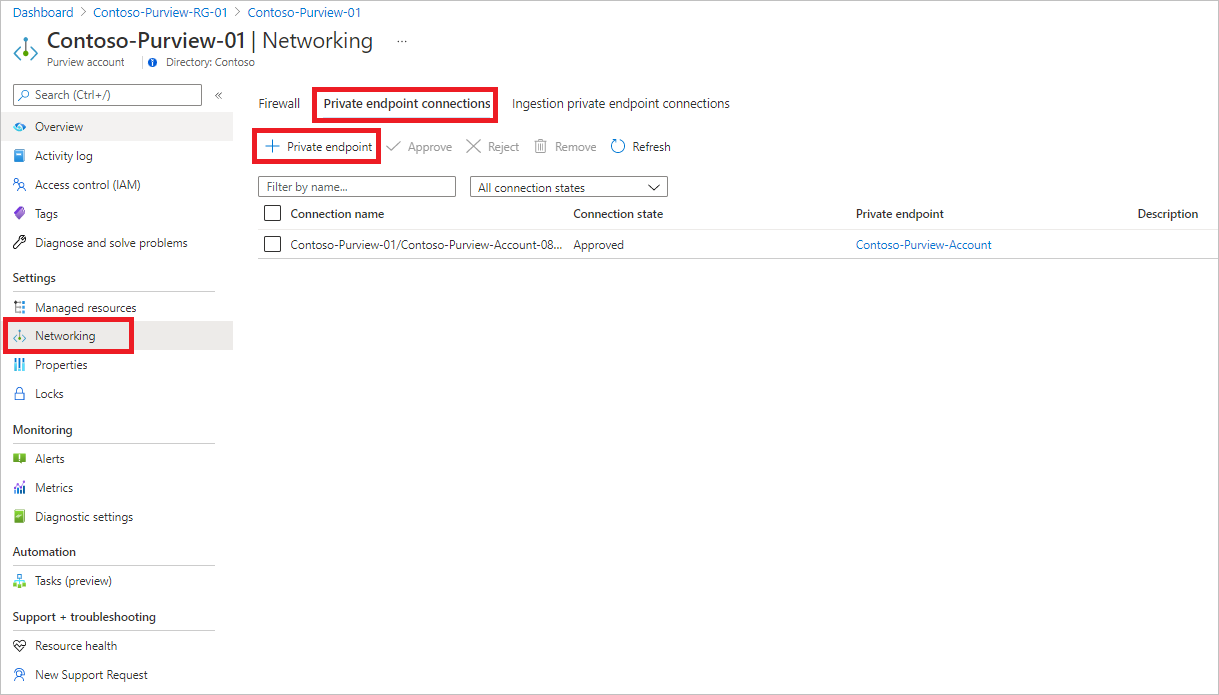
Select + Private endpoint to create a new private endpoint.
Fill in the basic information.
On the Resource tab, for Resource type, select Microsoft.Purview/accounts.
For Resource, select the Microsoft Purview account, and for Target sub-resource, select account.
On the Configuration tab, select the virtual network and optionally, select Azure Private DNS zone to create a new Azure DNS Zone.
Note
For DNS configuration, you can also use your existing Azure Private DNS Zones from the dropdown list or add the required DNS records to your DNS Servers manually later. For more information, see Configure DNS Name Resolution for private endpoints
Go to the summary page, and select Create to create the account private endpoint.
Repeat steps 2 through 7 to create the portal private endpoint. Make sure you select portal for Target sub-resource.
Deploy ingestion private endpoint
Ingestion private endpoints are deployed from the Azure portal for all Microsoft Purview instances, regardless of whether you're using the Microsoft Purview portal or the classic governance portal.
Go to the Azure portal, and then search for and select your Microsoft Purview account.
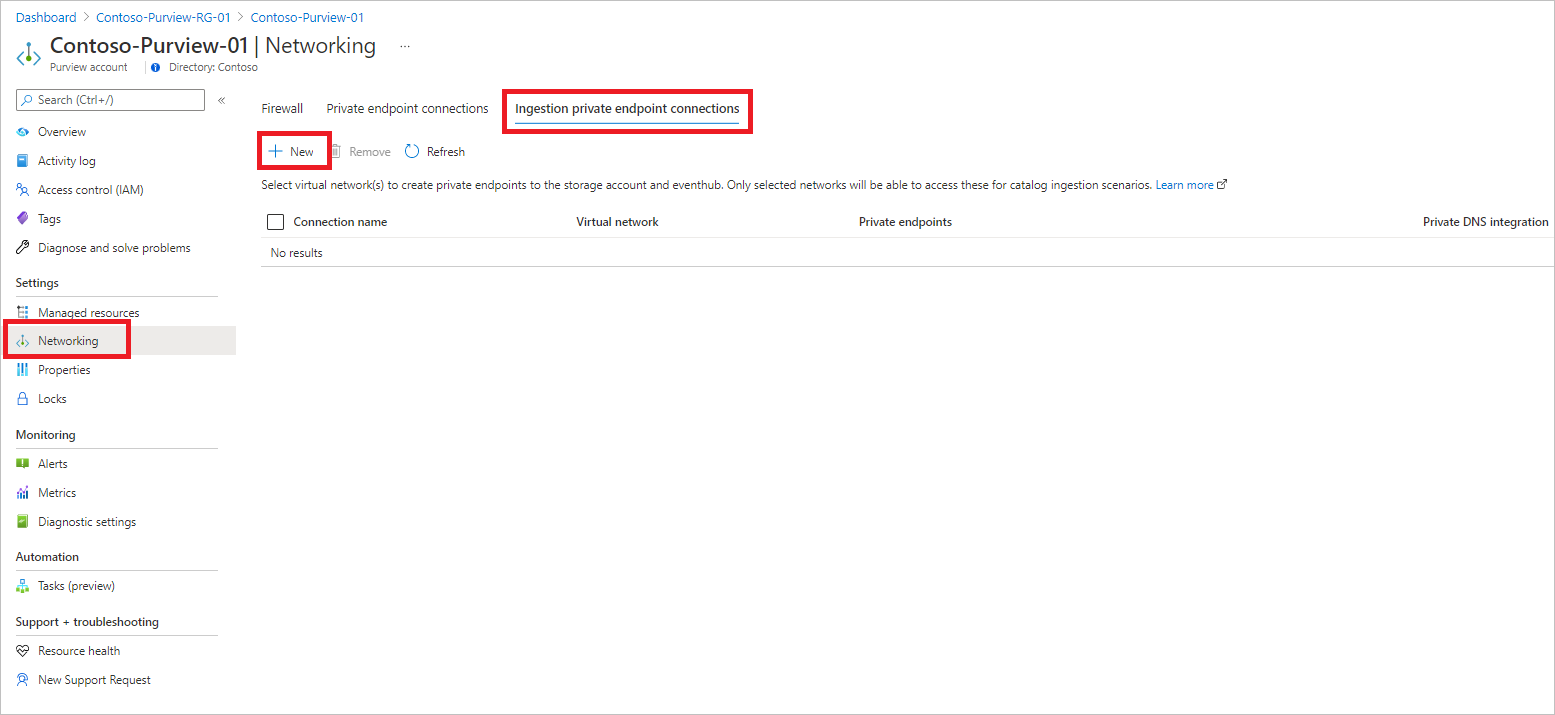
From your Microsoft Purview account, under Settings select Networking, and then select Ingestion private endpoint connections.
Under Ingestion private endpoint connections, select + New to create a new ingestion private endpoint.
Fill in the basic information, selecting your existing virtual network and a subnet details. Optionally, select Private DNS integration to use Azure Private DNS Zones. Select correct Azure Private DNS Zones from each list.
Note
You can also use your existing Azure Private DNS zones or create DNS records in your DNS Servers manually later. For more information, see Configure DNS Name Resolution for private endpoints
Select Create to create the private endpoint.
If you don't have one already, you need to deploy a self-hosted integration runtime to connect to the sources with private endpoints.
Configure networking for Event Hubs namespace
If you've configured an Event Hubs to send/receive events to/from Microsoft Purview's Apache Atlas Kafka topics, you need to confirm your Event Hubs network settings allow communication.
Deploy self-hosted integration runtime (IR) and scan your data sources
Once you deploy ingestion private endpoints for your Microsoft Purview, you need to setup and register at least one self-hosted integration runtime (IR):
All on-premises source types like Microsoft SQL Server, Oracle, SAP, and others are currently supported only via self-hosted IR-based scans. The self-hosted IR must run within your private network and then be peered with your virtual network in Azure.
For all Azure source types like Azure Blob Storage and Azure SQL Database, you must explicitly choose to run the scan by using a self-hosted integration runtime that is deployed in the same virtual network or a peered virtual network where Microsoft Purview account and ingestion private endpoints are deployed.
Follow the steps in Create and manage a self-hosted integration runtime to set up a self-hosted IR. Then set up your scan on the Azure source by choosing that self-hosted IR in the Connect via integration runtime dropdown list to ensure network isolation.

Important
Make sure you download and install the latest version of self-hosted integration runtime from Microsoft download center.
Enable access to Microsoft Entra ID
Note
If your VM, VPN gateway, or VNet Peering gateway has public internet access, it can access the classic Microsoft Purview governance portal and the Microsoft Purview account enabled with private endpoints. For this reason, you don't have to follow the rest of the instructions. If your private network has network security group rules set to deny all public internet traffic, you'll need to add some rules to enable Microsoft Entra ID access. Follow the instructions to do so.
These instructions are provided for accessing Microsoft Purview securely from an Azure VM. Similar steps must be followed if you're using VPN or other virtual network Peering gateways.
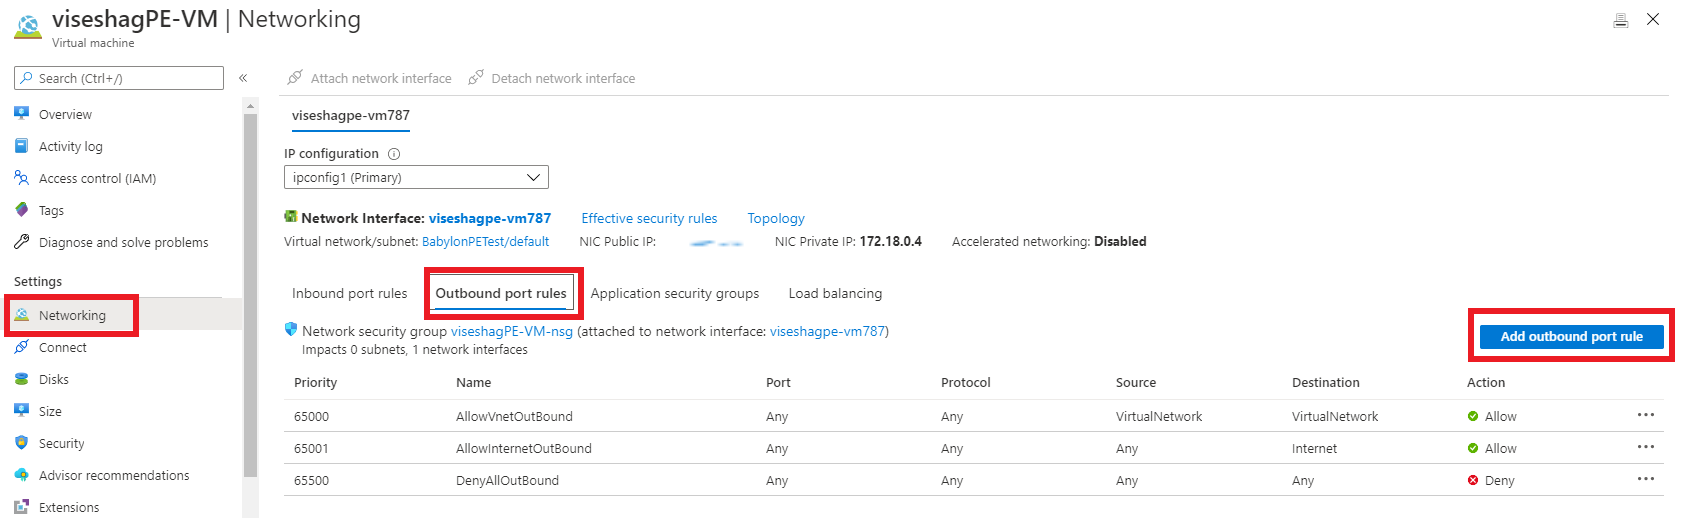
Go to your virtual machine in the Azure portal, and under Networking, select Network settings.
Select + Create port rule
Select Outbound port rule
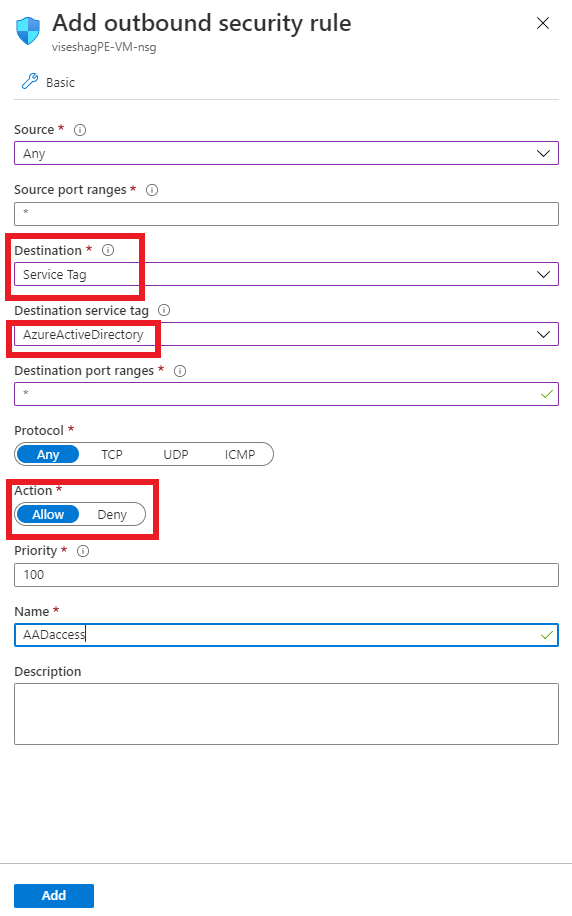
On the Add outbound security rule pane:
- Under Destination, select Service Tag.
- Under Destination service tag, select AzureActiveDirectory.
- Under Destination port ranges, select *.
- Under Action, select Allow.
- Under Priority, the value should be higher than the rule that denied all internet traffic.
Create the rule.
Follow the same steps to create another rule to allow the AzureResourceManager service tag. If you need to access the Azure portal, you can also add a rule for the AzurePortal service tag.
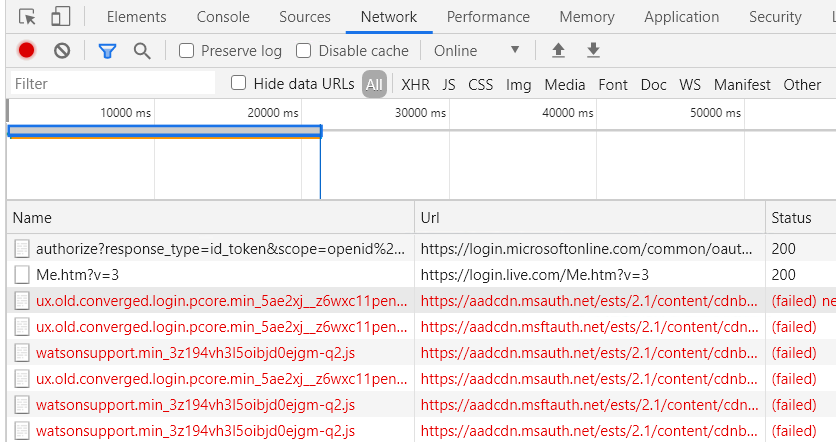
Connect to the VM and open the browser. Go to the browser console by selecting Ctrl+Shift+J, and switch to the network tab to monitor network requests. Enter web.purview.azure.com in the URL box, and try to sign in by using your Microsoft Entra credentials. Sign-in will probably fail, and on the Network tab on the console, you can see Microsoft Entra ID trying to access aadcdn.msauth.net but getting blocked.
In this case, open a command prompt on the VM, ping aadcdn.msauth.net, get its IP, and then add an outbound port rule for the IP in the VM's network security rules. Set the Destination to IP Addresses and set Destination IP addresses to the aadcdn IP. Because of Azure Load Balancer and Azure Traffic Manager, the Microsoft Entra Content Delivery Network IP might be dynamic. After you get its IP, it's better to add it into the VM's host file to force the browser to visit that IP to get the Microsoft Entra Content Delivery Network.


After the new rule is created, go back to the VM and try to sign in by using your Microsoft Entra credentials again. If signin succeeds, then the classic Microsoft Purview governance portal is ready to use. But in some cases, Microsoft Entra ID redirects to other domains to sign in based on a customer's account type. For example, for a live.com account, Microsoft Entra ID redirects to live.com to sign in, and then those requests are blocked again. For Microsoft employee accounts, Microsoft Entra ID accesses msft.sts.microsoft.com for sign-in information.
Check the networking requests on the browser Networking tab to see which domain's requests are getting blocked, redo the previous step to get its IP, and add outbound port rules in the network security group to allow requests for that IP. If possible, add the URL and IP to the VM's host file to fix the DNS resolution. If you know the exact sign-in domain's IP ranges, you can also directly add them into networking rules.
Now your Microsoft Entra sign-in should be successful. The classic Microsoft Purview governance portal will load successfully, but listing all the Microsoft Purview accounts won't work because it can only access a specific Microsoft Purview account. Enter
web.purview.azure.com/resource/{PurviewAccountName}to directly visit the Microsoft Purview account that you successfully set up a private endpoint for.
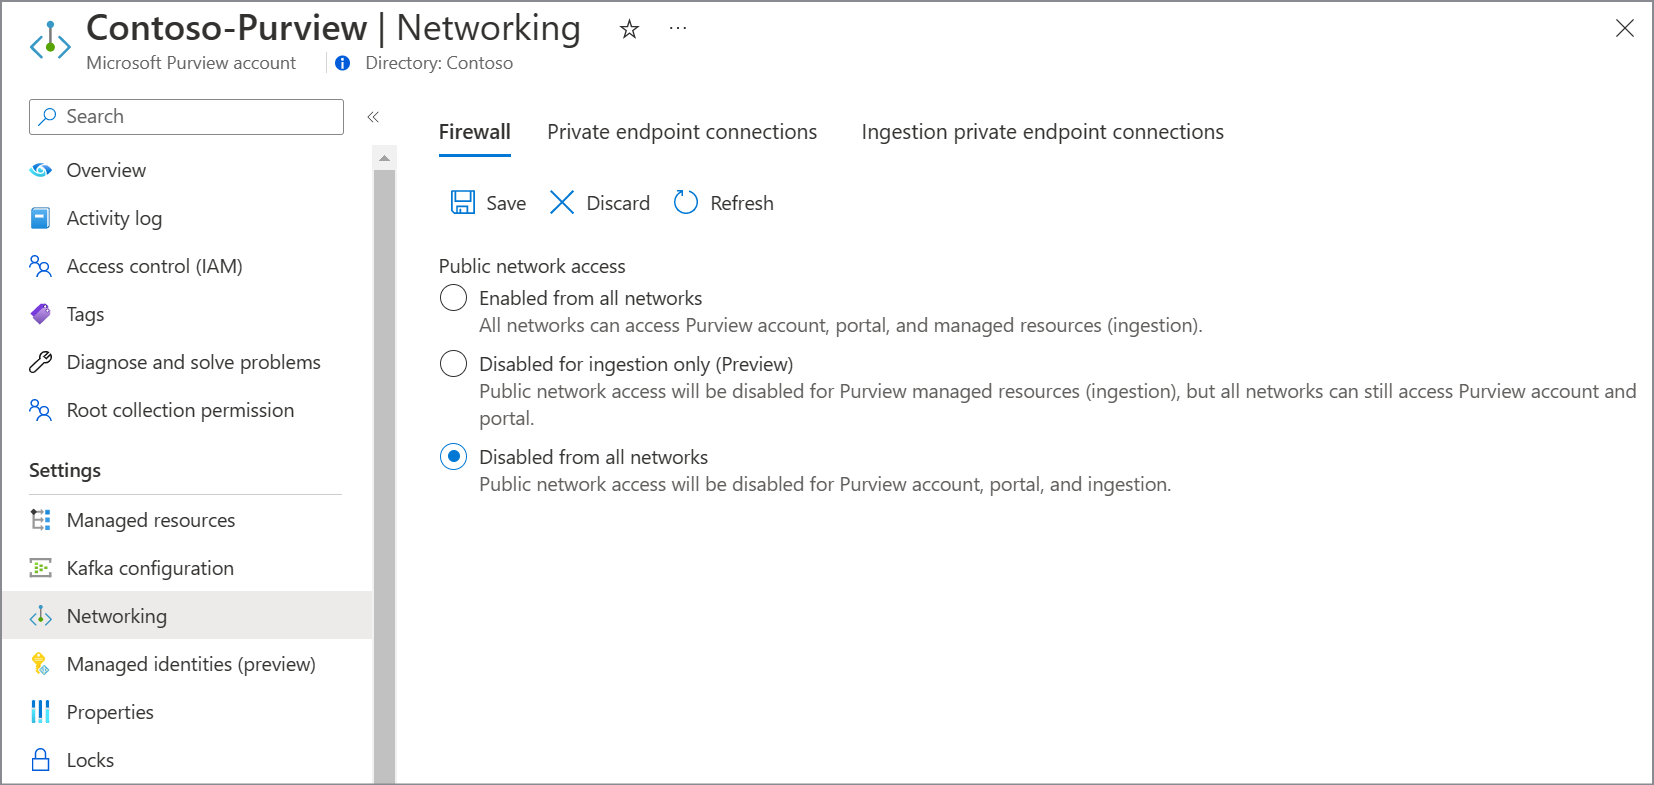
Firewalls to restrict public access
To cut off access to the Microsoft Purview account completely from the public internet, follow these steps. This setting applies to both private endpoint and ingestion private endpoint connections.
From the Azure portal, go to the Microsoft Purview account, and under Settings, select Networking.
Go to the Firewall tab, and ensure that the toggle is set to Disable from all networks.